Third-party Apps and Plugins
204 files
-

Community Theme Creator
By y2guru
Manuals / How to
Refer to my YouTube channel or visit Faeran's Theme Creator Workshop videos to better understand the new features.
Dave Paterson - YouTube
Development Live Streams - YouTube
COMMUNITY Theme Creator - Patreon
11,248 downloads
- bigbox
- custom bigbox themes
- (and 1 more)
-

Mame No-Nag Updated Monthly, Current Version:
By MadK9
**This removes the nag screen that informs you if a rom doesn't work correctly, or if at all, if you use this no nag, then please do NOT go to the mame support site with issues with games, please only use if you understand that there will be no help from anyone at mamedev as you are using a modified version of mame.
Contents: mame.exe - Normal Mame with Nags removed. (Note mame no longer carries the 64 in its exe name changed by Devs in 0.229)
It's advisable to download the full mame official pack and install it, then just overwrite the exe with the replacement, this covers any changes the mame devs may have made to the support files.
After you have done this, make sure you copy the folders artwork, ctrlr, cheat, hlsl, ini, folders and the ini files from the root of your original mame folder, and move/copy them to the new install.
If you are using your own installed/setup of mame then make sure you also set in the mame.ini 'Skip_gameinfo 1'
If you got Launchbox to setup mame for you when asked, you only need to replace the exe and play.
As some are not sure about False Positives, and report a virus was detected, As goes for all versions i upload, they are all ran through virustotal before i upload, and if by any chance something did end up with an issue it would be noticed very quickly after upload and would be removed/restricted.
0.264 - https://www.virustotal.com/gui/file/b7d301c777152a4ffe5402d7dee1c800d28691a7ffbbace5529b62e9bb1546ec?nocache=1
All NEW versions of the No-Nag will be posted in this download thread only, if you wish to get the new releases every month, either follow myself or the thread, As the download section will not show any new releases.
14,163 downloads
-
BezelLauncher
By JoeViking245
What is it?
Use this plugin to display bezels for emulators that don't natively support them.
What does it do?
It displays a bezel and resizes the emulator window to fit within the bezels transparent area.
What's required to make this plugin work?
LaunchBox v13.3 (or newer), the plugin file, bezel images and some minor setup. No more. No less. (See Setting up)
Do I need to provide my own bezel images?
Yes. (See Setting up for where to place them)
Will it work with game specific bezels?
Yes.
Will this work with all emulators?
Yes, with exception. RetroArch and MAME emulators will not show in the list of emulators and cannot be used with this plugin.
The emulators that have been tested so far all work. Some adjustments may be necessary. (see Emulator Settings)
Will this work with storefront games or Windows games?
No.
Can I use my existing RocketLauncher bezel configuration files?You can use the existing platform.png and platform.ini files from RL. These existing files should be located under:
/RocketLauncher/Media/Bezels/platform_name/_default/something.ini (and something.png)
(See Setting up [step #3])
What are the .ini files for?
The .ini (configuration) files tell the plugin how to resize and move the emulator window to fit within the bezel. (See .ini (configuration) Files for more info and Testing for creating and saving them)
Can this plugin add shaders as well?
No.
Disclaimer
This works on my test PC. I didn’t test it on my cab because I didn’t want to change my emulator settings to not use fullscreen (see Emulator Settings). Outside of RetroArch and MAME, I don’t use bezels, so didn’t want to mess-up-a-good-thing.
There are no guarantees, express or implied… blah blah blah blah blah blah blah.
There is no risk. This plugin makes no changes to LaunchBox or your emulators. If you decide this isn’t for you, simply undo any fullscreen changes you made and (with LB/BB not running) delete the BezelLauncher folder.
Special Thanks
Special thanks to @MadK9 for the idea, direction and help with testing! Without him, I would have never contemplated starting this project. Also a big thanks to @Sbaby for testing un-tested emulators with the plugin.
Updating from a version prior to 2.x
When updating, in order for the plugin to work you need to re-run BezelLauncher Setup. See Setting Up. You will not need to rerun Test (step 7.1, 7.2, 7.3). But do step 7.4. This update does not affect using the existing bezel layouts (ini files).
Installing
With LaunchBox/BigBox not running...
Download the plugin .zip file "Unblock" the file Right-click the file, select Properties, check the box "Unblock", click OK. Or better yet, just use 7-zip to open the file Copy the contents (a folder called "BezelLauncher") into your \LaunchBox\Plugins\ folder Start LaunchBox
Setting up
Start BezelLauncher Setup from the LaunchBox Tools menu, then click Close This will create the \Plugins\BezelLauncher\Bezels\platform_name\ subfolders Copy your bezel images into their respective platform_name subfolders See Bezel Images for more information (optional) If you have existing RL platform_name.ini files, copy those alongside the image files See .ini (configuration) Files for more information Restart BezelLauncher Setup Select a platform Choose an emulator you wish to use for that platform. Check Disabled to enable it Click Test Adjust (Move/resize) the orange frame to fit within the view area of the bezel (See Testing) Click Save [to save the .ini file] Click Save on the main setup screen to add the emulator to the list of Enabled platform emulators Repeat for other platforms and emulators you wish to add You must click "Save" for each emulator you've enabled, separately.
Maintenance
After adding/removing platforms or emulators
Run BezelLauncher Setup Click Refresh Continue with Setting up, step #5
Testing
To configure the placement of the emulator window within the bezel (Requires an existing bezel image):
Run BezelLauncher Setup Select a platform and an emulator Enable it (if it's not already) Click Test
Move and resize the frame
Click [and hold] the left or right side of the frame to move it around Click [and hold] the bottom right corner to resize Use the on-screen buttons to fine-tune the adjustments The on-screen display will show information about the emulator window.
(You can click and drag the OSD to move it around as needed)
x, y = upper left monitor-coordinates of the emulator window w, h = width and height of the emulator window x, y = lower right monitor-coordinates of the emulator window
If any of the values are red, they are off the screen The OUTSIDE edge of the frame is the emulator window extents After adjusting, click Save. This will overwrite any existing configuration file.
Parameters
Depending on the emulator and the bezel, you may need to check 1 or more of the following parameters:
(h) hideStuff
Check this if you see the desktop behind bezel while the game is loading. This adds a black background during the startup process.
(s) startupSleeper
“Hide stuff” for a little longer during startup (3 seconds)
(l) longerSleep
Same as above (4 seconds)
(g) hideGameStartup
Check this if LB Game Startup screen is showing behind the bezel at game startup
When selecting a platform, if the plugin detects an emulator that has been tested, “suggested” parameters will be shown. Your mileage may vary.
Emulator Settings
For the plugin to move/resize the emulators’ window, you will need to disable fullscreen in the emulator(s). This may be as easy as removing "-f" or "-fullscreen" from the Default Command-line Parameters (depending on the emulator).
Beyond that, of the emulators I've tested, the only one that needs to have its Default Command-line Parameters altered is SuperModel. You will need to manually set the resolution.
Start BezelLauncher Setup Select your Super Model 3 platform and Enable it Click Test and after adjusting the frame to where you want it, make note of the W(idth) and H(eight) #'s shown in the OSD. Save and Close. (Be sure to click Save on the main Setup screen to save Enabled as well.) Edit your SuperModel emulator (in LaunchBox) and set the Default Command-line Parameters to "-res=W,H" (no quotes, no spaces and replacing W & H with the #'s noted above) Example: -res=1420,1076
Bezel Images
When you run BezelLauncher Setup for the 1st time, the plugin creates subfolders for each of your eligible platforms. They are created in:
\LaunchBox\Plugins\BezelLauncher\Bezels\[platform_name]\
The platform image file needs to be in the [platform_name] folder and must be named the exact same as the platform.
\BezelLauncher\Bezels\Sony PSP\Sony PSP.png
Game-specific bezel files
New in version 2.0:
Game-specific bezel folders (or files) can be named after the games ROM filename or the games Title.
Using the games Title:
If the Title has 'invalid file name characters', those characters will need to be replaced with _ (underscore). The exact same way LaunchBox does with its image files (but without the -01 suffix).
Example: Title = Disney-Pixar's Toy Story 2: Buzz Lightyear to the Rescue!
Bezel = Disney-Pixar_s Toy Story 2_ Buzz Lightyear to the Rescue!.png
NOTE: Additional Apps game Titles are (i.e.) "Play USA Version...". So the bezel would be "Play USA Version....png". Same rules apply with 'invalid file name characters'.
Invalid characters are:
< (less than) > (greater than) : (colon) " (double quote) / (forward slash) \ (backslash) | (vertical bar or pipe) ? (question mark) * (asterisk) ' (single quote) Not technically invalid (post-DOS), but consistent with LaunchBox character replacement
Storing game-specific bezels:
Option 1:
Place your game bezel images directly inside their respective \[platform_name]\ folder. Game-specific image files must be named the exact same as the games ROM file or the games Title (accounting for invalid characters).
example:
\BezelLauncher\Bezels\Sony PSP\After Burner - Black Falcon (USA) (En,Fr,Es,It,Nl) (PSP) (PSN).png
Option 2:
Place your game-specific bezel image folders under the \[platform_name]\ folder. The subfolder must be named the exact same as the games ROM file or Title (barring invalid characters). The .png and .ini files in the subfolder can be any filename. example:
\BezelLauncher\Bezels\Sony PSP\After Burner - Black Falcon (USA) (En,Fr,Es,It,Nl) (PSP) (PSN)\thisIsAnyFileName.png See Launching different game versions for information about bezel requirements for games that are combined as Additional Apps.
ScummVM (new v2.0)
Setting up ScummVM for use with this plugin:
In LaunchBox, Edit games using ScummVM. In the ScummVM section, have both checkboxes un-checked. (Fullscreen and Aspect Correction). This cannot be done using the Bulk Edit Wizard, so will need to be done on a per-game basis. One-at-a-time.
If it's not displaying correctly with just the above, try the (optional) following:
Navigate to /LaunchBox/Third Party/SummVM/ and start ScummVM.exe. On the Graphics tab, set Graphics Mode to opengl. Leave the other 2 as default and the check box's un-checked. Click OK and Exit. ScummVM Bezel Files:
To use bezels with games using LB's integrated ScummVM, you will need to set them up manually. It will not appear in BezelLauncher Setup.
Navigate to the plugins Bezels subfolder and add your platform folder. i.e. \LaunchBox\Plugins\BezelLauncher\Bezels\ScummVM\ Add your platform default png and ini files to this folder. i.e. ScummVM.png ScummVM.ini Game specific bezels for ScummVM must be named the same as the Game Data Folder.
i.e. D:\LaunchBox\Games\ScummVM\King's Quest 1 - Quest for the Crown\[game files]
use: "King's Quest 1 - Quest for the Crown.png"
DOSBox (new v2.0)
The integrated version of DOSBox is NOT supported by this plugin. I couldn’t get it to cooperate 100% of the time. So going with plan “B”.
To use DOSBox with this plugin, you will need to install and set up DOSBox-X.
Setting up DOSBox for use with this plugin:
Note: BezelLauncher Setup will NOT show your DOSBox platform ('MS-DOS') as an available platform. So don't bother looking for it.
Download DOSBox-X
DOSBox-X releases can be found here: https://github.com/joncampbell123/dosbox-x/releases
Download the vsbuild-win64 version. (direct link for the download file) Create a new folder under \LaunchBox\ThirdParty\ and name it DOSBox-X Extract the contents of the downloads "\bin\x64\Release\" folder into the new folder Be sure to unblock the zip file before extracting (unless you’re using 7-Zip) Configuring DOSBox-X
In Windows Explorer, navigate to \LaunchBox\ThirdParty\DOSBox-X\. Make a copy of dosbox-x.conf. Rename the copy to [something like] "BL-dosbox-x.conf" Right-click the new 'BL-dosbox-x.conf' file and select edit (Notepad++ works great for this. But any text editor (Notepad) will work) Look for the following keys and change their Values as shown: (starting on approximately line 78)
fullresolution = 1400x1080
windowresolution = 1400x1080
windowposition = 260,0
output = ttf
showmenu = false
"1400x1080" (2 locations) is the dimension of the transparent area of your bezel. Adjust as necessary.
From your MS-DOS.ini file, use [Right X]-[Left X] for the 1st value (1400) and [Right Y]-[Left Y] for the 2nd (1080)
"260,0" is the upper-left coordinate of the transparent area. Use the Left-X value for the 1st number and Left-Y for the 2nd.
Save the changes and close the editor.
Configure games to use DOSBox-X
The following assumes your MS-DOS platform games are already setup to use the integrated version of DOSBox.
In LaunchBox, select all your DOSBox games and press Ctrl+E to start the Bulk Edit Wizard. (Select 1 game in the MS-DOS platform, then press Ctrl+A to select all) On the 2nd screen select the Field Custom DOSBox Version EXE Path for Value, Browse to and select dosbox-x.exe Click Next, Next Click “Yes, I would like to make more changes” select the Field DOSBox Configuration File for Value, Browse to and select the new file you created (BL-dosbox-x.conf) Click Next. Next (again). Click "No, I would not like to make more changes"
MS-DOS Bezel Files:
This assumes your DOSBox platform is called "MS-DOS".
In the Bezels subfolder under the plugin folder, create a new folder called 'MS-DOS'. In \LaunchBox\Plugins\BezelLauncher\Bezels\MS-DOS\, add your bezel files (MS-DOS.png and MS-DOS.ini). Game specific bezels for DOSBox need to be named the same as the Game Data Folder
i.e. D:\LaunchBox\Games\MS-DOS\Cosmos Cosmic Adventure\COSMO1.EXE
use "Cosmos Cosmic Adventure.png"
.ini (configuration) Files
The .ini files contain the monitors' coordinates for placing the emulator window.
The Upper Left x,y coordinate and the Lower Right x,y coordinate
Example:
Upper Left X Coordinate=240
Upper Left Y Coordinate=100
Lower Right X Coordinate=1680
Lower Right Y Coordinate=1080
The platform ini file must be named the exact same as the platform. If copied from RocketLauncher, you may need to rename it (removing any under_scores).
i.e. \BezelLauncher\Bezels\Sony PSP\Sony PSP.ini
For game-specific ini files, if they are located in a subfolder below /[platform_name]/ (see Bezel Images, Option 2, above), they can have any filename. If they are inside the /[platform_name]/ folder (Option 1), then they must be named the exact same as the games ROM file or Title.
If a game-specific .ini file doesn’t exist, the plugin will use the games platform.ini file.
Launching different game versions
Also known as Additional Apps, when right-clicking a game and selecting Play Version, the Additional App is not required to have its own bezel files. If the Additional App doesn't have its own bezel, the plugin will look for the Default Games' bezel. If neither of those exist, it will use the platforms’ bezel.
This eliminates the need to have a separate set of bezel files for each version of the game. Useful since they most likely all use the same image. This only works for games that are Additional Apps.
Plugin Folder Structure
As always, any thoughts, views, opinions, [constructive] criticism, comments and suggestions are welcome.
330 downloads
-
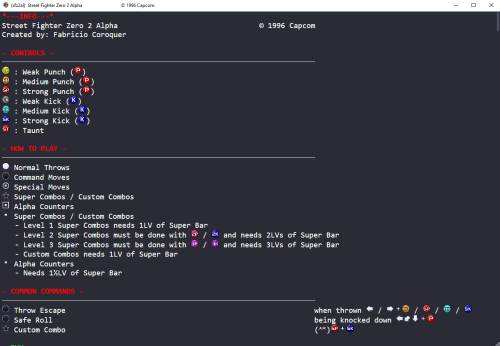
View game specific commands from MAME's command.dat
By JoeViking245
Inspired from MAME's built in feature in the main UI (and via their in-game Tab menu) and Ben Baker's CPWizard.
View information from MAME's command.dat to show:
CONTROLS
CHEATS
HOW TO PLAY
COMMON COMMANDS
SECRET CHARACTERS
Included in the plugin is a "MAME Command" Custom Badge (LaunchBox Only [unless someone figures out how to show Custom Badges in BigBox])
This will show the badge for games included in command.dat
Installing the plugin
Download and open the file using 7zip. if you don't use 7zip, first unblock the file (Right click, select Properties, and click Unblock) then open it as you normally would. Extract the main folder from inside the zip file into ..\LaunchBox\Plugins\ i.e. D:\LaunchBox\Plugins\MAMEConmmandDat\ (the main folder "MAMEConmmandDat" and all its subfolders are required for the plugin to work!) Start LaunchBox or BigBox
Enabling the Custom Badge
In LaunchBox, click Badges, Plugin Badges, "MAME Command"
You can change the badges image by replacing the image ../LaunchBox/Images/Badges/MAMEcommands.png
Using the plugin
LaunchBox: Right-click on a game and select MAME Commands.
BigBox: In the Game Details screen, scroll to the bottom on the list and select MAME Commands.
To scroll through the page, use your keyboard Up/Down arrow keys, mouse wheel or your controller's left joystick (or DPad) Up/Down.
To close the window, press Escape, or on your controller press your mapped Exit Game (LaunchBox) or Close Active Window (BigBox) button(s).
Version 0.262 of command.dat is included. Future updates can be found here: https://www.progettosnaps.net/command). Just replace the existing file located in the plugins /Data/ subfolder.
As always, all thoughts, views, opinions, suggestions, comments and accolades are welcome. 😎
21 downloads
-
community COLORFUL resources
By viking
# WHAT IS COLORFUL?
COLORFUL is a complete and coherent high quality graphic set, around a unique design. Made with love in France. I hope you like it ! ?
Here are planned development axes:
OFFICIAL COLORFUL ASSET :
COLORFUL Theme : The main hub, a unique interface for BigBox. Design by me, coded by @faeran COLORFUL Platform Video : Complete 4K video set, with a unique design. COLORFUL Source : To involve the community in the platform video creation. COLORFUL BigBox Startup Video : custom video to match the general design. COLORFUL Hardware Media PNG (1x1) : Taken from my videos, the 1x1 PNG set. (new) COLORFUL Startup Theme : (soon) COLORFUL Pause Theme : (soon) RECOMMENDED COMMUNITY ASSET :
Redrawn Platform ClearLogo by @Dan Patrick Colorful "Playlist" PNG set by @Klopjero Colorful custom theme for Android by @Bawnanable Platform Funtech Super A'can & Platform Arcade Kaneko by @evo1man Alternative Colorful Platform ClearLogo Set by @soqueroeu Alternative Startup Theme (Minimal-Colorful) by @Palada Recommended SoundPack with Steam Deck UI by @Phox
# WANT TO CREATE VIDEO? YOU ARE IN THE RIGHT PLACE!
On this page we are talking about COLORFUL RESOURCES.
Have you considered creating a new Platform/Category/Playlist video for Colorful? This is the place to be! Done, by and for the community.
You will find below my guideline and quick tutorial. If you are tempted by the adventure, please respect the rules below! Thx !!
# READY FOR ADVENTURE? FOLLOW THE GUIDE!
Before we start going into the technique, let's set up some basics on how we're going to do it.
The idea is not to make me a tyrant, but to keep an overall coherence of design, style and to centralize uploads/downloads on a single page.
The basic principles :
On this Resources Page, you will find: 1 archive = 1 platform sources. (From me or from you) On the Platform Video Page, you will find: 1 file = 1 video. (From me or from you) Here are the rules to follow:
ONLY use this forum thread for ALL that concerns the video creation. Form start to finish. Please, not used the comment section below. Announced on what platform(s) you want to work. (New or rebuild) Post your work in progress! This is very important, to have feedback from community and me. Follow the guideline below. There can be several videos from the same platform. I will add your credits. But keep the same background color please, for theme integration. Don't be susceptible if we make comments. ? At the end, send me your video and source files. I will upload them to the corresponding pages, with your credits. Here, I will act as a moderator. The goal of all these rules is to keep the set consistent, allow the community to take part in creation and centralize everything for ease of use.
About software, I used Photoshop and After Effect in their old version (CS6) and without any plugin, to maximize compatibility with your systems.
You can use other software of course, but try not to use plugins.
# GUIDELINES?
I created these guidelines, based on my experience with NOSTALGIA.
They have a whole purpose and I ask you to respect them.
Here is the principle:
You can find these construction lines, as guides, in the Photoshop (.PSD) files, in each Platform archive.
The goal is to let the design breathe, while allowing great versatility of use. Whether in full screen, in 4:3 or 1:1, this video set remains usable.
I have created a theme around this set, but I hope it will not be the only one! A word for the wise ...
# WHAT ARE THE STEPS ?
Briefly, the steps I follow for each video.
Find photo sources for each element of the montage. I try to put the credits in each archive. Carry out the editing in Photoshop, keeping a layer structure common to each platform. From Photoshop, save each layer group in separate PNG files. Find a Gameplay video (EmuMovies for most) and the boot section (Youtube for most) Go to After Effect, gather everything in 4K and render a "master" video file. (understand heavy one) Use VidCoder to make my different outputs (4K h264 / 4K h265 / HD h264) and size compression. <UPDATE> A quick word for the arcade cabinet:
It's too hard to find good photo sources. So I made them all in full 3D (CGI).
If you have the knowledge, go there! Otherwise, I create my renderings so that they can be edited in Photoshop. ?
# IN DETAIL, PHOTOSHOP ?
I'm not going to do a beginner tutorial for Photoshop. Here's how I sort my slaps.
It would be good to respect this nomenclature, always to maintain consistency.
And post on this forum thread your work in progress !
Once the editing is finalized, I export these slaps in 4 PNG files, to go under After Effect. (see text in the left column above)
Why in PNG and not directly use the PSD? Because I noticed "more file corruption with the PSD. In the context of exchange with the community, the PNG is much more universal for people not using the Adobe suite.
# IN DETAIL, AFTER EFFECT ?
Here it is more difficult to explain yourself with words or pictures.
But here is the basic principle:
The Mask Layer will be used for the Gameplay video.
And post on this forum thread your work in progress !
I let you open the files to better understand. If the need arises, I will come and fill this part.
# IN DETAIL, VIDCODER ? (update aug 23, 2022)
To optimize the size of the videos and multiply the formats, I use the free and open-source VIDCODER. (also on Microsoft Store)
It is rather simple, allows batch processing, and as there are finally few "moving" elements in my videos, the optimization is pretty good.
I created and tested 3 profiles that you can import and use. Here they are : VidCoder_Viking_Setting_Update.zip
# AT THE END, SHARING !
Once finished, send me the files directly:
Video in the 3 export formats from VidCoder. Your source archive, trying to keep the same structure as mine. I take care of the conformation of the names, the addition of the credit, and the upload on the right pages.
Thank you in advance !
# SPECIAL THANKS :
@Jason Carr for his hard work on LaunchBox/BigBox! To all Patreon guys! A GIANT THANKS to all of you!!! ? The whote community for yout support! # SOURCES - COPYRIGHT :
Each brand of hardware and software here represented as a tribute. Emumovies for (most) gameplay videos The Vanamo Online Game Museum for (most) photos. If special credit, see .TXT file in the corresponding source archive. (soon) # PLATFORM COVERED / CREDITBOARD :
See video release post for more details !
18,534 downloads
-
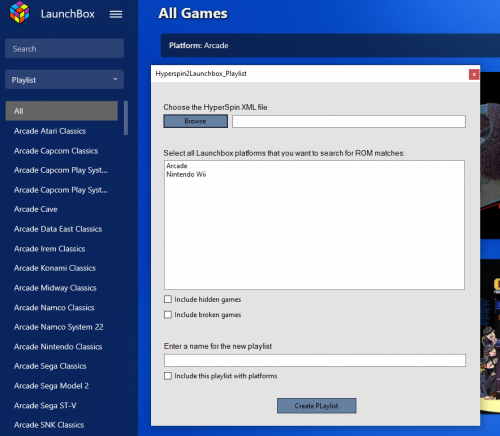
Hyperspin2LaunchboxPlaylist
By superrob3000
About:
Use this plugin to quickly convert from a Hyperspin collection to a Launchbox playlist. Choose a Hyperspin database XML file and this program will compare the rom names for all games in the Hyperspin XML file to the rom names for all of your installed Launchbox games. Any games with matching rom names will be added to the new Launchbox playlist.
Installation:
Copy RB_CreatePlaylistFromHyperspinXML.dll to the LaunchBox/Plugins folder. Restart Launchbox. Usage:
In Launchbox, select Tools->"Create playlist from Hyperspin XML" from the dropdown system menu. Select the Hyperspin XML file to import from. Choose which Launchbox platforms to pull games from. Enter a name for the new Launchbox playlist. Click "Create Playlist".
Update History:
1.0.1
- Added the option to specify which platform(s) to search.
- Added option to include hidden games.
- Added option to include broken games.
1.0.2
- Available platforms are now listed in alphabetical order.
227 downloads
-

Unofficial RetroAchievements 1G1R DATs.
UPDATE 08/01/2024: I'm busy working on v2.0 of the DATs so I won't be releasing any new updates for a long while.
This is my 1st attempt at creating 1G1R (1 Game 1 Rom) DAT files to scan with ClrMamePro for those who want a RetroAchievements-only rom collection. I've tried my best to make these DATs as perfect and up to date as I possibly can but not all of them are 100% complete/perfect so please make sure you backup your roms before scanning them with these DATs, just in case.
Here is some info on these DATs:
Each game entry listed on the RetroAchievement site has 1 "Best" rom each added in these DATs that I personally selected. The exceptions to this is for games with multiple discs/sides and with achievement sets that require you to play more than 1 linked rom of the same game to unlock all the achievements of that set. An example is the game "Game Boy Advance Video Series" where there are 15 linked roms on the RA website but you need to play all 15 roms in order to unlock all the achievements for this 1 set. In this case and all other cases like this, all 15 roms and all discs/sides are added in these DATs. There's possibly a LOT of games in these DATs that require more than 1 different linked rom to be played to unlock the entire achievement set but I only added 1 of the required roms in the DATs or vice versa so if you encounter any of these games with this problem in the DATs, please let me know so I can update them accordingly. Your roms will need to be in zip format for these DATs to work and these DATs will rename both the zip and the rom(s) inside the zip to the same name that is listed on the RetroAchievement website (e.g "Contra.zip/.nes" will be renamed to "Contra ! Probotector.zip/.nes"). If the rom type is a HACK, HOMEBREW, PROTOTYPE, UNLICENSED or DEMO, that type name will be added to the beginning of the rom name (e.g "~Hack~ Rockman 2 - Basic Master") and if it's a SUBSET, the subset name will be added at the end of the rom name (e.g "Mega Man 2 [Subset - Bonus]"). If an achievement set has multiple roms that are required to unlock all the achievements, the roms' names will be the game name on the RA website and something added after it to distinguish them from each other (e.g "RA Game Name (Disc 1)" and "RA Game Name (Disc 2)" or "RA Game Name (Debug)" and "RA Game Name (Non-Debug)", etc). I have prioritized English over every other language so the rom region/language priorities are as follows: USA > World > Europe > T+Eng > T-Eng > Japan > any non-English language. There are a lot of games where I prioritized hacks that made improvements to the original game in the DATs. Examples would be Restoration (Sound and/or Graphics) hacks, QoL Hacks, BugFix hacks etc. I also prioritized Alternate (a) roms and roms with the highest release version number (e.g v1.2 or REV B) wherever possible as long as it has RetroAchievement support. For SNES, I left out all but 2 MSU roms from the DATs because they have multiple files per game, they can't be played properly from within the zip (they need to be extracted 1st) and to keep the SNES DAT as short and clean as possible. The 2 exceptions are "~Hack~ Legend of Zelda, The - A Link to the Islands" and "~Homebrew~ Super Road Blaster" because there is no "non-MSU" rom linked for either of these 2 Achievement sets. All the CUEs have been edited to work correctly with the renamed BIN roms but there might be a few errors or discrepancies here and there. Please inform me of these so I can correct them. These CUEs are in a separate zip file download. If there's any issues, questions or suggestions, feel free to either comment or DM me. I'll only be adding new games to the DATs for now until I can find a way to see when a game's linked rom(s) on the website has been changed/removed or an achievement set has been removed from the website so I can then update the DATs accordingly. Alternatively, if anyone wants to help by letting me know of these changes/removals when they encounter them or as they happen, you're welcome to do so and I'll update the DATs accordingly. I'll even credit you by adding your name to the author section of the DATs that you helped me with if you want.
350 downloads
-
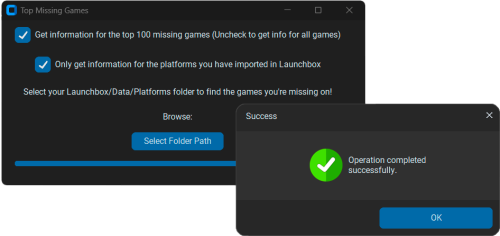
Find the Games your Collection is Missing
By christhed
About the Tool
It finds the top 100 games that are not already in your collection by scraping the XML files in your Data/Platforms folder and comparing it to the Launchbox database
How to use it
Select your Data/Platforms folder. The tool will look stuck for a couple of seconds (about 10-15 for me) but a message will pop up to confirm if it was successful.
So what's the point?
It outputs a .xlsx file containing the top 100 games that are missing from your library. It is meant to be used to find games to add to your library. The weighted score is score from 0-5 given to every game based on the user rating and the number of user votes.
I still plan to work on it a bit and I'd love some feedback if it's something you'd be interested in using! I mainly use it as a little project to teach myself coding
I know the size is a bit ridiculous for what it does, i'm trying to make it a bit lighter
142 downloads
-
Vidsnap Scraper
By maikeru1986
DISCLAIMER: Use at your own risk! Please read and understand Youtube's terms of service. I will not be held liable for any mis-use of any product or service.
This plugin makes use of the open source and unlicensed application, youtube-dl yt-dlp (forked from youtube-dl) to download game videos.
It first downloads videos from the link provided in the metadata from LaunchBox, skipping videos longer than a specified duration, and then searching for videos for missing games based on input search terms.
It is intended for Modern Windows games as this was my need initially. It may work on other platforms but is not well tested.
Installation Instructions:
Note: For this plugin to work, you will need to have yt-dlp.exe (included in .zip). Extract the contents of the .zip folder and place it in your LaunchBox plugins folder.
Usage Instructions:
Select a game or multiple games, right-click and select "Download Video Snap."
Adjust the maximum duration if desired.
The "Get Missing videos" checkbox sets whether or not to search for videos of games that don't have URL's in their metadata.
The "Trim videos" checkbox sets whether or not to trim videos after it has been downloaded.
Enter desired search terms for Missing videos.
click "Start" to start the download process.
Games will download asynchronously. resuming downloads is also supported natively.
Known Issues:
probably many that I am unaware of.
Other:
PLEASE NOTE: I AM NOT A DEVELOPER! I know very little about C# and programming in general, thus probably wont be able to address many issues that you may face. That being said I will try and fix things were I can. I've provided the spagetti source code for anyone to modify, improve, etc. (it seems you need to unblock the forms in the "Resources" folder -> RMB->properties->unblock)
As of now, i'm more comfortable with the usability of the plugin, however there are still probably many issues, any comments to provide insight/improvement to the code etc. would be much appreciated.
Thanks to @srxz for his source of Youtube Scraper of which this is based.
Thanks:
@srxz @JoeViking245 @C-Beats
maikeru86
2,197 downloads
-

EpicFail ScummVM Launcher NEW
By epicfail
Version 4.0.0
Now works with the ThirdParty folder. Also added a way to convert the BatRunner roms to launch straight from Launchbox instead of running through the batrunner and bat files. This feature is new.
Version 3.4.0
Big changes in this one. Some may like it, some may hate it. I now rewrite your ini file to help you out and maintain portability.
New game menu item to Configure ScummVM. ScummVM will open with that game selected. No need to scroll through a big list to find/guess the specific game to configure. When using my menu items to configure scummvm, I will automatically rewrite absolute paths as relative paths to your ini file. I also gave you the Configure ScummVM from the Tools drop down. During generation of the *.bat launchers I will check that you have the emulator set up, if not I will fix it for you. Can't change ScummVM path or launcher path now. Just go with it, life will be better. Simple and Advanced modes. Advanced mode is what your used to. Simple mode is one click setup, creates full list of launchers, and emulator creation. It will ask if you want to filter the non english languages. It should be easy if it works the way I intend.
click on the Tools->ScummVM Import Tool (simple) click on the Tools->Import->Rom Files to import the bat files as ScummVM games. Now scummvm can be portable easily in 3.3.1-plugin, you can rewriting the ini file. One click will read every single setting out of the ini file and find all absolute paths, check if the path is valid, than convert then to be relative to the launchbox directory.
I owe you guys some new instructions.
Updated with relative path for better travel!
ONLY the DLL is updated... See the update note below lots of new stuff.
uses launchbox built in ScummVM by default uses a local scummvm.ini by default, import existing to a local or create new fresh local scummvm.ini, all built in find and remove existing epicfail files. better rom names for smoother mass import BatRunner.exe installed from gui, must stay in your launchbox folder, point to it as your scummvm emulator. (BatRunner.exe is just the ScummVMimport.dll renamed and move to the launchbox main directory. Will prompt you when you create your launcher bat files. So its automatic you won't have do any thing to create it) Just point to it as the application for you scummvm emulator if your using the bat files. Updated filtering with priority duplicate control. ------------------------------------------------------------------------------------------------------------------
Older Version 2.0.5 from the videos ScummVMLauncher.exe
NEW AND IMPROVED - NOW WITH RETROARCH FEATURE
This is the scummvm launching system I use with launchbox. Most importantly this allows you to get art and videos for BB. It works for me, so I'm sharing it.
SETUP LAUNCHERS:
Put these ScummVMLauncher.exe files in your scummvm directory same directory as your scummvm.exe. I'm using 1.9.0.2-win32 currently. If you already setup my old launcher you can just delete the files and the launchers folder.
This is how I use it.
1st is to open your ScummVM and do a "Mass Add" if you don't know what that is hold the shift button down and the add button on scummvm will change. You could skip this if you already have your games loaded in scummvm, but I recommend starting fresh. After that close the scummvm program and assuming you have the microsoft .net framework installed run the ScummVMLauncher.exe. From the window, select Tools->load scummvm.ini this will attempt to automatically find your file in %appdata%ScummVM/, if its not there just navigate to the directory that you keep it and select your scummvm.ini file, then select open. This will grab the scummvm.ini file selected and parse it. You should see the gui populate and look similar to the screenshot. The gui should be intuitive. Filter the games the way you want to. Select Tools->Generate Launchers SETUP IN LAUNCHBOX:
Setup the emulator for ScummVM and pick the ScummVMLauncher.exe file as the executable. import roms - pick the launchers folder to import. Enjoy in BB, with art and videos!
10,976 downloads
-
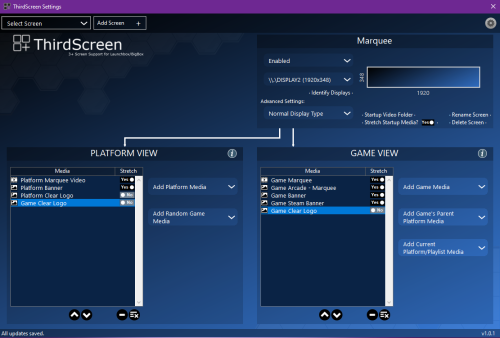
ThirdScreen Plugin for Platform Video Marquees, 3+ Screen Support, and more
By superrob3000
This plugin adds enhanced Marquee capabilities plus support for unlimited screens.
- Enhanced Marquee Capabilities:
Adds support for Platform Video Marquees, Playlist Video Marquees, and Platform Category Video Marquees. Adds support for Marquee Startup Videos. Adds support for animated gif files. Fixes marquee shift issue for TeknoParrot games. Marquee(s) will work in LaunchBox, not just in BigBox. Adds optional blur-fill background effect when media is not stretched to fit the entire screen (as of v2.0.10). - Support for a 3rd screen or unlimited additional screens each displaying their own priority based list of media.
- Each screen has access to ALL media that has been imported to LaunchBox (all images, all videos, plus rotating 3D box models!)
- Graphical user interface for setting up screens. Your theme files do not get modified.
- Ability to stretch or not stretch based on the media type being shown on each screen.
- Screens are tracked by GPU port stable IDs, so nothing will ever break due to Windows re-ordering display numbers.
Demo Videos:
Installation:
*** Before installing, please make sure you are using the latest version of LaunchBox. Version 13.0 or higher is required. *** Download ThirdScreen.zip to your PC. Right click on the zip file and extract all files. Close LaunchBox/BigBox and copy the Plugins and ThirdParty folders to your LaunchBox directory.
Adding a new screen:
1. If you are setting up your main Marquee screen, you'll first need to disable the Marquee in BigBox settings in order to transfer control of it over to ThirdScreen. Open BigBox. Hit escape to go to BigBox settings. Go to Options->General->Marquee Screen and set it to "None".
2. Select ThirdScreen Settings either from the Tools dropdown in LaunchBox or the settings screen in BigBox.
3. In the ThirdScreen Settings app choose "Add Screen" in the upper left.
4. Give this screen a name. If this is your main marquee, make sure "Start with typical marquee media" is checked - this will start you off with the typical expected media for a main marque (e.g. marquee videos, marquee images, banner images, clear logos, etc...). Then hit Continue.
5. Click "Identify Displays" and take note of the name displayed on the desired display. Then choose
the corresponding display name from the "Choose Display" drop down menu.
Choosing which media shows on each screen:
1. Select a screen from your list of existing screens.
2. Add desired media to both the game and platform views for this screen. (Tip: You can hover over most drop down boxes and controls to get a more detailed description of what each one does).
3. Adjust the priority of each media item up or down (items higher on the list have higher priority). ThirdScreen will search the selected game or platform's media starting from the top of the list and working its way down until it finds something to display.
4. For each media item in your views you can choose whether or not to stretch fill the screen. If set to No, then the item will be uniformly stretched (aspect ratio will be preserved). If set to Yes, the media will be stretched to fill the entire screen (aspect ratio will not be preserved). (Your choice will depend on the type of media and the screen dimensions. For example, Marquee videos/images will look best stretch filled on a bar type display but not on a 16:9 aspect ratio display. Video snaps will look best stretch filled on a 16:9 aspect ratio display, but not on a bar type display.)
Adding startup videos or images for each screen:
1. Select a screen from your list of existing screens.
2. Click "Startup Video Folder" to open the startup folder for this screen. Copy any media you want to be displayed at startup for this screen into this folder. Video files and static images are supported. If there is more than one item in the folder, ThirdScreen will choose one of them randomly to display at startup.
Adding Platform Marquee Videos, Playlist Marquee Videos, and Platform Category Marquee Videos:
1. In LaunchBox select Tools->"Manage Platform/Playlist Video Marquees"
2. From here you can add and manage video marquee files for Platforms, Playlists, and Platform Categories. Once added, they will be available for display using the ThirdScreen Plugin.
FAQs:
Q. How many screens are supported?
A. As many as you want. The only limit is the number of hdmi or display ports on your PC.
Q. Can I use this Plugin if I only have a single marquee screen?
A. Yes, if you don't have a third screen you can still use this for your main marquee. That will get you the added benefits of platform marquee videos, animated gif support, marquee startup videos, etc.
Q. If I choose to display 3D box models, how can I rotate them?
A. The 3D box models will be self-rotating. They will continuously spin while being displayed (no need for any user input).
Q. In Game View, what's the difference between "Add Game's Parent Platform Media" and "Add Current Platform/Playlist Media"? Which one should I choose?
A. It just depends on your preference when viewing Playlists. When scrolling games in a platform wheel, it will not make any difference which of the two dropdown lists you chose from. When scrolling games in a playlist wheel choose "Add Game's Parent Platform Media" if you want the media to change depending on the type of game (for example, the playlist might be a mix of NES, Wii, and Arcade games). Choose "Add Current Platform/Playlist Media" if you instead want to always display the Playlist's media (for example the marquee or theme video from your Favorites playlist).
Q. Will my Theme xaml files get modified?
A. No, the plugin never touches your theme files. You are free to switch and add new themes whenever you want.
Q. How can I delete/modify media in LaunchBox if it is currently being displayed by ThirdScreen?
A. You might sometimes run into a situation where you want to delete or modify a game's media files, but LaunchBox gives you an error because the media is in use. No problem, just temporarily disable ThirdScreen when in LaunchBox. Open the ThirdScreen settings app, click the gear icon in the upper right, and choose "Disabled when in LaunchBox".
Q. Why doesn't Platform view work for my marquee(s) when in LaunchBox?
A. This has been fixed with version 2.0.6 of this plugin as long as you are on LaunchBox version 13.1-beta-6 or higher..
Troubleshooting Steps:
1. Make sure you are using the latest version of this plugin.
2. If this is your main marquee screen, please first double-check that you have disabled your marquee in BigBox settings. The ThirdScreen plugin will not attempt to use your marquee display if BigBox is using it.
3. If some image or video you've added isn't showing up when you expect it to, double-check that it is categorized correctly in LaunchBox. It's very easy to add media in LaunchBox and then forget to change its image or video type (I do that all the time).
4. If you are having an issue, please enable logging for both the ThirdScreen plugin and LaunchBox/BigBox, and then send me the log files after you try the thing that isn't working. The log files will be in the LaunchBox/Logs folder. To enable logging do the following:
For ThirdScreen: Tools->ThirdScreen Settings, click the gear icon in the upper right and choose "Debug Log File Enabled". For LaunchBox/BigBox: Tools->Options->General->Debugging, check "Enable Debug Logs". 5. If LaunhBox/BigBox will not start at all after installing the dll files, make sure you are on version 13.0 or higher of LaunchBox and also try disabling any Pen or TouchScreen devices listed in Device Manager (there is currently a known conflict with the Windows Pen driver which is affecting some users). (Edit: This has been resolved in v2.0.13)
6. If animated gif files aren't displaying for you, try running LaunchBox/BigBox with admin privileges. (Edit: This has been resolved in v2.0.11)
7. If you are having issues with the ThirdScreen settings app reporting an incorrect resolution and/or your marquees being incorrectly sized, clipped, or off-center then it is most likely caused by dpi scaling. I recommend trying the following steps:
Windows 10:
Disable "Fix scaling for apps->Let Windows try to fix apps so they're not blurry" under "Advanced scaling settings" in Windows Display Settings. Also make sure all boxes are unchecked in Properties->Compatability->Change High DPI settings when you right click on the launchbox and bigbox executables and any shortcuts to them. If above steps didn't work then try disabling all settings above and then go to Windows Display settings and make sure the values of "Change the size of text, apps, and other items" matches between your main monitor and all of your additional monitors. Windows 11:
Windows 11 removed "Advanced scaling settings". I'm currently investigating whether any special handling is required for Windows 11 regarding DPI scaling. (Edit: v2.0.14 should fix most scaling issues in both Win10 and Win11)
8. This plugin tries to fix any marquee-shift issues when a game changes the main screen resolution. As of version 4.0.0 you can select between medium mode, aggressive mode, or disabled. Medium is the default mode and is recommended. If a game changes the screen resolution, medium mode will reposition all marquees to their correct locations. Aggressive mode also hides the BigBox window to ensure it does not end up covering one of the marquee screens. While aggressive mode works perfectly on mine and many other setups, some people have reported that it can interfere with game loading or exiting (including BigBox remaining hidden after exiting a game). If you run into those types of issues you should set the option back to medium mode or disabled. In LaunchBox, go to Tools->ThirdScreen Settings. Then click the gear icon in upper right and select "Medium Shift Handling".
-------------------------------------
Enjoy, and please follow the file to be notified of updates.
1,205 downloads
- third screen
- platform marquee videos
- (and 3 more)
-
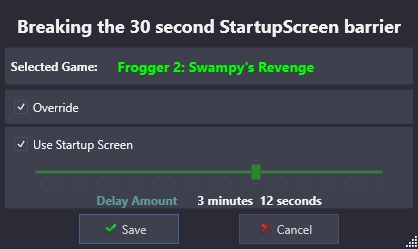
Startup Screen Load Delay: greater than 30 seconds
By JoeViking245
Breaking the 30 second Startup Load Delay barrier.
Description:
This plugin allows you to set the Startup Screen load delay time to greater than 30 seconds.
You can set it for a single game, multiple games (in bulk) or per emulator.
Installing:
With LaunchBox not running, download and unblock the zip file.
Copy the contents of the file to /LaunchBox/Plugins/
i.e. D:\LaunchBox\Plugins\StartupScreenTime\StartupScreenTime.dll
Using:
Single game - Right-click a game and select Custom Startup Screen Time
Check Override and Use Startup Screen
Set the Delay Amount to the desired duration.
Click OK to save the changes.
Multiple games - Select multiple games
Right-click and select Custom Startup Screen Time
Check Override and Use Startup Screen
Set the Delay Amount to the desired duration.
Click OK to save the changes.
An emulator - Click Tools and select Emulator Custom StartupScreen Time
Select an emulator
Check Use Startup Screen
Set the Delay Amount to the desired duration.
Click OK to save the changes.
Limitations:
- Max load delay time is 5 minutes (300 seconds)
- This WILL NOT fix issues with games/emulators that use a 'loader' to start a game.
The Startup Screen will still go away after the launched executable exits.
Here's showing a games' load delay time set to 3 minutes and 12 seconds.
28 downloads
- startup screen
- loading screen
- (and 1 more)
-
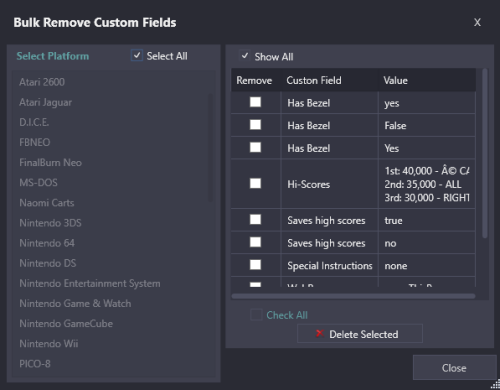
Bulk Remove Custom Fields
By JoeViking245
Bulk clear Custom Fields Values or remove the Custom Field entirely from LaunchBox.
Inspired in part by this BitBucket ticket (and the rest out of boredom)
https://bitbucket.org/jasondavidcarr/launchbox/issues/8475/mass-delete-remove-custom-fields
Notes about Custom Fields:
Custom Fileds are comprised of a Name and a Value. When you edit a game and look in the Custom Fields section, every Custom Field [Name] in your entire LaunchBox collection will be available. Whether a Value is assigned to it for that game, or not.
Only Custom Fields that have a Value assigned to it somewhere in your LaunchBox collection will actually exist.
aka, if you're seeing a Custom Field Name, something somewhere in your collection has a Value assigned to it.
Installing:
Download and unblock the zip file. Copy the contents of the zip into /LaunchBox/Plugins/ i.e. D:\LauncBox\Plugins\BulkRemoveCustomFields\BulkRemoveCustomFields.dll
How to use:
Start LaunchBox, click Tools and select Bulk Remove Custom Fields
Select a Platform to get a list of all Custom Fields [that have an associated Value] for that platform.
Or check Select All to get a list of all Custom Fields from all Platforms.
Example #1:
To remove all Custom Fields whose Name is "Has Bezel" and their Value is "yes" (lowercase "y")
Check Show All [to show ALL distinct Custom Field Names and Values]
Check the box next to "Has Bezel" "yes"
Click Delete Selected
Example #2:
To remove all Custom Fields whose Name is "Has Bezel", regardless of their Value
Un-Check Show All [to show ONLY the Custom Field Name]
Check the box next to "Has Bezel"
Click Delete Selected
To remove a Custom Field entirely from LaunchBox, check Select All and follow Example #2.
Options:
Select All
Show all Custom Fields for every Platform
Show All
Show Custom Fields Names and Values
CAUTION: If you click Delete Selected and then click Yes, those selected are now GONE!
Reprise: If you had LaunchBox's Automatic Backup feature enabled, you can use the Restore Data Backup to bring them back.
Q: Why is it listing the same Custom Field more than once?
A: It's not. Custom Fields are CasE sENsiTiVe. A Custom Field with the Name Saves High Scores is different from Saves high scores. Same goes for Custom Field Values. True is not the same as true.
20 downloads
-
Movie Scraper (Reboot 2023)
By JoeViking245
This is a reboot of the Movie Scraper Plugin by @Slipstream.
The intent of this plugin is to scrape metadata and media for movies you’ve imported into LaunchBox.
Q&A:
Why use LaunchBox as your digital movie library?
Because you can.
What metadata is imported?
Title Notes (Movie Plot) Release Date Publisher (Production Studio i.e. “Marvel Studios”) Genre(s) Series (Collection i.e. “The Avengers Collection”) Video Url (YouTube movie trailer)
What media is imported?
Box – Front Banner Clear Logo Disc Fanart – Background Arcade – Marquee
Can it import media I already have?
Yes. When importing media, the plugin will 1st look in the same folder the movie file is located.
Do I need to have my own personal API keys for both TMDB and FanArt.TV?
Yes.
However, when running Setup the first time, “temporary” API keys are automatically inserted. For now, they work. But for best, continued results, obtain and enter in your own keys. (See below)
Are both API keys required to scape?
Yes. If either of the keys are missing or invalid, the plugin will exit.
Do the Movie Titles [in LaunchBox] need to be named a certain way before scraping?
Yes. The Titles should be the name of the movie without any extras.
The Avengers will work. The Avengers (2012) will work. (new v1.3.0) The Avengers 2012 will not work.* The.Avengers.2012.1080p.BluRay.x264.DTS-FGT will not work.* *No. If you have a valid Information (NFO) file in the same folder as the movie, the plugin will parse the file to get the proper Title and movie ID#.
The Avengers 2012 will work. The.Avengers.2012.1080p.BluRay.x264.DTS-FGT will also work.
Can I scrape more than one movie at a time?
Yes. Select multiple (or all) movies in the Platform, right-click and select Scrape Movie.
You may want to test with just one movie or only a couple at first.
Can I scrape metadata in a language other than English?
Yes. See Setup: below. (new v1.3.0)
Installation:
Download the zip file Unblock it by right-clicking the file, select Properties, check “Unblock” and click OK. (Alternately, just use 7Zip to open the downloaded file) Copy the folder inside the zip into ../LaunchBox/Plugins/ i.e. D:\LaunchBox\Plugins\MovieScraper2023\MovieScraper.dll Setup:
Start LaunchBox Click Tools and select “Movie Scraper Setup” Enter in your API keys Click Verify Keys to confirm they are working (Optional) Check “Automatically select 1st Movie when multiple results are found” (Optional) Select a language to use when downloading metadata. (Default: English) (new v1.3.0) Click Save Use:
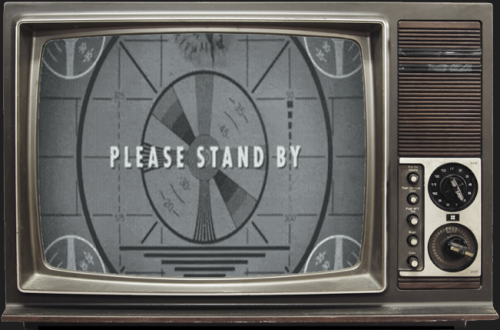
Select one or movies you have imported into LaunchBox, then right-click on one of them. Select Scrape Movie A “Please Stand By” window will appear indicating scraping is in progress. If a movie has more than one ‘close match’, a window will appear where you can select the correct movie. Unless during Setup, you checked “Automatically select 1st Movie when multiple results are found”. Scraping is complete when “Please Stand By” disappears. When completed, press F5 to refresh the Box-Front images for the selected movie(s). Click on a different movie and then back on one just scraped to refresh the images in the right side-bar.
Getting your personal API keys: (both are free to get)
TMDB
A TMDB user account is required to get an API key. Once created, log in and go to Profile - Overview - Edit Profile. Go down to API to get your “api_key (v3 auth)”. http://www.themoviedb.org
FanArt.TV
Register an account at https://fanart.tv/. Once registered, go to https://fanart.tv/get-an-api-key/ to find your personal key
The process when scraping:
Get the API keys from APIfile.xml and verify the API keys are valid If either API key returns “Unauthorized”, the plugin will exit Check if the movie has an NFO file (in the same folder as the video file). If so… Get/store the movies ID#. (Can be either TMDB or IMDB) Set the ‘games’ Title Check for existing image files in the same folder as the video file. If any exist, copy them into LB Image files need to have the same name as the video file, plus -imageType.png (or .jpg depending on the image type) Search TMDB using ‘Title’. (If an NFO file exists, search by the movie ID# from step 2 above) If no matches, “The movie could not be found.” [popup message] will appear. When scraping in bulk, a popup will appear at the end of all scraping instead, listing the movies not found If there are multiple matches, a window will appear to have you select the correct movie. (Unless you chose to “Automatically select 1st Movie” during Setup) If there’s only 1 match (or when a movie was manually selected), set the movies: Title, Notes, Release Date, Publisher, Genre(s), Series and Video Url (link to movie trailer) Download images from TMDB and FanArt.TV. Download images only if the image type doesn’t already exist (i.e. local images weren’t found)
Order of precedence for importing images:
Local images:
Box-Front
Banner
Clear Logo
Disc
Fanart-Background
Arcade-Marquee
TMDB:
Box-Front
Fanart-Background
FanArt.TV:
Box-Front
Banner
Clear Logo
Disc
Fanart-Background
Arcade-Marquee
When selecting a language other than English (new option v1.3.0) to download metadata, Box-Front and Background images are the only ones that will appear in that language (if available). FanArt.TV doesn't appear to support other languages.
Big thanks to @Slipstream for the original code and @jayjay for his update. Thanks to @universeofgamer for the suggestion to add the option to scrape metadata in other languages.
As always, all comments and suggestions are welcomed.
497 downloads
-
CLI Launcher - LaunchBox Command Line Interface for launching games directly from Stream Deck
By superrob3000
This plugin adds a command line interface to LaunchBox/BigBox for launching games via Stream Deck or having platform and playlist shortcuts. Marquee(s)* and LEDBlinky get updated automatically. Launching games on a remote PC is also supported.
*All Marquees will be updated when using either LaunchBox or BigBox if you are using the ThirdScreen Plugin. If you're using the default BigBox marquee handling, then your single marquee will be updated when using BigBox only.
Installation:
*** Before installing, if you are using the ThirdScreen plugin please make sure you are using the latest version. Version 3.0.1 or higher is compatible. *** Download CLI_Launcher.zip to your PC. Right click on the zip file and extract all files. Close LaunchBox/BigBox and copy the Plugins and ThirdParty folders to your LaunchBox directory.
Usage:
Game Shortcuts (launch command): (works with both LaunchBox and BigBox)
Create an AHK script with the following line, and point your StreamDeck shortcut to that script:
Run, "<path_to_launchbox>\ThirdParty\CLI_Launcher\CLI_Launcher.exe" launch "<platform_name>" "<game_name>"
For example, to launch Street Fighter Alpha 2 from the Arcade platform:
Run, "C:\Users\Administrator\LaunchBox\ThirdParty\CLI_Launcher\CLI_Launcher.exe" launch "arcade" "Street Fighter Alpha 2"
Platform Shortcuts (platform command): (added in v2.0.0 - only works with BigBox)
Create an AHK script with the following line, and point your StreamDeck shortcut to that script:
Run, "<path_to_launchbox>\ThirdParty\CLI_Launcher\CLI_Launcher.exe" platform "<platform_name>"
For example, to navigate to the Arcade platform in BigBox:
Run, "C:\Users\Administrator\LaunchBox\ThirdParty\CLI_Launcher\CLI_Launcher.exe" platform "arcade"
Playlist Shortcuts (playlist command): (added in v2.0.0 - only works with BigBox)
Create an AHK script with the following line, and point your StreamDeck shortcut to that script:
Run, "<path_to_launchbox>\ThirdParty\CLI_Launcher\CLI_Launcher.exe" playlist "<playlist_name>"
For example, to navigate to the favorites playlist in BigBox:
Run, "C:\Users\Administrator\LaunchBox\ThirdParty\CLI_Launcher\CLI_Launcher.exe" playlist "favorites"
Remote commands:
To run a command on a different PC that has the plugin installed and is running LaunchBox or BigBox just add "remote_ip=<ip_of_remote_pc>". For example, to launch a game on a different PC with IP 192.168.168.238:
Run, "CLI_Launcher.exe" launch "arcade" "Street Fighter Alpha 2" "remote_ip=192.168.168.238"
FAQs:
Q. What if neither LaunchBox nor BigBox are open when the script runs?
A. The command will just get ignored if LaunchBox or BigBox is not open.
Q. What if a game is already open when the script runs?
A. The command will just get ignored if a game is already open.
Q. Why not just launch the emulator and/or game directly from the script?
A. Using CLI Launcher is much simpler and leverages all the work you've already done in setting up LaunchBox to properly launch the game. Also, if you were to run the emulator and/or game directly from the script, your Marquee(s) and LEDBlinky would not get updated for the game.
Q. If I want to use remote commands, which port do I need to ensure is open?
A. If you are having trouble with remote commands, ensure port 0xb0b0 is open in Windows Firewall on the remote PC.
Q. Why would anyone want to launch a game on a remote PC?
A. Dunno... but you can now.
Q. Are AutoHotKey scripts really necessary?
A. No, that's just the way I do it. You could also just point the Stream Deck shortcut directly to CLI_Launcher.exe and pass in the correct arguments.
78 downloads
- cli
- command line interface
- (and 4 more)
-
LaunchBox Launcher
By ddraig
A launcher extension for LaunchBox, allowing easier autobooting / launching of individual roms for older 8 bit systems. It will also allow you to define different behaviour for a platform, based on the file extension, which is something LaunchBox is a bit lacking in.
The program file to run is defined using a custom field named "program" in Launchbox, this is stored against each individual rom. If a rom is not supplied then a default autoboot script may be run, for some systems this is all that is required, but some systems rely on the name of a program to run automatically (for example the Acorn Atom).
The launcher is currently set up for Mame, but it can be defined to run other emulators through the XML configuration.
Note this is currently very much beta software, I've coded it for my own use but realised it may actually be useful for someone else. This is my first real attempt at writing anything in PowerShell, so it may be a bit rough and ready. You'll probably need to change some XML files to make it work for your situation, it's probably worth looking at the Github Repository I've set up; this does have a basic readme explaining how it works.
Github Repository: https://github.com/jonesthesoftware/LaunchBoxLauncher
At the moment it defines boot sequences for Acorn Atom, Acorn Electron, BBC Micro, Amstrad CPC, and Dragon computers using Mame. I will be adding more options at a later date, more than happy for anyone else to add to the functionality / define boot sequences (it's distributed on a very unrestrictive MIT license).
8 downloads
(0 reviews)0 comments
Updated
-
LaunchBox Multi Monitor and BigBox +3rd monitor plugin
By JoeViking245
LaunchBox Multi Monitor and BigBox +3rd monitor plugin
This plugin adds support for 2nd (and 3rd) monitors in LaunchBox to display game images while navigating your collections. If you have LaunchBox version 13.1 or newer, Platform, Platform Category or Playlist images will be displayed when making a selection on the left navigation pane.
With BigBox, you already have use of a 2nd display (marquee monitor) for displaying images. For those who have a pinball-cab (or a fancy desktop setup) with 3 displays, this plugin will allow you display an image on the 3rd monitor while navigating BigBox.
Some details:
- The image displayed changes based on the Platform, Platform Category, Playlist or game you are viewing for both BigBox and LaunchBox.
- To view Platform, Platform Category and Playlist images in LaunchBox, LaunchBox version 13.6 is required. BigBox will work with any version.
- When a game is launched, the image(s) will be hidden and then reappear after exiting the game. (default)
- Optionally (new v1.1.0), you can select Keep image(s) visible during gameplay.
The exception is Steam games that are launched via "steam://rungameid/xxxxxx". Their images will not stay visible nor reappear.
- You set the default image type (i.e. Box-Front) to use for all games. Or you can set individual image types to use on a per Platform basis (new v1.1.2).
- To make this work in BigBox, Theme View files need to be modified. You can modify them yourself (instructions below) or let the plugin do it for you.
- No additional changes to LaunchBox or BigBox need to be made for this work (v1.1.3)
Q&A:
Why would I want to display an image on a 3rd monitor? Because you can. What image would I put on a 3rd monitor? That's entirely up to you. You can choose from pretty much any image type in your collection. Can it display a video on the 3rd (or 2nd-or-3rd in LB) monitor? No. Can it show a pdf file on the extra monitor? No. Can it display 3D models for boxes? No.
Installing:
Download the plugin zip file. Right-click the zip file, select Properties and check Unblock (if present). Click OK.
(With LaunchBox/BigBox not running,) Open the zip file and extract the included folder into your /LaunchBox/Plugins/ folder.
Setting up:
Start LaunchBox.
Click Tools, MultiMonitor Setup
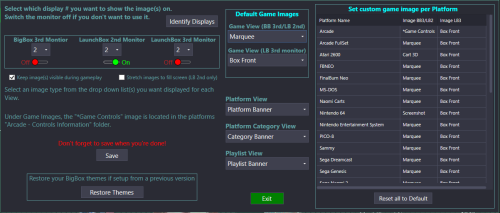
Monitor Configuration:
Select which monitor # you want the images displayed on from the pull-down list. Click Identify Displays to confirm which monitor corresponds with which monitor number. Toggle on or off to see images on the respective monitors. (v1.1.0) If you wish to keep the images up during gameplay, check Keep image(s) visible during gameplay. (v1.1.1) In LaunchBox, if images aren’t displaying correctly on you marquee monitor, check Stretch images to fill screen (LB 2nd only). This only works on LaunchBox 2nd monitor.
Image Selection:
Select the default image type you want displayed based on which View you're in. Default Game Images: BigBox 3rd Monitor and LaunchBox 2nd Monitor use the "Game View (BB 3rd/LB 2nd)" image. LaunchBox 3rd monitor uses the "Game View (LB 3rd monitor)" image. The image selection "*Game Controls" looks for game-specific images in your "/Images/platform_name/Arcade - Controls Information/" folder. In LaunchBox, if LaunchBox 3rd Monitor is turned off and the Game View 2nd monitor image doesn’t exist, it will attempt to use the Game View 3rd monitor image. In BigBox, if the Game View 2nd monitor image doesn’t exist, it will attempt to the Game View 3rd monitor image. Set custom game image per Platform (new v1.1.2) Pretty self-explanatory. Click Save after you're done making changes.
BigBox Theme Setup:
Starting with version 1.1.3, this is no longer required. The plugin will now work with any Theme, modified or not.
If you had previously setup (modified) your BigBox Theme(s) for use with this plugin using the Setup Themes button in the setup menu, click Restore Themes and follow the steps to revert them back to their original state.
If you modified them manually, just replace those Views with your backups.
Other Notes:
LaunchBox:
Platform/Category/Playlist images will only be displayed if using LaunchBox version 13.6 or newer.
BigBox:
Changes to image selections etc. can only be made in LaunchBox through Tools, MultiMonitor Setup.
General:
If after making changes in MultiMonitor Setup (AND clicking Save) images aren't displaying or there's some other plugin issue, try restarting LaunchBox.
Disclaimer:
This has only been tested on a 2-monitor setup. Neither of which were marquee monitors. So..... Good luck!
As always, comments, suggestions and requests are welcomed and encouraged.
294 downloads
-
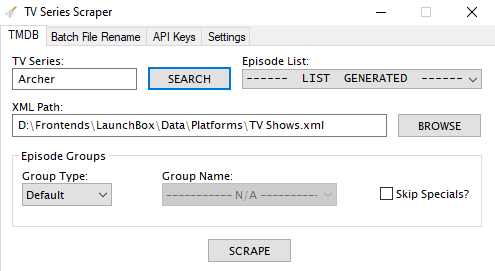
TV Series Scraper
By skizzosjt
Thank you for checking out TV Series Scraper! This tool will give LaunchBox and Big Box users the ability to easily add TV episodes to their library.
This is an AHK script written in V1 syntax and uses TMDB (The Movie Database) as its source for metadata and images
Users will be required to supply their own API key from https://www.themoviedb.org/ which is 100% free of charge and only takes the time needed to sign up creating a user name, and requesting an API key from within your user profile.
Within the .7z file there is a .ahk version and a .exe version. Both will operate exactly the same! If you are not familiar with setting up AHK then please use the .exe version.
#WHAT IT DOES#
-It will edit your PLATFORM XML file accordingly to add all data into LaunchBox and download both SEASON and EPISODE specific images
-SORT TITLE will be applied in the format of "TV SERIES SXXEXX EPISODE TITLE" to organize all series episodes together in proper sequential order
-SEASON specific images are saved into the platform's BOX - FRONT directory
-EPISODE specific images are saved into the platforms SCREENSHOT - GAMEPLAY directory
-METADATA applied will be the following:
Series title (within sort title) Series genre(s) Series network(s) Sort Title (in the format of SERIES TITLE SXXEXX EPISODE TITLE) Season number (within sort title) Episode number (within sort title) Episode title Episode overview Episode air date Episode Run Time (*only if custom field was added - see notes below)
#HOW TO USE#
-Import your video files into your platform
-Without editing these entries, close LaunchBox
-Open LaunchBox again, and now BULK EDIT the entries as follows
Edit the SERIES field with the TV SERIES NAME Edit the RELEASE DATE field with ANY DATE Optional but recommended Add a CUSTOM FIELD by doing the following Edit a SINGLE ENTRY Go to CUSTOM FIELDS tab Add a custom field name called "Run Time" Enter any value into the value field, for ex: "20" Custom fields only save if a value is assigned to at least a single entry Now BULK EDIT all entries again to edit the custom field "Run Time". Enter any value into the field -Close LaunchBox
-Open TV Series Scraper
-If this is your first launch, you must go to API KEYS tab and enter in your TMDB API KEY!
-On the TMBD tab, enter the TV SERIES into TV SERIES field
-Select the specific platform XML file using the BROWSE button
-Then click the SEARCH button
You will be prompted if the search result is correct or if you want to see the next result -Once you select a result all matching entries in your LaunchBox library will be populated into the EPISODES LIST drop down
This is to review if all of your episodes are in proper sequential order -Also once a search result is selected, if the TV series has additional "episode groups" then you will be able to change EPISODE GROUP TYPE to "Alternative" and then select the EPISODE GROUP NAME of your choice
-Once you are ready with your settings, click SCRAPE to begin the process!
#SETTINGS & FEATURES#
TMDB Tab
SKIP SPECIALS checkbox will do just that. If a TV series has specials, as in, episodes that do not correlate to any particular season, these can be skipped over if the checkbox is enabled EPISODE LIST is to review if your episodes are all in proper sequential order. If they are, you are free to pick either image naming format. ENTRY TITLE, or FILE NAME. If your episodes are NOT in proper sequential order, then you should ONLY use ENTRY TITLE. If FILE NAME is used and your episodes are not in sequential order, then images will not be assigned to the proper entry! Batch File Rename Tab (see below for details)
API Keys Tab
Go to this tab to enter in your TMDB API key. The script will NOT function without this key! Settings Tab
Search settings All of these settings will use different logic on how to match to your entries file name. Choose the one(s) that best fit your files naming scheme Each checkbox will display a tool tip to give an example of what it is using Use first search result will bypass the message prompt so the user can confirm they have the right series. Exact match only checkbox is the strictest search method and requires finding the SERIES TITLE, the SEASON AND EPISODE NUMBER, and the EPISODE NAME in your entries file name. This search method is ALWAYS enabled as the default but when this checkbox is enabled, all additional fallback search options are DISABLED Image settings ENTRY TITLE will name all images as the entries title (episode title) FILE NAME will name all images as the entries file name. Do NOT use this setting if your episode list is not completely in proper sequential order since images will not end up being named correctly Download first image found is permanently enabled. Potential improvement for future revision is to give users ability to choose additional images should they exist Additional Notes
If you choose to add multiple TV series to a single platform then it is recommended to NOT use the "Season # & episode #" search option (SXXEXX). This is due to it will only need to find for ex "S09E10" in a file name and will likely result in applying metadata and images for TV series "A" to a TV series "B" entry! This is the the "loosest" search setting as it has nothing specific to the TV series title, or to the individual episode title. Going off the above note, if all your TV series are separated into their own individual platforms, then using the "Season # & episode #" search option is very reliable assuming your file names have SXXEXX in them If you are having issues with getting good matches even with various search settings then you should utilize the Batch File Renamer to get your file's names better suited! SPECIALS, as in episodes that do not correlate to any specific season, will be considered part of "season 0" and given a sort title in LaunchBox as "SERIES TITLE S00EXX EPISODE TITLE" If you want to provide SEASON SPECIFIC images rather than have them downloaded from TMDB then place your image files into the "Images To Duplicate" folder prior to scraping. Images must be named in the following format: SERIES TITLE SXX For ex: Image file name "Archer S05.png" will be applied to every episode of Archer from its fifth season
#BATCH FILE RENAMER#
-This tool will batch rename files to the following format: SERIES TITLE SXXEXX EPISODE TITLE
-Having files named like this will guarantee good matches with even the strictest default setting of Exact match only!
-This tool will only rename files on a per season basis. For ex, if a TV series has 10 seasons and you want them all renamed, you will need to run this batch file rename 10 separate times
-The files in the selected directory MUST be in PROPER SEQUENTIAL ORDER! However, they can be named LITERALLY ANYTHING!
-What the batch file renamer does is take the first file found and gives it the name of the first episode for the series and season you entered. It then takes the second file found and gives it the second episodes name. Then it takes the third file found and gives it the third episodes name....and so on.
-To use do the following:
Enter the TV SERIES into the TV SERIES field Enter the SEASON NUMBER into the SEASON NUMBER field Enter your files FILE EXTENSION into the FILE EXTENSION field Select the directory which you want to batch rename files using the BROWSE button Click the SEARCH button You will be prompted if the correct search result came up. Once the proper search result is selected you can then select an ALTERNATIVE EPISODE GROUP should you want to use one, if the series has more than just the default episode group. With all fields filled in as desired, click the RENAME button. Your files will be renamed accordingly in just seconds! -CAUTION IS ADVISED! Back up your files first! There is no undo button associated with this action should you make a mistake
#GETTING TMDB API KEY#
-Once you have logged into your TMDB account you can click on your user name icon in the top right corner. In the pop-up menu click on "Edit Profile".
-In the left hand list click on API which will be near the bottom of the list
-Here you will be able to request and retrieve your own API key
#THANK YOU#
@Whatscheiser worked as a beta tester for v2.0 and their feedback was critical to making the tool better! Your time and efforts are much appreciated!
#EXAMPLE IMAGES#
Example for use in Big Box
#EXAMPLE VIDEO#
Showing the setup process to import and scrape for an entire season in just a few minutes!
Please note video editing took place during the scrape progress so the video could be shortened
TV Series Scraper Tutorial.mp4
#SUPPORT#
Please keep all questions and requests for help in the main discussion and support thread rather than this file download thread.
If you need any support, please click the "GET SUPPORT" button at the top of this page!
75 downloads
-

MAME Software Lists Import Tool - plugin
By JoeViking245
Use this plugin to filter and import MAME Software Lists into LaunchBox.
New - version 6.0
Requires LaunchBox 13.3 or newer* Slightly different look. Same old features. A lot of (behind the scenes) code improvement. This update has been rewritten in .NET 6.0 to “keep up with the times”. *If you’re using LaunchBox version 13.2 or older, download version 4.5 of the plugin.
(For now, at least) v4.5 will still work with LaunchBox 13.3 and newer.
Features:
Import MAME Console/Computer ROMs into a new or existing Platform Import clones as Additional Apps, separately or not at all (Option) Skip Prototypes (Option) Skip Non-Supported ROMs Adds the Platform and Command-line Parameter to the selected MAME emulator (ex. Atari 2600 a2600 -cart) (Option) Copy ROMs to a new folder during importing Imported games tagged as not supported by MAME will be marked as "Broken". (Option) Import only games that exist in your ROMs Source Folder (Option) Ignore games that only have a Title change (when updating) Version information found inside parenthesis in a Games Title will be added to the games "Version" (metadata)
Audit Feature: Compare your existing softlist console/Platform against the MAME hash.xml.
Will cross check Title and Rom names.
- Select the respective hash.xml and Platform
- Click Audit (last page)
- Any differences along with a brief description will be shown.
- Option to select files (if any) and have them removed from your LaunchBox Platform.
- Will check main Titles as well as Additional Apps (if you imported them that way).
This does NOT check rom integrity. That's between you and Clrmamepro (or related utility).
What's needed:
(1) dll file included in the zip. MAME Software List hash files (located in the "hash" sub folder of your Mame's main folder) MAME Software List ROMs* and BIOS files (only if you want to actually play them) *The rom set needs to be either a Split set or a Non-Merged set for a full import If you plan to not import clones, any type set will work.
What it won't do:
Filter/Sort by Region (it's a MAME hash file limitation) Determine if/what BIOS files are needed Import Metadata and Media (just use the built in LaunchBox Tool) To remove extra information from the games titles [Example "(Jpn)"], select Yes, download and replace all existing metadata and media when running the tool.)
How to:
- Copy the "ImportMameSoftwareLists" folder from the zip file to your ..\LaunchBox\Plugins folder.
- Navigate to that folder and unblock the .dll file. (Right click, Properties, and click Unblock)
- Start LaunchBox. Click on "Tools" and select "Import MAME Software Lists".
- Navigate through the wizard.
- After running the plugin, right-click your new platform and select Edit. Set Scrape-as to whatever your platform is and save.
Notes:
ROM Folder Locations (screen): The Destination Folder is required even if you don't plan to copy the files. It's needed to set up the Application Path for the ROMs when Importing.
Copy and/or Import (screen): To add Version info (if it exists in the Games Title) to an existing console (Platform), run the plugin and DO NOT CHECK Ignore games that only have a Title change (when updating)
Selecting an emulator:
The main intent of this plugin is to import consoles and computers using MAME softlist ROMs and set the games "proper" Title and application path. It will also attempt to add the appropriate Command-line Parameter for the platform in MAME’s Associated Platforms.
If you prefer to use an emulator that can load MAME ROMs other than MAME (or a variant there-of), go for it. It’s recommended to select MAME while using the importer, and then change the Default Emulator when done importing.
You can select the 'other' emulator in the plugin, and it will be set as the default for the platform. But it will also have the default command line parameters for the associated platform set using MAME parameters. So be sure to adjust as necessary.
Importing:
(optional) "Import games that only exist in the ROMs Source Folder"
If using a Merged softlist set, clones will not get imported using this option. But if you have a curated Split set, this can be handy.
(optional) "Ignore games that only have a Title change (when updating)"
If you manually renamed your game titles, check this box.
Updating:
If you’ve updated your MAME emulator and MAME softlist ROMs, simply run the importer and point to the updated hash file and select your existing platform.
When updating, this plugin will NOT remove any games from your collection that MAME has removed from the hash file(s). You can use Audit to compare your collection to the MAME hash file and manually remove games from your collection that don't exist in the hash file (if you so desire).
Downloading Metadata:
After running the plugin, right-click your new platform and select Edit. Set Scrape-as to whatever your platform is and save.
When downloading metadata and Media, choose "Yes, download and replace all existing metadata and media". This will remove the Version info from the games Title.
After updating the metadata, if some, but not all games got updated, restart LaunchBox and try the bulk metadata downloader again.
Auditing:
When auditing, if a game originally had the version info in its Title and you have ran the Download Metadata and Media wizard selecting "Yes, download and replace all existing metadata and media", you WILL see games marked as Missing.
* MESS xml *
Other Notes: (things I've learned)
- Software List folder/file locations:
- *Associated Platform Command line parameters
- MAME and CDROMS
2,464 downloads
-
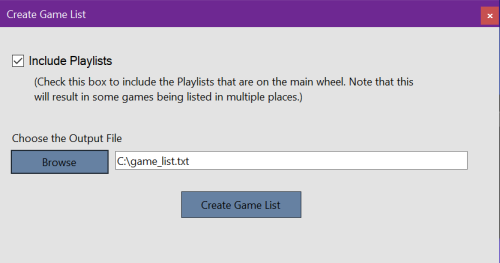
CreateGameList (Create Game List Plugin)
By superrob3000
A PlugIn to quickly dump your entire game list to a text file.
Installation:
1. Copy CreateGamesList.dll to your LaunchBox/Plugins folder.
Usage:
1. From LaunchBox choose Tools->Create game list file
2. Select or clear the checkbox for including playlists in the game list file.
3. Hit Browse to choose the location of the game list file.
4. Hit the "Create Game List" button.
139 downloads
-
Mame HLSL Settings
By Lordmonkus
Here are the Mame HLSL settings I use. HLSL has the advantage of working for both horizontal and vertical games.
These settings are for use in Mame version 0.172 or later. Older versions will not look right, there were changes made in Mame 0.172 that made HLSL a much better shader choice.
There are 3 text files inside, one is a readme with simple instructions. As always when making edits and changes make a backup of your files you are about ti edit first just in case you do not like the changes.
Copy the text from "mameini.txt" and paste it into the mame.ini file replacing the block of text that is already in it. Don't simply add it to the end.
Copy the text from rasterini.txt into the "raster.ini" file located in the /ini/presets folder in the Mame folder. Overwrite everything that is there.
As always with shader settings they may look better or worse on your monitor depending on size, resolution and calibration. These settings I think look really good on my monitor which is a 27" 1440 resolution TN panel from Asus.
1,864 downloads
-
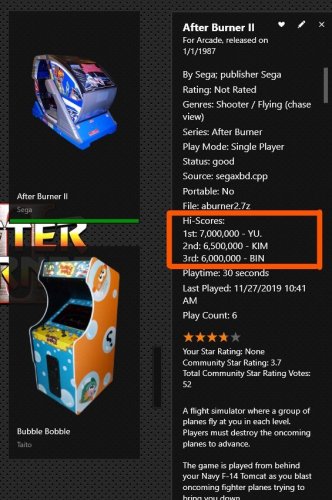
View MAME High scores in Game Details - A plugin for LaunchBox/BigBox
By JoeViking245
View MAME High scores in Game Details - A plugin for LaunchBox/BigBox
Use this plugin to see a games top 3 high scores in the Game Details.
Features
Shows high scores for most games in your Arcade platform in the Game Details. After playing a MAME Arcade game that saves its' high scores [and is supported by the included hi2txt program], this adds a Custom Field called "Hi-Scores" to the game. It will store 1st, 2nd and 3rd place and appear in the Game Details when the game is selected.
What's needed
(3) files that are included in the downloaded zip file (the plugin) One file that is included in the Version 3.0 downloaded zip file MAME configured to save high scores Saved high score files (These are automatically generated by MAME [once configured to save them] in the "hi" and/or “nvram” subfolders of your MAME emulator)
What it won't do
Show high scores for games using emulators other than MAME. MAME does not save high scores for all arcade machines, so not all games are supported by this plugin.
Contributors
@jayjay and @JoeViking245
A HUGE Special Thanks goes to GreatStone’s utility “hi2txt”. This utility converts MAME’s high score files into a readable format which ultimately makes this plugin possible!!
http://greatstone.free.fr/hi2txt/index.html
Installation and setup instructions:
Step 1: Installing the Plugin
Step 2: Making sure MAME is set up to save high scores
Installing the Plugin:
Download the plugin, LB-BB_Hi_Scores_v1.0.zip, from the LaunchBox download section After you’ve downloaded the zip file, be sure to unblock it in Windows by right clicking it, selecting Properties, and clicking Unblock
Open the zip file and extract/copy the "Hi_Scores" folder into ..\LaunchBox\Plugins e.g D:\LaunchBox\Plugins\
If you have previously installed “MAME Hi-Score Display - A plugin for BigBox”, you will only to copy the “HiScoreCustomField.dll” file into that same folder. Otherwise all 3 files are required. (Only one file is required with version 3.0) The 2 plugins will not conflict with each other.
Setting up MAME to save high scores:
Using a recent official MAME release –
By default, plugins are enabled in MAME. You can verify this by looking at the “mame.ini” file located in the root MAME install folder. Open “mame.ini” and scroll down to (or press Control + F and search for) “Scripting Options”. “plugins” should be set to 1. If it’s 0 (zero), change it to 1.
Next, open “plugin.ini” also located in MAME’s root directory and change “hiscore” to 1.
If you have an older release of MAME, you may need to do the following steps.
Go to this website: http://www.mameworld.info/highscore/download.htm and download a copy of the file hiscore.dat that corresponds to your version of MAME. The file (hiscoredat.zip) will need to be unzipped. Place the file hiscore.dat in your MAME/Plugins folder Open up your MAME.ini file in a text editor. In newer versions, this file will be in the same directory as the MAME.exe Press control + F and search for “Scripting Options” Next to the word Plugins, type “1” no quotes Next to the word Plugin, type “hiscore” no quotes It will look like this:
How to use:
Start LaunchBox or BigBox Go into the "Arcade" Platform Select a game, run it, then close it Now select a different game, then go back (poor man’s version to refresh the Game Details) If the game has saved high scores, they will now appear in that game’s Detail pane Depending on the BigBox theme you use, the amount of data shown in the Game Details may be limited. So you might need to go into Options, Game Details and deselect some of the Details.
Be sure that “Custom Fields” is checked.
423 downloads
-
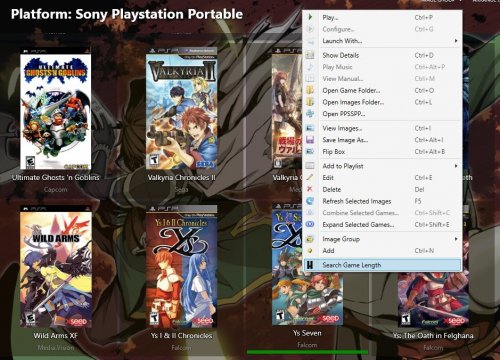
How Long To Beat - Game Length Plugin
By matiaspons
About
Plugin that scrapes information from HowLongToBeat.com and adds custom fields with game lengths information.
I made this plugin to add length information for certain games, mostly rpgs. This adds 3 custom fields for Main Story, Main + Extra and Completionist length. You can configure which ones you want to add by editing the file HLTBPlugin.xml.
Because there's no oficial API from HLTB, I had to parse the HTML, which means that as soon as they change something on the HTML this plugin probably will stop working...
Install
Extract files (dll + xml) to : Launchbox/Plugins/HLTBPlugin.
Config (HLTBPlugin.xml)
MainStoryLength: Enable/disable main story length update. Default: true. MainExtraLength: Enable/disable main story + extra length update. Default: true. CompletionistLength: Enable/disable completionist length update. Default: true. MainStoryFieldName: Change main story length custom field name. Default: Main Story Length MainExtraFieldName: Change main story + extra length custom field name. Default: Main + Extra Length CompletionistFieldName: Change completionist length custom field name. Default: Completionist Length Note: If you change the fields names it will not update the games that already have information, so you will end up with duplicated fields with different names and you will have to manually delete them (edit game -> custom fields tab). So config the first time and stick with that.
Usage
Access the option by right-click a game (only one game, no massive update yet). A window will popup with all the games found and you can choose which one correspond to your game. If there's no results you can manually change the search words (e.g. Metal Gear Ac!d will get no results but you can then change the search to Metal Gear Acid).
You can use the "Arrange By" option to order the games by length. Lengths are shown with leading zeroes because is the only way to properly order the games since custom fields are strings and not integers.
Tested on version 8.9. I think you need a premium license because custom fields are not supported in free license (not sure).
I have no relation with HowLongToBeat.com, if you like their work please go and support them.
Public Repository
https://github.com/matiasponsml/HLTBPlugin
1,401 downloads
- plugin
- game length
- (and 2 more)
-
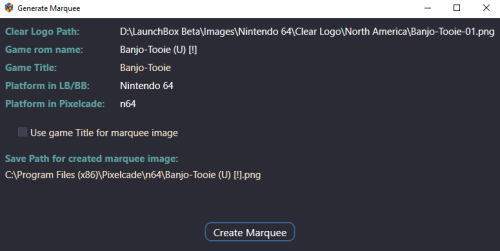
Create marquee images from Clear Logos (for use with Pixelcade™ LED Marquee displays)
By JoeViking245
Create marquee images from Clear Logos (for use with Pixelcade™ LED Marquee displays)
Pixelcade already provides numerous marquee images for many Platforms. But you may come across one or more that are missing.
This plugin will create 128x32 marquee-resolution png images using your games existing Clear Logo and place them in your Pixelcade directory**, under the corresponding Platform folder.
What’s needed:
The plugin files Pixelcade software installed (including LEDBlinky) [https://pixelcade.org] ffmpeg.exe (used to convert/create the marquee images) [https://ffmpeg.org] (included) (optional) An actual Pixelcade™ Marquee display
Installing:
Download and unblock the plugin zip file (Right-click the zip file, select Properties and check UnBlock) Copy the contents of the zip file into your ../LaunchBox/Plugins/ folder i.e. D:\LaunchBox\Plugins\PixelcadeMarquees\
Setting up the plugin:
The default install location for Pixelcade is “C:\Program Files (x86)\Pixelcade”**. If you installed it somewhere else, edit “pixSettings.xml” located in the Plugin folder. (Notepad can be used to edit it) Change the path (line #3) to match your install location. Save and close.
<?xml version="1.0" encoding="utf-8"?> <settings> <pixCadePath>C:\Program Files (x86)\Pixelcade</pixCadePath> </settings>
**Note:
If your Pixelcade installation is located under “C:\Program Files (x86)”, you will need to have Access Permission to be able to save the images there. The plugin will check for permissions when launched. If it doesn’t have the proper permission, images will be saved to the "Completed" subfolder.
i.e. D:\LaunchBox\Plugins\PixelcadeMarquees\Completed\
You will then need to copy them manually when done. The images will be saved to their own Platform subfolder as Pixelcade sees them. (Pixelcade Platform naming conversions are taken from "console.csv" located in your Pixelcade directory.) Example: if your Platform is called "Arcade", images will be saved in the folder "mame".
Using the plugin:
Start LaunchBox. Select one or more games. Right Click and select Generate Pixelcade Marquee Image Click Create Marquee
Game Title vs. ROM name:
In most cases LaunchBox passes the games ROM name to LEDBlinky (which in turn passes it to Pixelcade). But for certain games (namely Steam games [and others?]), LaunchBox will pass the games Title. For these, you’ll want to check the box Use game Title for marquee image.
If the games Title contains illegal characters (such as : [semicolon]), the image will not be created.
When selecting multiple games, if you check Use game Title for marquee image and click Create Marquees, if the game Title contains illegal characters, a message will popup indicating that game will be skipped. You can bypass these messages by checking Skip warnings about Titles with invalid characters.
Special thanks to @megashub for coming up with the idea for this plugin and for figuring out how to manipulate and convert the images to make them suitable for Pixelcade™ displays.
As always, questions, comments and suggestions are always welcome.
116 downloads
-

How Long to Beat Custom Fields Tool
By christhed
About the tool: The tool is NOT scraping data from https://howlongtobeat.com/. It is using data that has already been scraped from the website and adding it as custom fields for your games.
I encourage you to visit the website and manually add the data for missing games as well as support the website by contributing to the database.
How does it work?
Just run HLTB.exe, select your Lauchbox/Data/Platforms folder and press confirm. That's it!
**MAKE SURE TO BACKUP YOUR XML FILES BEFORE RUNNING IT!!**
What are the included platforms?
3DI Interactive Multiplayer, Arcade, Atari 2600, Atari 5200, Atari 7800, Atari Jaguar, Atari Lynx, ColecoVision, Commodore 64, Commodore Amiga, Microsoft Xbox 360, Microsoft Xbox, MS-DOS, Nintendo 3DS, Nintendo 64, Nintendo DS, Nintendo Entertainment System, Nintendo Famicom Disk System, Nintendo Game Boy Advance, Nintendo Game Boy Color, Nintendo Game Boy, Nintendo GameCube, Nintendo Switch, Nintendo Wii U, Nintendo Wii, Sega Dreamcast, Sega Genesis, Sega Saturn, Sony Playstation 2, Sony Playstation 3, Sony Playstation, Super Nintendo Entertainment System, Windows
Will you update the data/add more platforms?
I don't plan on it. At least not on a regular schedule.
How do I show that data on BigBox?
You can create your own theme or make changes to existing themes using the Community Theme Creator. I'm pretty bad at designing themes so I don't plan on releasing one but I'd be interested if someone wants to create a theme that takes advantage of the HLTB data.
**UPDATE**
I lied and made a theme for it. Here it is.
61 downloads
.thumb.png.0143038bf35d857bbdebee35c3dc47b2.png)
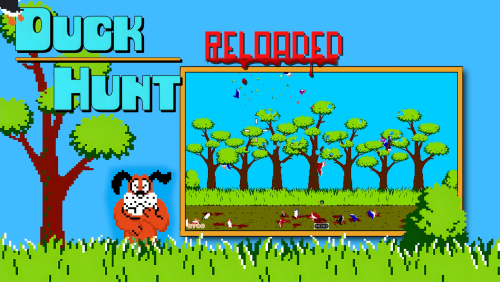

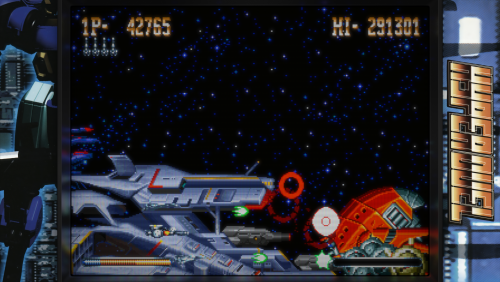
.thumb.png.7e3e30a8a12a702e05af7309eb087e82.png)