Third-party Apps and Plugins
204 files
-

Community Theme Creator
By y2guru
Manuals / How to
Refer to my YouTube channel or visit Faeran's Theme Creator Workshop videos to better understand the new features.
Dave Paterson - YouTube
Development Live Streams - YouTube
COMMUNITY Theme Creator - Patreon
11,248 downloads
- bigbox
- custom bigbox themes
- (and 1 more)
-
Mame No-Nag Updated Monthly, Current Version:
By MadK9
**This removes the nag screen that informs you if a rom doesn't work correctly, or if at all, if you use this no nag, then please do NOT go to the mame support site with issues with games, please only use if you understand that there will be no help from anyone at mamedev as you are using a modified version of mame.
Contents: mame.exe - Normal Mame with Nags removed. (Note mame no longer carries the 64 in its exe name changed by Devs in 0.229)
It's advisable to download the full mame official pack and install it, then just overwrite the exe with the replacement, this covers any changes the mame devs may have made to the support files.
After you have done this, make sure you copy the folders artwork, ctrlr, cheat, hlsl, ini, folders and the ini files from the root of your original mame folder, and move/copy them to the new install.
If you are using your own installed/setup of mame then make sure you also set in the mame.ini 'Skip_gameinfo 1'
If you got Launchbox to setup mame for you when asked, you only need to replace the exe and play.
As some are not sure about False Positives, and report a virus was detected, As goes for all versions i upload, they are all ran through virustotal before i upload, and if by any chance something did end up with an issue it would be noticed very quickly after upload and would be removed/restricted.
0.264 - https://www.virustotal.com/gui/file/b7d301c777152a4ffe5402d7dee1c800d28691a7ffbbace5529b62e9bb1546ec?nocache=1
All NEW versions of the No-Nag will be posted in this download thread only, if you wish to get the new releases every month, either follow myself or the thread, As the download section will not show any new releases.
14,163 downloads
-
Kodi addon for LaunchBox
By CoinTos
Launches LaunchBox in Big Box mode from within Kodi - It will close or minimize Kodi, launch LaunchBox in Big Box mode and when Big Box is exited Kodi will restart or maximize, with the option to run programs pre/post LaunchBox. It works with Windows only.
Features:
BigBox Startup video and splash screen support
LaunchBox and BigBox Updater support
LaunchBox (Free or Premium) and BigBox mode selection
Multiple Monitor detection and handling
Pre/Post scripts
Minimize or close Kodi option
Launcher Helper script version check
Supports Kodi 19, 20 and Kodi Windows Store versions.
Requirements:
Windows PC
LaunchBox (Premium or Free)
Kodi 19, 20 or Windows Store for Windows
Kodi 16, 17, 18, 19 for Windows (Up to version 1.5.9, BigBox only)
Known Issues:
Due to Windows Store's UWA security restrictions, user must set a save directory under the plugin's Advanced Settings to a directory of the user choice where the plugin's ahk helper script and icon file can be saved.
Taskbar will flash on Kodi Windows Store version (UWA) using 1.5.4+. Current workaround is to switch to Kodi non-UWA or to minimize effects, enable hide taskbar in advance options, remove Cortana search bar and change taskbar to black.
Starting with version 1.5.6, due to windows security restriction on SMB shares over IP (eg. \\192.168.1.1\shared-folder\), the addon will produce an error saying it is not supported. Current workaround is to enable SMB fix in Advance settings to replace IP with supplied server name or enable SMBv1 on server and computer to allow NetBIOS name resolutions in Kodi.
Kodi-six package is now required with 1.5.6-1.5.9, addon will fail if after first installation of Kodi-six package dependency, Kodi was not restarted.
Install instructions:
Use 'Install from Zip' in Kodi and browse to the directory the plugin's zip was downloaded to and select it.
Configuration:
This plugin requires the user to set the location of their LaunchBox directory in the addon settings before first use. eg. C:\Users\<username>\LaunchBox\
PLEASE NOTE:
THIS PLUGIN WILL PRODUCE AN ERROR DURING INSTALL IN KODI ON ANY OPERATING SYSTEM THAT CANNOT RUN LAUNCHBOX.
SINCE LAUNCHBOX IS CURRENTLY WINDOWS ONLY THAT IS THE ONLY OPERATING SYSTEM THE PLUGIN CURRENTLY SUPPORTS.
ATTENTION: WILL NOT WORK ON ANDROID (BOX, SMART TV, ETC.), IOS or MAC AND LINUX.
16,544 downloads
-

PCSX2 Configurator Next
By alec100_94
PCSX2 Configurator Next for LaunchBox
PCSX2 Configuartor Next is a plugin for LaunchBox that allows users to easily configure PCSX2 on a per-game basis. The plugin also allows for pre-optimised configs to be downloaded from right within LaunchBox for a whole host of popular PS2 games, from Zombeaver's excellent PS2 Configuration Project.
Installation
The plugin is easy to install and simply needs to be downloaded and extracted. The archive contains a folder called "PCSX2 Configurator Next", this should be placed in the root of the "Plugins" in the user's LaunchBox directory. Any previous versions of the plugin should be removed before attempting to install this version.
General Usage
The plugin is relatively straight forward to use, but has been changed significantly from previous versions. You will first need to have PCSX2 (1.5.0 development build) setup as an emulator in LaunchBox. Then right click on a PS2 Game and choose "PCSX2 Configurator" from near the bottom of the context menu. This will present a menu of options:
"Create Config" - Creates a new config for the game in question based on the users current PCSX2 settings, If a config already exists this will overwrite that config with a new one.
"Download Config" - This will download one of Zombeaver's Config and set it up to be ready to play for the selected game, this will be greyed out if now config is available, and will change to "Update Config" if a new update is available for the downloaded config.
"Remove Config" - This will remove the current config for the selected game, and will be greyed out if there is no current config.
"Configure With PCSX2" - This will open PCSX2 with the config for the selected game loaded, allowing you to customise your config for the selected game (Downloaded Config's can also be tweaked). Once a game has a created config this can also be done using LaunchBox's built in "Configure" from the games context menu. Both these options will be greyed out if there is no config for the selected game.
There is also a "settings.ini" file created in the plugins folder ("%LaunchBoxDir%/Plugins/PCSX2 Configurator Next"), this can be tweaked manually but most settings don't need to be touched in most cases. Some people may wish to change the "GameConfigsDir" which is where the created configs are stored, this deafults to the users PCSX2 "inis" directory. There is currently no inteface to modify these settings, but that is planned in a future version.
Version Info and The Next in The Name
This version of the plugin is the successor to the original PCSX2 Configurator plugin, with a completely re-worked codebase from that version, and full compatibility with LaunchBox.Next (which is now the current version of LaunchBox). The main reason "Next" was added to the name is to initially seperate it from that (now discontinued) verison of the plugin. This release is currently in Beta and the "Next" from the name will probably be dropped eventually for a stable release with more features.
Credit and Support
I have personally put a lot of time and effort into all versions of this plugin, with it essentially being my free-time pet project for the last year and a half. Though I know the plugin would not be what it is today without Zombeaver who really helped me to bring this plugin to the next level, by allow me to integrate his PS2 configurations into it as well as creating artwork and helping me test the plugin. I would also like to say a big thank you to spectral, neil9000, and kmoney for helping me out with testing, and of course Jason Carr for making LaunchBox and implementing some of my requested changes into the plugin engine. I intend to keep working on this plugin, and fix any reported bugs as well as update the plugin with new features. So if you have any problem or feature request's hop over to the plugins thread on the forums and let me know. The project is also open sourced under the MIT license and can be found on my github.
UPDATE (JUNE 2020): This Plugin is now in maintenance mode, and is nearing end of life. I am currently working on a standalone version that will serve the same purpose, which will also be made to work with LaunchBox. The progress of that can be found here
9,393 downloads
-

EpicFail ScummVM Launcher NEW
By epicfail
Version 4.0.0
Now works with the ThirdParty folder. Also added a way to convert the BatRunner roms to launch straight from Launchbox instead of running through the batrunner and bat files. This feature is new.
Version 3.4.0
Big changes in this one. Some may like it, some may hate it. I now rewrite your ini file to help you out and maintain portability.
New game menu item to Configure ScummVM. ScummVM will open with that game selected. No need to scroll through a big list to find/guess the specific game to configure. When using my menu items to configure scummvm, I will automatically rewrite absolute paths as relative paths to your ini file. I also gave you the Configure ScummVM from the Tools drop down. During generation of the *.bat launchers I will check that you have the emulator set up, if not I will fix it for you. Can't change ScummVM path or launcher path now. Just go with it, life will be better. Simple and Advanced modes. Advanced mode is what your used to. Simple mode is one click setup, creates full list of launchers, and emulator creation. It will ask if you want to filter the non english languages. It should be easy if it works the way I intend.
click on the Tools->ScummVM Import Tool (simple) click on the Tools->Import->Rom Files to import the bat files as ScummVM games. Now scummvm can be portable easily in 3.3.1-plugin, you can rewriting the ini file. One click will read every single setting out of the ini file and find all absolute paths, check if the path is valid, than convert then to be relative to the launchbox directory.
I owe you guys some new instructions.
Updated with relative path for better travel!
ONLY the DLL is updated... See the update note below lots of new stuff.
uses launchbox built in ScummVM by default uses a local scummvm.ini by default, import existing to a local or create new fresh local scummvm.ini, all built in find and remove existing epicfail files. better rom names for smoother mass import BatRunner.exe installed from gui, must stay in your launchbox folder, point to it as your scummvm emulator. (BatRunner.exe is just the ScummVMimport.dll renamed and move to the launchbox main directory. Will prompt you when you create your launcher bat files. So its automatic you won't have do any thing to create it) Just point to it as the application for you scummvm emulator if your using the bat files. Updated filtering with priority duplicate control. ------------------------------------------------------------------------------------------------------------------
Older Version 2.0.5 from the videos ScummVMLauncher.exe
NEW AND IMPROVED - NOW WITH RETROARCH FEATURE
This is the scummvm launching system I use with launchbox. Most importantly this allows you to get art and videos for BB. It works for me, so I'm sharing it.
SETUP LAUNCHERS:
Put these ScummVMLauncher.exe files in your scummvm directory same directory as your scummvm.exe. I'm using 1.9.0.2-win32 currently. If you already setup my old launcher you can just delete the files and the launchers folder.
This is how I use it.
1st is to open your ScummVM and do a "Mass Add" if you don't know what that is hold the shift button down and the add button on scummvm will change. You could skip this if you already have your games loaded in scummvm, but I recommend starting fresh. After that close the scummvm program and assuming you have the microsoft .net framework installed run the ScummVMLauncher.exe. From the window, select Tools->load scummvm.ini this will attempt to automatically find your file in %appdata%ScummVM/, if its not there just navigate to the directory that you keep it and select your scummvm.ini file, then select open. This will grab the scummvm.ini file selected and parse it. You should see the gui populate and look similar to the screenshot. The gui should be intuitive. Filter the games the way you want to. Select Tools->Generate Launchers SETUP IN LAUNCHBOX:
Setup the emulator for ScummVM and pick the ScummVMLauncher.exe file as the executable. import roms - pick the launchers folder to import. Enjoy in BB, with art and videos!
10,976 downloads
-
All Killer No Filler Mame Rom Copy
By Lordmonkus
These bat files will copy all the roms and bios files from a split rom set as of Mame v.170 rom set. Using this on a rom set not 170 you may have missing roms so use with care if your set is different.
First off I did not create this at all, I am merely packaging this into one file for easy download and distribution. I got these files from http://forum.arcadecontrols.com/index.php/topic,149708.msg1563036.html#msg1563036 and they were created by the user BadMouth and he deserves all the credit for these files and the work put into them.
In this package you will find bat files and txt files of the same name, these are exactly the same files but with different extentions. Open the txt files if you wish to view exactly what the bat files are going to do.
To use these files simply copy the bat files into your Mame rom folder and run each bat file. Each bat file will then create a folder with a name matching the bat file and copy the roms from your Mame roms into the corresponding folder for easy organization. It does not move your files so you will still have an intact full Mame rom set.
If you do not wish to have separate folders simply use the _NoFiller.bat to copy them all in one shot into a folder created by the bat file.
630 games including those commented out. The batch file may contain more than this since I included multiple versions of a few games so the user could pick which works best for them. (2 or 4 player version, Budweiser Tapper or Root Beer Tapper, etc)
I'm using split sets, these numbers may vary depending on type of set and compression method.
2,920 downloads
-
mame MAME No Nag
By NJDave71
MAME 0.218 NO NAG
It’s time for MAME 0.218, the first MAME release of 2020! We’ve added a couple of very interesting alternate versions of systems this month. One is a location test version of NMK’s GunNail, with different stage order, wider player shot patterns, a larger player hitbox, and lots of other differences from the final release. The other is The Last Apostle Puppetshow, an incredibly rare export version of Home Data’s Reikai Doushi. Also significant is a newer version Valadon Automation’s Super Bagman. There’s been enough progress made on Konami’s medal games for a number of them to be considered working, including Buttobi Striker, Dam Dam Boy, Korokoro Pensuke, Shuriken Boy and Yu-Gi-Oh Monster Capsule. Don’t expect too much in terms of gameplay though — they’re essentially gambling games for children.
There are several major computer emulation advances in this release, in completely different areas. Possibly most exciting is the ability to install and run Windows NT on the MIPS Magnum R4000 “Jazz” workstation, with working networking. With the assistance of Ash Wolf, MAME now emulates the Psion Series 5mx PDA. Psion’s EPOC32 operating system is the direct ancestor of the Symbian operating system, that powered a generation of smartphones. IDE and SCSI hard disk support for Acorn 8-bit systems has been added, the latter being one of the components of the BBC Domesday Project system. In PC emulation, Windows 3.1 is now usable with S3 ViRGE accelerated 2D video drivers. F.Ulivi has contributed microcode-level emulation of the iSBC-202 floppy controller for the Intel Intellec MDS-II system, adding 8" floppy disk support.
Of course there are plenty of other improvements and additions, including re-dumps of all the incorrectly dumped GameKing cartridges, disassemblers for PACE, WE32100 and “RipFire” 88000, better Geneve 9640 emulation, and plenty of working software list addition
Please visit @MadK9
Happy Gaming
2,222 downloads
-
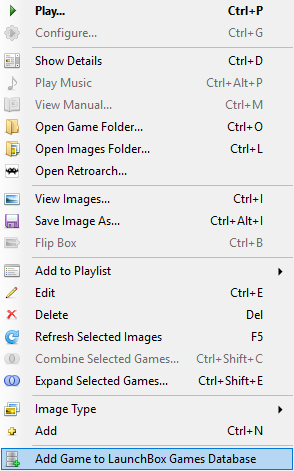
Add To Games DB
By UnderwoodNC
*** Updated for Initial Support for LaunchBox v.Next ***
AddToGamesDb: A plugin to help automate the process of submitting all of your game information and images from your collection to the LaunchBox Games Database.
About the Plugin
This plugin makes use of an application traditionally used in automated testing (Selenium) to automate the process of submitting games to the LaunchBox Games Database. It will open an instance of your default browser (provided that browser is either Chrome or Firefox. If some other browser is your default, it will try to open Chrome), and attempt to submit the selected game to the LaunchBox Games Database based on the information provided in your collection.
If the game does not exist in the database, it will create a new game entry and submit it to the database. If you have added additional information or images to a game that already exists in the database, it will enter the title and platform, then pause to let you choose the existing game, then add any additional information from your collection to the LaunchBox Games Database. Installation Instructions
Note: For this plugin to work, you will need to have either Chrome or Firefox installed. If you have both installed, it will use whichever you have set as your default browser. If you are using Firefox as your default browser and have enabled Firefox Profiles, please note that this will run under the default profile. For any and all other cases, Chrome is the preferred browser.
Unzip everything to the Plugins folder. Usage Instructions
Note: If, in editing your collection, you are prompted to download an update for the LaunchBox Games Database, afterward you will need to close and re-open LaunchBox for the plugin to detect the changes.
Open LaunchBox and browse to a game that is either missing from the Games Database, has additional information not in the database, or has images not in the database -- right click that game, and select the appropriate option, it will show either: Add Game to LaunchBox Games Database Update Game in LaunchBox Games Database Add New Images to LaunchBox Games Database The first time you run the plugin, you may be prompted to login to LaunchBox Games Database. If so, the plugin will pause here to allow you to login as normal. Check "Remember Me" to skip this step going forward. Your login information is not read or stored in the code, it is stored in Chrome or Firefox's normal AppData cache on your system. If you do not login, the plugin will time-out after 5 minutes and close the browser. Depending on the game, you may be prompted with a screen that identifies similar titles and you will be asked to either select the correct title, or click the button to add a new game. If so, the plugin will pause here until you make your desired selection, then automation will resume for the remainder of the process. Logging
By default, the logging is only set to a general "Info" level and up that contains generic start and submission successful messages, along with any errors encountered. If you continue to encounter an error somewhere along the way, please take the following steps:
Browse to the plugin's folder -- LaunchBox\Plugins\AddToGamesDb Open NLog.dll.nlog in Notepad or another text editor. Scroll down to the bottom and find the <rules> section of the configuration. Find this line: <logger name="*" minlevel="Info" writeTo="file" /> And change it to this:
<logger name="*" minlevel="Trace" writeTo="file" />
Try to submit the problem game, if it is a particular game causing the issue, or another game in general otherwise.
Browse to the log file in the plugin's folder -- LaunchBox\Plugins\AddToGamesDb\log\AddToGamesDb.log
Feel free to post the error and preceding trace either on the plugin's support page or PM me either the entire log or the part pertaining to the last issue, whichever is easier for you. From there, I'll investigate and make any updates necessary.
Supported Fields
Auto-population of the following fields is currently supported:
Name/Title Platform Release Date ESRB Developers Publishers Genres Wikipedia URL Overview Max Players Cooperative Images Known Issues
Context Menu (right-click menu) does not refresh on Audit window. If you update the information for a game in LaunchBox (clicking Edit from the right-click menu for the game), you will need to click away from the game (click some other game, for example), and then right-click on the updated game again for the context menu to update. Even without doing so, however, the correct process should run even though the text and icon on the menu haven't yet updated. A lot of work has gone into stabilizing the initial release and this latest release, but if you encounter any issues, please let me know and I will be glad to work with you to update the plugin accordingly.
Thanks, Jason, for providing your amazing software and thanks again to Jason, the LaunchBox staff and the community for your support in developing this plugin.
2,379 downloads
-
Youtube Scraper
By srxz
Simple Plugin to automate download videos from youtube.
Requirements: Launchbox 8.2+
Install: Extract the content of zip file to : Launchbox/plugins/YoutubeScraper
Source code: Github (feel free to make a pull request )
EDIT
If you have trouble running the plugin and crashing due CAS error, please right click on the DLL's , properties and then unblock.
There's two options:
URL Scraper: Just paste entire youtube URL from the desired video
One-click downloader: It will search automatically and download the first entry from youtube. Bulk Download supported!
3,499 downloads
-

SteamLauncher
By Lahma
SteamLauncher
A LaunchBox plugin designed to allow roms/emulators to easily be launched with Steam, directly from the LaunchBox/BigBox interface, without any complicated setup or technical know-how. Simply enable SteamLauncher and all LaunchBox/BigBox game/rom launches will be intercepted and launched via Steam. This will provide access to the Steam overlay, custom controller configurations, and will display the game/rom your are currently playing to any of your Steam friends.
Features
Here are a few of the features provided by SteamLauncher:
Allow LaunchBox to do what its good at - be the sole organizer and maintainer of your rom/game collection, without having to duplicate its functionality in Steam (something it was not designed for).
Keep the Steam library clean and uncluttered by hundreds of emulator/rom shortcuts.
Get all of the benefits of Steam's excellent overlay system while playing any rom or emulator.
Take advantage of Steam's infinitely customizable controller configuration (bindings) for both the Steam Controller and nearly all other DirectInput/XInput controllers.
Use per-rom/per-emulator/per-game controller configurations that are automatically remembered between gaming sessions (without having to create convoluted Steam shortcuts for every rom).
Bypass or improve upon many emulators' extremely limited controller bindings and hotkey options.
Share the game/rom currently being played with Steam friends (ex: JohnDoe is currently playing 'Super Metroid (SNES)').
Requirements
.NET Core 3.1 Steam for Windows LaunchBox/BigBox Getting Started
Installation
Download the latest plugin release from the LaunchBox forum plugin download page. This GitHub repository is meant as more of a resource for developers. While test builds and other pre-release packages may occassionally be posted on GitHub, the latest public release builds will always be posted on the LaunchBox forum plugin download page first:
LaunchBox Plugin Download: https://forums.launchbox-app.com/files/file/972-steamlauncher/
Extract the 'SteamLauncher' directory from the compressed package into your LaunchBox plugins directory.
Example: If LaunchBox is located at 'C:\LaunchBox', you would copy the 'SteamLauncher' directory to 'C:\LaunchBox\Plugins'. This would result in 'SteamLauncher.dll' and any additional files being inside the directory 'C:\LaunchBox\Plugins\SteamLauncher'.
How to Use
Note: Obviously, Steam must be running to launch games via Steam so one can either manually start Steam before opening LaunchBox/BigBox or SteamLauncher will automatically launch Steam when needed.
To launch a game/rom/emulator in LaunchBox/BigBox via Steam:
Ensure SteamLauncher is enabled by using 1 of the 2 following methods:
Selecting the 'Tools' menu item and clicking 'Use SteamLauncher'. When SteamLauncher is enabled the menu item will be labeled '(ON)'. This menu item can also be found in BigBox.
Selecting the 'Tools' menu item and clicking 'SteamLauncher Settings', resulting in the SteamLauncher settings dialog being displayed. By then checking the checkbox labeled 'Enable SteamLauncher' and clicking the 'Save' button, SteamLauncher will be enabled. The SteamLauncher settings dialog cannot be accessed in BigBox.
Once SteamLauncher is enabled, all games/roms/emulators will be intercepted by SteamLauncher and launched through Steam. Customize Platform Names
When games/roms are launched with SteamLauncher enabled, the title and platform of the game/rom will be displayed in one's Steam status in the format of: 'Game Title (Platform Name)'.
Example: Super Mario Bros. (Nintendo Entertainment System)
Friends on Steam will see this title in one's status whenever a particular game/rom is being played. If desired, the platform name displayed can be customized. For example, the platform 'Nintendo Entertainment System' can be changed to 'NES'. This customization can be performed by navigating to the 'Platform Names' tab in the SteamLauncher settings dialog.
Note: To entirely omit a platform name from one's Steam status, leave the 'Custom Platform Name' entry blank (as seen in the 'Windows' entry in the screenshot below).
Selective Use
The 'Selective Use' feature allows one to precisely customize the circumstances under which SteamLauncher will be enabled/disabled. The settings for this feature can be found in the 'Selective Use' tab in the SteamLauncher settings dialog.
Filter Mode
'Filter Mode' defines how the entries in the 'Filter List' will be applied.
Blacklist: SteamLauncher will always be enabled except when a matching filter is found. Whitelist: SteamLauncher will always be disabled except when a matching filter is found. Off: Disable the 'Selective Use' feature entirely. Filters List
The 'Filters List' is a list of user defined filters that control when SteamLauncher will be enabled/disabled.
Enable: This checkbox must be checked for a particular filter list entry to be enabled. If not checked, it will be completely ignored. Description: Used purely as a means of helping the user describe what the filter list entry does. It is entirely optional and has no impact on the actual functionality of the entry. Filter String: This is the string which is matched against the target 'Filter Type', dictating whether or not this entry matches a particular game title, platform name, etc. The filter string is not case sensitive and it supports 2 types of wildcards: '*' Wilcard: matches one or more of any character. '?' Wildcard: matches any single character. Filter Type: Dicates what field the 'Filter String' is compared against. The 'Filter Type' options are: Game Title: Title of the game or rom (ex: Celeste, Super Mario World, Donkey Kong Country, etc). Platform Name: Name of the platform (ex: Windows, Nintendo 64, Sony Playstation, etc). Emulator Title: Title of the emulator (ex: Retroarch, Dolphin, Cemu, etc). Exe Path: The path of the game or emulator EXE file (ex: 'C:\PC_Games\GOG\*', 'D:\*', '*\DOSBox\*', etc). Additional Application Name: Name of an 'Additional App' (a LaunchBox feature which allows you to specify additional commands to run for a game). Status: A field in LaunchBox's metadata for games (right click game, 'Edit' -> 'Edit Metadata') which specifies what platform/launcher/store a game was imported from (ex: '*Xbox*', '*Microsoft Store*', '*GOG*', etc). Ignore Custom Fields: Enabling this feature causes SteamLauncher to ignore all 'SLEnabled' custom field entries. What are 'SLEnabled' custom field entries? Right click on a game in LaunchBox, click 'Edit' -> 'Edit Metadata', and then select the 'Custom Fields' menu item. By adding a new entry named 'SLEnabled' and setting its value to '1' or '0', SteamLauncher can be made to always be enabled for this game (1) or always be disabled for this game (0). This custom field value will always take precedent over all other filtering features (filter strings, filter modes, etc). The only exception to this is when 'Ignore Custom Fields' is enabled (which will cause all 'SLEnabled' custom field entries to be ignored).
VTables 'Automatic Online Updates'
'Automatic Online Updates' of vtables definitions can be enabled/disabled in the 'Miscellaneous' tab of the SteamLauncher settings dialog. For SteamLauncher to properly work it has to access internal Steam features that are not meant to be accessed by developers outside of Valve. To access these undocumented, unexported functions, SteamLauncher uses a set of definitions which define what these functions are, their function signatures (their parameters, return values, and how to call them), and where to find them within the Steam client DLL. These definitions can change whenever Valve releases a new Steam update and if they change significantly, they can cause SteamLauncher to stop working correctly. In order for SteamLauncher to continue working properly, without the author manually patching the plugin and releasing a new SteamLauncher update every time this happens, an online database was created that can be updated when one of these changes happens, allowing SteamLauncher to continue functioning normally. If 'Automatic Online Updates' is enabled, SteamLauncher will automatically check for new updates every time LaunchBox/BigBox is launched. If new definitions are available, it will silently update and continue working normally. If automatic updates are not enabled, one can manually check for new updates by clicking the 'Force Update' button.
Support
If you have ANY problems with the plugin, I want to know about them. If you need help with any technical issue (see 'Logs'), want to suggest a new feature (I'm very open to any ideas), just want to chat, or anything else related to the plugin, visit the support thread at the link below. I am also available to chat on Steam for any urgent issues or if more direct help is needed.
Plugin Support Thread: https://forums.launchbox-app.com/topic/43142-steamlauncher/
Logs
To provide help with any technical problems or to investigate a bug, I will need a copy of the debug log that is generated whenever 'Log Level' is set to 'Verbose'. To enable and collect 'Verbose' debug logs, do the following:
Open the SteamLauncher settings dialog.
Click the dropdown box under 'Log Level' and select 'Verbose'.
Click the 'Save' button.
Restart LaunchBox/BigBox.
Now simply repeat whatever behavior was causing the issue and/or bug, and after you're sure you've replicated the behavior, close LaunchBox/BigBox.
Look inside of the SteamLauncher directory for a file named 'debug.log' (there may be more than one sequentially named log file if there was an enormous amount of output but this is unlikely if verbose logging was turned on just briefly).
Open this 'debug.log' file in a text editor, copy its entire contents, and paste/upload it to pastebin.com.
In the SteamLauncher support thread, provide the PasteBin URL, the details of the problem you encountered, and the particulars of your setup (Windows version, 32-bit or 64-bit, LaunchBox version, Steam version, SteamLauncher plugin version, etc). The more information the better.
Contact Information
Alias: Lahma
Email: lahma0@gmail.com
Steam Alias: lahma0
Friend me on Steam: You can click on my alias above or you can copy/paste the following URL into your address bar:
steam://friends/add/76561198237461630
GitHub Project URL: https://github.com/lahma0/SteamLauncher
LaunchBox Community Forums Profile: https://forums.launchbox-app.com/profile/89710-lahma/
Plugin Support Thread: https://forums.launchbox-app.com/topic/43142-steamlauncher/
Credits
ChippiHeppu: Logo
m4dengi: steamclient_tracker (unfortunately, no longer updated)
cammelspit: Help with developing the idea and direction for the project
Nielk1: Initial inspiration for the project and just a talented programmer to bounce ideas off of
Helpful members of the LaunchBox community: The_Keeper86, JedExodus, FromLostDays, HTPCei, Corgana, Benuno, Neil9000 (sorry for anyone I'm forgetting)
Known Issues
MAME Compatibility Fix
It has been observed that MAME crashes when launched through a non-Steam shortcut. This problem is not directly related to SteamLauncher, but since SteamLauncher relies on non-Steam shortcuts, launching MAME via SteamLauncher was no longer working. After a lot of investigation and tinkering by some dedicated users on the LaunchBox forums (cammelspit and JedExodus), a fix was eventually found for the issue. Whether launching MAME directly via a non-Steam shortcut or via SteamLauncher using LaunchBox/BigBox, the fix is simply to modify the launch parameters to include the following:
-joystickprovider xinput -keyboardprovider win32 If one of these parameters already exists when modifying MAME within LaunchBox, you will obviously need to replace it (don't just add a 2nd instance of '-joystickprovider' or '-keyboardprovider'). You can safely ignore any popups/warnings that LaunchBox displays about pause screen compatibility.
Legal Stuff
©2022 Valve Corporation. Steam and the Steam logo are trademarks and/or registered trademarks of Valve Corporation in the U.S. and/or other countries.
2,594 downloads
-
community COLORFUL resources
By viking
# WHAT IS COLORFUL?
COLORFUL is a complete and coherent high quality graphic set, around a unique design. Made with love in France. I hope you like it ! ?
Here are planned development axes:
OFFICIAL COLORFUL ASSET :
COLORFUL Theme : The main hub, a unique interface for BigBox. Design by me, coded by @faeran COLORFUL Platform Video : Complete 4K video set, with a unique design. COLORFUL Source : To involve the community in the platform video creation. COLORFUL BigBox Startup Video : custom video to match the general design. COLORFUL Hardware Media PNG (1x1) : Taken from my videos, the 1x1 PNG set. (new) COLORFUL Startup Theme : (soon) COLORFUL Pause Theme : (soon) RECOMMENDED COMMUNITY ASSET :
Redrawn Platform ClearLogo by @Dan Patrick Colorful "Playlist" PNG set by @Klopjero Colorful custom theme for Android by @Bawnanable Platform Funtech Super A'can & Platform Arcade Kaneko by @evo1man Alternative Colorful Platform ClearLogo Set by @soqueroeu Alternative Startup Theme (Minimal-Colorful) by @Palada Recommended SoundPack with Steam Deck UI by @Phox
# WANT TO CREATE VIDEO? YOU ARE IN THE RIGHT PLACE!
On this page we are talking about COLORFUL RESOURCES.
Have you considered creating a new Platform/Category/Playlist video for Colorful? This is the place to be! Done, by and for the community.
You will find below my guideline and quick tutorial. If you are tempted by the adventure, please respect the rules below! Thx !!
# READY FOR ADVENTURE? FOLLOW THE GUIDE!
Before we start going into the technique, let's set up some basics on how we're going to do it.
The idea is not to make me a tyrant, but to keep an overall coherence of design, style and to centralize uploads/downloads on a single page.
The basic principles :
On this Resources Page, you will find: 1 archive = 1 platform sources. (From me or from you) On the Platform Video Page, you will find: 1 file = 1 video. (From me or from you) Here are the rules to follow:
ONLY use this forum thread for ALL that concerns the video creation. Form start to finish. Please, not used the comment section below. Announced on what platform(s) you want to work. (New or rebuild) Post your work in progress! This is very important, to have feedback from community and me. Follow the guideline below. There can be several videos from the same platform. I will add your credits. But keep the same background color please, for theme integration. Don't be susceptible if we make comments. ? At the end, send me your video and source files. I will upload them to the corresponding pages, with your credits. Here, I will act as a moderator. The goal of all these rules is to keep the set consistent, allow the community to take part in creation and centralize everything for ease of use.
About software, I used Photoshop and After Effect in their old version (CS6) and without any plugin, to maximize compatibility with your systems.
You can use other software of course, but try not to use plugins.
# GUIDELINES?
I created these guidelines, based on my experience with NOSTALGIA.
They have a whole purpose and I ask you to respect them.
Here is the principle:
You can find these construction lines, as guides, in the Photoshop (.PSD) files, in each Platform archive.
The goal is to let the design breathe, while allowing great versatility of use. Whether in full screen, in 4:3 or 1:1, this video set remains usable.
I have created a theme around this set, but I hope it will not be the only one! A word for the wise ...
# WHAT ARE THE STEPS ?
Briefly, the steps I follow for each video.
Find photo sources for each element of the montage. I try to put the credits in each archive. Carry out the editing in Photoshop, keeping a layer structure common to each platform. From Photoshop, save each layer group in separate PNG files. Find a Gameplay video (EmuMovies for most) and the boot section (Youtube for most) Go to After Effect, gather everything in 4K and render a "master" video file. (understand heavy one) Use VidCoder to make my different outputs (4K h264 / 4K h265 / HD h264) and size compression. <UPDATE> A quick word for the arcade cabinet:
It's too hard to find good photo sources. So I made them all in full 3D (CGI).
If you have the knowledge, go there! Otherwise, I create my renderings so that they can be edited in Photoshop. ?
# IN DETAIL, PHOTOSHOP ?
I'm not going to do a beginner tutorial for Photoshop. Here's how I sort my slaps.
It would be good to respect this nomenclature, always to maintain consistency.
And post on this forum thread your work in progress !
Once the editing is finalized, I export these slaps in 4 PNG files, to go under After Effect. (see text in the left column above)
Why in PNG and not directly use the PSD? Because I noticed "more file corruption with the PSD. In the context of exchange with the community, the PNG is much more universal for people not using the Adobe suite.
# IN DETAIL, AFTER EFFECT ?
Here it is more difficult to explain yourself with words or pictures.
But here is the basic principle:
The Mask Layer will be used for the Gameplay video.
And post on this forum thread your work in progress !
I let you open the files to better understand. If the need arises, I will come and fill this part.
# IN DETAIL, VIDCODER ? (update aug 23, 2022)
To optimize the size of the videos and multiply the formats, I use the free and open-source VIDCODER. (also on Microsoft Store)
It is rather simple, allows batch processing, and as there are finally few "moving" elements in my videos, the optimization is pretty good.
I created and tested 3 profiles that you can import and use. Here they are : VidCoder_Viking_Setting_Update.zip
# AT THE END, SHARING !
Once finished, send me the files directly:
Video in the 3 export formats from VidCoder. Your source archive, trying to keep the same structure as mine. I take care of the conformation of the names, the addition of the credit, and the upload on the right pages.
Thank you in advance !
# SPECIAL THANKS :
@Jason Carr for his hard work on LaunchBox/BigBox! To all Patreon guys! A GIANT THANKS to all of you!!! ? The whote community for yout support! # SOURCES - COPYRIGHT :
Each brand of hardware and software here represented as a tribute. Emumovies for (most) gameplay videos The Vanamo Online Game Museum for (most) photos. If special credit, see .TXT file in the corresponding source archive. (soon) # PLATFORM COVERED / CREDITBOARD :
See video release post for more details !
18,534 downloads
-
Demul ROM extractor pack for MAME ROMs
By DOS76
Ok this was totally motivated by the fact that a lot of my Naomi ROMs no longer work in Demul due to needing newer ROMs so inspired by the All Killer No Filler .bat and .txt files that @lordmonkusposted I don't recall the original person who did the work but he gets credit for this also. I simply looked at the NoFiller .txt file and saw what was going on and basically did the same thing for all of the Naomi, NaomiGD, Naomi2, Naomi2GD, Hikaru, Gaelco and Sammy Atomiswave games. I hope people find it useful. I'm also thinking about making one of these for Sega Model 3 which I believe uses MAME ROMs.
4,261 downloads
-
ghoulsu.thumb.png.da61d2c6b6541902e25d67e18acc5096.png)
Mame HLSL ver 2
By Lordmonkus
This is a new version of HLSL settings I have been using recently and I find them much more "accurate" than my previous settings found here:
To use this simply enable HLSL in your mame.ini by setting hlsl_enable to 1 instead of 0 and dropping this raster.ini file into your \Mame\ini\presets folder. Backup your old one first just in case you do not like this one.
I do not take any credit for these settings at all. I got these from the youtube channel Big Blue Frontend and his custom 186 version of Mame he uploaded.
As always with shaders there are several factors that have an effect in how they look such as display type (TN vs IPS) size and resolution and of course personal preference.
2,884 downloads
-
Bulk Convert .cue/.bin (or files other than .bin) to .chd
By JoeViking245
Bulk Convert .cue/.bin (or files other than .bin) to .chd
Using MAME’s chdman.exe (“Compressed Hunks of Data (CHD) Manager”, included with MAME), this plugin will convert CD based game files to a single .chd file in your selected Platform. Example:
Before Loom (USA).cue Loom (USA).ccd Loom (USA).img Loom (USA).sub
After Loom (USA).chd
Before Arctic Thunder.cue Arctic Thunder.bin
After Arctic Thunder.chd
If you are looking to convert gdi or iso files (as well as cue) to CHD, see this plugin instead.
Bulk Convert cue/gdi/iso files to CHD - Third-party Apps and Plugins - LaunchBox Community Forums (launchbox-app.com)
Why convert?
You end up with just a single file per game A CHD file is, well… compressed. Resulting in less storage space requirements Arctic Thunder.cue + .bin = 601MB Arctic Thunder.chd = 466MB Spider-Man 2: Enter Electro = 684MB CHD format = 318MB Because we can and it's easy to do
Requirements
This plugin file chdman.exe (included with MAME) Game rom-sets that include a .cue file. (Loom (USA).cue, Arctic Thunder.cue etc.)
What happens after converting?
After successfully creating a CHD Image, the games application path will be changed to the new .chd file.
Also, after the files have been converted you have the option to
Leave the old files in place (default) Move the old files to a separate [backup] folder Delete the old files
Installing the plugin
Download the plugin Unblock “cue2chd (v1.00).zip” by right clicking the file and checking “Unblock” and clicking “OK”. Open the zip file and copy the contents (1 folder containing 1 file) into /LaunchBox/Plugins/ i.e. G:/LaunchBox/Plugins/cue2chd/cue2chd.dll
Using the plugin
Start LaunchBox Select Tools, Convert cue to chd Select a Platform Click Convert (Optional) Check Delete old files when complete This will permanently delete the old files (.cue, .bin, .img etc) after successfully converting them to .chd. Check Move old files when complete This will move the old files (.cue, .bin, .img etc) after successfully converting them to .chd to a folder you specify [for ‘backup’].
If you do not select Delete or Move, all files will remain in their current location along with the newly created .chd file.
If you opt to delete the old files and later want/need to convert the CHD files back to .cue etc., you can use chdman.exe to "reverse the process". The command line is:
chdman.exe extractcd -i “file_name.chd” -o “file_name.cue”
Special thanks to @faeran for coming up with the idea for this plugin and his support and testing.
As always, all comments and suggestions are welcome.
2,564 downloads
-

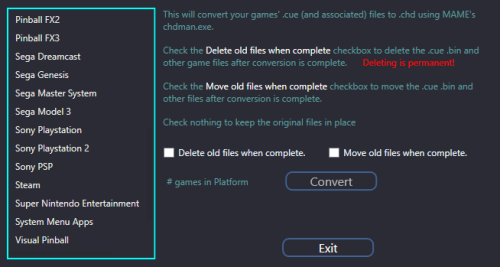
MAME Software Lists Import Tool - plugin
By JoeViking245
Use this plugin to filter and import MAME Software Lists into LaunchBox.
New - version 6.0
Requires LaunchBox 13.3 or newer* Slightly different look. Same old features. A lot of (behind the scenes) code improvement. This update has been rewritten in .NET 6.0 to “keep up with the times”. *If you’re using LaunchBox version 13.2 or older, download version 4.5 of the plugin.
(For now, at least) v4.5 will still work with LaunchBox 13.3 and newer.
Features:
Import MAME Console/Computer ROMs into a new or existing Platform Import clones as Additional Apps, separately or not at all (Option) Skip Prototypes (Option) Skip Non-Supported ROMs Adds the Platform and Command-line Parameter to the selected MAME emulator (ex. Atari 2600 a2600 -cart) (Option) Copy ROMs to a new folder during importing Imported games tagged as not supported by MAME will be marked as "Broken". (Option) Import only games that exist in your ROMs Source Folder (Option) Ignore games that only have a Title change (when updating) Version information found inside parenthesis in a Games Title will be added to the games "Version" (metadata)
Audit Feature: Compare your existing softlist console/Platform against the MAME hash.xml.
Will cross check Title and Rom names.
- Select the respective hash.xml and Platform
- Click Audit (last page)
- Any differences along with a brief description will be shown.
- Option to select files (if any) and have them removed from your LaunchBox Platform.
- Will check main Titles as well as Additional Apps (if you imported them that way).
This does NOT check rom integrity. That's between you and Clrmamepro (or related utility).
What's needed:
(1) dll file included in the zip. MAME Software List hash files (located in the "hash" sub folder of your Mame's main folder) MAME Software List ROMs* and BIOS files (only if you want to actually play them) *The rom set needs to be either a Split set or a Non-Merged set for a full import If you plan to not import clones, any type set will work.
What it won't do:
Filter/Sort by Region (it's a MAME hash file limitation) Determine if/what BIOS files are needed Import Metadata and Media (just use the built in LaunchBox Tool) To remove extra information from the games titles [Example "(Jpn)"], select Yes, download and replace all existing metadata and media when running the tool.)
How to:
- Copy the "ImportMameSoftwareLists" folder from the zip file to your ..\LaunchBox\Plugins folder.
- Navigate to that folder and unblock the .dll file. (Right click, Properties, and click Unblock)
- Start LaunchBox. Click on "Tools" and select "Import MAME Software Lists".
- Navigate through the wizard.
- After running the plugin, right-click your new platform and select Edit. Set Scrape-as to whatever your platform is and save.
Notes:
ROM Folder Locations (screen): The Destination Folder is required even if you don't plan to copy the files. It's needed to set up the Application Path for the ROMs when Importing.
Copy and/or Import (screen): To add Version info (if it exists in the Games Title) to an existing console (Platform), run the plugin and DO NOT CHECK Ignore games that only have a Title change (when updating)
Selecting an emulator:
The main intent of this plugin is to import consoles and computers using MAME softlist ROMs and set the games "proper" Title and application path. It will also attempt to add the appropriate Command-line Parameter for the platform in MAME’s Associated Platforms.
If you prefer to use an emulator that can load MAME ROMs other than MAME (or a variant there-of), go for it. It’s recommended to select MAME while using the importer, and then change the Default Emulator when done importing.
You can select the 'other' emulator in the plugin, and it will be set as the default for the platform. But it will also have the default command line parameters for the associated platform set using MAME parameters. So be sure to adjust as necessary.
Importing:
(optional) "Import games that only exist in the ROMs Source Folder"
If using a Merged softlist set, clones will not get imported using this option. But if you have a curated Split set, this can be handy.
(optional) "Ignore games that only have a Title change (when updating)"
If you manually renamed your game titles, check this box.
Updating:
If you’ve updated your MAME emulator and MAME softlist ROMs, simply run the importer and point to the updated hash file and select your existing platform.
When updating, this plugin will NOT remove any games from your collection that MAME has removed from the hash file(s). You can use Audit to compare your collection to the MAME hash file and manually remove games from your collection that don't exist in the hash file (if you so desire).
Downloading Metadata:
After running the plugin, right-click your new platform and select Edit. Set Scrape-as to whatever your platform is and save.
When downloading metadata and Media, choose "Yes, download and replace all existing metadata and media". This will remove the Version info from the games Title.
After updating the metadata, if some, but not all games got updated, restart LaunchBox and try the bulk metadata downloader again.
Auditing:
When auditing, if a game originally had the version info in its Title and you have ran the Download Metadata and Media wizard selecting "Yes, download and replace all existing metadata and media", you WILL see games marked as Missing.
* MESS xml *
Other Notes: (things I've learned)
- Software List folder/file locations:
- *Associated Platform Command line parameters
- MAME and CDROMS
2,464 downloads
-
Archive Cache Manager
By fraganator
A LaunchBox plugin which caches extracted ROM archives, letting you play games faster. Also allows launching individual files from archives, and loading preferred file types from an archive.
New in v2.16
New M3U name option - "Disc 1 Filename" Always use the filename of the first disc of a multi-disc game for the m3u file, regardless of which disc was launched Allows better support for The Bezel Project config files, which use config files based on the ROM name New batch caching option to pause on caching errors (default is to skip and continue) Minor config window tweaks Description
When a compressed ROM (zip, 7z, rar, gz, chd, rvz, etc.) is first extracted, it is stored in the archive cache. The next time it is played, the game is loaded directly from the cache, virtually eliminating wait time.
As the cache size approaches the maximum size, the oldest played games are deleted from the cache, making room for new games.
Features
Skip the extraction wait time for recently played games. Configurable cache size and location. Configurable minimum archive size (don't cache small archives). Option to extract all discs in a multi-disc game, and generate M3U file. Option to copy ROM files to cache without extraction. Option to keep select ROMs cached and ready to play. Select and play individual ROMs from a merged ROM archive. Batch cache feature for extracting or copying multiple games to cache at once. Filename and extension priorities per emulator and platform (cue, bin, iso, etc). Support for additional archive formats (chd, rvz, etc) Support for Xbox iso to xiso conversion Badge to indicate cached games Example Use Cases
Why use Archive Cache Manager? Here's some example use cases.
ROMs located on NAS or external storage, where disk read or transfer time is slow. ROM library maintained as accurately ripped/dumped collections, where specialised compression formats not an option. Extract and play archives from location other than LaunchBox\ThirdParty\7-Zip\Temp, such as platform specific folder (for RetroArch Content Directory settings). Playing ripped PS2 games with PCSX2 where the disc image is bin/cue format, avoiding the "CDVD plugin failed to open" error message. Playing zipped MSU versions of games, where need to launch the rom file instead of the cue file from the archive. The library contains GoodMerged sets, and you want a quick way to play individual ROMs. Installation
Download the latest release from https://forums.launchbox-app.com/files/file/234-archive-cache-manager/ or https://github.com/fraganator/archive-cache-manager/releases Unblock the download if necessary (right-click file -> Properties -> Unblock) Extract this archive to your LaunchBox\Plugins folder, then run LaunchBox / BigBox. Within LaunchBox, ensure the emulator or emulator platform has the "Extract ROM archives before running" option checked. Uninstallation
Quit LaunchBox / BigBox, then navigate to the LaunchBox\Plugins folder and delete ArchiveCacheManager. Delete the archive cache folder (default is LaunchBox\ArchiveCache). Usage
Extracting and Caching
Archive Cache Manager runs transparently to the user. All that is required is the emulator or emulator platform has the "Extract ROM archives before running" option checked. Extraction and cache management is carried out automatically when a game is launched.
Cache and extraction behaviour can be modified in plugin's configuration window.
Multi-Disc Games
To use the multi-disc cache feature, check the "Multi-disc Support" option in the Archive Cache Manager config window. The next time a multi-disc game is launched, all the discs from the game will be extracted to the cache and a corresponding M3U file generated.
If the emulator \ platform supports M3U files (as configured in LaunchBox), the generated M3U file will be used when launching the game. Otherwise a single disc will be launched, and swapping between cached discs can be done manually in the emulator.
Batch Caching Games
Multiple games can be cached at once using the Batch Cache Games window. Select one or more games in LaunchBox, then right-click a game and choose the "Batch Cache Games..." option.
A window will popup displaying the list of games, and begin checking the extracted ROM sizes. Once the checks are complete, click the Cache Games button to begin caching.
Games are cached according to the plugin's emulator and platform settings. A game may be extracted, copied, or no action taken if it doesn't match a caching rule, or it's already cached.
Each game's caching progress will be displayed in the Status column, and a progress bar at the bottom of the game list shows the overall caching progress. If an error occurs during caching, it will be flagged in the Status column and caching will skip to the next game. If the "Pause Caching On Error" is checked, an error message is displayed with the option to continue or stop.
Tip: For games stored on a NAS or an external drive, use Batch Cache Games to cache a selection of them locally. Enable the plugin's Always Bypass LaunchBox Path Check option to allow the cached game to be launched directly, even if the network or external drive is disconnected!
Selecting and Playing Individual ROMs From an Archive
To play an individual ROM from an archive containing multiple ROMs (different regions, hacks, or discs), right-click it and choose "Select ROM In Archive...".
A window will popup with a full listing of the archive contents. Select the desired ROM file, then click Play. That ROM will now launch with the configured emulator.
The next time the game is launched via the normal Play option, the previous ROM selection will be automatically applied. To select another ROM, use the same "Select ROM In Archive..." menu.
The same menu is also available in BigBox, though currently only supports keyboard input.
Keeping Games Cached
Games can be marked 'Keep' so they stay cached and ready to play. To keep a game cached, open the plugin configuration window from the Tools->Archive Cache Manager menu. From there a list of games in the cache is shown. Check the Keep box next to the game, then click OK.
Badge
The plugin includes a badge to indicate if a game is currently in the cache. It is available under the Badges->Plugin Badges->Enable Archive Cached menu. There are additional Simple White and Neon style badges, which can be found in the LaunchBox\Plugins\ArchiveCacheManager\Badges folder. Copy your preferred icon to the LaunchBox\Images\Badges folder and rename it Archive Cached.png.
Configuration
Configuration can be accessed from the Tools->Archive Cache Manager menu. An overview of each of the configuration screens and options is below.
Cache Settings
This page shows a summary of the cache storage and currently cached items, and provides options for cache configuration.
Configure Cache
Clicking the Configure Cache... button opens the cache configuration window.
Configure Cache - Cache Path
This is the path of the cache on disk. The path can be absolute or relative, where relative paths are to the LaunchBox root folder.
Default: ArchiveCache
If the cache path is set to an invalid location (LaunchBox root for example), an error message will be displayed when clicking OK.
If the cache path is set to an existing path that already contains files or folders, a warning will be displayed when clicking OK. Click Yes to proceed, or No to go back and change the path.
Configure Cache - Cache Size
This is the maximum cache size on disk in megabytes. The oldest played games will be deleted from the cache when it reaches this size.
Default: 20,000 MB (20 GB)
Configure Cache - Minimum Archive Size
This is the minimum size in megabytes of an uncompressed archive before it will be added to the cache. Archives smaller than this won't be added to the cache.
Default: 100 MB
Keep
A Keep flag can be applied to a cached item. When set, the item will be excluded from cache management and not be removed from the cache. This is useful for less frequently played games which need to load without waiting (very large games, party games, favourites, children's games, etc).
Default: Disabled
Open In Explorer
Clicking the Open In Explorer button will open the configured cache path in Windows Explorer. This button is disabled if the cache path does not exist.
Refresh
Refreshes the cache summary and list of cached items from disk.
Delete
Clicking on the Delete button will remove the selected items from the cache (including items with the Keep setting).
Delete All
Clicking on the Delete All button will delete everything from the cache (including items with the Keep setting).
Extraction Settings
This page provides settings for archive extraction and launch behviour. Each row in the table applies to the specified emulator \ platform pair. If a game is launched which doesn't match an emulator \ platform, the settings in All \ All will be used.
Emulator \ Platform
The specific emulator and platform for the settings to be applied to. Add a new emulator and platform row using the Add... button. Remove an emulator \ platform row using the Delete button.
When a new row is added its settings will be copied from the All \ All entry, except for Priority which will be blank.
Priority
Files from an archive can be prioritized in the case where an emulator requires a certain filename or file type. This setting defines the filename or extension priority for the specified emulator and platform combination.
The priorities are a comma delimited list, where the highest priority is the first entry, the next highest priority is the second entry, and so on. If a match is not found in the archive when a game is loaded, the priority in All \ All is used.
A wildcard (*) can be used to perform partial filename matches. Examples include:
bin, iso - Files ending with bin, then files ending in iso, then all other files. eboot.bin - Files named eboot.bin, then all other files. *(*E*)*[!].*, *(*U*)*[!].*, *[!].* - GoodMerged style, prioritizing European 'good' ROM dumps, then USA 'good' ROM dumps, then other region 'good' ROM dumps, then all other files. Note that the priority is applied to all archives, even if they are not cached.
The fallback All \ All priority is the basis for the contents of the multi-disc M3U file generation. Be careful removing entries such as cue, unless a specific emulator \ platform is used to handle cue and similar file types.
Default:
All \ All | mds, gdi, cue, eboot.bin PCSX2 \ Sony Playstation 2 | bin, iso Action
The action to take when processing a ROM file.
Extract - Extract an archive to the cache. Non-archive files will be passed directly to the emulator. Copy - Copy the game file to the cache. Archive files will copied, but not extracted. Extract or Copy - If the game file is an archive, extract it to the cache. Otherwise copy the game file to the cache. Default: Extract
Launch Path
The path within the cache to launch the game from. Useful for managing common settings in RetroArch which are based on the game's folder.
Default - The archive folder in the cache, which is in the form <Filename> - <MD5 Hash> Title - The game's title set in LaunchBox (e.g. Final Fantasy VII) Platform - The game's platform set in LaunchBox (e.g. Sony Playstation) Emulator - The emulator title set in LaunchBox (e.g. RetroArch) Games will always be extracted \ copied to the <Filename> - <MD5 Hash> location. If the Launch Path is set to something other than Default, the corresponding folder will be created within the cache, and NTFS hardlinks will be created which point to the extracted \ copied files.
Default: Default
Multi-Disc
Check this option to enable multi-disc support. When enabled, the following actions occur when playing a multi-disc game:
All discs from a multi-disc game will be extracted \ copied and added to the archive cache. M3U files will be generated, with the name based on the M3U Name setting. The M3U contents will list the absolute path to one cached file per disc, where the file is chosen based on the emulator \ platform file priority, or the special All \ All priority. If the emulator \ platform supports M3U files, the generated M3U file will be used when launching the game. Default: Enabled
M3U Name
The name of the M3U file created when launching a multi-disc game, and Multi-Disc is enabled. The M3U file name is used by some emulators to create a save file and match settings.
Game ID - The unique ID for a game, generated by LaunchBox. This is the same M3U naming convention used by LaunchBox (e.g. 2828d969-4362-49d5-b080-c2b7cc6f7d59.m3u) Title + Version - The game's title and version combined, with (Disc N) removed from the version (e.g. Final Fantasy VII (Europe).m3u) Disc 1 Filename - Use the filename of the first disc as the name of the M3U, regardless of which disc was launched (e.g. Final Fantasy VII (Europe) (Disc 1).m3u). Allows for The Bezel Project support, while maintaining a consistent name for emulators to manage save files across multiple discs. Default: Game ID
Smart Extract
Check this option to enable smart extraction, which will only extract a single file from an archive if a number of rules are met. See the Smart Extract Settings section for details.
Default: Enabled
chdman
Check this option to extract a chd file to cue+bin files using chdman. The executable chdman.exe must be copied to the folder LaunchBox\Plugins\ArchiveCacheManager\Extractors.
Default Disabled
DolphinTool
Check this option to extract rvz, wia, and gcz files to iso files using DolphinTool. The executable DolphinTool.exe must be copied to the folder LaunchBox\Plugins\ArchiveCacheManager\Extractors.
Default Disabled
extract-xiso
Check this option to extract and convert full iso files to Xbox iso files using extract-xiso. Supports both zipped and stand-alone iso files. The executable extract-xiso.exe must be copied to the folder LaunchBox\Plugins\ArchiveCacheManager\Extractors.
Default Disabled
Smart Extract Settings
When enabled, the Smart Extract option will check if it's possible to extract only a single file from an archive. For merged archives containing multiple ROM versions and hacks, this avoids the need to extract a potentially large number of files to play a single game.
Smart Extract will extract and launch a single file from an archive if the following conditions are met:
All of the file types in an archive are the same, excluding files with Metadata Extensions.
OR
All of the file types in an archive are Stand-alone ROMs, excluding files with Metadata Extensions.
The file to extract will be (in priority order):
The individual file selected through the "Select ROM in Archive..." right-click menu. The first file which matches a configured Priority. The first file in the archive. Stand-alone ROM Extensions
A comma delimited list of file extensions which can run stand-alone (no dependencies on other files).
Default: gb, gbc, gba, agb, nes, fds, smc, sfc, n64, z64, v64, ndd, md, smd, gen, iso, chd, gg, gcm, 32x, bin
Metadata Extensions
A comma delimited list of file extensions which indicate ROM metadata, and aren't required to play a ROM file.
Default: nfo, txt, dat, xml, json
Plugin Settings
Always Bypass LaunchBox Path Check
When enabled, bypasses LaunchBox's check that a game's application path (ROM file) exists before launch. If a game is cached and the source ROM storage is slow or unavailable, the game will still launch immediately.
The bypass check happens automatically if the extract action is Copy, or the file is not zip, 7z, or rar.
Default: Disabled
Check For Updates On Startup
Enable this option to check for plugin updates when LaunchBox starts up. This is a simple version check of the latest release on github, and nothing is automatically downloaded or installed. If a new update is found a message box will appear shortly after LaunchBox is started, with the option to open the download page in a browser.
Default: On first run, a message box will appear asking the user if they'd like to enable the update check.
Source Code
This plugin is open source, and can be found on github: https://github.com/fraganator/archive-cache-manager
1,238 downloads
-
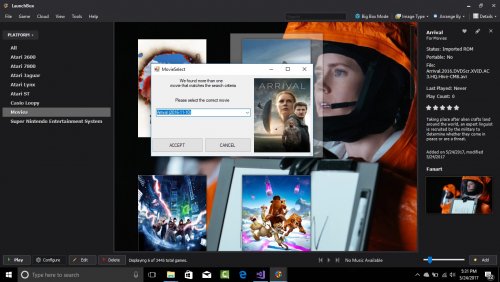
Movie Scraper Plugin
By slipsystem
Downloads Information and Images for Movies.
Thanks to @superfurry for the insperation(he created the Movie Launcher in this thread)
thanks to @Nielk1 for assistance with the forms, you do amazing work and are always there to lend a hand.
this Plugin uses the Fanart.TV Api and omdbapi to scrape images and details.
simply add movies to your LaunchBox collection.
Right Click on the Movie or Multiple Movies
Select Scrape Movie.
you may need to hit f5 to refresh the images.
you can find this sourcecode and others at
https://github.com/slipsystem/LaunchBox-Plugin-Examples
BUY ME A BEER
2,574 downloads
-

Steam Scraper
By srxz
Plugin that scrapes Steam Information, banner, screenshots and video to a selected game.
Requirements: Launchbox 8.8+
Install: Extract the content of zip file to : Launchbox/plugins/SteamScraper
Source code: Github (feel free to make a pull request )
Thanks to:
@fawkesyeah for the extensive testing
@CriticalCid for Ideas.
EDIT
If you have trouble running the plugin and crashing due CAS error, please right click on the DLL's , properties and then unblock.
Usage:
Just paste the Steam URL from the game that you need to scrape information.
Video Tutorial:
If you want to add Additional Custom fields and Tags please edit the properties.json :
Note: This will generate a LOT of tags, I advise to hide it if you are going to use it. (Legacy Settings -> Game Details -> Disable Custom Fields)
Also if you have the SteamDB or SteamSpy Link only you can use it to get the Steam metadata as well, the regex works just remind to put the / on the final url just like this:
BUT THIS WONT GET INFO FROM THE RESPECTIVELY WEBSITES, IT WILL GO TO STEAM ANYWAYS.
1,710 downloads
-
Philips CD-i to .CHD Batch Converter
By harryoke
Philips CD-i (cue/bin) format to .CHD converter
I have automated the process.
Usage: simply place the extracted files into your Philips CD-i games folder.
Launch RUN ME.bat
And every bin file in the folder will be converted to .CHD format ready for loading into MESS.
2,804 downloads
-
importer Flashpoint Importer for Launchers
By oblivioncth
FIL (Flashpoint Importer for Launchers)
FIL is an importer tool for several launchers/frontends that allows one to add platforms and playlists from BlueMaxima's Flashpoint project to their collection. It is fully automated and only requires the user to provide the paths to their launcher and Flashpoint installs, choose which Platforms/Playlists they wish to import, and select between a few import mode options. Once the import is started the current progress is displayed and any errors that occur are shown to the user, with resolvable errors including a prompt for what the user would like to do. After the process has completed, the specified launcher can be started and the games from Flashpoint can be played like those from any other Platform.
For Platforms, the importer is capable of importing each game/animation along with any additional apps, images, and most of the metadata fields (i.e. Title, Description, etc, see below).
Function
This utility makes use of its sister project CLIFp (Command-line Interface for Flashpoint) to allow launchers to actually start and exit the games correctly. It is automatically deployed into your Flashpoint installation (updated if necessary) at the end of a successful import and the latest version of CLIFp will be included in each release of this utility so it is not generally something the end-user needs to concern themselves with.
Before making any changes to your collection, any datafiles that will be altered are automatically backed up (only one backup is maintained at once so any previous backup will be overwritten) and if any unrecoverable errors occur during the import any partial changes are reverted and the backups are restored; however, it is strongly suggested that you consider making a manual backup of your launcher's configuration to be safe. No responsibility is held for the loss of data due to use of this tool.
FIL can safely be used multiple times on the same collection to update the selected Platforms and Playlists if that have already been imported previously. The method with which to handle existing entries is selected within the program before each import.
The import time will vary, correlated with how many Platforms/Playlists you have selected, but more significantly the image mode you choose, which is expanded on later. Importing the entire collection usually takes 5-10 minutes with the recommended settings but can take longer with a more basic PC. The vast majority of the processing time is due to the plethora of images that have to be copied/symlinked when games processed so the speed of your storage device is the most significant factor. Running the importer for updates should be significantly faster it first checks to see if the source image from the new import source is actually different than your current one before copying/linking it.
You will still be able to use the standard Flashpoint launcher as normal after completing an import.
Compatability
Flashpoint Infinity/Flashpoint Ultimate
This tool was made with the express purpose of using it with Flashpoint Ultimate (i.e. all games/animations pre-downloaded), but since the 0.2 rewrite of CLIFp it should work with Infinity as well. Just note that use with Infinity is not tested as rigorously.
General
While testing for 100% compatibility is infeasible given the size of Flashpoint, OFILb was designed with full compatibility in mind.
The ":message:" feature of Flashpoint, commonly used to automatically show usage instructions for some games before they are started, is supported. The entries that use it are added as additional-apps to their respective games as they once were when Flashpoint came packaged with LaunchBox. All messages are displayed in a pop-up dialog via CLIFp.
Viewing extras (which are simply a folder) is also supported and the corresponding additional apps that open these folders will be added when importing a platform.
Since Flashpoint originally used LaunchBox as its launcher, most fields within Flashpoint have a one-to-one equivalent (or close enough equivalent) LaunchBox field. That being said there are a few fields that are unique to Flashpoint that do not have matching field and so they are simply excluded during the import, resulting in a relatively minor loss of information for each game in your collection.
Version Matching
Supported Launchers
LaunchBox AttractMode Flashpoint
While testing for 100% compatibility is infeasible given the size of Flashpoint, FIL was designed with full compatibility in mind.
The ":message:" feature of Flashpoint, commonly used to automatically show usage instructions for some games before they are started, is supported. The entries that use it are added as additional-apps to their respective games as they once were when Flashpoint came packaged with LaunchBox. All messages are displayed in a pop-up dialog via CLIFp.
Viewing extras (which are simply a folder) is also supported and the corresponding additional apps that open these folders will be added when importing a platform.
Each metadata field (i.e. Title, Author, etc.) is matched to the closest equivalent of a given launcher, or a custom field if there is no near equivalent and the launcher supports them; otherwise, the field will be omitted.
Both Flashpoint Ultimate and Flashpoint Infinity are supported.
Version Matching
Each release of this application targets a specific version series of BlueMaxima's Flashpoint, which are composed of a major and minor version number, and are designed to work with all Flashpoint updates within that series. For example, a FIL release that targets Flashpoint 10.1 is intended to be used with any version of flashpoint that fits the scheme 10.1.x.x, such as 10.1, 10.1.0.3, 10.1.2, etc, but not 10.2.
Using a version of FIL that does not target the version of Flashpoint you wish to use it with is highly discouraged as some features may not work correctly or at all and in some cases the utility may fail to function entirely or even damage the Flashpoint install it is used with.
Please see the project's releases page on GitHub to check which tool version targets which Flashpoint version.
Metadata Fields
Currently the following fields in LaunchBox will be populated for each game, which is limited by what is available within Flashpoint:
Title Series Developer Publisher Platform Sort Title Date Added Date Modified Broken Flag Play Mode Status Notes Source Release Date Version Library Language (as a Custom Field) Usage
Please check the usage section for the tool on its GitHub page. It's easier to keep the instructions up to date when they are in one location.
If you have a bug or feature request I ask that you submit an issue on the GitHub page for this tool, but if you just want to ask a question, discuss the tool in general, or are having issues getting it working for reasons you don't think are due to a bug then please just make a post here. Since sometimes the line between the two can be blurry don't feel afraid to use the wrong system, it isn't a huge deal.
GitHub
FIL: https://github.com/oblivioncth/OFILb
CLIFp: https://github.com/oblivioncth/CLIFp
640 downloads
- flash games
- flashpoint
- (and 3 more)
-
Vidsnap Scraper
By maikeru1986
DISCLAIMER: Use at your own risk! Please read and understand Youtube's terms of service. I will not be held liable for any mis-use of any product or service.
This plugin makes use of the open source and unlicensed application, youtube-dl yt-dlp (forked from youtube-dl) to download game videos.
It first downloads videos from the link provided in the metadata from LaunchBox, skipping videos longer than a specified duration, and then searching for videos for missing games based on input search terms.
It is intended for Modern Windows games as this was my need initially. It may work on other platforms but is not well tested.
Installation Instructions:
Note: For this plugin to work, you will need to have yt-dlp.exe (included in .zip). Extract the contents of the .zip folder and place it in your LaunchBox plugins folder.
Usage Instructions:
Select a game or multiple games, right-click and select "Download Video Snap."
Adjust the maximum duration if desired.
The "Get Missing videos" checkbox sets whether or not to search for videos of games that don't have URL's in their metadata.
The "Trim videos" checkbox sets whether or not to trim videos after it has been downloaded.
Enter desired search terms for Missing videos.
click "Start" to start the download process.
Games will download asynchronously. resuming downloads is also supported natively.
Known Issues:
probably many that I am unaware of.
Other:
PLEASE NOTE: I AM NOT A DEVELOPER! I know very little about C# and programming in general, thus probably wont be able to address many issues that you may face. That being said I will try and fix things were I can. I've provided the spagetti source code for anyone to modify, improve, etc. (it seems you need to unblock the forms in the "Resources" folder -> RMB->properties->unblock)
As of now, i'm more comfortable with the usability of the plugin, however there are still probably many issues, any comments to provide insight/improvement to the code etc. would be much appreciated.
Thanks to @srxz for his source of Youtube Scraper of which this is based.
Thanks:
@srxz @JoeViking245 @C-Beats
maikeru86
2,197 downloads
-
Startup Video Manager
By UnderwoodNC
***** Now Supporting Random Startup Videos *****
Startup Video Manager: A plugin to manage Startup videos for the user through a clean, simple interface.
About the Plugin
This plugin provides a menu item that will open a window to allow users to manage their startup videos, and optionally, to activate random startup videos. Random startup videos will be switched out as LaunchBox closes and Big Box opens.
New and Returning Features:
Reads from a "Startups" folder in LaunchBox\Videos to let the user select their desired startup video. Clicking "Preview" will let the user preview the selected Startup video through a custom VLC player with options for play/pause/stop, forward and backward, volume control and full-screen viewing. Double-clicking the video will also take you to and from fullscreen viewing. Pressing Esc while in fullscreen will also take you back to the normal view. Another way to get back while in fullscreen is to move the mouse to the bottom of the screen where a menu with the video name and a back button will appear. Copies the selected video in LaunchBox\VIdeos\Startups to LaunchBox\Videos and renames it to startup.mp4 so that BigBox will recognize it. Before replacing your existing startup.mp4 file, it checks to see whether or not your current startup.mp4 exists in the Startups folder. If not, it will copy your current startup.mp4 to the Startups folder, adding the Unix timestamp to the filename, to make sure you do not lose any startup video you may not have backed up. New in 2.0.0: Optionally lets the user select Randomize Startup Videos to have the plugin randomly select a startup video and adjust the minimum startup duration each time Big Box is started from LaunchBox. New in 2.0.0: With my system, I found that I needed to slightly tweak the minimum startup time from the actual length of the video. If you find you need to do this as well, in PluginConfig.xml for this that will be covered below. New in 2.1.0: Optionally lets the user update a configuration setting to match their actual load time of Big Box so that random videos will be limited to videos that are at least that long (no looping video on startup). Installation Instructions
If you have the old version, BigBoxStartupSelector, delete that folder and unzip the new folder into the LaunchBox\Plugins folder. Create a folder named Startups in the LaunchBox\Videos folder and move all of your startup videos there. You may rename the startup videos in this folder to whatever name you prefer to help you remember each video. Optional Configuration
These optional configuration settings can be applied by opening the included PluginConfig.xml in your favorite text editor and changing the appropriate number.
StartupTimeOffsetInSeconds: In my case, I found that when setting the Minimum Startup Video Duration to the actual length of the video, even for longer videos, caused the video to start to loop for about a couple seconds. To accommodate this, you can tweak the number of seconds being set as the minimum startup duration for videos through this configuration setting. I had to adjust mine by -2 seconds, but this is 0 by default, which will set the minimum startup duration to the actual length of the video. If you notice that after setting a video through this tool, the video either stops early or starts to loop, you can set this time to adjust all videos accordingly.
ActualStartupTimeInSeconds: This setting only applies to randomly-selected videos. If you set this to something other than the default of 0, only videos with at least this startup time will be considered for random selection. How to find out your actual startup time? Get the stopwatch app on your phone ready, go into the Big Box options and set Minimum Startup Video Duration to "No Delay". Now go back to LaunchBox, and as soon as you click to switch back to Big Box mode, start the stopwatch. Stop the stopwatch as soon as Big Box has finished loading. That time, rounded to the nearest second, is the value you should put as your actual startup time. But again, this only applies to randomly-selected videos. If you leave it as the default of 0, all videos will be considered for randomization, but you may have looping if the randomly-selected video is shorter than your actual load time.
Usage Instructions
Open LaunchBox or BigBox and browse to the Startup Video Manager plugin. Choose the Startup Video you would like to set, then if desired, click Preview to watch the video and make sure that's the one you want. If you'd like random startup videos going forward, make sure to check Randomize Startup Videos in the bottom-left corner. Note: the random selection setting saves as soon as you check or uncheck it. You can click Cancel or close the window from there. The Save button is only if you want to manually select a video to set as your startup video. Once you've decided on a video, click Save and the magic will happen. Otherwise, click Cancel. Enjoy! Please let me know if you run into any issues. Special thanks to angelobodetti for the random startup video idea!
Thanks, Jason, for providing your amazing software and thanks again to Jason, the LaunchBox staff and the community for your support in developing this plugin.
868 downloads
- plugin
- startup video
- (and 1 more)
-
Launchbox-RetroPie-Batocera-Miyoo Export
By dingodan
Launchbox is great, but it doesn't run on linux. RetroPie is great, but the scraper is terrible. This script will copy your roms, metadata and images from LaunchBox for use with RetroPie (or Batocera/Miyoo). If desired, it will also reduce the size of the copied images to make them load faster on the Pi. Edit the attached file to choose your platforms, and decide if you want everything, or only your favourites.
If selecting Batocera XML format it will attempt to copy the first box art, marquee, screenshot and video file for each of your titles.
If selecting the Miyoo Onion OS XML format the gamelists will be called miyoogamelist.xml and the boxart will be reduced to 250px and converted to PNG. See their github for more info.
How to Install:
Download and install Python Choose All Users and add it to your Path Open cmd, and type 'pip install Pillow' Download the attached file and edit it accordingly (specify your LaunchBox folder, desired output folder and platforms) Run 'python launchbox_retropie_export.py' Transfer the files to your Pi using WinSCP or similar Copy the gamelists, roms and images to /home/pi/RetroPie/roms Enable the 'Parse Gamelists Only' option in EmulationStation730 downloads
-
RetroAchievement Badges
By JoeViking245
RetroAchievement Badges
What does this plugin do?
Adds “RetroAchievement” Badges to games that support RetroAchievements.
(See complete list of games here: https://retroachievements.org/gameList.php)
Why?
Because some people wanted it.
April 24, 2023
Version 2.3.5 will be the last update for this plugin.
As of LaunchBox version 13.2 (Feb. 27, 2023), Achievement Badges are now supported. (Includes RetroAchievements, Steam and GOG achievements)
To enable: click the hamburger menu, select View, Badges, Game Attributes, Enable Achievements.
How to install the plugin:
Download RetroAchBadge v2.x.x.zip UnBlock the zip file. Right click the file, select “Properties” and check the box that says ‘Unblock’ [or something along those lines] Click OK to close the Properties window Open the zip file Copy the folder “RetroAchBadge” into your “/LaunchBox/Plugins/” folder Start LaunchBox Select Tools Select RetroAchievements Badge Updater (Internet connection required) Click Start Update and Wait for the Updater to complete. (This may take up to 1 minute.)
How to see the badges:
Start LaunchBox (not necessary if you just completed the Install - steps 1 through 9) Click BADGES Select Plugin Badges 'Check’ Enable Retroachievements
How to add or remove the badge from a game:
Right click the game and select "RetroAchievements Badge"
How to get updates for new games added to RetroAchievements:
In LaunchBox, Select Tools Select RetroAchievements Badge Updater (Internet connection required) If you added or removed RetroAchievement badges for specific games, those games will remain added or removed after running the Updater. To reset the games that have been added/removed, delete the files Added.xml and Removed.xml located in the plugins folder and rerun the Updater.
A word about Platform names:
Some of the Platform names used by RetroAchievements are different than the default names used in LaunchBox. When using the Badge Updater, it will ‘convert’ these to the default names.
Examples: “Mega Drive” gets changed to "Sega Genesis". “SNES” to "Super Nintendo Entertainment System". "Game Boy" to "Nintendo Game Boy".
This plugin will not rename any of your existing Platforms.
When checking for badges, the plugin will check your Platforms Scrape As setting as well as the Platform name.
Example: If you named your Platform "Game Boy" and Scrape As is set to "Nintendo Game Boy", badges will show for that Platform.
Platform names that get changed:
From To
"Mega Drive" "Sega Genesis"
"SNES" "Super Nintendo Entertainment System"
"Game Boy" "Nintendo Game Boy"
"Game Boy Advance" "Nintendo Game Boy Advance"
"Game Boy Color" "Nintendo Game Boy Color"
"NES" "Nintendo Entertainment System"
"32X" "Sega 32X"
"Master System" "Sega Master System"
"PlayStation" "Sony Playstation"
"Game Gear" "Sega Game Gear"
"Virtual Boy" "Nintendo Virtual Boy"
"MSX" "Microsoft MSX"
"SG-1000" "Sega SG-1000"
"Saturn" "Sega Saturn"
"Intellivision" "Mattel Intellivision"
"Vectrex" "GCE Vectrex"
"PC-8000_8800" "NEC PC-8801"
"PC-9800" "NEC PC-9801"
"PC-FX" "NEC PC-FX"
"Dreamcast" "Sega Dreamcast"
"PlayStation Portable" "Sony PSP"
"PC Engine" "NEC TurboGrafx-16"
Changing the default icon:
If you wish to use a different Badge icon, replace “\LaunchBox\Images\Badges\RABadge001.png” with your own image.
Known Issues:
Game titles are taken directly from RetroAchievements and may differ (slightly or a lot) from yours. So if you have a game that is known to have achievements and the badge isn’t showing, follow all steps under How to add or remove the badge from a game:.
Updating via the Tools menu may take up to 1 minute to complete. Though not really an 'issue' perse, but it is a "thing". So plan your updates around refilling your water glass, grabbing a soda or whatever takes you about 60 seconds to do.
Unknown issues:
Let me know when you find them.
Designed for LaunchBox 11.3 and newer. Major contributors to the plugin are: @jayjay
1,016 downloads
- retroachivements
- badges
- (and 1 more)
-
ThirdScreen Plugin for Platform Video Marquees, 3+ Screen Support, and more
By superrob3000
This plugin adds enhanced Marquee capabilities plus support for unlimited screens.
- Enhanced Marquee Capabilities:
Adds support for Platform Video Marquees, Playlist Video Marquees, and Platform Category Video Marquees. Adds support for Marquee Startup Videos. Adds support for animated gif files. Fixes marquee shift issue for TeknoParrot games. Marquee(s) will work in LaunchBox, not just in BigBox. Adds optional blur-fill background effect when media is not stretched to fit the entire screen (as of v2.0.10). - Support for a 3rd screen or unlimited additional screens each displaying their own priority based list of media.
- Each screen has access to ALL media that has been imported to LaunchBox (all images, all videos, plus rotating 3D box models!)
- Graphical user interface for setting up screens. Your theme files do not get modified.
- Ability to stretch or not stretch based on the media type being shown on each screen.
- Screens are tracked by GPU port stable IDs, so nothing will ever break due to Windows re-ordering display numbers.
Demo Videos:
Installation:
*** Before installing, please make sure you are using the latest version of LaunchBox. Version 13.0 or higher is required. *** Download ThirdScreen.zip to your PC. Right click on the zip file and extract all files. Close LaunchBox/BigBox and copy the Plugins and ThirdParty folders to your LaunchBox directory.
Adding a new screen:
1. If you are setting up your main Marquee screen, you'll first need to disable the Marquee in BigBox settings in order to transfer control of it over to ThirdScreen. Open BigBox. Hit escape to go to BigBox settings. Go to Options->General->Marquee Screen and set it to "None".
2. Select ThirdScreen Settings either from the Tools dropdown in LaunchBox or the settings screen in BigBox.
3. In the ThirdScreen Settings app choose "Add Screen" in the upper left.
4. Give this screen a name. If this is your main marquee, make sure "Start with typical marquee media" is checked - this will start you off with the typical expected media for a main marque (e.g. marquee videos, marquee images, banner images, clear logos, etc...). Then hit Continue.
5. Click "Identify Displays" and take note of the name displayed on the desired display. Then choose
the corresponding display name from the "Choose Display" drop down menu.
Choosing which media shows on each screen:
1. Select a screen from your list of existing screens.
2. Add desired media to both the game and platform views for this screen. (Tip: You can hover over most drop down boxes and controls to get a more detailed description of what each one does).
3. Adjust the priority of each media item up or down (items higher on the list have higher priority). ThirdScreen will search the selected game or platform's media starting from the top of the list and working its way down until it finds something to display.
4. For each media item in your views you can choose whether or not to stretch fill the screen. If set to No, then the item will be uniformly stretched (aspect ratio will be preserved). If set to Yes, the media will be stretched to fill the entire screen (aspect ratio will not be preserved). (Your choice will depend on the type of media and the screen dimensions. For example, Marquee videos/images will look best stretch filled on a bar type display but not on a 16:9 aspect ratio display. Video snaps will look best stretch filled on a 16:9 aspect ratio display, but not on a bar type display.)
Adding startup videos or images for each screen:
1. Select a screen from your list of existing screens.
2. Click "Startup Video Folder" to open the startup folder for this screen. Copy any media you want to be displayed at startup for this screen into this folder. Video files and static images are supported. If there is more than one item in the folder, ThirdScreen will choose one of them randomly to display at startup.
Adding Platform Marquee Videos, Playlist Marquee Videos, and Platform Category Marquee Videos:
1. In LaunchBox select Tools->"Manage Platform/Playlist Video Marquees"
2. From here you can add and manage video marquee files for Platforms, Playlists, and Platform Categories. Once added, they will be available for display using the ThirdScreen Plugin.
FAQs:
Q. How many screens are supported?
A. As many as you want. The only limit is the number of hdmi or display ports on your PC.
Q. Can I use this Plugin if I only have a single marquee screen?
A. Yes, if you don't have a third screen you can still use this for your main marquee. That will get you the added benefits of platform marquee videos, animated gif support, marquee startup videos, etc.
Q. If I choose to display 3D box models, how can I rotate them?
A. The 3D box models will be self-rotating. They will continuously spin while being displayed (no need for any user input).
Q. In Game View, what's the difference between "Add Game's Parent Platform Media" and "Add Current Platform/Playlist Media"? Which one should I choose?
A. It just depends on your preference when viewing Playlists. When scrolling games in a platform wheel, it will not make any difference which of the two dropdown lists you chose from. When scrolling games in a playlist wheel choose "Add Game's Parent Platform Media" if you want the media to change depending on the type of game (for example, the playlist might be a mix of NES, Wii, and Arcade games). Choose "Add Current Platform/Playlist Media" if you instead want to always display the Playlist's media (for example the marquee or theme video from your Favorites playlist).
Q. Will my Theme xaml files get modified?
A. No, the plugin never touches your theme files. You are free to switch and add new themes whenever you want.
Q. How can I delete/modify media in LaunchBox if it is currently being displayed by ThirdScreen?
A. You might sometimes run into a situation where you want to delete or modify a game's media files, but LaunchBox gives you an error because the media is in use. No problem, just temporarily disable ThirdScreen when in LaunchBox. Open the ThirdScreen settings app, click the gear icon in the upper right, and choose "Disabled when in LaunchBox".
Q. Why doesn't Platform view work for my marquee(s) when in LaunchBox?
A. This has been fixed with version 2.0.6 of this plugin as long as you are on LaunchBox version 13.1-beta-6 or higher..
Troubleshooting Steps:
1. Make sure you are using the latest version of this plugin.
2. If this is your main marquee screen, please first double-check that you have disabled your marquee in BigBox settings. The ThirdScreen plugin will not attempt to use your marquee display if BigBox is using it.
3. If some image or video you've added isn't showing up when you expect it to, double-check that it is categorized correctly in LaunchBox. It's very easy to add media in LaunchBox and then forget to change its image or video type (I do that all the time).
4. If you are having an issue, please enable logging for both the ThirdScreen plugin and LaunchBox/BigBox, and then send me the log files after you try the thing that isn't working. The log files will be in the LaunchBox/Logs folder. To enable logging do the following:
For ThirdScreen: Tools->ThirdScreen Settings, click the gear icon in the upper right and choose "Debug Log File Enabled". For LaunchBox/BigBox: Tools->Options->General->Debugging, check "Enable Debug Logs". 5. If LaunhBox/BigBox will not start at all after installing the dll files, make sure you are on version 13.0 or higher of LaunchBox and also try disabling any Pen or TouchScreen devices listed in Device Manager (there is currently a known conflict with the Windows Pen driver which is affecting some users). (Edit: This has been resolved in v2.0.13)
6. If animated gif files aren't displaying for you, try running LaunchBox/BigBox with admin privileges. (Edit: This has been resolved in v2.0.11)
7. If you are having issues with the ThirdScreen settings app reporting an incorrect resolution and/or your marquees being incorrectly sized, clipped, or off-center then it is most likely caused by dpi scaling. I recommend trying the following steps:
Windows 10:
Disable "Fix scaling for apps->Let Windows try to fix apps so they're not blurry" under "Advanced scaling settings" in Windows Display Settings. Also make sure all boxes are unchecked in Properties->Compatability->Change High DPI settings when you right click on the launchbox and bigbox executables and any shortcuts to them. If above steps didn't work then try disabling all settings above and then go to Windows Display settings and make sure the values of "Change the size of text, apps, and other items" matches between your main monitor and all of your additional monitors. Windows 11:
Windows 11 removed "Advanced scaling settings". I'm currently investigating whether any special handling is required for Windows 11 regarding DPI scaling. (Edit: v2.0.14 should fix most scaling issues in both Win10 and Win11)
8. This plugin tries to fix any marquee-shift issues when a game changes the main screen resolution. As of version 4.0.0 you can select between medium mode, aggressive mode, or disabled. Medium is the default mode and is recommended. If a game changes the screen resolution, medium mode will reposition all marquees to their correct locations. Aggressive mode also hides the BigBox window to ensure it does not end up covering one of the marquee screens. While aggressive mode works perfectly on mine and many other setups, some people have reported that it can interfere with game loading or exiting (including BigBox remaining hidden after exiting a game). If you run into those types of issues you should set the option back to medium mode or disabled. In LaunchBox, go to Tools->ThirdScreen Settings. Then click the gear icon in upper right and select "Medium Shift Handling".
-------------------------------------
Enjoy, and please follow the file to be notified of updates.
1,205 downloads
- third screen
- platform marquee videos
- (and 3 more)
.thumb.png.0143038bf35d857bbdebee35c3dc47b2.png)

.thumb.png.7e3e30a8a12a702e05af7309eb087e82.png)