

silvusvalentine
-
Posts
16 -
Joined
-
Last visited
Content Type
Profiles
Forums
Articles
Downloads
Gallery
Blogs
Posts posted by silvusvalentine
-
-
2 hours ago, Bower84 said:
When this is set up which mine is now, when starting a table is it supposed to just take you to pinball FX2 table select menu but the cursor will already be on the table you just selected? Thats what mine is doing and is that correct, its not supposed to start the table and skip the selection menu etc is it? I know you can do this with future pinball but with fx2 being more of an actual game i didnt think this was possible? If so whats the command line and is there one to exit out of the whole game with the esc key like you can with the other platforms /emulators? Thanks a lot
You may have to request a code for the Cabinet Support feature, which allows the game to accept command line parameters. There's a button on the main menu that will launch a web page where you enter your information, and I've also linked to it in the original tutorial. Someone from Zen Studios should then contact you, and they may ask you to send them a picture of your setup. They just want to verify that your setup isn't for public use. Once you enter the code, you should be able to launch straight into the game you choose from within LaunchBox.
-
7 minutes ago, Zombeaver said:
...Huh?
I re-read this like four times and I'm still scratching my head haha
Previous versions:
 This version:
-
 1
1
-
-
@Helveticus I had the same message about the Steam Client not running. I made a guide on how to get it working here:
-
Thanks @lordmonkus, I will do that.
-
Description: Tables for Pinball FX2 on Steam are treated similarly to DLC for other games. Therefore, the tables do not have their own launchers in Steam, and are chosen after starting up the main game. However, the following will describe how you can enter each Pinball FX2 table as an individual game in LaunchBox.
Note: You may need to get a code from Zen Studios to enable command line support with Pinball FX2. There is a link within the game that will send you to the appropriate form, or you can go to it directly, here: https://blog.zenstudios.com/?page_id=5981 I don't know if this step is necessary, as I had already received a code before I imported the tables to LaunchBox. So check there first if the command line arguments aren't working.
Steps:
- Optional: Navigate to Tools -> Manage Platforms from the LaunchBox menu bar and click the + Add... button to add a new platform.
-
Optional: Enter the following metadata:
- Title: Pinball FX2
- Release Date: 05/10/2013
- Developer: Zen Studios
- Category: Pinball or Arcade
- Images: (See Image 1 for Clear Logo)
- Optional: Click the ✔ Ok button and you now have a platform for your Pinball FX2 tables.
Note: The previous steps may not be necessary, depending on how you organize your platforms. The Pinball FX2 tables can be added to the platform of your choice — this is just the setup that worked well for me.
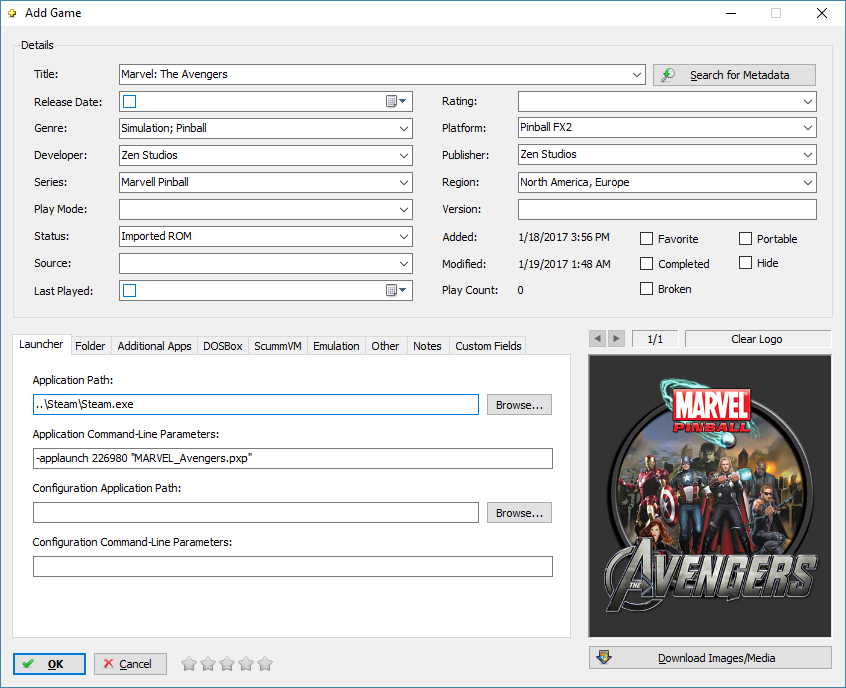
- Navigate to Game -> Add from the LaunchBox menu bar, or press Ctrl+N.
- Enter any necessary metadata in the Details section (Image 2). Since these titles do not exist as separate games, they are not currently in the LaunchBox Games DB, so I'm unaware of an easy way to scrape metadata at the moment.
- Beneath the Details section, within the Launcher tab, click the Browse... button next to the Application Path textbox.
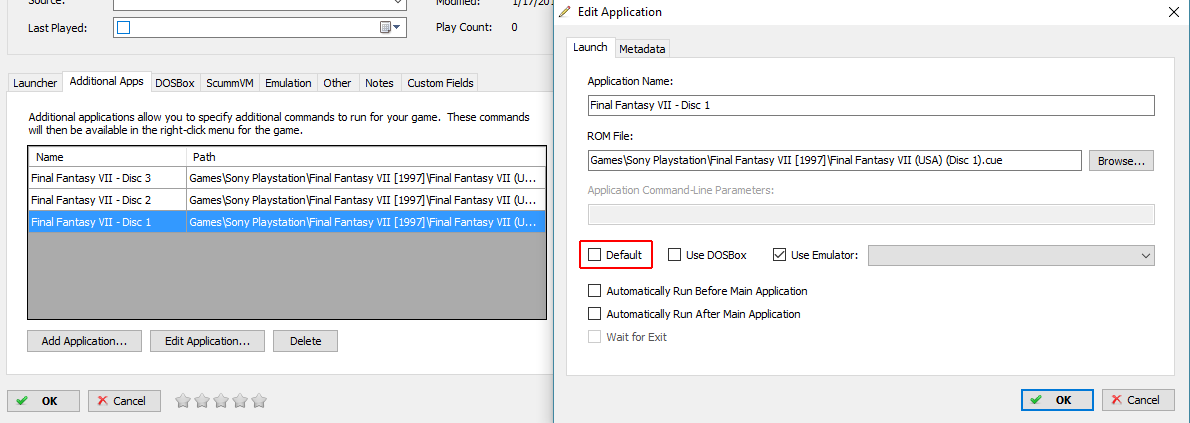
Note: If you see ROM File (Emulation is enabled) instead of Application Path, you will need to navigate to the Emulation tab, and uncheck Use an emulator to play this game.
- Navigate to your Steam install folder, select the file named Steam.exe, and click the Open button.
-
The Application Path setting should now be set to something like:
- ..\Steam\Steam.exe
-
Next, in the Application Command-Line Parameters textbox, enter the following text:
- -applaunch 226980 "TableName.pxp"
- Replace TableName in the sample text above with the name of the table you are adding (See below for the list of table names and command line parameters).
- This parameter will tell Steam to launch the app with the id of 226980, which happens to be Pinball FX2, and it will pass the name of the table we want to run to Pinball FX2.
- Click the ✔ Ok button and you should now see the game added to your selected platform.
Note: Since we are passing the name of the table file to Pinball FX2 through the command line, and not the table file itself, we cannot use the usual Tools -> Import -> ROM Files... method.
Images:
Table Names and Command-Line Parameters:
SpoilerTable Name Command-Line Parameters
Alien Isolation -applaunch 226980 "Alien_Isolation.pxp"
Alien vs. Predator -applaunch 226980 "Alien_vs_Predator.pxp"
Aliens -applaunch 226980 "Aliens.pxp"
American Dad! -applaunch 226980 "AmericanDad.pxp"
Archer -applaunch 226980 "Archer.pxp"
Bethesda: Doom -applaunch 226980 "BETHESDA_Doom.pxp"
Bethesda: Fallout -applaunch 226980 "BETHESDA_Fallout.pxp"
Bethesda: Skyrim -applaunch 226980 "BETHESDA_Skyrim.pxp"
Biolab -applaunch 226980 "BioLab.pxp"
Bob's Burgers -applaunch 226980 "BobsBurgers.pxp"
Castle Storm -applaunch 226980 "CastleStorm.pxp"
Earth Defense -applaunch 226980 "EarthDefense.pxp"
El Dorado -applaunch 226980 "Eldorado.pxp"
Epic Quest -applaunch 226980 "Looter.pxp"
Excalibur -applaunch 226980 "Excalibur.pxp"
Family Guy -applaunch 226980 "FamilyGuy.pxp"
Mars -applaunch 226980 "Mars.pxp"
Marvel: Ant-Man -applaunch 226980 "MARVEL_Ant-Man.pxp"
Marvel: Avengers: Age of Ultron -applaunch 226980 "MARVEL_Age_of_Ultron.pxp"
Marvel: Blade -applaunch 226980 "MARVEL_Blade.pxp"
Marvel: Captain America -applaunch 226980 "MARVEL_CaptainAmerica.pxp"
Marvel: Civil War -applaunch 226980 "MARVEL_CivilWar.pxp"
Marvel: Deadpool -applaunch 226980 "MARVEL_Deadpool.pxp"
Marvel: Doctor Strange -applaunch 226980 "MARVEL_DrStrange.pxp"
Marvel: Fantastic Four -applaunch 226980 "MARVEL_FantasticFour.pxp"
Marvel: Fear Itself -applaunch 226980 "MARVEL_FearItSelf.pxp"
Marvel: Ghost Rider -applaunch 226980 "MARVEL_GhostRider.pxp"
Marvel: Guardians of the Galaxy -applaunch 226980 "MARVEL_Guardians.pxp"
Marvel: Iron Man -applaunch 226980 "MARVEL_IronMan.pxp"
Marvel: Moon Knight -applaunch 226980 "MARVEL_MoonKnight.pxp"
Marvel: Spider-Man -applaunch 226980 "MARVEL_SpiderMan.pxp"
Marvel: The Avengers -applaunch 226980 "MARVEL_Avengers.pxp"
Marvel: The Infinity Gauntlet -applaunch 226980 "MARVEL_InfinityGauntlet.pxp"
Marvel: Thor -applaunch 226980 "MARVEL_Thor.pxp"
Marvel: Venom -applaunch 226980 "MARVEL_Venom.pxp"
Marvel: Wolverine -applaunch 226980 "MARVEL_Wolverine.pxp"
Marvel: Women of Power: A-Force -applaunch 226980 "MARVEL_MsMarvel.pxp"
Marvel: Women of Power: Champions -applaunch 226980 "MARVEL_WOP_TheNextGeneration.pxp"
Marvel: World War Hulk -applaunch 226980 "MARVEL_WWH.pxp"
Marvel: X-Men -applaunch 226980 "MARVEL_XMen.pxp"
Ms. Splosion Man -applaunch 226980 "SplosionMan.pxp"
Paranormal -applaunch 226980 "Paranormal.pxp"
Pasha -applaunch 226980 "Pasha.pxp"
Plants vs. Zombies -applaunch 226980 "PlantsVsZombies.pxp"
Portal -applaunch 226980 "Portal.pxp"
Rome -applaunch 226980 "Rome.pxp"
Secrets of the Deep -applaunch 226980 "Atlantis.pxp"
Shaman -applaunch 226980 "Shaman.pxp"
Sorcerer's Lair -applaunch 226980 "Citadel.pxp"
South Park: Butters' Very Own Pinball Game -applaunch 226980 "SouthPark2.pxp"
South Park: Super Sweet Pinball -applaunch 226980 "SouthPark1.pxp"
Star Wars: Boba Fett -applaunch 226980 "STARWARS_Boba_Fett.pxp"
Star Wars: Darth Vader -applaunch 226980 "STARWARS_Darth_Vader.pxp"
Star Wars: Droids -applaunch 226980 "STARWARS_Droids.pxp"
Star Wars: Episode IV: A New Hope -applaunch 226980 "STARWARS_Episode_4.pxp"
Star Wars: Episode V: The Empire Strikes Back -applaunch 226980 "STARWARS_Episode_5.pxp"
Star Wars: Episode VI: Return of the Jedi -applaunch 226980 "STARWARS_Episode_6.pxp"
Star Wars: Episode VII: The Force Awakens -applaunch 226980 "STARWARS_Episode_7.pxp"
Star Wars: Han Solo -applaunch 226980 "STARWARS_Han_Solo.pxp"
Star Wars: Masters of the Force -applaunch 226980 "STARWARS_Light_VS_Dark.pxp"
Star Wars: Might of the First Order -applaunch 226980 "STARWARS_MFO.pxp"
Star Wars: Rebels -applaunch 226980 "STARWARS_Rebels.pxp"
Star Wars: Starfighter Assault -applaunch 226980 "STARWARS_SFA.pxp"
Star Wars: The Clone Wars -applaunch 226980 "STARWARS_CloneWars.pxp"
Super League: Arsenal F.C. -applaunch 226980 "Football_Arsenal.pxp"
Super League: Barcelona F.C. -applaunch 226980 "Football_Barcelona.pxp"
Super League: Juventus F.C. -applaunch 226980 "Football_Juventus.pxp"
Super League: Liverpool F.C. -applaunch 226980 "Football_Liverpool.pxp"
Super League: Milan F.C. -applaunch 226980 "Football_Milan.pxp"
Super League: Real Madrid F.C. -applaunch 226980 "Football_RealMadrid.pxp"
Super League: Roma F.C. -applaunch 226980 "Football_Roma.pxp"
Super League: Zen Studios F.C. -applaunch 226980 "Football.pxp"
Tesla -applaunch 226980 "Tesla.pxp"
The Walking Dead -applaunch 226980 "TheWalkingDead.pxp"
V12 -applaunch 226980 "V12.pxp"
Wild West Rampage -applaunch 226980 "Western.pxp"
Note: The names of the tables can be found by navigating to your Pinball FX2 directory within your Steam directory. It will be at the following location:
- Steam -> SteamApps -> common -> Pinball FX2 -> data_steam
Ignore any of the files that are in lower case (game_cfg.pxp, gui.pxp, etc.), as well as the PTSData.dat file, as these are not table files.
-
5
-
You can accomplish this by creating a style for background element. Let's say your background is a Grid component. In the view's XAML file, paste the following Resource Dictionary just below the UserControl tag:
<UserControl.Resources>

	<Style x:Key="DynamicBackground" TargetType="{x:Type Grid}">

		<Style.Triggers>

			<DataTrigger Binding="{Binding Path=SelectedPlatform.Name}" Value="Arcade">

				<Setter Property="Background" Value="Blue" />

			</DataTrigger>

			<DataTrigger Binding="{Binding Path=SelectedPlatform.Name}" Value="Nintendo 64">

				<Setter Property="Background" Value="Red" />

			</DataTrigger>

			<DataTrigger Binding="{Binding Path=SelectedPlatform.Name}" Value="Nintendo Entertainment System">

				<Setter Property="Background" Value="Green" />

			</DataTrigger>

		</Style.Triggers>

	</Style>

</UserControl.Resources>
So here's the breakdown. The Style is defined with a Key, which is basically the name that identifies the style. In this case, I've named the style DynamicBackground. Since the background will be a Grid component, I've set the TargetType to Grid. In order to vary the background color based on the platform, the color is set by using Triggers. This works by defining a condition, and if the condition is true, the value is set based on that condition. In this case, we want the color of the Grid's background to change depending on the platform, so the Trigger is the value of the selected platform. Therefore, in the DataTrigger tag, we set the Binding property to SelectedPlatform.Name, and the Value that will trigger this color is the name of the platform, for example, Arcade. When the trigger is activated, we want it to set the background color; so, inside the DataTrigger, a Setter is defined, along with the Property that we want to set and the appropriate Value. In the case of the Arcade platform, we want the Background Property of the Grid component to be set to the color Blue. This process can be repeated for as many platforms as you would like, just define a DataTrigger for each of them.
To implement it, you just have to apply the Style to the Grid component, like so:
<Grid Style="{StaticResource DynamicBackground}">
Since the style is defined in a Resource Dictionary, it is accessible as a StaticResource with the name DynamicBackground, in this case. Here's an example of it in action:
I hope that helps! -
It is just for showing stars. When I said Star Rating control, I meant control as in element or component.
-
1
-
-
Okay, I think I've come up with something for the Star Rating control. It's probably the worst way to handle this, but the only way I could think to accomplish it without code behind. In the view that you want to feature the Star Rating control, paste the following UserControl.Resources code at the top, so it's the first element inside the UserControl tag.
Here's an example of the UserControl tag, it should be the top-most element of every view:
Spoiler<UserControl xmlns="http://schemas.microsoft.com/winfx/2006/xaml/presentation"
xmlns:x="http://schemas.microsoft.com/winfx/2006/xaml"
xmlns:mc="http://schemas.openxmlformats.org/markup-compatibility/2006"
xmlns:d="http://schemas.microsoft.com/expression/blend/2008"
xmlns:transitions="clr-namespace:BigBox.Transitions;assembly=BigBox"
xmlns:controls="clr-namespace:BigBox.Controls;assembly=BigBox"
mc:Ignorable="d"
d:DesignHeight="562"
d:DesignWidth="1000"
HorizontalAlignment="Stretch"
VerticalAlignment="Stretch"
Style="{DynamicResource UserControlStyle}">Paste the following UserControl.Resources code:
Spoiler<UserControl.Resources>
<SolidColorBrush x:Key="StarFillColor" Color="#FF393A3B" />
<SolidColorBrush x:Key="StarEmptyColor" Color="#0097999B" />
<SolidColorBrush x:Key="StarStrokeColor" Color="#FF393A3B" />
<Style x:Key="OneStarRating" TargetType="{x:Type Path}">
<Style.Triggers>
<DataTrigger Binding="{Binding Path=SelectedGame.StarRating}" Value="0">
<Setter Property="Fill" Value="{StaticResource StarEmptyColor}" />
</DataTrigger>
<DataTrigger Binding="{Binding Path=SelectedGame.StarRating}" Value="1">
<Setter Property="Fill" Value="{StaticResource StarFillColor}" />
</DataTrigger>
<DataTrigger Binding="{Binding Path=SelectedGame.StarRating}" Value="2">
<Setter Property="Fill" Value="{StaticResource StarFillColor}" />
</DataTrigger>
<DataTrigger Binding="{Binding Path=SelectedGame.StarRating}" Value="3">
<Setter Property="Fill" Value="{StaticResource StarFillColor}" />
</DataTrigger>
<DataTrigger Binding="{Binding Path=SelectedGame.StarRating}" Value="4">
<Setter Property="Fill" Value="{StaticResource StarFillColor}" />
</DataTrigger>
<DataTrigger Binding="{Binding Path=SelectedGame.StarRating}" Value="5">
<Setter Property="Fill" Value="{StaticResource StarFillColor}" />
</DataTrigger></Style.Triggers>
</Style>
<Style x:Key="TwoStarRating" TargetType="{x:Type Path}">
<Style.Triggers>
<DataTrigger Binding="{Binding Path=SelectedGame.StarRating}" Value="0">
<Setter Property="Fill" Value="{StaticResource StarEmptyColor}" />
</DataTrigger>
<DataTrigger Binding="{Binding Path=SelectedGame.StarRating}" Value="1">
<Setter Property="Fill" Value="{StaticResource StarEmptyColor}" />
</DataTrigger>
<DataTrigger Binding="{Binding Path=SelectedGame.StarRating}" Value="2">
<Setter Property="Fill" Value="{StaticResource StarFillColor}" />
</DataTrigger>
<DataTrigger Binding="{Binding Path=SelectedGame.StarRating}" Value="3">
<Setter Property="Fill" Value="{StaticResource StarFillColor}" />
</DataTrigger>
<DataTrigger Binding="{Binding Path=SelectedGame.StarRating}" Value="4">
<Setter Property="Fill" Value="{StaticResource StarFillColor}" />
</DataTrigger>
<DataTrigger Binding="{Binding Path=SelectedGame.StarRating}" Value="5">
<Setter Property="Fill" Value="{StaticResource StarFillColor}" />
</DataTrigger></Style.Triggers>
</Style>
<Style x:Key="ThreeStarRating" TargetType="{x:Type Path}">
<Style.Triggers>
<DataTrigger Binding="{Binding Path=SelectedGame.StarRating}" Value="0">
<Setter Property="Fill" Value="{StaticResource StarEmptyColor}" />
</DataTrigger>
<DataTrigger Binding="{Binding Path=SelectedGame.StarRating}" Value="1">
<Setter Property="Fill" Value="{StaticResource StarEmptyColor}" />
</DataTrigger>
<DataTrigger Binding="{Binding Path=SelectedGame.StarRating}" Value="2">
<Setter Property="Fill" Value="{StaticResource StarEmptyColor}" />
</DataTrigger>
<DataTrigger Binding="{Binding Path=SelectedGame.StarRating}" Value="3">
<Setter Property="Fill" Value="{StaticResource StarFillColor}" />
</DataTrigger>
<DataTrigger Binding="{Binding Path=SelectedGame.StarRating}" Value="4">
<Setter Property="Fill" Value="{StaticResource StarFillColor}" />
</DataTrigger>
<DataTrigger Binding="{Binding Path=SelectedGame.StarRating}" Value="5">
<Setter Property="Fill" Value="{StaticResource StarFillColor}" />
</DataTrigger></Style.Triggers>
</Style>
<Style x:Key="FourStarRating" TargetType="{x:Type Path}">
<Style.Triggers>
<DataTrigger Binding="{Binding Path=SelectedGame.StarRating}" Value="0">
<Setter Property="Fill" Value="{StaticResource StarEmptyColor}" />
</DataTrigger>
<DataTrigger Binding="{Binding Path=SelectedGame.StarRating}" Value="1">
<Setter Property="Fill" Value="{StaticResource StarEmptyColor}" />
</DataTrigger>
<DataTrigger Binding="{Binding Path=SelectedGame.StarRating}" Value="2">
<Setter Property="Fill" Value="{StaticResource StarEmptyColor}" />
</DataTrigger>
<DataTrigger Binding="{Binding Path=SelectedGame.StarRating}" Value="3">
<Setter Property="Fill" Value="{StaticResource StarEmptyColor}" />
</DataTrigger>
<DataTrigger Binding="{Binding Path=SelectedGame.StarRating}" Value="4">
<Setter Property="Fill" Value="{StaticResource StarFillColor}" />
</DataTrigger>
<DataTrigger Binding="{Binding Path=SelectedGame.StarRating}" Value="5">
<Setter Property="Fill" Value="{StaticResource StarFillColor}" />
</DataTrigger></Style.Triggers>
</Style>
<Style x:Key="FiveStarRating" TargetType="{x:Type Path}">
<Style.Triggers>
<DataTrigger Binding="{Binding Path=SelectedGame.StarRating}" Value="0">
<Setter Property="Fill" Value="{StaticResource StarEmptyColor}" />
</DataTrigger>
<DataTrigger Binding="{Binding Path=SelectedGame.StarRating}" Value="1">
<Setter Property="Fill" Value="{StaticResource StarEmptyColor}" />
</DataTrigger>
<DataTrigger Binding="{Binding Path=SelectedGame.StarRating}" Value="2">
<Setter Property="Fill" Value="{StaticResource StarEmptyColor}" />
</DataTrigger>
<DataTrigger Binding="{Binding Path=SelectedGame.StarRating}" Value="3">
<Setter Property="Fill" Value="{StaticResource StarEmptyColor}" />
</DataTrigger>
<DataTrigger Binding="{Binding Path=SelectedGame.StarRating}" Value="4">
<Setter Property="Fill" Value="{StaticResource StarEmptyColor}" />
</DataTrigger>
<DataTrigger Binding="{Binding Path=SelectedGame.StarRating}" Value="5">
<Setter Property="Fill" Value="{StaticResource StarFillColor}" />
</DataTrigger></Style.Triggers>
</Style>
<ControlTemplate x:Key="StarRatingControl" TargetType="{x:Type ContentControl}">
<Canvas Name="StarRatingCanvas" Height="{TemplateBinding Height}">
<DockPanel>
<Viewbox Height="{Binding ElementName=StarRatingCanvas, Path=Height}"
DockPanel.Dock="Left"
Margin="{TemplateBinding Margin}">
<Path Style="{StaticResource OneStarRating}"
Stroke="{StaticResource StarStrokeColor}"
StrokeThickness="0.75"
Data="F1 M 7.323,2.964 L 5.700,4.547 L 6.085,6.782 C 6.089,6.813 6.089,6.840 6.089,6.872 C 6.089,6.988 6.036,7.095 5.906,7.095 C 5.843,7.095 5.781,7.073 5.727,7.042 L 3.720,5.986 L 1.712,7.042 C 1.654,7.073 1.596,7.095 1.534,7.095 C 1.404,7.095 1.346,6.988 1.346,6.872 C 1.346,6.840 1.350,6.813 1.354,6.782 L 1.739,4.547 L 0.112,2.964 C 0.058,2.906 0.000,2.830 0.000,2.750 C 0.000,2.615 0.139,2.562 0.250,2.544 L 2.495,2.217 L 3.500,0.183 C 3.541,0.098 3.617,0.000 3.720,0.000 C 3.823,0.000 3.898,0.098 3.939,0.183 L 4.945,2.217 L 7.189,2.544 C 7.296,2.562 7.439,2.615 7.439,2.750 C 7.439,2.830 7.381,2.906 7.323,2.964 Z" />
</Viewbox>
<Viewbox Height="{Binding ElementName=StarRatingCanvas, Path=Height}"
DockPanel.Dock="Left"
Margin="{TemplateBinding Margin}">
<Path Style="{StaticResource TwoStarRating}"
Stroke="{StaticResource StarStrokeColor}"
StrokeThickness="0.75"
Data="F1 M 7.323,2.964 L 5.700,4.547 L 6.085,6.782 C 6.089,6.813 6.089,6.840 6.089,6.872 C 6.089,6.988 6.036,7.095 5.906,7.095 C 5.843,7.095 5.781,7.073 5.727,7.042 L 3.720,5.986 L 1.712,7.042 C 1.654,7.073 1.596,7.095 1.534,7.095 C 1.404,7.095 1.346,6.988 1.346,6.872 C 1.346,6.840 1.350,6.813 1.354,6.782 L 1.739,4.547 L 0.112,2.964 C 0.058,2.906 0.000,2.830 0.000,2.750 C 0.000,2.615 0.139,2.562 0.250,2.544 L 2.495,2.217 L 3.500,0.183 C 3.541,0.098 3.617,0.000 3.720,0.000 C 3.823,0.000 3.898,0.098 3.939,0.183 L 4.945,2.217 L 7.189,2.544 C 7.296,2.562 7.439,2.615 7.439,2.750 C 7.439,2.830 7.381,2.906 7.323,2.964 Z" />
</Viewbox>
<Viewbox Height="{Binding ElementName=StarRatingCanvas, Path=Height}"
DockPanel.Dock="Left"
Margin="{TemplateBinding Margin}">
<Path Style="{StaticResource ThreeStarRating}"
Stroke="{StaticResource StarStrokeColor}"
StrokeThickness="0.75"
Data="F1 M 7.323,2.964 L 5.700,4.547 L 6.085,6.782 C 6.089,6.813 6.089,6.840 6.089,6.872 C 6.089,6.988 6.036,7.095 5.906,7.095 C 5.843,7.095 5.781,7.073 5.727,7.042 L 3.720,5.986 L 1.712,7.042 C 1.654,7.073 1.596,7.095 1.534,7.095 C 1.404,7.095 1.346,6.988 1.346,6.872 C 1.346,6.840 1.350,6.813 1.354,6.782 L 1.739,4.547 L 0.112,2.964 C 0.058,2.906 0.000,2.830 0.000,2.750 C 0.000,2.615 0.139,2.562 0.250,2.544 L 2.495,2.217 L 3.500,0.183 C 3.541,0.098 3.617,0.000 3.720,0.000 C 3.823,0.000 3.898,0.098 3.939,0.183 L 4.945,2.217 L 7.189,2.544 C 7.296,2.562 7.439,2.615 7.439,2.750 C 7.439,2.830 7.381,2.906 7.323,2.964 Z" />
</Viewbox>
<Viewbox Height="{Binding ElementName=StarRatingCanvas, Path=Height}"
DockPanel.Dock="Left"
Margin="{TemplateBinding Margin}">
<Path Style="{StaticResource FourStarRating}"
Stroke="{StaticResource StarStrokeColor}"
StrokeThickness="0.75"
Data="F1 M 7.323,2.964 L 5.700,4.547 L 6.085,6.782 C 6.089,6.813 6.089,6.840 6.089,6.872 C 6.089,6.988 6.036,7.095 5.906,7.095 C 5.843,7.095 5.781,7.073 5.727,7.042 L 3.720,5.986 L 1.712,7.042 C 1.654,7.073 1.596,7.095 1.534,7.095 C 1.404,7.095 1.346,6.988 1.346,6.872 C 1.346,6.840 1.350,6.813 1.354,6.782 L 1.739,4.547 L 0.112,2.964 C 0.058,2.906 0.000,2.830 0.000,2.750 C 0.000,2.615 0.139,2.562 0.250,2.544 L 2.495,2.217 L 3.500,0.183 C 3.541,0.098 3.617,0.000 3.720,0.000 C 3.823,0.000 3.898,0.098 3.939,0.183 L 4.945,2.217 L 7.189,2.544 C 7.296,2.562 7.439,2.615 7.439,2.750 C 7.439,2.830 7.381,2.906 7.323,2.964 Z" />
</Viewbox>
<Viewbox Height="{Binding ElementName=StarRatingCanvas, Path=Height}"
DockPanel.Dock="Left"
Margin="{TemplateBinding Margin}">
<Path Style="{StaticResource FiveStarRating}"
Stroke="{StaticResource StarStrokeColor}"
StrokeThickness="0.75"
Data="F1 M 7.323,2.964 L 5.700,4.547 L 6.085,6.782 C 6.089,6.813 6.089,6.840 6.089,6.872 C 6.089,6.988 6.036,7.095 5.906,7.095 C 5.843,7.095 5.781,7.073 5.727,7.042 L 3.720,5.986 L 1.712,7.042 C 1.654,7.073 1.596,7.095 1.534,7.095 C 1.404,7.095 1.346,6.988 1.346,6.872 C 1.346,6.840 1.350,6.813 1.354,6.782 L 1.739,4.547 L 0.112,2.964 C 0.058,2.906 0.000,2.830 0.000,2.750 C 0.000,2.615 0.139,2.562 0.250,2.544 L 2.495,2.217 L 3.500,0.183 C 3.541,0.098 3.617,0.000 3.720,0.000 C 3.823,0.000 3.898,0.098 3.939,0.183 L 4.945,2.217 L 7.189,2.544 C 7.296,2.562 7.439,2.615 7.439,2.750 C 7.439,2.830 7.381,2.906 7.323,2.964 Z" />
</Viewbox>
</DockPanel>
</Canvas>
</ControlTemplate>
</UserControl.Resources>Now, wherever you want to add a Star Rating control, just use the following code:
Spoiler<ContentControl Template="{StaticResource StarRatingControl}"
Height="20"
Margin="0,0,4,0" />Customizing
If you want to change the size of the stars, just adjust the Height property of the ContentControl. Since the stars are Path elements, you can make them as large or small as you want and you don't have to worry about pixelation. If you want to adjust the spacing between the stars, adjust the Margin property.
If you want to change the star's fill color, empty color, or stroke color, that can be found at the top of the UserControl.Resources code:
Spoiler<UserControl.Resources>
<SolidColorBrush x:Key="StarFillColor" Color="#FF393A3B" />
<SolidColorBrush x:Key="StarEmptyColor" Color="#0097999B" />
<SolidColorBrush x:Key="StarStrokeColor" Color="#FF393A3B" />It's not the best solution, but it should work for now. Maybe I can try to implement it as a custom control. Hope that helps for now!
-
1
-
-
If you wanted to implement the blur effect programmatically, you can add an effect to the image in the XAML.
<Image Source="{Binding ImagePath}" HorizontalAlignment="Stretch"

           VerticalAlignment="Stretch"

           Stretch="UniformToFill"

           RenderOptions.BitmapScalingMode="HighQuality">

	<Image.Effect>

		<BlurEffect Radius="30"></BlurEffect>

	</Image.Effect>

</Image>
Just adjust the Radius property to adjust the amount of blur. It will most likely slow down performance, but it will work for every image without having to blur them manually.
-
1
-
-
I'm only just figuring out how to get shaders to work in Retroarch. I wouldn't know where to start in standalone Mame. Are there any tutorials on here that show how to set them up?
-
I had been doing the same. I just happened to find them while I was exploring the options lol.
-
Retroarch Version: 1.3.6
Mame Core: MAME 0.174 (The core labeled Arcade (MAME) in the Core Updater)
Steps:
- Open Retroarch and pull up the Main Menu (Press F1 if you are in-game).
- Load the Mame Core if it is not already loaded (check the bottom left of the screen for the currently loaded core).
- Navigate to Main Menu -> Quick Menu -> Options.
-
In the Options menu, turn ON the following options (Image 1):
- Hide nag screen
- Hide gameinfo screen
- Hide warnings screen
- Navigate back to the Main Menu and select Save Current Config.
- Now, when you play an Arcade game with Retroarch, it will begin loading the rom immediately.
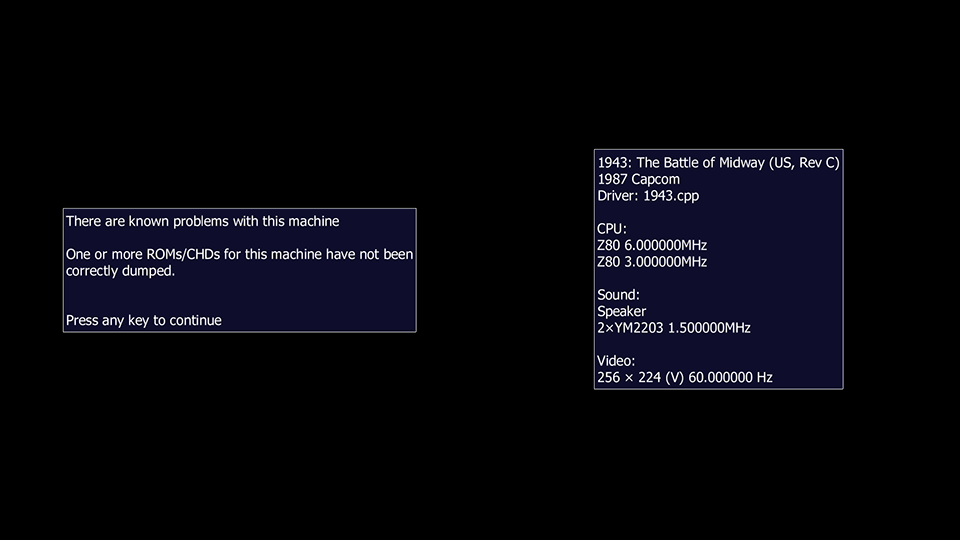
Note: The nag screens, warning screens, and info screens are the screens that display before the rom is actually loaded (Image 2). These screens usually require a button press before the process is allowed to continue. These settings will not remove the arcade startup screens, display test screens, RAM check screens, hard disk load screens, etc.
Images:
-
2
-
For what it's worth, I think the two should be separate. The games can be played on either system, but you would have to either modify the SNES cartridges to fit inside the Super Famicom, or you would have to modify the SNES to allow the Super Famicom cartridges to fit inside the SNES. If you want to draw a parallel, many games can be played across GameBoy, GameBoy Color, GameBoy Advance, and the GameCube GameBoy Player. Here's the compatibility chart. In addition, there were some Super Famicom games that were never released for the SNES. In some cases, the games were released under different titles. For example, Final Fantasy III for SNES was actually Final Fantasy VI for the Super Famicom. In terms of artwork, the boxes were a completely different shape, so the artwork doesn't match from one system to the other, without creating custom artwork. So it makes more sense to me for the two to remain separate, but that's just my opinion.
-
Nintendo Super Famicom Clearlogo.
-
1
-


LaunchBox Configuration for Pinball FX2 on Steam
in Troubleshooting
Posted
@FlightRisk I'm not too familiar with Rocket Launcher or CP78. In my setup, Pinball FX2 is installed on Steam, and launched from LaunchBox. It would require Steam to be running in the background on your machine. If Steam isn't working, you might try a fresh install. You can install it wherever you'd like, just change the game's Application Path in LaunchBox to point to Steam.exe. Hope that helps.