

mrhappydude
-
Posts
36 -
Joined
-
Last visited
Content Type
Profiles
Forums
Articles
Downloads
Gallery
Blogs
Everything posted by mrhappydude
-
In the video is it Rayman, but the artwork is 420 Inspired.
-
Finally finished my version 2 cabinet, and it is working awesome. It can play xbox 360, ps4, ps3, launchbox and retropie the video in the link if it works is a modded ps3. Special thanks to brook for building a board that supports thumbsticks!! The main joystick is actually Left thumbstick and the right thumbstick placement works perfectly for playing any game that requires it. I 3d printed many of the parts, like the voltage usage, usb chargers, power button holder, the circles of the joystick themed (not sure what they are called) and various other parts inside for mounting stuff. questions and comments welcome. 20190406_151915.mp4

-

Second Build Right Side
mrhappydude commented on mrhappydude's gallery image in Photos of Your Builds
 Thanks.
 -
And here is what it looks like mounted, with d-pad button and touch-pad (left of player 2 button). I have an analog joystick so it acts as left stick (had to add a button for ls-button), the thumb stick mounted on front is right stick.
-
Just wanted to share my solution for adding thumb sticks to my control panel.
-
nice.
-
It has been forever since I have had time to play with Launchbox, but I will try and get to it in the next couple of weeks. Very busy. There are some great resources on youtube, but I do recall it being very particular but once Joytokey recognized my joystick it just worked. I will see if I can copy my profile up here and you can play with it.
-
No worries, glad it helped you out.
-
latin625 if you search youtube for joytokey how to videos you will find what you need. YouTube
-
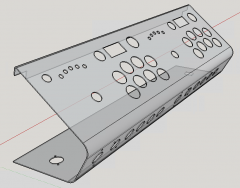
3D Model of New Control Panel (Animated)
mrhappydude posted a gallery image in Photos of Your Builds
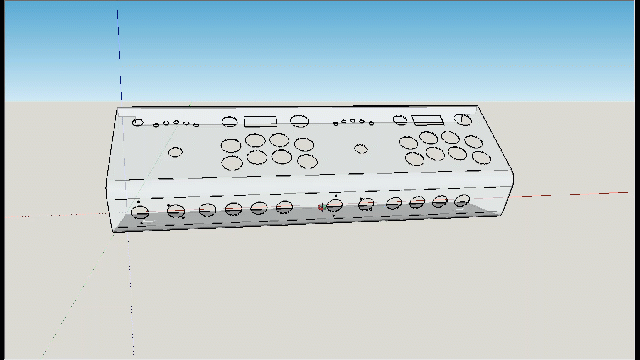 This is my new control panel designed for my Brook Fight board With Sound. - Touch Pad - Thumb Sticks - 8 Button Layout - Headphone Jacks - USB Ports - Player Led s/ Turbo .....
 -
-
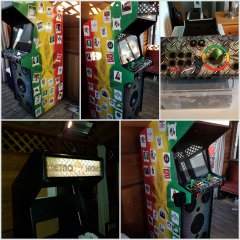 Thanks, Actually holds up to the weather really well and is covered from the elements. I am working on version 2 of the control panel right now, will have thumb sticks, 8 button layout, touch pad...basically everything on modern joysticks.... so can play PS4, PS3, XBOX 360 and all the emulators. I just added a new amp 600w with blue tooth for the lower speakers so this thing kicks
 -
Capture1 - Is the Emulator Settings Capture 2 - In the Emulator Folder. Note the Roms must exist here. Capture 3 and 4 - JoytoKey screen shots. You will map your joystick buttons and special key combos ie. Select + Start to exit...etc.
-
I will try and post some screen shots of my config as soon as i can.
-
@ETAPRIME this would be a great tutorial video for those who want vector games in all their glory.
-
dvdbob, in joytokey you can setup mappings for individual applications. Simply setup a profile for AAE and it will detect when AAE is running and take over joystick control. I kill the joytokey process after the application exits and it works very well. Youtube has videos on how to set this up.
-
This is a re-post of a thread started on shoryuken forms by jonyfraze. If you are going to build an arcade cab I would wait for this board! This will be the only board I know of on the market that will provide pin-outs for analog sticks and touch-pad so you to play any emulated console on your arcade cab; Plus you can plug in to ps4 and PS3. My hope is they update their UFB and it will work with Xbox one, 360 and Wii-U. Features: •Plug & Play PS3/PS4/PC (XINPUT) •3.5mm jack for headphone and mic support (supports game audio and mic input) •Micro USB Jack •Additional access to Turbo, LEDs, SOCD, Touch Pad, Analogs, & 20pin connector for inputs. •Screw Terminals for easy wire connections •Same size as UFB •Same low latency performance as previous Brook PCBs Pinout: J1 : USB Port to PS3/PS4/PC[X-input] J2 : Player LED J3 : Screw terminal to connect with inputting buttons J4 : external port to connect with inputting buttons J5 : Left and Right Analog Stick J6 : Touch panel J7 : Turbo function (Key and LED) J11 : 3.5mm Phone Jack J12 : Select Stick to map LS/DP/RS J14 : Enable/Disable Left and Right Analog Stick J15 : Enable/Disable SOCD function jonyfraze's review on youtube.
-
Nice wood (is that maple?) it would almost be a shame to cover it up. Nice craftsmanship as well, your cuts look pretty much perfect. On your control panel you may want to rout-out the joysticks so they sit up higher.
-
I have the same issue.
-
@Jason Carrand if one could make custom layouts (themes) for marquees that would be awesome too.
-
@Jason Carr not sure if you caught my post on this before but a stretched lcd is basically a 1/3 LCD monitor which has been cut so you only see 1/3 of the monitor but the default display is 1024x768 but the actual size is actually ~1024x253. The settings need to include top left, top right, bottom left and bottom right to cover all possibilities. Making a custom display in windows 10 is a b*tch so this would be best.
-
This is a basic set of steps required to get this working with the best emulator for vector games. IT took me a bit to get this going but I think I have a working solution to share. First you need to download AAE. http://pages.suddenlink.net/aae/ Then roms *Hint:TheRomGuru* Need JoyToKey (or XPadder). http://joytokey.net/en/download You will need to map all the joystick buttons to keyboard buttons in a new joytokey profile including (start + select to exit use button alias under options). Make it detect the process so it only takes over joystick control when AAE is running. When importing make sure you select import duplicates. On AAE Emulator settings check use filename only without extension. If you need screen shots let me know.
-
 Will use car wrap vinyl so it will mold over the coin door.


