.thumb.png.c9faf450e4d2b690a819048b18173f61.png)
About This File
GameBase database Importer
Import games and metadata from GameBase database file(s) into LaunchBox.
Based on information in your GameBase database file(s), this plugin will:
- Create a new Platform
- Add games to the new Platform
- Add game “Extras” as Additional Applications
-
Add available information to each game:
-
Metadata
- Title
- Release Date
- Genre
- Developer
- Play Mode
- Max Players
- Platform
- Publisher
- Favorite (check box)
-
Media
- Game Manual Path
-
Image
- Game Screenshot
-
Launching
- Full Application Path to files
-
Metadata
If you’re not familiar with GameBase, you can check it out here: https://www.bu22.com Also check out their forums for more complete and updated databases.
Installing the plugin
- Download the plugin
- Unblock “ImportGameBase.zip” by right clicking the file and checking “Unblock” and clicking “OK”
- Open the zip file and copy the folder (containing 3 files) into /LaunchBox/Plugins/
(For those who braved testing the beta release, delete that copy of the plugin first.)
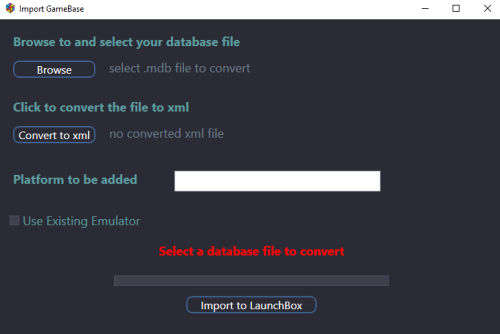
Using the plugin*
- Start LaunchBox
- Select Tools, Import GameBase
- Click Browse and navigate to your GameBase database folder and select the database file (i.e. “Amstrad CPC.mdb”)
- Click Convert to xml (may take a couple seconds)
- (Optional) rename the Platform to be added
- (Optional, but recommended) Select an emulator to use with the games being imported**
-
Click Import to LB Once you’ve clicked Import, you’re stuck until it’s done importing!
- This will 1st import the games and Extras into the Platform then copy Screenshot images (if they exist)
- When importing, DO NOT attempt to multi-task in LaunchBox!! Just sit back and let it do its thing.
- Once it’s done, close the plugin window.
* If you plan to use an emulator already setup in GameBase, setup the “GBLaunch” emulator in LaunchBox BEFORE running the plugin. (See Using GameBase Emulators below).
Some kind of important stuff:
- You need to have your own GameBase database file(s), ROMs, images and manuals.
- You need to have your databases setup in GameBase BEFORE attempting to import. Namely setting up the Paths to the ROMs, Screenshots and Extras.
- To make use of the emulators through GameBase, those need to be already setup AND working.
- You can only import into a new Platform.
- The Platform will not be setup to “Scrape As...”, so you’ll need to set that yourself for when you use LaunchBox to import images***.
- If a database you plan to import into LaunchBox doesn’t work in GameBase, it WILL NOT magically work in LaunchBox.
-
No files will be moved, copied (except Screenshots***) or altered in your existing GameBase installation folder(s).
- All games and Extras imported will point to their current location in your GameBase directory.
**Setting up an emulator
Since GameBase pretty much sets up the emulators for you through exhaustive scripts they’ve created, it makes sense to use those. This is easily done by using GBLauncher.exe (included with GameBase). However to access game ROMs that are located in game “Extras”, you’ll need to have GBLauncher2.exe.
The other option is to setup and use your own emulator in LaunchBox. Example: RetroArch for SuperNESBase.
Using GameBase Emulators
You need to add 2 files to your GameBase root folder. GBLauncher2.exe and GBLaunch.ahk.
-
Download and unzip GBLauncher2.exe and place it in your GameBase root folder. “Unblock” the file the same way as in step 2 - Installing the plugin. You can download it from here:
http://www.gb64.com/forum/viewtopic.php?t=5653.-
UPDATE Oct. 22, 2023
- The file in the above link appears to now be corrupt (bad CRC).
- An archived version of the file can be found here.
- Thanks @GreatGuy for the heads up!
-
UPDATE Oct. 22, 2023
- Copy (or move) GBLaunch.ahk (included with the plugin) into your GameBase root folder.
In LaunchBox,
1. Click Tools, Manage, Emulators…
2. Click Add
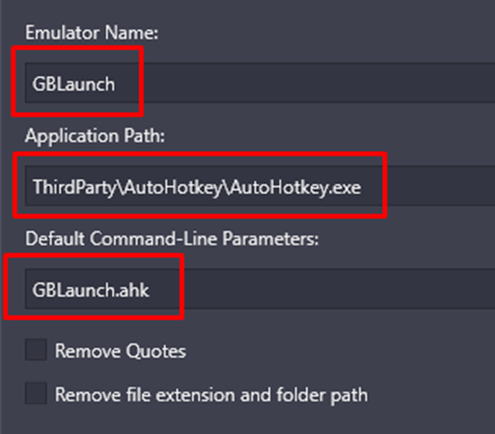
3. Give it an Emulator Name: Example: GBLaunch (But can be any name you want)
4. In Application Path: Click Browse and navigate to /LaunchBox/ThirdParty/AutoHotkey/ and select AutoHotkey.exe
5. In Default Command-Line Parameters:, type in GBLaunch.ahk
6. Now go to Associated Platforms and select an existing Platform (i.e. Atari 2600). It doesn’t matter which one. But DO NOT check Default Emulator!! You can also just type in a name like “airplane”. It doesn’t matter, as long as something is in there.

7. Click OK to save and exit.
When you run the plugin, check Use Existing Emulator. "GBLaunch" (or whatever you ended up naming it in step #3) will automatically be selected.
Using your own Emulator(s)
These do not necessarily need to be setup in LaunchBox prior to importing.
If using emulators you already have setup in LaunchBox, in the plugin, check Use Existing Emulator and select it from the dropdown list. This will automatically assign the Associated Platform to that emulator and set it as the Default Emulator for this platform.
In either case, you may need to edit the emulator and assign any Default Command-Line Parameters: and in the case of RetroArch, you will need to assign the Core and Extra Command-Line Parameters (if needed).
***GameBase Images
The only game images this plugin will touch are game Screenshots. The available Screenshots will be copied into the Platforms’ "Screenshot - Gameplay" folder.
Any other images (box art, flyers etc.) that a database may have will not be handled by this plugin in any way, shape or form. These other images are stored too inconsistently among the various databases with respect to the folders they reside in.
To add other images from the database into LaunchBox, you’ll need to copy them from the respective database folder to the corresponding LaunchBox/Images folder.
For example, Box – Front images (as LaunchBox sees them) would come from:
Vic20_v03 \Extras\Cover\Cart Box\Front\
Amiga 2.3 \Extras\Cover Scans\[letter or number]\
SuperNESBase \Extras\Boxart - Front\[country]\[letter or number]\
…and copied into /LaunchBox/Images/platform_name/Box – Front/
(It’s recommended you close LaunchBox prior to copying the images)
Disclaimer
I don’t use GameBase myself. I only know how to get the database to Import into LaunchBox. So that part I know works. 😎
If you need any help getting GameBase setup with databases and emulators they use, or setting up your own emulator(s) in LaunchBox for use with the database ROMs, ask somewhere else. These go far beyond the scope of this plugin and my personal knowledgebase.
Only a select few databases have been tested. So I imagine some refinements will need to be made to accommodate other databases. Accommodations considered will be in the form of ROMs that are listed as a games “Extras”. Examples: Extras using “WHDLoad” in Amiga 2.3. And “TAP” and “Cart” in Vic20_v03.
Special Thanks
Huge thanks goes to @dillonm for all your time and patience. Dillon was instrumental in teaching me how GameBase works and without hesitation, took time to do testing, retesting and testing once again. Without Dillon’s guidance, contributions and willingness to help, this plugin would still be sitting in beta collecting dust. Thanks Dillon!!
As always, any and all comments and suggestions are welcomed. All reasonable requests (‘reasonable’ as determined by management) will be considered.


