

Retrofrogg
-
Posts
1,290 -
Joined
-
Last visited
-
Days Won
7
Content Type
Profiles
Forums
Articles
Downloads
Gallery
Blogs
Posts posted by Retrofrogg
-
-
Also....could you add box - front - recontruction to the options list please?
-
Fair enough! I tried adding magazines to Launchbox before; I think the main problem was that LB doesn't create thumbnails for the magazines, so I had to create "box - front" images for them all manually, leading me to abandon the idea.
-
Nice! Would be great if this was integrated into Launchbox somehow, so we could see our games magazines along with the relevant platforms.
-
 3
3
-
 1
1
-
-

Updates
April 2023
- Reformatted the guide
- Removed "homebrew", as this has been removed from No-Intro sets and Dat-O-Matic at the request of multiple developers
- Expanded "Step 12 - updating the ROM set" to include instructions on how to manage this with Windows explorer
- Changed "Step 5 - determine which regions exist within a particular rom set"
Introduction
Having spent a fair amount of time finding the best way to import and manage full (not just licensed games) ROM sets, I'm sharing my method of importing and organising ROMs to help others (and in case anyone has any ideas for improvement). The focus here is on Launchbox, though if you also use BigBox then you'll see the changes reflected there. This guide is not for everyone; 1G1R afficionados who prefer the simplicity of having a single version of a game would use a different method.
Some prefer a smaller curated game collection, others full sets for platforms. Both have their advantages. The method described here has in my opinion the best of both worlds. The aims are, for each desired platform:
- To have a full ROM set for the platform with all ROMs present and correctly named
- To have each region properly separated out in Launchbox
- That each region has the correct metadata, artwork, manuals etc
- To have the commercially released games in their own playlist, though to have alternate versions, unreleased, etc available also
- To be able to update the ROM set when changes are made, with these changes reflected in Launchbox
- That the above is easy and consumes minimal time
STEP 1 - obtain the up-to-date DAT file for the platform being added, and load it into a ROM manager
Rationale: Using a ROM manager allows you to compare your ROM collection for a platform against a definitive list. The list will probably be as complete a list as you're going to get. Keep your ROM set tidy and organised and confirm the validity of your ROMs. You can check that you have all the games/ROMs, that they are correctly named, and can add any missing ones or fix any errors. You can also check that your ROM set is up-to-date, with the latest versions of roms and the most recent changes added.
These lists come in the form of DAT files, which contain lists of all dumped roms for a platform as well as the correct names and checksums. If you're not familiar with the datting world (quite different to the dating world) then it's worth doing some reading around this. The main datting groups are No-Intro (for consoles), Redump (for discs), MAME (for arcade) and Tosec (for everything else), though there are many others.
Method: Various ROM managers are available; I've found RomVault the best. It has a component called DatVault, which can automatically add DAT files and keep them up to date. The DAT files are available from all the datting groups mentioned above and are regularly updated. Note - you can skip these steps relating to a ROM manager, though it will be more difficult to keep track of any future updates or changes to the ROM set.
STEP 2 - obtain the full rom set for the platform being added
Rationale: If you're going to do something, you may as well do it right. Obtaining the full ROM set ensures that you have all of the games for that platform (unless any are MIA) - generally including released games, unlicensed games, prototype and many other kinds of ROMs. If you're the collector type then this is the way to go. Note that hacks are not included; if you want to add these, you can do so separately at the end.
Method: I won't list ROM sources here, but ensure that you obtain the most up-to-date full ROM set for the platform.
Once you have the ROM set and have placed it in the folder where it is going to live, leave it there rather than moving ROMs into any sub-folders. This means that future scans of the folder with the ROM manager will work. Separating out any roms into subfolders in Windows Explorer will break the link with the ROM manager.
STEP 3 - scan the ROM directory in the ROM manager using the DAT
Rationale: This will help ensure that all ROMs are present and correct. In RomVault, if all ROMs are present in the folder and correct, then the icon for that platform will be green.
Method: This involves telling the ROM manager where the roms are stored for that platform, and then running a scan.
Below you can see my entry for the NES in the RomVault DAT tree, showing that I have all 4452 of the correct roms:
This uses the No-Intro DAT file, which is regularly updated and contains all licensed games as well as beta versions, unlicensed games, demos, prototypes and samples. Sometimes ROMs will be missing from your set and will need to be added, or sometimes roms will need "fixed" within the app.
STEP 4 - decide on how you want to separate the regions for the platform
Rationale: We are going to import ROMs by separate regions, as this has various advantages over importing the full set and then letting Launchbox create region playlists. Doing each region separately means:
- You will have all released games for the platform - as some games were released in specific regions only
- You can browse games for each region separately in Launchbox
- All ROMs will have the correct regional artwork and metadata
- ROMs with more than 1 region (e.g. "Excitebike (Japan, USA)") will be correctly handled, and will appear under both regions and with the correct artwork
- Any regional variations in the platform/console itself will be correct - e.g. the Nintendo Famicom and Nintendo Entertainment System will appear separately with the correct names, platform videos, images, metadata etc.
In terms of how to separate the regions - the 3 main regions are North America, Europe and Japan. These would tend to be the default 3 regions for a platform, though there will be some variation between platforms and so you can choose this on a per-platform basis. There is also a "World" region, which is for games that were released worldwide (we are going to add the "world" region roms to each of the 3 main regions).
As regards the other remaining regions, you could have a 4th region group for "other", though I think it makes more sense to group these remaining regions under either North America (if it is an NTSC region) or Europe (if it is a PAL region). This page is quite useful in listing regions:
https://nintendo.fandom.com/wiki/Regions
Method: For the above to all work correctly, we are going to import each of the 3 regions as it's own platform in Launchbox - we will then group these platforms under a platform category. The hierarchy will end up looking something like this:
Consoles (platform category)
--Nintendo (platform category)
----Nintendo Entertainment System (platform category)
------Nintendo Entertainment System (North America) (platform)
------Nintendo Entertainment System (Europe) (platform)
------Nintendo Famicom (platform)
Each of the above platforms will contain the relevant playlists (which we'll get to later). In Launchbox it will look something like this (ignore the other platforms for now):
STEP 5 - determine which regions existing within a particular ROM set
Rationale: If we are going to import the ROM regions separately, we need to know which regions exist within the ROM set so that we can make sure that all are imported.
Method: A relatively easy way to do this is to do the following:
- Import the full ROM set into Launchbox. Don't scrape for any game information, images, videos, bezels or anything else. When doing the import, set the platform name as the first region that you are going to import (e.g. Nintendo Entertainment System (North America)
- Right-click the platform in Launchbox and select "auto-generate child playlists"
- Make sure only "Regions" is selected and click "OK"
- Make a note of all the regions that appear as playlists; these are all the regions that exist within that ROM set
- With the platform selected, select all games, right-click and "delete"; the platform, playlists and games should all be gone from Launchbox
However, potentially a better way is to use the following Python script I made, which will parse any directory and return a list of the regions contained therein (it works with No-Intro files; I haven't looked at other datting groups yet):
To run the script, open a command prompt, navigate to the folder where the script is stored, then type (without the quotes): "python list_regions.py".
STEP 6 - import the first region into Launchbox
We are now going to properly import the first region. We will start with the North America region, which is generally the main and preferred region for a platform. Again, using the No-Intro Nintendo Entertainment System set as an example, all the North America ROMs contain "USA" in the filename. We could just run a search in the ROM folder in Windows File Explorer for "USA", though that would also return games which have "USA" in the title. You could import all those, but you would then have to delete the games which are non-North America but have USA in the title.
An easier way is to search specifically for the USA region by searching for "(USA" and importing those, and then searching for "USA)" and importing those. The No-Intro NES ROM set doesn't seem to have aeny triple-region ROMs, though if a ROM set had these then I would go for the alternative option mentioned above.
Note that Windows File Explorer is funny about including a bracket in the search string. You have to enter it a certain way. See the last post in this link for how to do it properly:
Basically you have to search for (without the first and last quotation marks): "name:~"*(USA*"" and then "name:~"*USA)*"" - for example"
So, do the first search, and then import all those into Launchbox. Again, at this stage don't scrape for game information, images, videos, or anything else. In the importing ROMs dialogue I tend to ask Launchbox to leave the ROMs where they are. I would set the platform as "Nintendo Entertainment System (North America) (using this example), and set the "scrape as" to "Nintendo Entertainment System" (which should be selected by default). Make sure to check the box for "Force importing duplicate games". Although it is tempting, make sure that "Combine ROMs with matching titles into a single game" is unchecked. If you like, you can combine some of the ROMs later - I recommend doing this only for "released" games, as these are less likely to change or be updated.
If you have "Combine ROMs with matching titles into a single game" checked, then only one of the ROMs is counted as a game, with the others being added as "additional applications". This is a flaw of the app as is stands, and means that any auto-populated playlists that you make will not recruit ROMs that are listed as "additional applications". Also, note that if you later decide to expand the combined games, the additional apps will have lost the associated images and you will have to re-scrape those.
Once all the ROMs have been imported, do the same for the second search term. You should now have all North America (USA) ROMs for that platform imported.
Finally, repeat the above steps for the "World" region (adding them to the North America platform). All "World" region ROMs were released in North America, and so should be a part of that set. You should now have all ROMs for the North America platform imported.
STEP 7 - create the Nintendo Entertainment System platform category
If you have not already done so, now is a good time to create the platform category for the NES platforms. I organise my platforms first by manufacturer, and so have a "Nintendo" platform category under the "Consoles" category. Make sure you're viewing the platform tree in "Platform Category" mode by the way. You can then create a "Nintendo Entertainment System" plaform category and put it under the "Nintendo" category.
You can now move the "Nintendo Entertainment System (North America)" platform to the "Nintendo Entertainment System" category.
STEP 8 - import the other regions into Launchbox
Now repeat step 6 for the "Europe" region, and then for the "Japan" region. Make sure every step is followed, including adding the "World" region ROMs to each.
Finally, look at the region list for that platform that you made earlier, and see if there are any regions that you have not yet imported. You can run searches in Windows Explorer for these remaining regions. There won't be many games that have been specifically released in these other regions.
For example, if a ROM has the region "Australia", it will not have been imported yet using the above method - go ahead and import it, adding it to the "Europe" region platform as Australia is a PAL region (if you want to use the method mentioned above - you can create a 4th platform for "other" regions if you want).
STEP 9 - organise the ROMs for each of these region platforms into release type playlists
Now that we have all the roms correctly imported into Launchbox and under the 3 main region categories, we are going to organise them within Launchbox. Start with the North America region.
At this stage you won't have any playlists. All ROMs will be grouped together under the platform heading. These ROMs will include released games but also unlicensed, demo, etc etc.
The first step is therefore to separate these ROMs out by release type. Launchbox has a metadata field for "Release type" which is automatically populated from the ROM filename. I find that this works for most, but not all, ROMs. Why it works for some but not others, I'm not sure.
Whilst Launchbox can create a number of auto-playlists (e.g. for regions, play modes and genres), unfortunately it cannot currently do this for release type. So we are going to create these manually.
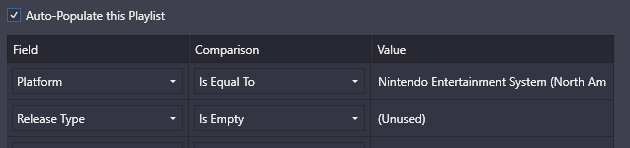
First, create a platform category under the main region platform ("Nintendo Entertainment System - North America" using our example) called "Release Type". Next, create a playlist called "All Licensed Games". Under the "Auto-Populate" tab of this playlist, you need 2 rules; Platform / is equal to / Nintendo Entertainment System (North America), and Release Type / Is Equal To / Released. In the parents tab, make sure that the playlist is set to appear under the "Release Type" category only. Click OK. You should now see something like this (don't worry about the numbers):
Next, make similar auto-playlists for Unlicensed, Beta, Demo, Prototype, Sample, Program and Pirate. You could also do Aftermarket, but see the paragraph below. You should see some games appearing under these playlists when you refresh.
Note that the No-Intro sets also contain "Aftermarket" releases; there is ongoing debate on the best tagging method within No-Intro. Currently, "unlicensed" is a kind of umbrella tag which coincides with "aftermarket" for the majority of ROMs, though not all; see here for some further information about the tagging, though note the error in that not all "aftermarket" games are "unlicensed":
https://wiki.no-intro.org/index.php?title=Aftermarket_Guide
I think that these release types should be fairly universal amongst No-Intro ROM sets, but if you're doing this with other No-Intro ROM sets then it would be worth checking that there are no other release types mentioned.
Now to address the ROMs which don't have a release type assigned. Create a playlist called "No release type" with auto-populate rules: platform / is equal to / Nintendo Entertainment System (North America), and Release Type / is empty.
This will then list all games without a release type. View the games in this playlist in "list view" and then arrange by "Version". You can now go through the list, selecting groups of games with the same release type, and then adding in the correct release type via right click - open bulk edit wizard. Go through the list until all ROMs have a release type assigned, and there are none left in this playlist.
Now repeat this step for the other region platforms.
STEP 10 - create the other playlists
Now you can go ahead and "auto-generate child playlists" for the other playlists that you want - I tend to add in "genre" and "play mode". You may want to create other auto-populated playlists - for example in the NES No-Intro set you could create a playlist for "virtual console" ROMs, "Namcot Collection" ROMs and others. You can create manual playlists, but bear in mind these will not be auto-updated when you update the ROM set. For this reason, I prefer to have mainly auto-populated playlists.
STEP 11 - scrape the game information, metadata, artwork and videos
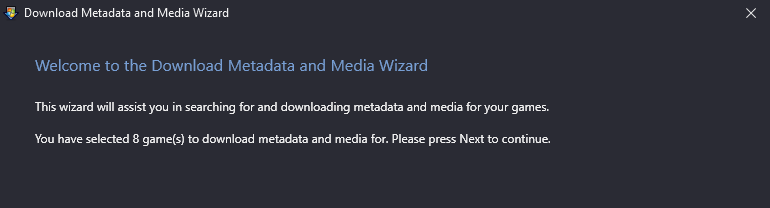
Now that the ROMs are properly organised, you can scrape the game information, metadata, artwork and videos - whichever items you prefer to have. Before starting, go to tools/options/region priorities, and make sure that the region for the ROMs that you are going to scrape is selected and at the top. Select any other regions that you have ROMs for. Then select all the games that you want to scrape for, and to go tools/download/update metadata and media for selected games. Then do the same for the other region platforms, selecting the appropriate region priority before scraping.
Once all the above has downloaded, you can manually check through the collection and fix any errors in terms of box art region. I found that there were a small number that needed changed. You can replace the standard scraped images with art packs if you want.
STEP 12 - updating the ROM set
That's it! You should now have a ROM set in Launchbox that is properly set up. A good thing about doing it this way is that you can update the ROM set (relatively) easily, and so keep up to date with any additions or changes.
When a ROM set is updated, if you have the latest DAT then on scanning in your ROM manager it will show the missing ROMs. You can then add these to your ROM folder, re-scan to make sure everything is OK, then import these ROMs into the relevant region platforms in Launchbox. If the update process has removed some old or defunct ROMs, then in Launchbox you can go to Tools / Scan / For Removed Roms in Currently Selected Platform". Do not use the Scan / For Added Roms feature, as it will look in your ROM directory and add all the ROMs that are for the other regions.
In terms of how to update the ROM set, there are various methods. Currently the way I do it is to:
- Download the latest ROM set for the platform
- In your existing ROM folder in Windows Explorer, add a "date created" column (in "detail" view)
- Copy all the ROMs from the new set to the existing set; when it asks if you wish to over-write, select "no"
- Only the missing ROMs will be copied across
- Now sort the ROM folder by the "date created" column - the newly copied across ROMs should have that date & time set to when they were copied across
- You can now filter that folder by that date/time, to show only the new roms, click the down arrow at the edge of the "date created" column and choose the corresponding date
- You can now search within just the new roms for your regions, and import those into Launchbox; I start by searching for the "world" region, then after importing those I change the search to "-world" to remove those; then wrinse and repeat for the remaining regions; if there are any ROMs with dual regions then those would have to be added manually
I hope this is helpful. The method is still too cumbersome for my liking and I'll keep working on streamlining things.
Ideally Jason and Gordon would get together to combine their powers and integrate rom management functionality into Launchbox. Update: I hear a plugin from Gordon is in the works!
Let me know of any suggestions for improvement!
-
4
-
 1
1
-
 4
4
-
With various people working on various game media and box art projects (in particular with the 3D box model functionality with spines etc), what seems to be lacking is a central spreadsheet or similar where this work can be methodically documented and collated - in particular to avoid duplication.
This thread could be a start of something like this.
Anyway, I've started on work on game box art for the Nintendo NES (North America region). I plan to create front, back and spine (hopefully all 4 spines) images that can then be used to construct the 3D model. These images exist to some degree already - though my set will be "realistic" - based on original box scans - and not cleaned, airbrushed or Photoshopped. The aim is to have the 3D model look like the actual physical cardboard box rather than a computer generated model.
-
5
-
-
A lot of work going on here! Would you be able to shed some light on the tools you use to make these improvements? Also, are you doing spines at all, given the new 3D model box functionally in Launchbox?
-
Very sorry to hear this.
-
1
-
-
Noice! Huge improvement to be able to view the 3D model boxes full screen in Launchbox. Would be amazing to be able to lock the vertical rotation when using the mouse (so we can rotate the box horizonally without it flipping about).
Only issue is I'm getting a white line at the top of the screen when viewing 3D model boxes fullscreen - but this only happens on the 4k monitor and not the 1440p one:
-
As far as I can tell, if you consolidate roms, then any rom in that set which isn't the primary/main rom won't display in any auto-generated playlists. Is this correct, and is there a way round it?
-
I ran the "consolidate roms" feature on my Nintendo Famicom platform, after they had already been imported. A bunch of them consolidated, but many didnt. See screenshot below as an example. Shouldn't these and similar have been consolidated too?
-
On 9/2/2021 at 2:09 PM, C-Beats said:
Currently different fields are joined with an AND and multiple entries of the same field are joined with an OR. There is currently no way to change that.
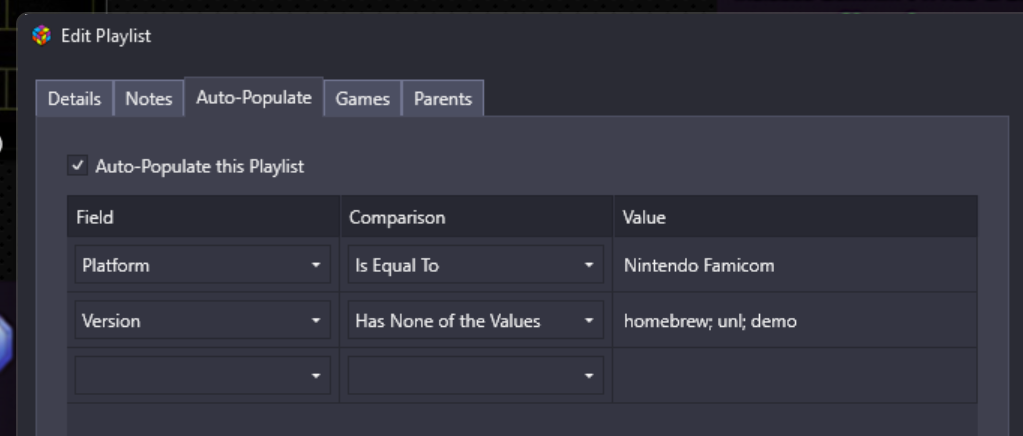
Is this function still working? For my Famicom platform I have an auto playlist that looks like this:
But it doesn't seem to be working; all games for that platform are included in the playlist.
-
Great plugin! Please consider enabling 3D rotatable box on the 2nd monitor

-
1
-
-
Looks awesome
") And useful info.
And useful info.
-
1
-
-
It would be very useful if the audit tool could be run on a playlist, rather than just a platform. For example, I have a playlist where I'm trying to remove all homebrew games; the only way to do this en-masse seems to be via the audit tool. I don't want to remove them all from the platform however.
You can vote for this feature here: https://bitbucket.org/jasondavidcarr/launchbox/issues/7392/allow-audit-tool-to-work-on-playlists-not
-
Spine images are great for the 3D box models, and hopefully we will soon have image categories for all 4 spine images so that we can make the models properly. However, I don't want these spine images cluttering the image carousel. Can spine images be left off the carousel please?
You can vote for this feature here: https://bitbucket.org/jasondavidcarr/launchbox/issues/7387/spine-images-leave-off-carousel
-
You can currently enter custom game metadata - i.e. create your own metadata fields and apply to games or groups of games. It would be very helpful to be able to add custom platform metadata too, to add useful details regarding the platforms.
You can vote for this feature here: https://bitbucket.org/jasondavidcarr/launchbox/issues/7386/please-allow-custom-platform-metadata
-
@TheHillbillyGamerDon't forget to share that great work! I plan to start similar work; it would be good to avoid duplication.
-
1
-
-
At least as an option, could we have the ability to remove the vertical rotation of the 3D model boxes? When rotating them with the mouse currently, it's quite hard to stop it rotating in the vertical plane and makes controlling the rotation kind of difficult. We really only need to see the front, back and sides of the box - I don't think seeing the top or bottom adds anything.
As an example, see this user's implementation, where only horizontal rotation is possible; it makes rotating the boxes nice and easy:
https://bigboxcollection.com/#CollectionOverview
You can vote for this feature here: https://bitbucket.org/jasondavidcarr/launchbox/issues/7385/3d-model-box-remove-vertical-rotation-keep
-
Have you tried messing with the relevant xaml @Qbertzelious?
-
Nice one vaderag
-
1
-
-
@polygonslayer@TheHillbillyGamer Thanks - don't forget to vote for these features on the bitbucket link above.
-
Many thanks for implementing my request!
-
1
-
-
Another issue with the 3D model box; the resolution on the back is too low to read the text on many games. The "back" image is of sufficient resolution, but when it gets put onto the model the resolution seems to drop a lot.
-
It would be great if the 3D box model could be maximised from the carousel, just like the other image types can be. For such a cool feature, the carousel window is a very small viewing platform.
You can vote for this feature here: https://bitbucket.org/jasondavidcarr/launchbox/issues/7376/allow-maximise-of-3d-box-model-from


LaunchBox Multi Monitor and BigBox +3rd monitor plugin
in Third-Party Applications and Plugins (Released)
Posted
Thanks @JoeViking245 . But that’s not really a workaround - then all the box-front-reconstructed images will show in the main games list, when it should show box-front.