About This File
Create marquee images from Clear Logos (for use with Pixelcade™ LED Marquee displays)
Pixelcade already provides numerous marquee images for many Platforms. But you may come across one or more that are missing.
This plugin will create 128x32 marquee-resolution png images using your games existing Clear Logo and place them in your Pixelcade directory**, under the corresponding Platform folder.
What’s needed:
- The plugin files
- Pixelcade software installed (including LEDBlinky) [https://pixelcade.org]
- ffmpeg.exe (used to convert/create the marquee images) [https://ffmpeg.org] (included)
- (optional) An actual Pixelcade™ Marquee display
Installing:
- Download and unblock the plugin zip file (Right-click the zip file, select Properties and check UnBlock)
-
Copy the contents of the zip file into your ../LaunchBox/Plugins/ folder
- i.e. D:\LaunchBox\Plugins\PixelcadeMarquees\
Setting up the plugin:
The default install location for Pixelcade is “C:\Program Files (x86)\Pixelcade”**. If you installed it somewhere else, edit “pixSettings.xml” located in the Plugin folder. (Notepad can be used to edit it) Change the path (line #3) to match your install location. Save and close.
- <?xml version="1.0" encoding="utf-8"?>
- <settings>
- <pixCadePath>C:\Program Files (x86)\Pixelcade</pixCadePath>
- </settings>
**Note:
If your Pixelcade installation is located under “C:\Program Files (x86)”, you will need to have Access Permission to be able to save the images there. The plugin will check for permissions when launched. If it doesn’t have the proper permission, images will be saved to the "Completed" subfolder.
i.e. D:\LaunchBox\Plugins\PixelcadeMarquees\Completed\
You will then need to copy them manually when done. The images will be saved to their own Platform subfolder as Pixelcade sees them. (Pixelcade Platform naming conversions are taken from "console.csv" located in your Pixelcade directory.) Example: if your Platform is called "Arcade", images will be saved in the folder "mame".
Using the plugin:
- Start LaunchBox.
- Select one or more games.
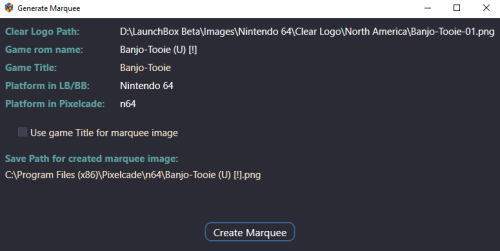
- Right Click and select Generate Pixelcade Marquee Image
- Click Create Marquee
Game Title vs. ROM name:
In most cases LaunchBox passes the games ROM name to LEDBlinky (which in turn passes it to Pixelcade). But for certain games (namely Steam games [and others?]), LaunchBox will pass the games Title. For these, you’ll want to check the box Use game Title for marquee image.
If the games Title contains illegal characters (such as : [semicolon]), the image will not be created.
When selecting multiple games, if you check Use game Title for marquee image and click Create Marquees, if the game Title contains illegal characters, a message will popup indicating that game will be skipped. You can bypass these messages by checking Skip warnings about Titles with invalid characters.
Special thanks to @megashub for coming up with the idea for this plugin and for figuring out how to manipulate and convert the images to make them suitable for Pixelcade™ displays.
As always, questions, comments and suggestions are always welcome.
Edited by JoeViking245
What's New in Version 1.1.0 See changelog
Released
V1.1
Now removes excess white space and crops images before re-scaling.
.thumb.png.c9faf450e4d2b690a819048b18173f61.png)


Recommended Comments
Join the conversation
You can post now and register later. If you have an account, sign in now to post with your account.