


About This File
This plugin adds enhanced Marquee capabilities plus support for unlimited screens.
- Enhanced Marquee Capabilities:
- Adds support for Platform Video Marquees, Playlist Video Marquees, and Platform Category Video Marquees.
- Adds support for Marquee Startup Videos.
- Adds support for animated gif files.
- Fixes marquee shift issue for TeknoParrot games.
- Marquee(s) will work in LaunchBox, not just in BigBox.
- Adds optional blur-fill background effect when media is not stretched to fit the entire screen (as of v2.0.10).
- Support for a 3rd screen or unlimited additional screens each displaying their own priority based list of media.
- Each screen has access to ALL media that has been imported to LaunchBox (all images, all videos, plus rotating 3D box models!)
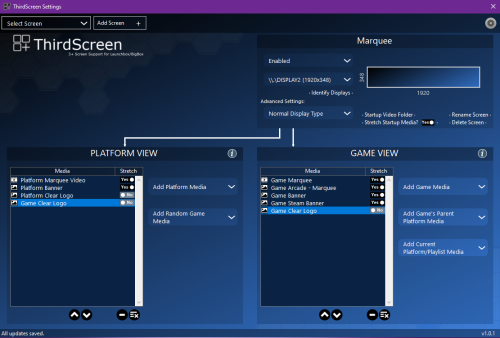
- Graphical user interface for setting up screens. Your theme files do not get modified.
- Ability to stretch or not stretch based on the media type being shown on each screen.
- Screens are tracked by GPU port stable IDs, so nothing will ever break due to Windows re-ordering display numbers.
Demo Videos:
Installation:
- *** Before installing, please make sure you are using the latest version of LaunchBox. Version 13.0 or higher is required. ***
- Download ThirdScreen.zip to your PC. Right click on the zip file and extract all files.
- Close LaunchBox/BigBox and copy the Plugins and ThirdParty folders to your LaunchBox directory.
Adding a new screen:
1. If you are setting up your main Marquee screen, you'll first need to disable the Marquee in BigBox settings in order to transfer control of it over to ThirdScreen. Open BigBox. Hit escape to go to BigBox settings. Go to Options->General->Marquee Screen and set it to "None".

2. Select ThirdScreen Settings either from the Tools dropdown in LaunchBox or the settings screen in BigBox.

3. In the ThirdScreen Settings app choose "Add Screen" in the upper left.

4. Give this screen a name. If this is your main marquee, make sure "Start with typical marquee media" is checked - this will start you off with the typical expected media for a main marque (e.g. marquee videos, marquee images, banner images, clear logos, etc...). Then hit Continue.

5. Click "Identify Displays" and take note of the name displayed on the desired display. Then choose
the corresponding display name from the "Choose Display" drop down menu.

Choosing which media shows on each screen:
1. Select a screen from your list of existing screens.

2. Add desired media to both the game and platform views for this screen. (Tip: You can hover over most drop down boxes and controls to get a more detailed description of what each one does).

3. Adjust the priority of each media item up or down (items higher on the list have higher priority). ThirdScreen will search the selected game or platform's media starting from the top of the list and working its way down until it finds something to display.

4. For each media item in your views you can choose whether or not to stretch fill the screen. If set to No, then the item will be uniformly stretched (aspect ratio will be preserved). If set to Yes, the media will be stretched to fill the entire screen (aspect ratio will not be preserved). (Your choice will depend on the type of media and the screen dimensions. For example, Marquee videos/images will look best stretch filled on a bar type display but not on a 16:9 aspect ratio display. Video snaps will look best stretch filled on a 16:9 aspect ratio display, but not on a bar type display.)

Adding startup videos or images for each screen:
1. Select a screen from your list of existing screens.
2. Click "Startup Video Folder" to open the startup folder for this screen. Copy any media you want to be displayed at startup for this screen into this folder. Video files and static images are supported. If there is more than one item in the folder, ThirdScreen will choose one of them randomly to display at startup.

Adding Platform Marquee Videos, Playlist Marquee Videos, and Platform Category Marquee Videos:
1. In LaunchBox select Tools->"Manage Platform/Playlist Video Marquees"

2. From here you can add and manage video marquee files for Platforms, Playlists, and Platform Categories. Once added, they will be available for display using the ThirdScreen Plugin.

FAQs:
Q. How many screens are supported?
A. As many as you want. The only limit is the number of hdmi or display ports on your PC.
Q. Can I use this Plugin if I only have a single marquee screen?
A. Yes, if you don't have a third screen you can still use this for your main marquee. That will get you the added benefits of platform marquee videos, animated gif support, marquee startup videos, etc.
Q. If I choose to display 3D box models, how can I rotate them?
A. The 3D box models will be self-rotating. They will continuously spin while being displayed (no need for any user input).
Q. In Game View, what's the difference between "Add Game's Parent Platform Media" and "Add Current Platform/Playlist Media"? Which one should I choose?
A. It just depends on your preference when viewing Playlists. When scrolling games in a platform wheel, it will not make any difference which of the two dropdown lists you chose from. When scrolling games in a playlist wheel choose "Add Game's Parent Platform Media" if you want the media to change depending on the type of game (for example, the playlist might be a mix of NES, Wii, and Arcade games). Choose "Add Current Platform/Playlist Media" if you instead want to always display the Playlist's media (for example the marquee or theme video from your Favorites playlist).
Q. Will my Theme xaml files get modified?
A. No, the plugin never touches your theme files. You are free to switch and add new themes whenever you want.
Q. How can I delete/modify media in LaunchBox if it is currently being displayed by ThirdScreen?
A. You might sometimes run into a situation where you want to delete or modify a game's media files, but LaunchBox gives you an error because the media is in use. No problem, just temporarily disable ThirdScreen when in LaunchBox. Open the ThirdScreen settings app, click the gear icon in the upper right, and choose "Disabled when in LaunchBox".
Q. Why doesn't Platform view work for my marquee(s) when in LaunchBox?
A. This has been fixed with version 2.0.6 of this plugin as long as you are on LaunchBox version 13.1-beta-6 or higher..
Troubleshooting Steps:
1. Make sure you are using the latest version of this plugin.
2. If this is your main marquee screen, please first double-check that you have disabled your marquee in BigBox settings. The ThirdScreen plugin will not attempt to use your marquee display if BigBox is using it.
3. If some image or video you've added isn't showing up when you expect it to, double-check that it is categorized correctly in LaunchBox. It's very easy to add media in LaunchBox and then forget to change its image or video type (I do that all the time).
4. If you are having an issue, please enable logging for both the ThirdScreen plugin and LaunchBox/BigBox, and then send me the log files after you try the thing that isn't working. The log files will be in the LaunchBox/Logs folder. To enable logging do the following:
- For ThirdScreen: Tools->ThirdScreen Settings, click the gear icon in the upper right and choose "Debug Log File Enabled".
- For LaunchBox/BigBox: Tools->Options->General->Debugging, check "Enable Debug Logs".
5. If LaunhBox/BigBox will not start at all after installing the dll files, make sure you are on version 13.0 or higher of LaunchBox and also try disabling any Pen or TouchScreen devices listed in Device Manager (there is currently a known conflict with the Windows Pen driver which is affecting some users). (Edit: This has been resolved in v2.0.13)
6. If animated gif files aren't displaying for you, try running LaunchBox/BigBox with admin privileges. (Edit: This has been resolved in v2.0.11)
7. If you are having issues with the ThirdScreen settings app reporting an incorrect resolution and/or your marquees being incorrectly sized, clipped, or off-center then it is most likely caused by dpi scaling. ThirdScreen v2.0.14 and higher should fix most scaling issues in both Win10 and Win11.
8. This plugin tries to fix any marquee-shift issues when a game changes the main screen resolution. As of version 4.0.0 you can select between medium mode, aggressive mode, or disabled. Medium is the default mode and is recommended. If a game changes the screen resolution, medium mode will reposition all marquees to their correct locations. Aggressive mode also hides the BigBox window to ensure it does not end up covering one of the marquee screens. While aggressive mode works perfectly on mine and many other setups, some people have reported that it can interfere with game loading or exiting (including BigBox remaining hidden after exiting a game). If you run into those types of issues you should set the option back to medium mode or disabled. In LaunchBox, go to Tools->ThirdScreen Settings. Then click the gear icon in upper right and select "Medium Shift Handling".
-------------------------------------
Enjoy, and please follow the file to be notified of updates.
Edited by superrob3000
What's New in Version 2.0.5 See changelog
Released
Fixed a race condition that could cause BigBox to get hidden when exiting games that change the main screen's resolution.


