.thumb.png.9332e12cab6cec0213b9ffd456a9a968.png)


About This File
IMPORTANT: I am not working for the Supermodel Team. This is in no way official. It's just me, admiring Ian and the teams amazing hard work. Presenting it in a way that is usable for PC, Controller and Mouse with minimal effort. A lot of people are turned away from this emulator because of the setup. Thinking it's broken or too much hard work. I want to change that and make things easy so people realise just how good Supermodel is.
Thank you to @Joejoe for a bunch of cheats and unlocks and checking everything as it's progressed. Thanks to @Baggio for providing the AHK script for Light Guns. Thanks to @Johnny T for various stuff, and @Headrush69 for something I can't remember.
Much has changed with this emulator over the past 2 and a bit years. With new features, fixes and the emergence of a new UI, it's safe to say Supermodel has never looked better. So, it's time to flatten everything and create a new standard for the project, at least with it's setup and usage. It's time to strip out what ain't needed. With 2 permanent solutions to the fabled 'light gun indexing' issue, light gun users should no longer need to ask 'why my light gun no worky?' Also, thanks to @Joejoe we now have all unlocks for every game. The last one to fall was Dirt Devils with it's extra track and truck.
The main update is the Light Gun AHK script and extra stuff for Dirt Devils.
With this pre configuration you will get:
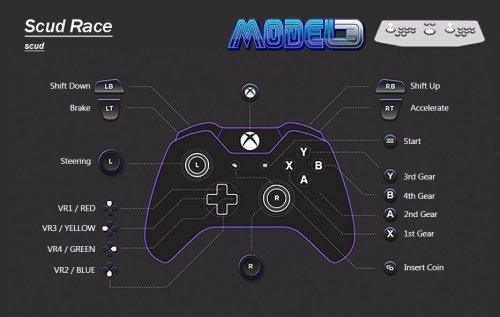
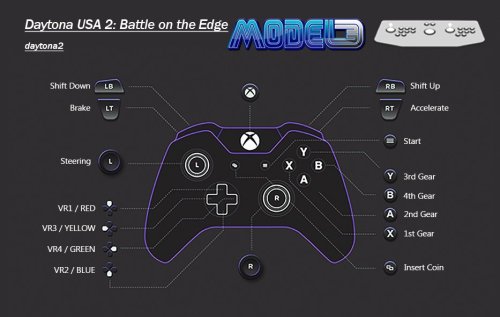
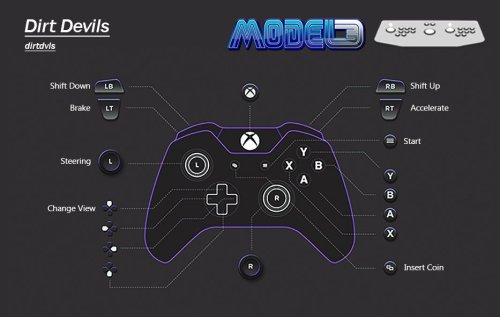
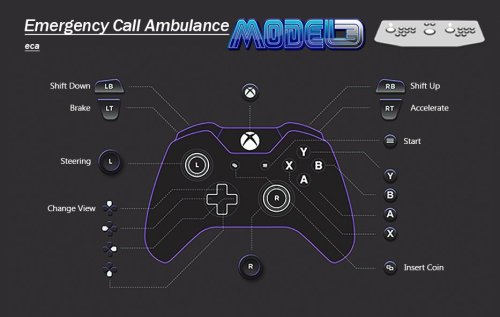
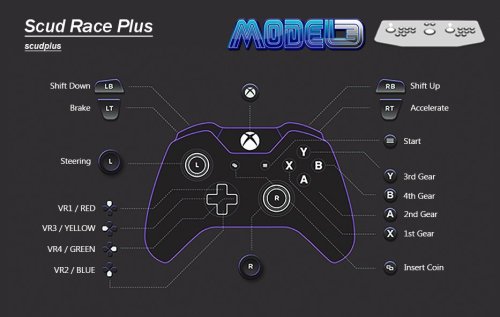
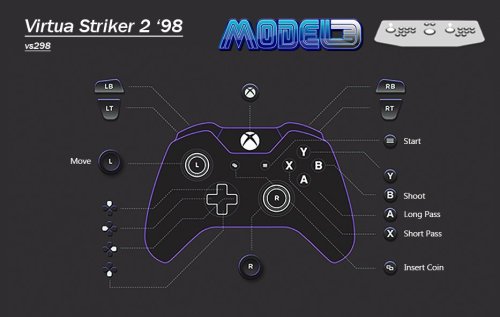
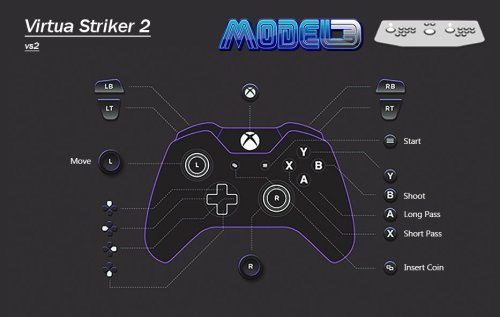
Controls Pre Configured. Please see the images provided for button layouts. I have spent many hours on figuring out the best layouts to ensure no clashing inputs and intuitive controls, I could go into detail but again it would need a video an hour long to cover it all. Just know a 'dead zone' of 7% has been added to the analogue sticks to prevent saggy sticks from steering your car for you, or randomly entering directional inputs when you don't want. Also, some games will use force feedback to vibrate your controller.
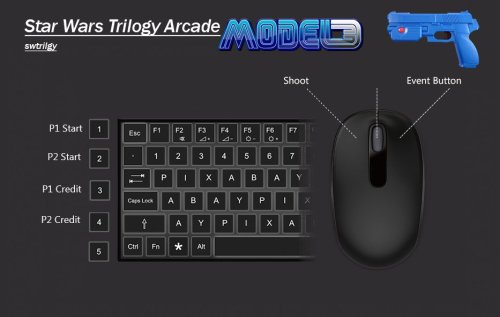
2 Player Mouse Light Gun Support. The Lost World, The Ocean Hunter, L.A. Machineguns and Start Wars Arcade (yes I have calibrated for both players). By default the mouse indexes have been set to MOUSE1 and MOUSE2. For mouse only users this is generally fine, but light gun users may find their mouse index set to a higher/different MOUSE number. Supermodel also LOVES to make windows switch mouse indexing, more than other emulators, causing your Light Guns just stop working. The new UI has a solution for this, where you essentially shoot/click a box before booting the game, when RAWINPUT is set. This sets the correct indexing and light gun controls for you, ensuring a seamless light gun experience every time you play.
However, the UI solution is not currently deployable into LaunchBox. But...thanks to @Baggio we now have an AHK script which will fix your light gun index permanently with LaunchBox (and without). It does require some setup, but once it's done, it's done. It's pretty much a bullet proof solution, pardon the pun.
Test Menu Fixes. Every game that needed a test menu fix has had it done. For E.g. the Network Board Not Present issue in Daytona 2, and Feedback Lever issue in Star Wars. This includes setting many of these games Cabinet Type to 'normal' rather than leaving them set to Deluxe. Most of the Deluxe variants have more input options (clutch, fishing line etc) that aren't used or emulated, especially for use with a controller. All games are set to Free Play, Japanese language set to English, and regions have been changed to USA where possible.
Analogue Steering Saturation & Analogue Calibration. All of the racing games except Sega Rally 2 have very twitchy steering. I have spent hours sorting out the Analog Saturation to make them more playable. However, the fact is these arcade racers use 1:1 Analog steering. This is TOTALLY NOT how console racers work, unless using a proper analog steering wheel. As the steering is 1:1, it reacts as fast as the stick moves, which again is NOT how console racers work with controllers. If you have the analog stick fully locked to the left and release the stick, the steering will return to centre at the same speed as the stick moving, REALLY really fast. Again... console racers don't do this. There is no current way around this, I have mitigated it, but not removed it. You will have to ease the stick back to centre like you would an analog steering wheel to be able to play effectively. Just be gentle. Sega Rally 2 is fine tho.
Enhancements. Some games benefit from having different modes activated. For e.g. Sega Rally 2 'Game Type' set to 'Special' enables 3 laps per stage rather than just the one. Virtua Striker has Golden Goal and Penalty Shootout modes that are off by default, having a longer play time is also preferable in this type of game. There's also little changes like setting Speedometers to MPH from KPH. Please see the table below for more info.
Audio Configured (sorta) Left at default the audio is quiet/loud and not balanced for most games as the baseline (not bassline) is not known. It's actually a god damned mystery how these cabs were balanced for audio. Supermodel simply sets it all to max by Default leaving some games really loud and others really quiet. Apparently that's how it was with OG hardware. Meaning the service technician would have balanced these depending on the setup. As you can link certain games like Daytona, audio would have needed to be balanced in accordance, manually. Is there some kinda document or guide out there that's missing, or did the techs just do it by ear? Who fuckin' knows man! There is NO official audio balance standard for Model 3 games, that we know of!
So, Audio has been adjusted on a per game basis. This took ages and would probably need a video an hour long to explain. Just know that it was super confusing with the Balance option doing different things per game.
I adjusted every games volume to be 'about' the same db. This aspect of the project is the last piece of the puzzle. The audio emulation seems to be getting some attention recently, so gonna hold off to see what happens.
I have provided a pre configured Supermodel.ini file for XINPUT and DINPUT.
XINPUT (Xbox/Windows) is by far the preferred input method. This is because all XINPUT controllers are the same between controllers with their input IDs. This is great for making pre configurations because it's the same for everyone.
If you are unsure as to what input system your controller uses a quick google search should tell you, or this should tell you https://gamepad-tester.com
DINPUT is not so great for making pre configs as their input IDs can vary between controllers.
So, now here comes a...
DISCLAIMER: FOR THE DINPUT PRE CONFIG I USED A PS4 CONTROLLER. IF YOU ARE USING A DIFFERENT DINPUT CONTROLLER YOUR INPUTS COULD BE WRONG AS DINPUT CONTROLERS CAN VARY WITH INPUT IDs.
Use X360CE if your DINPUT controller inputs are incorrect, and use the Xinput ini instead - https://www.x360ce.com/
So with that out of the way.
SETUP INSTRUCTIONS
- Download the most recent Supermodel Git version from the official website here - https://www.supermodel3.com/Download.html
- Download the Sega Model 3 UI from the official GitHub page here - https://github.com/BackPonBeauty/Sega-Model-3-UI-for-20240128-/tree/Segamodel3UIver1122
- Download NVRAM & Correct INI file for your controller from this page.
- Unzip all of this.
- Transfer/copy all the files from the UI folder into the Supermodel folder.
- Transfer/copy the correct Supermodel.ini into the Config folder of Supermodel and replace the one already there.
- Transfer/copy NVRAM files into NVRAM folder of Supermodel.
- Place ROMs into the ROMs folder in the root of Supermodel. You can use a custom location, but this location will mitigate issues.
- Start the UI, set your settings to your preference and PLAY!
Roms INFO
- Use as recent as possible MAME NON-Merged ROMS. DON'T USE MERGED ROMS. Split will work but will be missing files needed for controller rumble/FFB.
- Supermodel is now kept in line with MAME rom updates, if they are to do with Model 3 Games.
-
You can use as old as 0.236. Supermodel is "backwards compatible" to this point. However, 0.263 or newer is best, the reasons why are below:
magtruck was updated 0.249
oceanhun was updated 0.253
scudxo was added 0.263
ONLY THESE VERSIONS HAVE BEEN CONFIGURED FOR.
dayto2pe
daytona2
dirtdvls
eca
fvipers2
getbassur (Best version for controller usage. It lacks the 'fishing line tension input'. This version was ported to Dreamcast and the only version here)
harley
lamachin
lemans24
lostwsga
magtruck (Better dump as of 0.249. Fixes Attract Mode. This is a better dump so it will be the new parent. With the old 'magtruck' parent becoming the clone 'mgtrkbad')
oceanhun (New dump as of 0.253. This is a newer version so it will be the new parent. With the old 'oceanhun' parent becoming the clone 'oceanhuna')
scud
scudplus
scudxo (This was found as of 0.263. This is an earlier version with MAJOR gameplay differences and different attract modes)
skichamp
spikeofe
spikeout
srally2
srally2dx
swtrilgy
vf3
vf3tb
von2
vs2
vs298
vs2v991
LB PLATFORM XML INSTRUCTIONS
- Download Sega Model 3 XML from this page.
- Make sure LaunchBox is closed and not running in the background.
- Place XML into 'Platforms' folder. It is located in the 'Data' folder.
- Start LaunchBox
- Sega Model 3 Platform should appear on the left.
- Set ROMS Path - Click on any Model 3 game - Press Ctrl + A to select all games - Go to Tools->File Management - Click on 'Change Roms path for selected games' - Select folder where your ROMs are located.
- Make sure the Emulator is setup and is the default for Sega Model 3 under Associated Platforms.
- PLAY!!!
LIGHT GUN INDEX FIX AHK SCRIPT INSTRUCTIONS
- You will need to install AHK, or use it portably. Just install it, it's easier. The script uses version v1 / v1.1, but you can just download the new one, v2, and let it prompt to download the older version in addition, on the first load attempt of the script. Download here https://www.autohotkey.com/
- Download & unzip the AHK script from this page.
- Best Practice is to move the Light Gun AHK Script folder with the ahk script inside, into the root of Supermodel
- Download ControllerRemap Utility v0.0.11.0 here - https://forum.arcadecontrols.com/index.php/topic,108767.0.html (Download is at the bottom of the first post. Before you can unzip it, you will need to rename the file from ControllerRemap.zip.txt ...to... ControllerRemap.zip. Just take the .txt off the file name. THEN UNZIP)
- Place the ControllerRemap.exe you just unzipped into the Light Gun AHK Script folder next to the LightgunIndexRemap.ahk
- In LB, right click on a SM3 light gun game and select 'Edit Metadata/Media'
- Select 'Additional Apps' on the left.
- Select 'Add Application' at the bottom.
- Name Application 'Supermodel Light Gun AHK Script'
- To set Application Path, click 'browse' and select the LightgunIndexRemap.ahk in the Light Gun AHK Script folder you downloaded.
- Check 'Automatically Run Before Main Application'
- Hit OK!
- Repeat above steps (from step 6) for the other 3 Light Gun Games in LaunchBox.
- But Wait! Theeere's more! You need to set the VID/PID id's of your specific light guns in the AHK script. So we need to...
- Launch a Game you have set the AHK to with LB, with both light guns connected.
- If you only have AHK v2, you should get a prompt telling you the script is for v1. It will then ask if you want to download the latest v1.1 version in addition to v2. SAY YES. Wait for it to download. If you need to do this, RESTART YOU PC/DEVICE after v1.1 has installed. Otherwise the script wont work. If you already have v1 or v1.1 you won't get the prompt or need to restart.
- Now you have (or already have) v1/v1.1 the game should boot up with no script warnings. You wont be able to control anything as the PID/VID is not set. However, by simply booting with the script we have made a log of what they are so you can set them.
- Exit the game.
- Open Light Gun AHK Script folder. Inside you will find a list.txt file. Open this and you will see the VID/PID number for the connected light guns, plain as day.
- Now Right Click & Edit the LightgunIndexRemap.ahk script, with a text editor like WordPad. At the top you will find:
-
***********************************
; Insert guns ID/PID here
***********************************
P1DeviceGunID = VID_0000_PID_1111
P1DeviceGunPID = 1111
P2DeviceGunID = VID_0000_PID_1111
P2DeviceGunPID = 1111
*********************************** - Simply replace/edit the ID's in the .ahk script (reference e.g. above) to how they appear in the list.txt file. It's obvious what part of the string you need to use.
- Don't forget to SAVE the ahk!
- You should now be able to play with no indexing issues. PHEW!
Awesome Feature:
Try using WideScreen at the same time as WideBackround. This is essentially a widescreen hack giving a true anamorphic widescreen image.
It works really well with most games, apart from Virtua Striker 2 and Sega Bass Fishing.
Any questions feel free to ask.
Below is a list of everything that I have done per game. YOU DON'T NEED TO DO ANY OF THIS. Consider this the documentation for this pre configuration.
Please give this a read! A lot of hard work went into this.
Not only have I listed everything that I have done I have also listed any cheats, region change codes and important information.
|
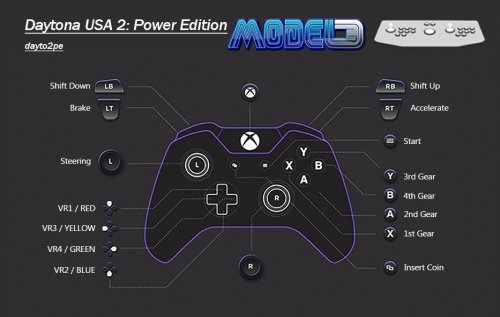
Daytona USA 2: Battle on the Edge daytona2 Daytona USA 2: Power Edition dayto2pe |
Test Menu Changes: -Language/Game Region set to English/USA. Only achievable by using the Region Change Code. Japan is the default. -Link ID set to SINGLE. Fixes Network Board Not Present. -Setting Region to USA removes the option to switch between the Dennis St. James and the Takenobu Mitsuyoshi soundtracks. (Dennis) is the default when set to USA. However, you can still play the alternate soundtrack version with a really easy cheat that is listed below. Analogue Steering Saturation & Calibration: -Steering was very twitchy due to the Analogue Saturation. The analogue steering is technically 1 to 1 however, there is actually quite a lot of 'dead zone' when you have the steering fully turned. I found you can ease off the control stick about a quarter of the way, from fully locked, before it actually started effecting the steering. I confirmed this in 1st Person view where you can see the drivers hand and steering wheel. I eased of the steering about a quarter of the way before the steering wheel moved and the steering started to react. The 'Input Test' within the test menu did not reflect this, giving values for the entire range of the left stick XAXIS. -So after some extensive testing I have changed the InputJoy1XSaturation to 155% for Daytona 2:BOTE and 165% for Daytona 2:PE, to compensate for this 'dead zone'. This makes the area of the analogue steering XAXIS wider giving way better control, without losing any actual in game steering 'range'. As soon as you ease of the stick the steering will react. -This 'kinda dead zone' would have been present on the original arcade machine hardware, but due to the amount of travel/range left and right on the steering wheel it wouldn't have been noticed (arms don't twist that far). This adjustment is more of a "trueish" 1 to 1 and is much more appropriate for use with a controller. General Info: -Controller will vibrate with this game if you have that functionality. -More racing modes and 'number of laps customisation per difficulty' are available in the test menu when set to USA. Alternate Camera Views (you won't be able to do some of these due to the VR buttons NEEDING to be mapped to the D-Pad): -Press VR1 and VR2 at the same time to get a view from just behind the front left wheel well. -Press VR2 and VR3 at the same time to get a view from just behind the front right wheel well. -Press VR2 while already in VR2 to get a cockpit view. -Press & Hold VR4, and while you are holding it press the other three at the same time to get a sky cam view. -Hold VR2 or VR3 or VR4 and repeatedly tap Start for other alternate views. Cheats: -Hold Start when selecting a transmission for 'Time Lap' mode. No other cars on the track. -Hold Start when waiting for the race to start/load to play the alternate soundtrack. -Hold Start when selecting a track to play the mirrored version. -Light Up Fantasy Amusement Park - Rapidly tap Start during Lap 3 or Lap 4 to light up the road. Unlock Hornet Car - Battle on the Edge Version Only (you won't be able to pull this off due to the VR buttons NEEDING to be mapped to the D-Pad. However, I have provided a save state of just after inputting the code, so you can adjust the stats and use this car): -Before starting the game, move the gear stick into first gear. -At the course selection screen, move the stick into fourth gear. -Then Press View Buttons in this Order: VR1, VR4, VR2, VR4, VR1, VR2, VR2+VR3 (together), and VR1. You only have 8 seconds to pull this off and then quickly select a track, if you don't want to play the beginner course. -If done correctly, you'll get the Hornet in place of the usual selection of cars. The cars stats can be modified using the view buttons and the steering wheel. Again, you only have 8 seconds to do this. Region Change Code: -In the main test menu, Push and Hold Start, then with Start Held, Press GREEN/VR4, GREEN/VR4, BLUE/VR2, YELLOW/VR3, RED/VR1, YELLOW/VR3, BLUE/VR2. -This brings you to a hidden region select screen where you can change to USA and other regions. |
|
Dirt Devils dirtdvls |
Test Menu Changes:
Unlocks:
Analogue Steering Saturation & Calibration: |
|
Emergency Call Ambulance eca |
Test Menu Changes:
4-Way Gear Shifting |
|
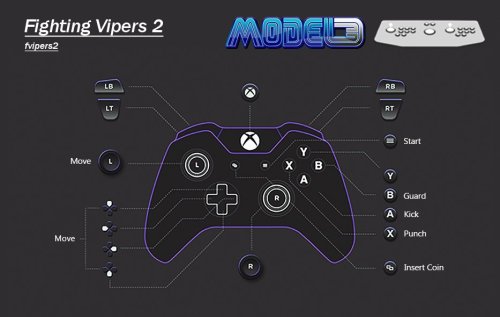
Fighting Vipers 2 fvipers2 |
Test Menu Changes: -Language/Game Region set to English/USA. Only achievable by using Region Change Code. Japan is the default. General Info: -Controls are set to the Dreamcast port defaults. P=(X), K=(Y), G=(A). The Left Stick and D-Pad are usable at the same time. -A full moves list can be found here https://strategywiki.org/wiki/Fighting_Vipers_2/Moves Region Change Code: -Go to test menu then go into 'Game Assignments' -Set cursor at 'Country' line then press Left, Left, Left, Right, Right, Left. -This will then allow you to change the 'Country' to USA and others. |
|
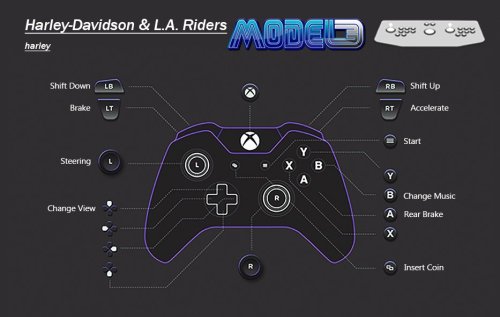
Harley-Davidson & L.A. Riders harley |
Test Menu Changes: -Game Region set to USA. Only achievable by using Region Change Code. Export is the default. -Cabinet Type set to STANDARD. -Engine Volume set to 5. The default is 8. -Number of Stages set to 5. The default is 4. -Analogue Controls calibrated in the 'Volume Setting' function. Analogue Steering Saturation & Calibration: -As the analogue controls have been calibrated in the 'Volume Setting' in the test menu there is NO need to adjust the InputJoy1XSaturation. Cheats: Extra Music Track -When you select your bike press and hold the foot/rear brake (A). -Then select your transmission with the Start button. Hold the foot/rear brake (A) and the Start button until the race starts. -Now scroll through the music tracks and you'll find one called ''Jingle Bells''. Region Change Code: -Go to test menu then go into 'Game Assignments' -Press Shift Up, Shift Up, Shift Down, Shift Down, View, Music, View, Music -This brings up an additional region select option where you can select USA and other regions. |
|
L.A Machineguns: Rage of the Machines lamachin |
Test Menu Changes: -Language/Game Region set to English/USA. Only achievable by using Region Change Code. Japan is the default. -Cabinet Type set to STANDERED. (Not a typo, it's spelled like this in the test menu) -Calibrated for Accuracy in the 'Aim Set' function. Region Change Code: -In the main test menu push Start, Start, Service, Start, Start, Start, Service, Test. -This brings you to a hidden region select screen where you can change to USA and other regions. |
|
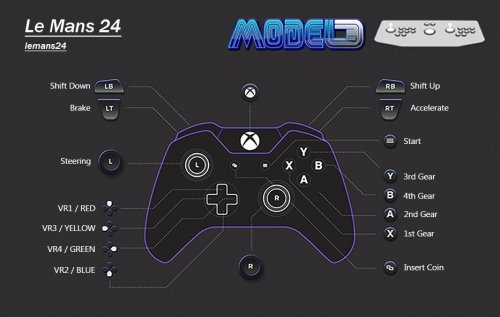
Le Mans 24 lemans24 |
Test Menu Changes: -Language/Game Region set to English/USA. Only achievable by using Region Change Code. Japan is the default. -Special Car set to SKYLINE. The default is NONE Analogue Steering Saturation & Calibration: -Steering is very twitchy due to the Analogue Saturation. Controls are a perfect 1 to 1 however it's still really difficult to control. -So after some extensive testing I have changed the InputJoy1XSaturation to 120%. This makes the area of the analog steering XAXIS 'wider' giving way better control. -You do lose some steering range but the trade off is more than worth it and barely noticeable. Region Change Code: -In the main test menu press Start, Start, Service, Service, Start, Test. -This brings you to a hidden region select screen where you can change to USA and other regions. |
|
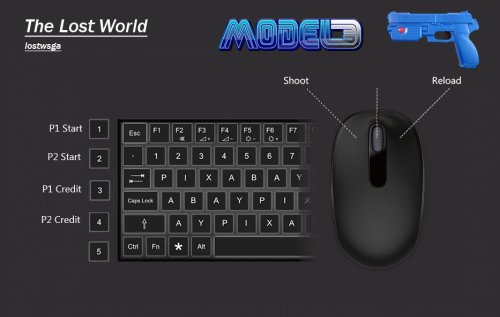
Lost World, The lostwsga |
IMPORTANT: -So, I'm bringing the hammer down on this one as I have discovered the issue everyone (inc. myself) has been having. This game has 2 input methods which can only be changed in the Games.xml. 1-The default, which is analog input, so x and y coordinate based. This one doesn't flash as it's analog based (<input type="analog_gun1" />). 2-The alternative light gun input method which flashes the screen and detects where the light gun is pointed, like a traditional light gun game (<input type="gun1" />). -In the Supermodel.ini file the inputs labeled for The Lost World ONLY APPLY when the game has been set to Light Gun input (<input type="gun1" />). When set to the default analog input type (<input type="analog_gun1" />), the inputs are actually the ones labelled as Ocean Hunter, L.A. Machineguns, NOT the inputs labelled as Lost World. With 'InputAnalogTriggerLeft' being the trigger for Lost World, and 'InputAnalogTriggerRight' being the off-screen/reload button for Lost World, under the "Analog Inputs" for Ocean Hunter, L.A. Machineguns input section. Not confusing as shit at all. -This does make sense after the fact, as when set to analog input..... the analog inputs apply.... not the light gun inputs derrrrr. But because of the frankly appalling labelling in the ini file, it has spun me (and seemingly everyone else) till now. As a result of all this confusion I have labelled these inputs correctly in the ini file. I swear this emulator is out to get me..... -InputAutoTrigger in the .ini is ON. This allows you to simply press the reload button to reload. If this is OFF you'd need to hold reload and then press fire to reload. Test Menu Changes: -Language/Game Region set to English/USA. Only achievable by using Region Change Code. Japan is the default. -Calibrated for Accuracy in 'Gun Setting' option. General Info: -Crosshairs are ON in the .ini file. Region Change Code: -In the main test menu press Start, Start, Service, Start, Service, Test. -This brings you to a hidden region select screen where you can change to USA and other regions. |
|
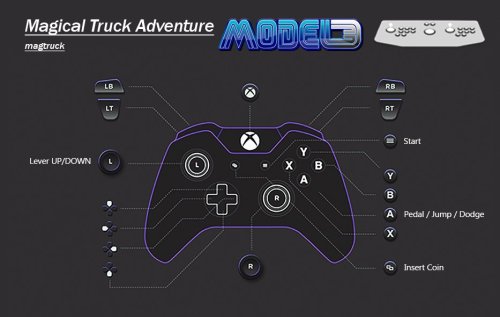
Magical Truck Adventure magtruck |
Test Menu Changes: -Language/Game Region set to English/USA. Only achievable by using Region Change Code. Export is the default. -Christmas Mode is ON. Changes outfits of players. -Analogue Controls calibrated in the 'Device Settings' function. Region Change Code: -In the main test menu press Start, Start, Service, Start, Service, Test -This brings you to a hidden region select screen where you can change to USA and other regions. |
|
Ocean Hunter, The oceanhun |
Test Menu Changes: -Language/Game Region set to English/USA. Only achievable by using Region Change Code. Japan is the default. -Cabinet Type set to STANDARD. The default is DELUXE. -Analogue Controls calibrated for Accuracy in 'Volume Setting' function. Region Change Code: -Go to test menu then go into 'Game Assignments' and press 1P Start, 2P Start, 1P Start, 2P Start, 1P Start, 2P Start, 2P Start -This brings up an extra option. Select USA or other regions. |
|
Scud Race / Sega Super GT scud scudxo Scud Race Plus / Sega Super GT Plus scudplus |
Test Menu Changes: -Language/Game Region set to English/USA. No Region Change Code. USA and other regions selectable from 'Game Assignments'. Japan is the default. -SETTING TO USA CHANGES GAME TITLE TO SEGA SUPER GT. -Link ID set to SINGLE. Fixes Network Board Not Present. General Info: -Controller will vibrate with this game if you have that functionality. Analogue Steering Saturation & Calibration: -Steering is very twitchy due to the Analogue Saturation. The analogue steering is 1 to 1 however there is quite a lot of 'dead zone' when you have the steering fully turned, despite the values the test menu gives you. I found you can ease off the stick about a quarter of the way before it actually started affecting the steering. I confirmed this in 1st Person View where you can see the drivers hand and steering wheel, I eased of the steering about a quarter of the way before the steering wheel moved and the steering started to react. The 'Input Test' did not reflect this, giving values for the entire range of the control stick XAXIS. -So after some extensive testing I have changed the InputJoy1XSaturation to 165%, to compensate for this 'dead zone'. This makes the area of the analog steering XAXIS wider giving way better control, without losing any actual in-game steering 'range'. As soon as you ease of the stick the steering will react. -This 'kinda dead zone' would have been present on the original hardware, but due to the amount of travel from left to right on the steering wheel it wouldn't have been noticed. This adjustment is more of a 'kinda true 1 to 1' and is much more appropriate for a controller. |
|
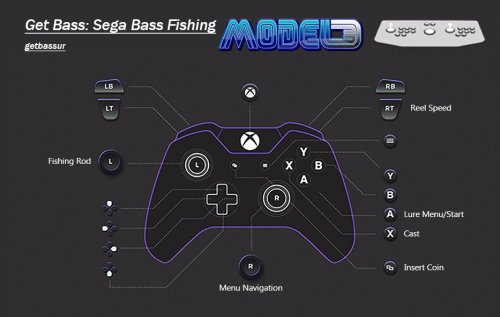
Sega Bass Fishing / Get Bass getbassur |
IMPORTANT: -Use 'getbassur' over every other version of Sega Bass Fishing. -This version lacks the tension input which is better for controllers. Test Menu Changes: -Language/Game Region set to English/USA. Only achievable by using Region Change Code. Japan is the default. -Analogue Controls calibrated in the Volume Setting function within the test menu. -Game Time and Continue Time have been set to the maximum '3m50s'. Region Change Code: -In the main test menu, select CRT TEST and move to screen 2/2. -Push the Service Button 4 times, exit the CRT TEST. -Go into Game Assignments, push Service Button 3 times, then press and hold Service Button and then press Test. -This brings you to a hidden region select screen where you can change to other regions. |
|
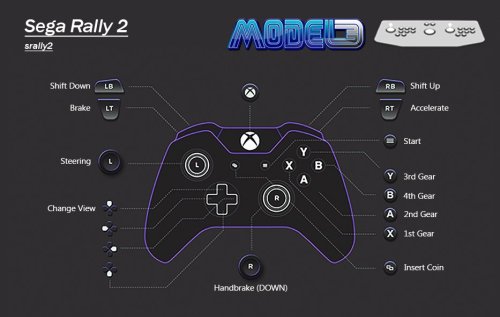
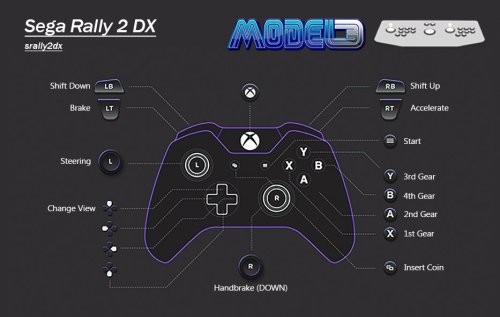
Sega Rally 2 srally2 Sega Rally 2 DX srally2dx |
Standard and DX differences: -The DX version has a different livery (car decals) and some other minor "under the hood" updates. IMPORTANT: -This game will run slow and have graphical glitches if the PowerPCFrequency is left on 49. -Setting to a higher number will fix this. However if set too high the emulator will start to run slow. -PowerPCFrenquency set to 69 in the ini file. This fixes the issue. It's the sweet spot. Test Menu Changes: -Game Region set to USA. Only achievable by using Region Change Code. Export is the default. -Game Mode set to SPECIAL. This enables 3 Laps per stage. The default is NORMAL (1 Lap per stage). -Default View set to BEHIND. The default is Driver. -Speedometer set to MPH. Default is KMH. -Cabinet Type set to TWIN. The CLUTCH and other stuff are NOT used when set to TWIN, which is what we want. The default is DELUXE. -Coin Assignments set to Free Play. This helps with a bug where if you restart the game with credits loaded it may not display any graphics. Setting to Free Play helps with this. Analogue Steering Saturation & Calibration: -Steering is very twitchy due to the Analogue Saturation being 'short'. The analogue steering is 1 to 1 however there is quite a lot of 'dead zone' when you have the steering fully turned, despite the values the test menu gives you. I found you can ease off the stick about a quarter of the way before it actually started affecting the steering. -So after some extensive testing I have changed the InputJoy1XSaturation to 155%, to compensate for this 'dead zone'. This makes the area of the analog steering XAXIS 'wider' giving way better control, without losing any actual in-game steering 'range'. As soon as you ease of the stick the steering will react. -This 'kinda dead zone' would have been present on the original hardware, but due to the amount of travel from left to right on the steering wheel it wouldn't have been noticed. This adjustment is more of a 'kinda true 1 to 1' and is much more appropriate for a controller. General Info: -Controller will vibrate with this game if you have that functionality. Cheats: -Unlock the Delta and Celica Cars - Press View Change and the Handbrake (A+Y) at the same time on the car select. -Better Time Display - Put in your name then hold View Change and Handbrake (A+Y) at the same time until the game starts. -Turn Off Music - Put in your name then hold Start until the game starts. Region Change Code: -In the main test menu using the Service Button:- -Do 4 short presses, 2 long (about 2 seconds per press), 2 short presses, then 1 long press (about 2 seconds). -This brings you to a hidden region select screen where you can change to other regions. |
|
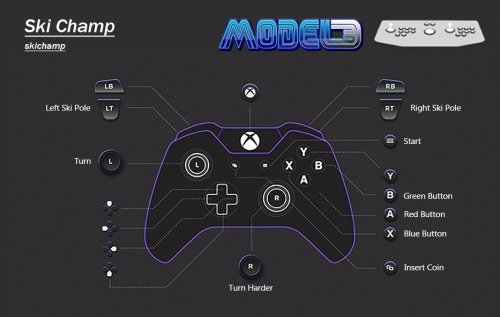
Ski Champ skichamp |
IMPORTANT: -This game has an InputSkiY AXIS Input. Despite this being designated as a Y axis it's actually used for movement on the X axis. -IT'S NOT USED FOR UP AND DOWN MOTION. -It is for turning harder, like digging in the edges of the skis. This is how the original arcade hardware works. -This is assigned to the Right Stick. Move the Right Stick in the same direction as the Left Stick to turn harder. Test Menu Changes: -Language/Game Region set to English/Export. Setting to USA kept crashing the game for me. Only achievable by using Region Change Code. Japan is the default. -Extend Time set to 25s. The game is pretty much impossible to complete otherwise. The default is 20s. -Analogue Controls calibrated in the Volume Setting function within the test menu. -Force Feedback MUST be enabled otherwise you'll get the 'Check Drive Board' error. Preventing you from playing the game. -Setting to Free Play forces a 1st Person perspective. Set to 1coin = 1play. General Info: -Controller will vibrate with this game if you have that functionality. Region Change Code: -In the main test menu press Blue, Green, Blue, Green, Service, Service. -This brings you to a hidden region select screen where you can change to USA and other regions. |
|
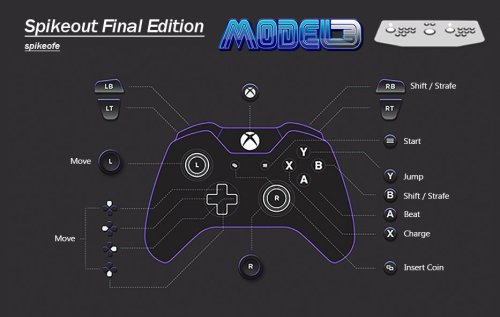
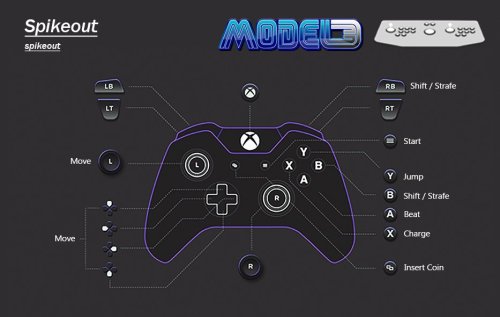
Spikeout spikeout Spikeout Final Edition spikeofe |
Test Menu Changes: -Game Region set to USA. Only achievable by using Region Change Code. Export is the default. General Info: -To pick up an item press Beat+Charge+Down (X+A+Down, at the same time). I couldn't figure this out for ages. -There is a surprising amount of moves and combos. Here is a full list https://gamefaqs.gamespot.com/arcade/574616-spikeout/faqs/414 Spikeout Region Change Code: -Set cursor on Game Assignments. -Then press Button3(Charge), Start, Button4(Jump), Start, Start, Start, Button1(Shift), Start, Start. -This brings you to a hidden region select screen where you can change to USA and other regions. Spikeout Final Edition Region Change Code: -Set cursor on TIMER TEST. -Then press and hold the Service Button and enter the following: -Button4(Jump), Start, Button4(Jump), Start, THEN RELEASE SERVICE BUTTON, Button1(Shift), Start, Start, Start, Button3(Charge), Start, Start, Button1(Shift), Start, Test. -This brings you to a hidden region select screen where you can change to USA and other regions. |
|
Star Wars Trilogy Arcade swtrilgy |
IMPORTANT: -Coin Assignments set to Free Play. This helps with a bug where if you restart the game with credits loaded from a previous play session, it may not display any graphics. Setting to Free Play helps with this. Test Menu Changes: -Cabinet Type set to U/R. This prevents an issues with the 'Feedback Lever'. The default is DELUXE -Lever set to Up---Down - Down---Up. This aligns the main game and bonus stages Y axis control inversion. General Info: -The parent rom 'swtrilgy' is USA region. This game has a Region Change Code available but not needed for this version/set. It will be listed below anyway just for reference. Region Change Code: -In the main test menu using the Service Button, -Do 3 short presses, 2 long presses (about 2 seconds per press), 2 short presses then 1 long press (about 2 seconds). -This brings you to a hidden region select screen where you can change to USA and other regions. |
|
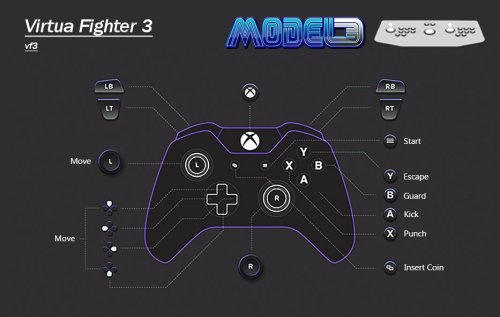
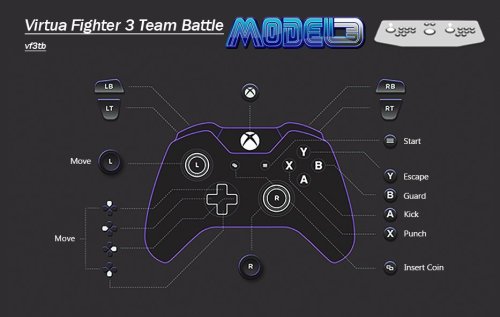
Virtua Fighter 3 vf3 Virtua Fighter 3 Team Battle vf3tb |
Test Menu Changes: -Language/Game Region set to English/USA. No Region Change Code, USA and other regions selectable from 'Game Assignments'. Japan is the default. -Show Command set to ON. -Stage Select set to CHALLENGER. The default is OFF. General Info: -Controls set to Dreamcast port defaults. The Left stick and D-Pad are usable at the same time. -A full moves list is here https://virtuafighter.com/commands/?ver=3tb Cheats: Different Costumes - Hold Start and then select your character with any button. |
|
Virtua Striker 2 vs2 Virtua Striker 2 '98 vs298 Virtua Striker 2 '99.1 vs2v991 |
Test Menu Changes: -'vs2 and 'vs2v991'Language/Game Region set to English/USA. No Region Change Code, USA and other regions selectable from 'Game Assignments'. Export is the default. -'vs298' Game Region set to USA. Only achievable by using Region Change Code. Japan is the default. -Game Time set to maximum 3m00s. Default is 2m00s -G Goal Mode (IF THERE'S A DRAW BY THE END OF THE MATCH) = (EXTRA TIME, NEXT GOAL WINS) set to 1m. OFF is the default. (If extra time goes 1m with no goals the match will go to a Penalty Knockout.) -P K Mode (PENALTY KNOCKOUT) Set to REAL. OFF is the default. (This will let penalties go on until there is a clear winner.) Virtua Striker 2 '98 Region Change Code: -Go to test menu then go into 'Game Assignments'. -Then press the Service Button once for about 5 seconds, then press the Service Button three times shortly, then press the Service Button one time for about 5 seconds again. -This brings you to a hidden region select screen where you can change to USA and other regions. |
|
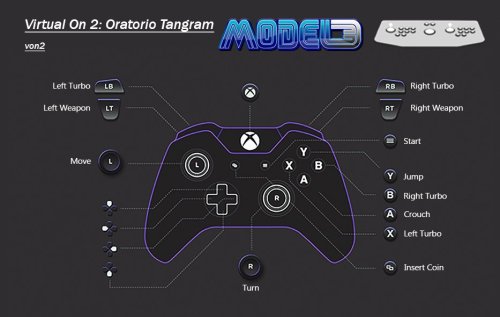
Virtual On 2: Oratorio Tangram von2 |
Test Menu Changes: -Language/Game Region set to English/USA. Only achievable by using Engineers Code. Japan is the default. -Play Time for all options is set to DEATHMATCH (No Timer). The default is 80 secs. General Info: -Using Macro Controls, Turn Left & Right are set to the right stick. Engineers Region Change Code: -In the main test menu press Start, Start, Service, Start, Start, Start, Service, Service, Test. -This brings you to a hidden region select screen where you can change to USA and other regions. |
Edited by Warped Polygon
Added 4-Way Gears info to ECA. Thanks again JoeJoe
What's New in Version 1.0.5 See changelog
Released
Removed ControllerRemap.exe from AHK Script download as it was tripping a false positive on download. Additional step added to AHK guide to download this direct from ArcadeControls, as doing it this way doesn't trip any false positives.


