
About This File
![]()
A LaunchBox plugin which caches extracted ROM archives, letting you play games faster. Also allows launching individual files from archives, and loading preferred file types from an archive.
New in v2.16
-
New M3U name option - "Disc 1 Filename"
- Always use the filename of the first disc of a multi-disc game for the m3u file, regardless of which disc was launched
- Allows better support for The Bezel Project config files, which use config files based on the ROM name
- New batch caching option to pause on caching errors (default is to skip and continue)
- Minor config window tweaks
Description
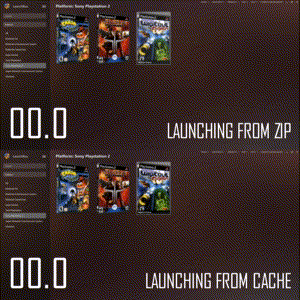
When a compressed ROM (zip, 7z, rar, gz, chd, rvz, etc.) is first extracted, it is stored in the archive cache. The next time it is played, the game is loaded directly from the cache, virtually eliminating wait time.

As the cache size approaches the maximum size, the oldest played games are deleted from the cache, making room for new games.
Features
- Skip the extraction wait time for recently played games.
- Configurable cache size and location.
- Configurable minimum archive size (don't cache small archives).
- Option to extract all discs in a multi-disc game, and generate M3U file.
- Option to copy ROM files to cache without extraction.
- Option to keep select ROMs cached and ready to play.
- Select and play individual ROMs from a merged ROM archive.
- Batch cache feature for extracting or copying multiple games to cache at once.
- Filename and extension priorities per emulator and platform (cue, bin, iso, etc).
- Support for additional archive formats (chd, rvz, etc)
- Support for Xbox iso to xiso conversion
- Badge to indicate cached games
Example Use Cases
Why use Archive Cache Manager? Here's some example use cases.
- ROMs located on NAS or external storage, where disk read or transfer time is slow.
- ROM library maintained as accurately ripped/dumped collections, where specialised compression formats not an option.
-
Extract and play archives from location other than
LaunchBox\ThirdParty\7-Zip\Temp, such as platform specific folder (for RetroArch Content Directory settings). - Playing ripped PS2 games with PCSX2 where the disc image is bin/cue format, avoiding the "CDVD plugin failed to open" error message.
- Playing zipped MSU versions of games, where need to launch the rom file instead of the cue file from the archive.
- The library contains GoodMerged sets, and you want a quick way to play individual ROMs.
Installation
- Download the latest release from https://forums.launchbox-app.com/files/file/234-archive-cache-manager/ or https://github.com/fraganator/archive-cache-manager/releases
- Unblock the download if necessary (right-click file -> Properties -> Unblock)
-
Extract this archive to your
LaunchBox\Pluginsfolder, then run LaunchBox / BigBox. - Within LaunchBox, ensure the emulator or emulator platform has the "Extract ROM archives before running" option checked.
Uninstallation
-
Quit LaunchBox / BigBox, then navigate to the
LaunchBox\Pluginsfolder and deleteArchiveCacheManager. -
Delete the archive cache folder (default is
LaunchBox\ArchiveCache).
Usage
Extracting and Caching
Archive Cache Manager runs transparently to the user. All that is required is the emulator or emulator platform has the "Extract ROM archives before running" option checked. Extraction and cache management is carried out automatically when a game is launched.
Cache and extraction behaviour can be modified in plugin's configuration window.
Multi-Disc Games
To use the multi-disc cache feature, check the "Multi-disc Support" option in the Archive Cache Manager config window. The next time a multi-disc game is launched, all the discs from the game will be extracted to the cache and a corresponding M3U file generated.
If the emulator \ platform supports M3U files (as configured in LaunchBox), the generated M3U file will be used when launching the game. Otherwise a single disc will be launched, and swapping between cached discs can be done manually in the emulator.
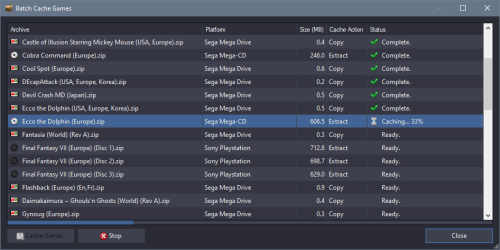
Batch Caching Games
Multiple games can be cached at once using the Batch Cache Games window. Select one or more games in LaunchBox, then right-click a game and choose the "Batch Cache Games..." option.
A window will popup displaying the list of games, and begin checking the extracted ROM sizes. Once the checks are complete, click the Cache Games button to begin caching.

Games are cached according to the plugin's emulator and platform settings. A game may be extracted, copied, or no action taken if it doesn't match a caching rule, or it's already cached.
Each game's caching progress will be displayed in the Status column, and a progress bar at the bottom of the game list shows the overall caching progress. If an error occurs during caching, it will be flagged in the Status column and caching will skip to the next game. If the "Pause Caching On Error" is checked, an error message is displayed with the option to continue or stop.
Tip: For games stored on a NAS or an external drive, use Batch Cache Games to cache a selection of them locally. Enable the plugin's Always Bypass LaunchBox Path Check option to allow the cached game to be launched directly, even if the network or external drive is disconnected!
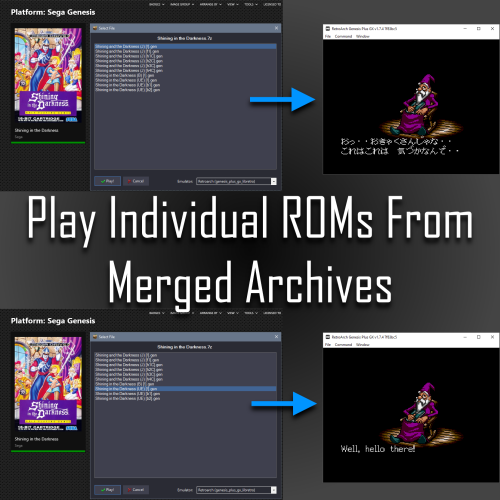
Selecting and Playing Individual ROMs From an Archive
To play an individual ROM from an archive containing multiple ROMs (different regions, hacks, or discs), right-click it and choose "Select ROM In Archive...".
A window will popup with a full listing of the archive contents. Select the desired ROM file, then click Play. That ROM will now launch with the configured emulator.
The next time the game is launched via the normal Play option, the previous ROM selection will be automatically applied. To select another ROM, use the same "Select ROM In Archive..." menu.

The same menu is also available in BigBox, though currently only supports keyboard input.

Keeping Games Cached
Games can be marked 'Keep' so they stay cached and ready to play. To keep a game cached, open the plugin configuration window from the Tools->Archive Cache Manager menu. From there a list of games in the cache is shown. Check the Keep box next to the game, then click OK.
Badge
The plugin includes a badge to indicate if a game is currently in the cache. It is available under the Badges->Plugin Badges->Enable Archive Cached menu. There are additional Simple White and Neon style badges, which can be found in the LaunchBox\Plugins\ArchiveCacheManager\Badges folder. Copy your preferred icon to the LaunchBox\Images\Badges folder and rename it Archive Cached.png.

Configuration
Configuration can be accessed from the Tools->Archive Cache Manager menu. An overview of each of the configuration screens and options is below.
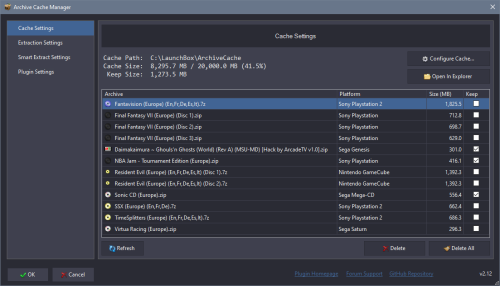
Cache Settings
This page shows a summary of the cache storage and currently cached items, and provides options for cache configuration.

Configure Cache
Clicking the Configure Cache... button opens the cache configuration window.

Configure Cache - Cache Path
This is the path of the cache on disk. The path can be absolute or relative, where relative paths are to the LaunchBox root folder.
Default: ArchiveCache
If the cache path is set to an invalid location (LaunchBox root for example), an error message will be displayed when clicking OK.

If the cache path is set to an existing path that already contains files or folders, a warning will be displayed when clicking OK. Click Yes to proceed, or No to go back and change the path.

Configure Cache - Cache Size
This is the maximum cache size on disk in megabytes. The oldest played games will be deleted from the cache when it reaches this size.
Default: 20,000 MB (20 GB)
Configure Cache - Minimum Archive Size
This is the minimum size in megabytes of an uncompressed archive before it will be added to the cache. Archives smaller than this won't be added to the cache.
Default: 100 MB
Keep
A Keep flag can be applied to a cached item. When set, the item will be excluded from cache management and not be removed from the cache. This is useful for less frequently played games which need to load without waiting (very large games, party games, favourites, children's games, etc).
Default: Disabled
Open In Explorer
Clicking the Open In Explorer button will open the configured cache path in Windows Explorer. This button is disabled if the cache path does not exist.
Refresh
Refreshes the cache summary and list of cached items from disk.
Delete
Clicking on the Delete button will remove the selected items from the cache (including items with the Keep setting).
Delete All
Clicking on the Delete All button will delete everything from the cache (including items with the Keep setting).
Extraction Settings
This page provides settings for archive extraction and launch behviour. Each row in the table applies to the specified emulator \ platform pair. If a game is launched which doesn't match an emulator \ platform, the settings in All \ All will be used.

Emulator \ Platform
The specific emulator and platform for the settings to be applied to. Add a new emulator and platform row using the Add... button. Remove an emulator \ platform row using the Delete button.
When a new row is added its settings will be copied from the All \ All entry, except for Priority which will be blank.
Priority
Files from an archive can be prioritized in the case where an emulator requires a certain filename or file type. This setting defines the filename or extension priority for the specified emulator and platform combination.
The priorities are a comma delimited list, where the highest priority is the first entry, the next highest priority is the second entry, and so on. If a match is not found in the archive when a game is loaded, the priority in All \ All is used.
A wildcard (*) can be used to perform partial filename matches. Examples include:
-
bin, iso- Files ending with bin, then files ending in iso, then all other files. -
eboot.bin- Files named eboot.bin, then all other files. -
*(*E*)*[!].*, *(*U*)*[!].*, *[!].*- GoodMerged style, prioritizing European 'good' ROM dumps, then USA 'good' ROM dumps, then other region 'good' ROM dumps, then all other files.
Note that the priority is applied to all archives, even if they are not cached.
The fallback All \ All priority is the basis for the contents of the multi-disc M3U file generation. Be careful removing entries such as cue, unless a specific emulator \ platform is used to handle cue and similar file types.
Default:
-
All \ All|mds, gdi, cue, eboot.bin -
PCSX2 \ Sony Playstation 2|bin, iso
Action
The action to take when processing a ROM file.
-
Extract- Extract an archive to the cache. Non-archive files will be passed directly to the emulator. -
Copy- Copy the game file to the cache. Archive files will copied, but not extracted. -
Extract or Copy- If the game file is an archive, extract it to the cache. Otherwise copy the game file to the cache.
Default: Extract
Launch Path
The path within the cache to launch the game from. Useful for managing common settings in RetroArch which are based on the game's folder.
-
Default- The archive folder in the cache, which is in the form <Filename> - <MD5 Hash> -
Title- The game's title set in LaunchBox (e.g. Final Fantasy VII) -
Platform- The game's platform set in LaunchBox (e.g. Sony Playstation) -
Emulator- The emulator title set in LaunchBox (e.g. RetroArch)
Games will always be extracted \ copied to the <Filename> - <MD5 Hash> location. If the Launch Path is set to something other than Default, the corresponding folder will be created within the cache, and NTFS hardlinks will be created which point to the extracted \ copied files.
Default: Default
Multi-Disc
Check this option to enable multi-disc support. When enabled, the following actions occur when playing a multi-disc game:
- All discs from a multi-disc game will be extracted \ copied and added to the archive cache.
- M3U files will be generated, with the name based on the M3U Name setting.
- The M3U contents will list the absolute path to one cached file per disc, where the file is chosen based on the emulator \ platform file priority, or the special All \ All priority.
- If the emulator \ platform supports M3U files, the generated M3U file will be used when launching the game.
Default: Enabled
M3U Name
The name of the M3U file created when launching a multi-disc game, and Multi-Disc is enabled. The M3U file name is used by some emulators to create a save file and match settings.
-
Game ID- The unique ID for a game, generated by LaunchBox. This is the same M3U naming convention used by LaunchBox (e.g. 2828d969-4362-49d5-b080-c2b7cc6f7d59.m3u) -
Title + Version- The game's title and version combined, with (Disc N) removed from the version (e.g. Final Fantasy VII (Europe).m3u) -
Disc 1 Filename- Use the filename of the first disc as the name of the M3U, regardless of which disc was launched (e.g. Final Fantasy VII (Europe) (Disc 1).m3u). Allows for The Bezel Project support, while maintaining a consistent name for emulators to manage save files across multiple discs.
Default: Game ID
Smart Extract
Check this option to enable smart extraction, which will only extract a single file from an archive if a number of rules are met. See the Smart Extract Settings section for details.
Default: Enabled
chdman
Check this option to extract a chd file to cue+bin files using chdman. The executable chdman.exe must be copied to the folder LaunchBox\Plugins\ArchiveCacheManager\Extractors.
Default Disabled
DolphinTool
Check this option to extract rvz, wia, and gcz files to iso files using DolphinTool. The executable DolphinTool.exe must be copied to the folder LaunchBox\Plugins\ArchiveCacheManager\Extractors.
Default Disabled
extract-xiso
Check this option to extract and convert full iso files to Xbox iso files using extract-xiso. Supports both zipped and stand-alone iso files. The executable extract-xiso.exe must be copied to the folder LaunchBox\Plugins\ArchiveCacheManager\Extractors.
Default Disabled
Smart Extract Settings
When enabled, the Smart Extract option will check if it's possible to extract only a single file from an archive. For merged archives containing multiple ROM versions and hacks, this avoids the need to extract a potentially large number of files to play a single game.

Smart Extract will extract and launch a single file from an archive if the following conditions are met:
-
All of the file types in an archive are the same, excluding files with Metadata Extensions.
OR
-
All of the file types in an archive are Stand-alone ROMs, excluding files with Metadata Extensions.
The file to extract will be (in priority order):
- The individual file selected through the "Select ROM in Archive..." right-click menu.
- The first file which matches a configured Priority.
- The first file in the archive.
Stand-alone ROM Extensions
A comma delimited list of file extensions which can run stand-alone (no dependencies on other files).
Default: gb, gbc, gba, agb, nes, fds, smc, sfc, n64, z64, v64, ndd, md, smd, gen, iso, chd, gg, gcm, 32x, bin
Metadata Extensions
A comma delimited list of file extensions which indicate ROM metadata, and aren't required to play a ROM file.
Default: nfo, txt, dat, xml, json
Plugin Settings

Always Bypass LaunchBox Path Check
When enabled, bypasses LaunchBox's check that a game's application path (ROM file) exists before launch. If a game is cached and the source ROM storage is slow or unavailable, the game will still launch immediately.
The bypass check happens automatically if the extract action is Copy, or the file is not zip, 7z, or rar.
Default: Disabled
Check For Updates On Startup
Enable this option to check for plugin updates when LaunchBox starts up. This is a simple version check of the latest release on github, and nothing is automatically downloaded or installed. If a new update is found a message box will appear shortly after LaunchBox is started, with the option to open the download page in a browser.
Default: On first run, a message box will appear asking the user if they'd like to enable the update check.

Source Code
This plugin is open source, and can be found on github: https://github.com/fraganator/archive-cache-manager
Edited by fraganator
Update to v2.16
What's New in Version 2.0.5 See changelog
Released
-
New feature - 'Keep'
- Keep your favourite games cached and ready to play
- Games marked 'Keep' will not be removed from the cache, and do not contribute to the used cache size
-
Configuration window updates
- Cache info summary
- View cached games, toggle the 'Keep' option
- Manually remove games from the cache or clear it entirely
-
Events and errors now logged to
LaunchBox\Plugins\ArchiveCacheManager\Logs - Minor bug fixes


