-
Posts
13,723 -
Joined
-
Last visited
-
Days Won
388
Content Type
Profiles
Forums
Articles
Downloads
Gallery
Blogs
Everything posted by Jason Carr
-
It's not abandoned; I still use it myself. However, I'm definitely more focused on other things for the moment (such as LaunchBox for Android). It's been a base hit for us, but can't be anywhere near as high of a priority, because it's not nearly as popular as LaunchBox. I expect I will be back to development on it at some point, but it will probably be a while.
-
Thank you @dukeemu. Got that in for the next beta.
-
Thanks @Cauptain. I have that in for the beta going out today. We're still hoping to release tomorrow.
-
Hey all, it's translation time again. We're hoping to put out the 13.0 official release early next week (probably Tuesday). Thank you all very much for your help. I have all the translation packages updated, release notes included. @Offone @Kondorito @Cauptain @Nyny77 @Opak @dukeemu @cyanjiang @Just001Kim @MajKSA @gamehacker @alexposad @k_kutsugi @Bardock @Soomin papa
-
Yes, but they likely won't make it into this release. We do plan to expand out the models here soon though.
-
Sure, I can see that being helpful for some households. For me, my kids are old enough to know better and I'd rather make it obvious to my adult friends how to use the cabinet. Yeah, I think a full-size arcade machine is going to be heavy no matter what you do. I'm no expert on wood types. I am using birch plywood though, which you would think would be lighter than some other options, but I don't really know. I do think that a big part of the weight of the older machines is the CRTs, so at least we don't have to deal with that anymore, but at the same time, these 32" widescreen cabinets are a lot wider than most cabinets were back in the day, which I'm sure doesn't help.
-

Moderator Guidelines and Contributor Rules
Jason Carr replied to Jason Carr's topic in News and Updates
I won't allow this thread to get back into a discussion as to whether or not we should allow nipples in the database. I thought I made myself perfectly clear already. We can't allow it for legal reasons, and to protect children. If someone wants to be helpful getting rid of content in our database that is problematic, then I will wholeheartedly appreciate it. If, as a moderator, you need to take a break because of the amount of annoying things to be moderated coming in, then by all means, take a break. I don't appreciate the stance of "just leave the nudity because it's annoying to moderate." I'm also not looking for an argument here, so any arguments will be met with temporary bans. Edit: Deleted the two previous posts in an effort to discourage continued counter-productive discussion. -
That indeed would have likely saved me some frustration...
-
Player 1 Start Player 2 Start Player 1 Coin Player 2 Coin Mouse Left Mouse Right Volume Up Volume Down Menu (Tab for MAME) Select (Enter Key) Pause Exit It's definitely more than you really "need", but it makes it really convenient to have dedicated buttons for all of those things. That's pretty much everything you could possibly need. It even lets you configure games in MAME without having to pull out a keyboard.
-
Ah, I see. I have both lightguns and the marquee on my existing cab without issues, but I can see how resolution changes could be a problem. I do my best to just make sure resolutions don't change, but I know that's not always possible (Teknoparrot is the only issue that I'm aware of though).
-
Okay, this is finally the last post for today. Ultimately, I installed the marquee screen that I got from Pixelcade: I had to come up with my own design for the frame, but that was easy enough just by measuring things up and calculating the difference between the size of the actual screen part and the size of the cabinet top. However, I did run into an issue with the jigsaw again; I first tried to use the jigsaw to cut out the center as a hole and do it all in one piece, but once again that was a failure because it's just so hard to cut a perfect straight line with the jigsaw. I ended up using the table saw and just made four pieces for the four sides, and glued them together. I then used wood filler on the edges and sanded them down, and now that it's painted, you can't really tell that it was four pieces. I did have to learn how to use edge banding for the first time in making that top frame piece (for the outer edges and the inside edges). That went mostly smoothly though, thankfully, other than for the fact that I had to go to the store to pick up an iron lol. Unfortunately that top frame piece did require two coats of paint though, mostly because the edge banding just doesn't take the paint all that well. It was a bit of pain dealing with drips because of the fact that the entire piece needed painted, but I got a good result in the end with enough sandings and coats. I screwed the marquee screen into the frame, and then just used pocket holes to screw the frame into the cabinet itself. Other than for a paint spot or two that I need to touch up, it's looking awesome. The marquee screen from Pixelcade is great; it doesn't have any of the funky issues that a lot of the Chinese screens have (like the picture being warped or cut off). However, I was thrown off by the fact that it comes with a lot of extra crap and tries to communicate with the frontend over the network. Apparently they want you to use the parts that it comes with to do the actual screen rendering instead of just plugging the screen into Windows. To be honest, I think that's a really stupid idea and of course I want to connect it up to Big Box directly. Thankfully though, once you figure out how the cables all work, you can disconnect their extra junk and just connect an HDMI cable straight up to the screen. Then it shows up in Windows exactly as you'd expect. That's it for me for the night. I'm finally to the point where I'm happy with progress again. Those side panels were really kicking my butt for quite a while, but they're done now. Next, I need to get them painted and get the artwork and the t-molding on them, and then I can install them on the cabinet. Then all that's left is the control panel and mounting the TV. Onwards!
-
Next I installed the speaker grills and the coin door: Both of these were thankfully simple and straightforward. You can see now how good the paint job on the base looks. I was tempted to sand it down and give it another coat, but I don't really see any need to, so I'm just leaving it. Finally, after painting the front of the control panel with the oil-based paint, I installed the artwork on the front, screwed all three pieces together, and drilled some holes for the cables: Everything was straightforward, sans for the artwork. I think the artwork for the front of the control panel is a different material than the vinyl used for the sides of the cabinet. I first tried to wrap the material around the edges of the plywood, but that just straight up didn't work at all. I ended up using a knife to cut it instead. It does work, but isn't quite as clean as I'd like it to be (it would be a little bit cleaner on the edges if I could wrap it around like we'll do for the side panels). One thing I forgot to mention (or take pictures of) is using the router with a slot cutting bit to cut a slot into the bottom front edge of the control panel section for t-molding. Thankfully using the router for this is fairly straightforward and didn't really give me any real issues. I installed the t-molding into the bottom of the control panel after I put the artwork on and before I screwed everything together. Continued in next post.
-
Next, I started painting. I hate painting. It's the worst. I picked up two different paints from Home Depot, both of them flat black. One is a modern water-based paint with primer included, and that does a great job of covering the wood in a single coat. The other is an oil-based paint that is needed for the surfaces that are covered in vinyl. Apparently you have to use an oil-based paint, and you shouldn't use stuff with primer included. I started with the water-based paint on the base: All in all, I think it looks great, and I only had to use one coat. The final product does look a little bit better than the picture above, because it wasn't completely dry yet. I used some smaller paint rollers for the majority of it, and a brush where necessary. I also painted the inside of the top part of the cabinet, just so that it was dark inside and no bright surfaces show through (since I'm planning to use glass in front of the monitor, unlike the original design): Again, it does look a lot better now that it's dry. I also failed to mention that I had previously drilled the holes for the speaker grills. Next, I started painting some of the surfaces to cover in vinyl with the oil-based paint. I learned the hard way that oil-based paint is evil. If you get it on your hands, it takes a few days to get it off, unless you use some nasty chemicals. So that wasn't a whole lot of fun, but I didn't run into any significant issues. Continued in the next post.
-
Next, I started working on tackling the two side pieces, which has been the most challenging part of everything I've done so far (and I've had to learn the most expensive lessons). Unfortunately I ended up wasting quite a bit of plywood trying to get the two side pieces cut out properly. The first side piece I cut out ended up looking okay: It was far from perfect though. One of the most unfortunate things I ran into is that the cabinet itself (most specifically the bottom front of the cabinet with the angles) is not perfectly 90 degrees up and down on the edges. I don't know of a good way to really get all that 100% perfect while building it. You really can't tell at all when you're looking at the base of the cabinet, but you sure can when the side panel doesn't line up properly. So this begins my tirade of wasted plywood and frustration. First off, I had a horrible time trying to cut out my second side panel. I must have just gotten lucky with the first one, because I felt like I couldn't cut straight lines with the jigsaw to save my life when I was cutting this second piece. Here's both pieces thus far: I did my best to modify these pieces to match up with the unexpected angles on the cabinet, but unfortunately I couldn't get my hand steady enough with the jigsaw and managed to completely screw them up (both of them). I tried to fix some of the issues by sanding and using wood filler, but ultimately, it was just a train wreck. At this point I was a bit pissed off, because plywood is so expensive these days, so this was a costly mistake. All in all, I ended up making 5 of these side panels. The last two that I made are pretty close to perfect and fit the cabinet very well, thankfully. I learned one very important lesson though: cutting straight lines is much easier with a circular saw than with a jigsaw. For the last two, I used the jigsaw as little as possible and used the circular saw for nearly all of the cuts. Thank the Lord, I managed to do these last two without really screwing anything up, and everything lines up to the cabinet very well. This was definitely the most frustrating part of the entire build thus far (and I hope it'll be the last overly frustrating bit). Will continue in the next post.
-
Okay, finally time to catch up here a bit. It's been a roller coaster to say the least. Some of the toughest problems didn't come up until the later stages, so it was getting quite frustrating from time to time. I didn't expect it to be easy, but some of this stuff was rather difficult and I had a lot to learn. First off, I worked on the holes for the control panel board: This process was all relatively straightforward, thankfully. I wasn't able to print out a full-size sheet of paper of all the measurements without going to the UPS store again to get them printed (and I didn't feel like it), so I just printed it all out in pieces, using Photoshop. Thankfully Photoshop is able to print everything out with the proper dimensions. After printing out the pieces, I just measured dimensions from the edges to determine exactly where everything goes and then taped them all down. From there, I used a pointed knife to poke into the middle of the crosshair of each hole, making sure to push in deep enough to be visible in the wood. Then I just took all the pieces off. You end up with markings that you can easily just stick your drill bit into: The next step was just to actually drill the holes. I found that using my drill press was much easier than freehanding it with my drill, and it produces much cleaner holes as well. That said, there were a few holes that I couldn't reach with my drill press, and the drill did work fine (it just saves my carpal tunnel wrists to use the drill press and the holes aren't quite as clean). It doesn't really matter how clean the holes are though, because the edges will all be covered up by the buttons/joysticks/etc. For the most part, all went well with drilling out the holes. You can see the difference in how clean the holes are between the majority of them and the few that I had to drill by hand. The big hole for the trackball I did have to move up a tiny bit, just so that I could reach it with my small, cheap drill press. Otherwise, I would have had to drill that by hand, which would have been a bit difficult due to the size of the hole. Thankfully though, there was room to move it up, and it doesn't really present any usability issues to do so. There is one minor issue, which I will have to deal with later. The plans call for putting pieces on the very inside edges in order to hold the whole thing place once the controls are all in, but my left-most holes for the spinner buttons are in the way there. I didn't want to move them though just because they're in the best place for usability. So that just means that I'll have to cut out a space for them when I glue in the pieces to hold it all together, which I don't see as a big issue. Per the bits themselves, I went to Home Depot looking for forstner bits, but for whatever reason they didn't have any. I ended up going with hole saw bits instead, which are slightly more annoying because you have to constantly remove the cores after making each hole, but they did work just fine. Gonna make a new post to continue progress.
-

Moderator Guidelines and Contributor Rules
Jason Carr replied to Jason Carr's topic in News and Updates
The problem with censoring is that the line will constantly be pushed, and we really don't want to fight that battle. So yes, if you find nudity in the database, it needs deleted. Thanks for your help and understanding @LonestarK. -

Moderator Guidelines and Contributor Rules
Jason Carr replied to Jason Carr's topic in News and Updates
We won't be going through and approving or disapproving various types of smut. If there's a question, please don't upload it. The games database is accessible to kids and adults alike, without restriction. If it's something that'd you be willing to show to your own kids, then it's probably safe to post. Otherwise, please don't. My faith in Jesus is indeed extremely important to me, but it is generally irrelevant in this decision. I don't think anyone in their right mind aims to share porn with kids. -
Yes, that's correct from what I can tell. It doesn't look like they secure the control panel board down, most likely so that you can still easily access the components/wires underneath. That is a cool idea. I definitely wasn't following you before. Yes, from what I can tell, it does look like you could potentially do that, though I don't have the full cabinet together yet so I can't say for certain, but I would assume that you would have to be able to open that all up after the cabinet is completed.
-
Nice, the build looks great. Yeah, I used the Rec Room Masters board for my main inspiration. My main beef with that board though is the feel of the edge of the plexiglass on your arm as you play. It just hurts and feels cheap. That's a good point with the mouse buttons. I think ideally you'd be able to click them with your left hand while using your right hand on the trackball. But finding a good place for them on the left-hand side of the board isn't easy. I'd put them below or above the trackball, but then they'll definitely get in the way while playing something like Golden Tee. I have noticed that the mag-sticks have very little travel. I can't tell if I'll like them yet or not though, so I'll probably just end up installing them and I'll have to replace them if I don't like them. We shall see.
-
We're actually working on making those edits easier. Right now, unfortunately for us to open them up requires some development. The only thing we have right now is direct access to the database, which we definitely can't share with anyone. We'll be working on some admin tools here soon that should really help.
-
https://tech.slashdot.org/story/22/10/27/2113259/did-paypal-just-reintroduce-its-2500-misinformation-fine-hoping-we-wouldnt-notice
-
Hmm, that's odd. I think if you restart the app after manually adding those clear logos, that problem should go away. It sounds like we must have a bug there that I need to look into. Let me know if it's still happening after completely closing the app and restarting. Send me a screenshot if it's still happening.
-
Tonight I started working on the controls board again. I managed to use a Japanese pull saw to cut out the corners like so: However, this was a massive pain in the butt to do accurately. I completely screwed up both corners the first time around and they looked terribly janky. Ultimately, I had to cut a new piece from the plywood scraps and do it all over again (which thankfully wasn't that difficult because it's just a square cut). It's still not perfect this time around, but I think it'll look decent enough with the art on it and the cabinet all put together. I did chip out the top finish on the edge of it, (see the second picture above), but I expect that won't be noticeable once the art is on the board. Still, that was not a great experience making that cut happen. The reason the plans call for you to do it this way is because there's a funky angle on the cuts, due to the fact that the control board isn't level with the ground, so I guess there's not really an easier way to pull it off. But anyways, I'm glad that's done well enough. I did also have to cut an angle on the back edge of the board at 9.5 degrees in order for it to properly match up with the rest of the cabinet. This was also mistakenly left out of the plans. Next, I started working on positioning the joysticks, buttons, spinner, and trackball on the board, and eventually I realized that my previous design had some usability flaws: The footprint of the design was slightly too wide, so players would likely be a bit too far past the edges of the 32" screen There wasn't enough room towards the front of the controller board for players to comfortably rest their wrists The spinner and buttons were awkwardly placed, which was making the player 1 joystick get in the way of being able to easily use them None of those things were easy to figure out without physically placing the pieces on the board to feel it out. It also helped to use my Rec Room Masters Xtension controller board to compare things against (even though that board has some things with its design that I don't like). Anyways, I went back to the drawing board and came up with this: In my mind, I think that's perfect. Everything will be comfortable to use and in theory, nothing will get in the way of anything else. We'll see how it goes in practice, but I'm pretty confident in this design. I already received all the buttons, joysticks, spinner, and trackball from Ultimarc (it shipped here lightning fast), so next I'll be cutting/drilling out all the holes for the board and doing a test fit (though I can't put anything in permanently until after I get the printed art and put it on the board).
-
There's no data there that would be useful to you. We make a point not to store anything useful in there.
-
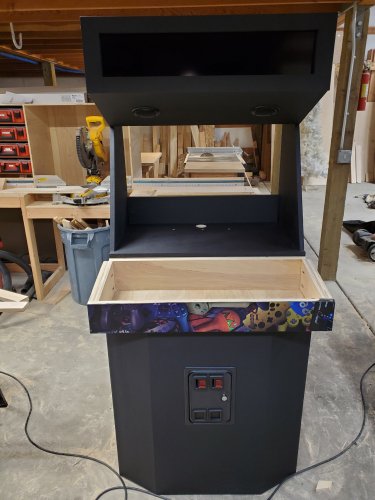
Yes, the three sections just sit on top of each other, but you do have to screw them together once you get the basic frame completed (basically what I have done above), and then you have to screw the side panels into the sides of all three pieces. Because of the finicky-ness of screwing pocket hole screws into plywood, I honestly wouldn't press my luck by screwing and unscrewing all those screws multiple times. I guess in theory it would work, but you would probably end up sacrificing some of the structural integrity depending on how many times you took it all apart and put it back together.


