-
Posts
11,556 -
Joined
-
Last visited
-
Days Won
76
Content Type
Profiles
Forums
Articles
Downloads
Gallery
Blogs
Everything posted by Lordmonkus
-
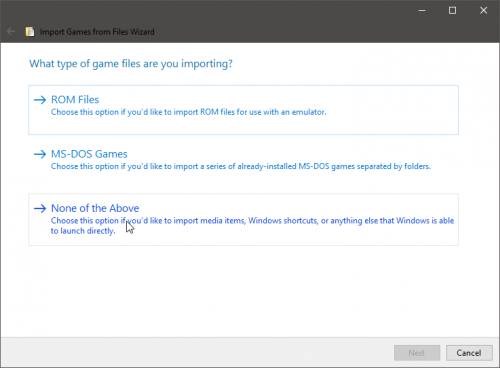
Yeah, now when you drag in a shortcut file to start the import select the "None of the above" option.
-
This has been addressed in the recent beta builds and is now implemented.
-
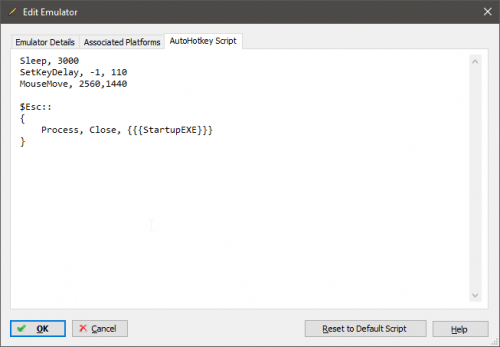
I modified it using @Suhrvivors mousemove AHK to this now and works too and is resolution independent. Sleep, 3000 SetKeyDelay, -1, 110 MouseMove, 0, 2160, 0, R $Esc:: { Process, Close, {{{StartupEXE}}} }
-

Video Discussion: What Retroarch SNES core is right for you ?
Lordmonkus replied to Lordmonkus's topic in Videos
Only for the games that require them. The BSnes Mercury cores allow for this as well. -
Nice to know this works for any resolution without any tweaking.
-
Turn off Bilinear Filtering.
-
Yeah sure, learn to use and setup a bloated confusing software package just to hide a mouse cursor, talk about a sledgehammer for a small job. Edit: Just doing some tinkering combining of AHK scripts and cobbled this together and seems to work perfectly without the need to use any external programs whatsoever, it relies solely on Launchbox's built in AHK script. Simply put the following script in the AutoHotKey Script tab of the edit emulator window. If using a different resolution display change the 1920,1080 to whatever the resolution your display is. The reason for the sleep command is because I found without it the mouse didn't move, the delay seemed to fix it. Sleep, 3000 SetKeyDelay, -1, 110 MouseMove, 1920,1080 $Esc:: { Process, Close, {{{StartupEXE}}} }
-
I think that is a Windows 10 thing, not sure if it works in previous versions or not.
-
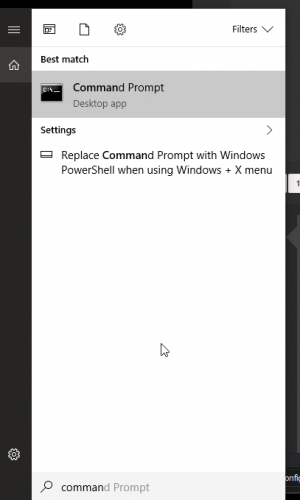
To get to a command prompt you can get there in a couple of different ways. 1) Using the search function simply type "command" and you it should be there. 2) Open the Run box by pressing the Windows key + R and type in "cmd", press enter.3) In your file explorer go to the folder you want to open the command prompt in and press Shift and right click on the mouse and in the popup menu there should be an "Open Command Prompt" window here.
-
Simply uncheck the video and any other media you already have and don't want to re-download during the import process.
-
It's on the "Small Things" list. Hopefully @Jason Carr implements it.
-

Some ideas to improve the UI and usability of Big Box
Lordmonkus replied to Bri Bri's topic in Features
Then feel free to post it in the Small Things thread -

Some ideas to improve the UI and usability of Big Box
Lordmonkus replied to Bri Bri's topic in Features
-

Video Discussion: What Retroarch SNES core is right for you ?
Lordmonkus replied to Lordmonkus's topic in Videos
This video guide is now horrendously outdated and useless so here's an updated and ultra simplified version of this guide. Please refer to the link below to see what games are incompatible or have known issues with specific cores. https://wiki.libretro.com/index.php?title=Nintendo_SNES_Core_Compatibility#SNES9x For the vast majority of the average users out there just use the Snes9x core, the one that has no year in its name. This core will run 99% of the games just fine and works very well on modest hardware and is updated regularly. The cores with the years in their name or meant for very old and low powered mobile hardware, you can view more information on those specific cores here: https://wiki.libretro.com/index.php?title=Main_Page For those of you who require more accuracy, compatibility and have the extra CPU power to drive it the BSnes Balanced and Accuracy cores are the next choice. There are the Mercury variants of these cores which allows for a couple of extra core functions such as FX chip overclocking so you can run games like Star Fox at a faster frame rate. There is one catch to these cores however, you have to have dumps of the special chips in your \Retroarch\system\ folder for the games that require them to work. For a list of the required special chips refer to this link here: https://wiki.libretro.com/index.php?title=Bsnes and for a list of games that require these special chips refer to this wiki page found here: https://en.wikipedia.org/wiki/List_of_Super_NES_enhancement_chips And for those of you that demand the most accurate and cutting edge SNES emulation and have a very powerful CPU you will want the newly added Higan core. This core will also require the same special chip dumps as the BSnes cores above. This core is extremely demanding on the CPU so unless you have a very powerful modern CPU to use this core and maintain a constant smooth 60 fps I highly suggest that you use one of the other cores. This core runs "fine" on my 4GHz AMD 8350 CPU but there are some audio crackles here and there which indicate performance problems and I have read that even a modern i7 has some problems with it. In conclusion here's the TL;DR: Average users stick with Snes9x (no year). If you have the special chip dumps and a semi decent CPU use BSnes Balanced or Accuracy. If you have a beastly CPU and you MUST HAVE the best use the Higan core. Edit: Because the Snes9x core is faster you can set your "Frame Delay" setting in the Video options of Retroarch to a much higher setting in return reducing input latency. Now whether or not this is something many people actually care about is another story and is personal preference but it is something to consider when deciding which core to use. -
We try our best around here to help when we can. The mame.ini default location I believe is in the \ini folder but I cannot say for sure. Mine is in the Main install folder of Mame where the executable is because the first thing I do when I install a new version is to generate a mame.ini file with the command mame64.exe -cc
-
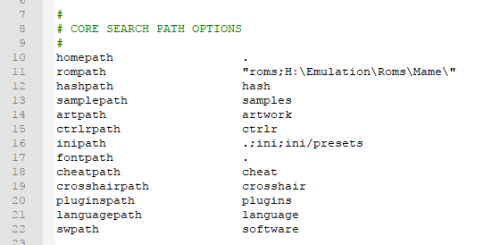
You can tell Mame where to look for your roms in a couple of ways if you are using the command line version. Option 1: You can edit the mame.ini file Option 2: Load up Mame and then press "Tab" on your keyboard to bring up Mames internal UI. Then go to Configure Options > Configure Directories > Roms, there you can add your roms folder in there.
-
Just want to make clear here that sharing of your Launchbox license file is not acceptable and may result in your license being blacklisted and prevented from future updates. We also cannot condone sharing of copyright files such as roms and bios files but of course what you do privately is up to you.
-
Shit, they got rid of it. MameUI has it's own rom audit tool to check your roms to what games are working and what ones are missing. As for CLRMamePro, I don't use it so I cannot tell you how to use it.
-
-
I forget which Mame core would be best for that set but either the 2014 or 2016 core (probably 2016). They used to have all the cores listed and what version of Mame they were based off on the Retroarch wiki but that seems to have been removed or moved. My honest opinion on the matter though is you should use a stand alone version of Mame for a romset that old, those older Mame cores are not as good as the stand alones like it is now. You can get a UI version of Mame and use the audit tool in it to figure out what roms are good and bad and what the bad ones are missing.
-

Xtension Two Player Control Board "Emulator Edition"
Lordmonkus replied to rmilyard's topic in Emulation
Unfortunately I have nothing I can help you with beyond what I have said already. -
What version of the Mame core and rom set are you using ? In Retroarch Press F1 and look at the bottom left, if you have a newer core and your rom set is older you could have some roms not up to date for the core.
-
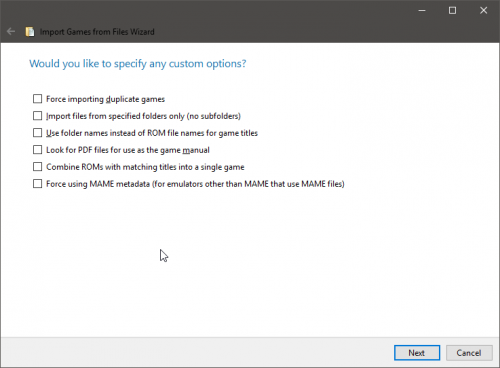
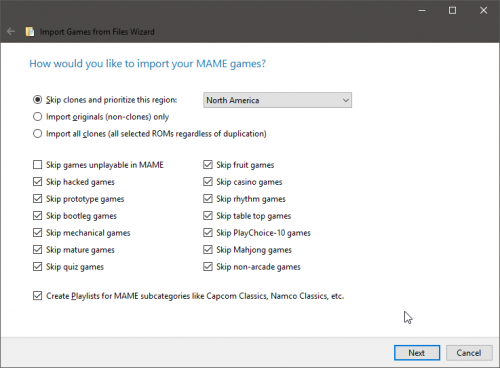
I don't know of any pre sorted rom sets but during the import at the 2nd to last step you will have a box that looks like this: Check the bottom box "Force using MAME metadata", you will then get a different window for next step where you can filter out a large percentage of the junk. Bonus Tip: At the bottom of this window turn off the check box for "Create Playlists" if you don't want Launchbox to automatically generate them. Some people don't want them while some people do, it's personal preference.
-

Xtension Two Player Control Board "Emulator Edition"
Lordmonkus replied to rmilyard's topic in Emulation
On a Pi I have no idea but on a normal PC with a keyboard you press "Tab" to get into the Mame menu to configure it. -
Believe it or not but Gamestop is a good place and Amazon.


