

-McFly-
-
Posts
327 -
Joined
-
Last visited
-
Days Won
2


Recent Profile Visitors
9,808 profile views


-McFly-'s Achievements
")
-
 What it is: A single PowerShell script that lets you temporarily "park" platforms - cleanly removing them from your library so LaunchBox/BigBox doesn't parse them at startup - and restore them later, byte-for-byte, whenever you want. No third-party software, no installer, nothing modified except your Data XMLs (which are backed up on every run). Why: LaunchBox parses every XML file in `Data\Platforms` at startup, so startup time scales with library size. On my ~1,500,000-game / 47.4 GB library, BigBox took ~11 minutes to reach the wheel. After parking the platforms I rarely browse (media pseudo-platforms, obscure systems), the same install starts in about 80 seconds - and everything comes back with one command when I want it. Why not just delete/hide platforms in LaunchBox? Deleting throws away your metadata and can cascade (removing category links, playlist placements). Parking sidesteps all of that: LaunchBox never sees an inconsistent state, so it never prunes anything, and unparking restores the exact original data. How it works For each parked platform the script saves a manifest in `<LaunchBox>\_parking\` containing: - its `<Platform>` node from `Platforms.xml` - all its category links from `Parents.xml` - all its emulator mappings from `Emulators.xml` …then moves its games XML from `Data\Platforms\` into `_parking\` and removes those entries from the live files. **Nothing is ever deleted** - your games, media, and images are not touched at all (they're just not loaded). Unparking re-injects everything and moves the games file back under its original name. Safety features - Refuses to run while LaunchBox or BigBox is open. - Backs up `Platforms.xml`, `Parents.xml`, `Emulators.xml` and `ListCache.xml` to `_parking\backups\<timestamp>` before every operation. - Saves after each platform, so an error mid-run can't leave you half-done. - Finds games files by content when the filename doesn't match the platform name (LaunchBox sometimes shortens names when creating games files — e.g. a platform called "MS-DOS Magazines & Newsletters" can live in `MS-DOS Magazines.xml`). - Deletes `ListCache.xml` after changes so the sidebar rebuilds with correct counts (skippable with `-KeepListCache`). - Writes a log of everything it does to `_parking\parker.log`. Usage 1. Save `LB-Platform-Parker.ps1` anywhere. 2. Close LaunchBox / BigBox completely. 3. Right-click the file → *Run with PowerShell* (or from a terminal: `powershell -ExecutionPolicy Bypass -File .\LB-Platform-Parker.ps1`). 4. First run: point it at your LaunchBox folder (it remembers it afterwards). 5. Use the menu: 1) Park platforms (remove from library, keep safe) 2) Unpark platforms (restore) 3) Unpark ALL 4) Status Q) Quit The park list shows each platform's games-XML size - that's its share of your startup time, so park the big ones you don't browse. Selection accepts numbers and ranges (`1,4,7-12`), `all`, or type text to filter the list first. Command-line use also works if you want to script it (e.g. park before a session, unpark for a showcase): (powershell) .\LB-Platform-Parker.ps1 -Action park -Platforms 'Platform A','Platform B' .\LB-Platform-Parker.ps1 -Action unpark-all .\LB-Platform-Parker.ps1 -Action status Requirements & notes - Windows PowerShell 5.1 (built into Windows 10/11) or PowerShell 7. No modules needed. - Always run it with LaunchBox/BigBox closed (it checks and refuses otherwise). - Parked platforms won't appear anywhere in LaunchBox - that's the point. Your images, videos, manuals and game files stay exactly where they are. - If you use cloud sync / multiple machines pointed at one install, park/unpark on one machine at a time. - Tested on LaunchBox 13.x. Standard disclaimer: it backs up everything it touches, but you're responsible for your library - keep your normal backups too. Restore path if anything ever looks wrong: copy the three XMLs back from the newest `_parking\backups\<timestamp>` folder, and move any `_parking\*.games.xml` files back into `Data\Platforms` (renaming `<name>.games.xml` → `<name>.xml`). That's the entire failure surface. The zip file includes these instructions (best read using Notepad++) and the powershell file. If you find bugs, let me know and I'll fix them. Enjoy the fast boots. Feedback welcome! Platform-Parker.zip
 -
Launchbox crashes / hangs with too many platforms.
-McFly- replied to -McFly-'s topic in Troubleshooting
Mine's Pro. I went back to an earlier build during the debugging as we went down the graphics card rabbit hole. I'll probably leave it here though. -
Launchbox crashes / hangs with too many platforms.
-McFly- replied to -McFly-'s topic in Troubleshooting
Win 11 24H2 Build 26100.8037 -
Launchbox crashes / hangs with too many platforms.
-McFly- replied to -McFly-'s topic in Troubleshooting
So... I've had it running now for over 3 hours without crashing. Here's what I found. BigBox was running under PageHeap / IFEO debug instrumentation, which was making it far more likely to terminate or behave abnormally during long runs. Windows had a hidden per-app debugging setting attached to BigBox.exe, even though normal verifier /query looked clean. HKLM\SOFTWARE\Microsoft\Windows NT\CurrentVersion\Image File Execution Options\BigBox.exe GlobalFlag 0x02000000 PageHeapFlags 0x3 BigBox itself was being destabilized by PageHeap being enabled, and removing it fixed the problem. The crash problem was caused, or at least heavily triggered, by hidden Windows PageHeap debugging being enabled specifically for BigBox.exe. - This may return or may not have fixed everything but I've not had it run for 3 hours for at least a month. -
I'm continually seeing my Bigbox setup hang or crash when I run all my platforms and playlists. I'm trying to use Attract Mode with the Aeon MQ7 theme with almost 800 platforms and a little over 700 playlists. (I have too many and I'm asking too much, I know.) I've spent the last few weeks going through my hardware, software, operating system, drivers and more with fixes, trial runs, tests, VLC/FFME/Media Player trials, and just about everything I can with AI without success. The final result is to send this to the Launchbox devs, which I'm doing here. Others may have similar issues or have comments to add as well as a few 'just use less platforms and playlists you muppet' which I do, but I'd really like to have this run for more than 90 or so minutes before crashing or freezing with everything added. I've attached a Crash Packet that ChatGPT put together for me and there is a link to other files available inside the document for Devs or anyone else to look at. Don't get me wrong - I'm not complaining that Bigbox has any errors or should support something this ridiculous, but I really would love to have this running during the day while I sit working from home, for me to look up to and break the monotony that is emails and teams meetings and phone calls and powerpoint presentations. I expect that I'm just asking for too much... but if you don't ask, you don't get...? BigBox_Developer_Crash_Packet_Mcfly.docx
-
Launchbox Video Recovery - Audit, Find and Fix View File LaunchBox Video Recovery v1.0 Recover missing playlist and platform videos LaunchBox Video Recovery scans your video library and helps you recover missing platform or playlist videos by finding likely matches elsewhere in your LaunchBox video collection. The script can then optionally create symbolic links to the best matches, restoring videos without duplicating files. This is especially useful for large LaunchBox libraries where videos may already exist but are stored under a different platform or theme folder. What This Script Does LaunchBox Video Recovery can: • Scan LaunchBox Playlist XML files for missing videos • Scan LaunchBox Platform XML files for missing videos • Search your video library for possible matches • Score candidate videos based on similarity • Let you choose the correct match • Create symbolic links to restore missing videos The script helps recover missing videos without copying or duplicating large files. Why This Exists Large LaunchBox video libraries can become fragmented over time. Common causes include: • Media packs installed for the wrong platform • Theme videos stored in different platform folders • Moving media between drives • Playlists referencing videos that no longer exist • Duplicate or renamed videos Instead of manually searching thousands of files, this script finds and links likely matches automatically. Features • Recover Playlist videos • Recover Platform videos • Dry-run mode (test without making changes) • Interactive selection of candidates • Candidate scoring system to identify best matches • Automatic symlink creation for recovered videos • Report generation for all actions Match Score Explanation When the script finds possible replacement videos, it displays them with a '[ match score ]': Missing: Aquarium Collection 0. [1170] H:\LaunchBox\Videos\Final Burn Neo\Theme\Aquarium.mp4 1. [960] H:\LaunchBox\Videos\MAME\Aquarium Gameplay.mp4 2. [820] H:\LaunchBox\Videos\Arcade\Aquarium Trailer.mp4 3. [610] H:\LaunchBox\Videos\Arcade\Aquarium Intro.mp4 The number in brackets is the match score calculated by the script. Higher scores mean the script believes the video is a closer match. Score Guide Score Range Meaning 1000+ Very strong match 700–1000 Likely correct 400–700 Possible match Below 400 Weak guess Example: Missing: Aquarium Collection Candidate: Aquarium.mp4 The script sees: • "Aquarium" → strong match • "Collection" → missing word (small penalty) Result: high score How Matching Works The script evaluates candidate videos using several factors: • Exact word matches • Partial word matches • Filename similarity • Platform folder relevance • Penalties for extra or missing words This helps identify videos that are likely correct even when stored in another platform folder. Requirements • Windows • PowerShell • Administrator privileges (required for symlink creation) LaunchBox does not need to be running while the script runs. How to Run Place the script anywhere and run it with PowerShell from inside that location: powershell -ExecutionPolicy Bypass -File .\LaunchBox-Video-Recovery-v1.0.ps1 The script will guide you through: Selecting Playlist or Platform recovery Choosing dry-run mode (shows what will be changed without changing anything yet) Setting report output folder Selecting video search roots Example Workflow Example scenario: A playlist references a missing video: H:\LaunchBox\Videos\Playlists\Aquarium Collection.mp4 But the actual video exists here: H:\LaunchBox\Videos\Final Burn Neo\Theme\Aquarium.mp4 The script detects the match and can create: H:\LaunchBox\Videos\Playlists\Aquarium Collection.mp4 → symlink to H:\LaunchBox\Videos\Final Burn Neo\Theme\Aquarium.mp4 LaunchBox will then play the video normally. Typical Output Example: Playlist XML files checked : 718 Missing destination videos : 365 Missing: Aquarium Collection 0. [1170] H:\LaunchBox\Videos\Final Burn Neo\Theme\Aquarium.mp4 1. [960] H:\LaunchBox\Videos\MAME\Aquarium Gameplay.mp4 2. [820] H:\LaunchBox\Videos\Arcade\Aquarium Trailer.mp4 You can then select the correct match. Safety The script is designed to be non-destructive. It: • Does not delete videos • Does not overwrite existing videos • Only creates symbolic links to existing files Dry-run mode lets you preview all changes before anything is created. Recommended Usage This script is most useful for: • Very large video libraries • Recovering missing playlist videos • Fixing broken media references • Consolidating video libraries across platforms Feedback If you encounter issues or have suggestions, feel free to post feedback. Submitter -McFly- Submitted 03/08/2026 Category Third-party Apps and Plugins
-
Version 1.0.0
16 downloads
LaunchBox Video Recovery v1.0 Recover missing playlist and platform videos LaunchBox Video Recovery scans your video library and helps you recover missing platform or playlist videos by finding likely matches elsewhere in your LaunchBox video collection. The script can then optionally create symbolic links to the best matches, restoring videos without duplicating files. This is especially useful for large LaunchBox libraries where videos may already exist but are stored under a different platform or theme folder. What This Script Does LaunchBox Video Recovery can: • Scan LaunchBox Playlist XML files for missing videos • Scan LaunchBox Platform XML files for missing videos • Search your video library for possible matches • Score candidate videos based on similarity • Let you choose the correct match • Create symbolic links to restore missing videos The script helps recover missing videos without copying or duplicating large files. Why This Exists Large LaunchBox video libraries can become fragmented over time. Common causes include: • Media packs installed for the wrong platform • Theme videos stored in different platform folders • Moving media between drives • Playlists referencing videos that no longer exist • Duplicate or renamed videos Instead of manually searching thousands of files, this script finds and links likely matches automatically. Features • Recover Playlist videos • Recover Platform videos • Dry-run mode (test without making changes) • Interactive selection of candidates • Candidate scoring system to identify best matches • Automatic symlink creation for recovered videos • Report generation for all actions Match Score Explanation When the script finds possible replacement videos, it displays them with a '[ match score ]': Missing: Aquarium Collection 0. [1170] H:\LaunchBox\Videos\Final Burn Neo\Theme\Aquarium.mp4 1. [960] H:\LaunchBox\Videos\MAME\Aquarium Gameplay.mp4 2. [820] H:\LaunchBox\Videos\Arcade\Aquarium Trailer.mp4 3. [610] H:\LaunchBox\Videos\Arcade\Aquarium Intro.mp4 The number in brackets is the match score calculated by the script. Higher scores mean the script believes the video is a closer match. Score Guide Score Range Meaning 1000+ Very strong match 700–1000 Likely correct 400–700 Possible match Below 400 Weak guess Example: Missing: Aquarium Collection Candidate: Aquarium.mp4 The script sees: • "Aquarium" → strong match • "Collection" → missing word (small penalty) Result: high score How Matching Works The script evaluates candidate videos using several factors: • Exact word matches • Partial word matches • Filename similarity • Platform folder relevance • Penalties for extra or missing words This helps identify videos that are likely correct even when stored in another platform folder. Requirements • Windows • PowerShell • Administrator privileges (required for symlink creation) LaunchBox does not need to be running while the script runs. How to Run Place the script anywhere and run it with PowerShell from inside that location: powershell -ExecutionPolicy Bypass -File .\LaunchBox-Video-Recovery-v1.0.ps1 The script will guide you through: Selecting Playlist or Platform recovery Choosing dry-run mode (shows what will be changed without changing anything yet) Setting report output folder Selecting video search roots Example Workflow Example scenario: A playlist references a missing video: H:\LaunchBox\Videos\Playlists\Aquarium Collection.mp4 But the actual video exists here: H:\LaunchBox\Videos\Final Burn Neo\Theme\Aquarium.mp4 The script detects the match and can create: H:\LaunchBox\Videos\Playlists\Aquarium Collection.mp4 → symlink to H:\LaunchBox\Videos\Final Burn Neo\Theme\Aquarium.mp4 LaunchBox will then play the video normally. Typical Output Example: Playlist XML files checked : 718 Missing destination videos : 365 Missing: Aquarium Collection 0. [1170] H:\LaunchBox\Videos\Final Burn Neo\Theme\Aquarium.mp4 1. [960] H:\LaunchBox\Videos\MAME\Aquarium Gameplay.mp4 2. [820] H:\LaunchBox\Videos\Arcade\Aquarium Trailer.mp4 You can then select the correct match. Safety The script is designed to be non-destructive. It: • Does not delete videos • Does not overwrite existing videos • Only creates symbolic links to existing files Dry-run mode lets you preview all changes before anything is created. Recommended Usage This script is most useful for: • Very large video libraries • Recovering missing playlist videos • Fixing broken media references • Consolidating video libraries across platforms Feedback If you encounter issues or have suggestions, feel free to post feedback. -
Launchbox Doctor - Audit Tool View File LaunchBox Doctor v1.0 Repair, audit, and verify LaunchBox installations Author: Mcfly LaunchBox Doctor scans your LaunchBox installation and repairs common structural issues that can break LaunchBox, BigBox, or large collections. It was built specifically for large libraries and multi-drive setups, including collections using junctions, symbolic links, or split storage across multiple drives. What LaunchBox Doctor Does LaunchBox Doctor performs several checks and repairs: • Detects missing or broken symbolic links / junctions • Repairs missing game folder links • Detects missing or invalid media paths • Verifies LaunchBox XML structure integrity • Identifies orphaned or unreachable content • Identifies missing Platform and Playlist videos The script can recreate missing junctions automatically if the source folders exist. Why This Exists Large LaunchBox collections (especially multi-drive setups) often use: • Junction links • Symbolic links • Split storage across drives • Network shares If one of those links breaks, LaunchBox may suddenly show missing games, empty platforms, or startup errors. LaunchBox Doctor helps identify and repair those problems quickly. Typical Problems This Script Fixes Examples of issues LaunchBox Doctor can detect or repair: • Platform suddenly showing 0 games • Games missing after drive letter change • Broken LaunchBox\Games junctions • LaunchBox failing to load certain platforms • Broken symlink libraries after drive reconnect • Incorrect folder mappings Safety LaunchBox Doctor is designed to be non-destructive. The script: • Does not delete games • Does not modify ROM files • Only recreates missing links when the source exists If a required source folder cannot be found, the script will skip it and report the issue instead of making changes. Requirements • Windows • PowerShell • Administrator privileges (required for junction creation) LaunchBox / Bigbox itself should not be running while the script runs. How to Run Place the script anywhere and run it with PowerShell as an Administrator inside that location: powershell -ExecutionPolicy Bypass -File .\LaunchBox-Doctor-v1.0.ps1 Follow the prompts to select your LaunchBox installation and check paths. The script itself can be updated with these paths using Notepad, although last-run paths are remembered. Example Use Case Example scenario: You store games across multiple drives: H:\LaunchBox\Games K:\More\Games J:\Games LaunchBox Doctor can detect if a junction under LaunchBox\Games has broken and automatically recreate it pointing to the correct location. Typical Output See example image. Recommended Usage Run LaunchBox Doctor if you experience: • Missing platforms • Empty game lists • Broken junction libraries • Problems after moving drives • Issues after rebuilding storage • Missing Platform or Playlist videos It can also be useful as a quick audit tool for very large LaunchBox installations. Notes If you use: • NAS storage • Multiple SSD/NVMe drives • Junction-based libraries this script can save a lot of time when troubleshooting missing content. Feedback This tool was written to support large LaunchBox collections. If you find bugs or have improvement ideas, feel free to post feedback. Submitter -McFly- Submitted 03/08/2026 Category Third-party Apps and Plugins
-
Version 1.0.0
42 downloads
LaunchBox Doctor v1.0 Repair, audit, and verify LaunchBox installations Author: Mcfly LaunchBox Doctor scans your LaunchBox installation and repairs common structural issues that can break LaunchBox, BigBox, or large collections. It was built specifically for large libraries and multi-drive setups, including collections using junctions, symbolic links, or split storage across multiple drives. What LaunchBox Doctor Does LaunchBox Doctor performs several checks and repairs: • Detects missing or broken symbolic links / junctions • Repairs missing game folder links • Detects missing or invalid media paths • Verifies LaunchBox XML structure integrity • Identifies orphaned or unreachable content • Identifies missing Platform and Playlist videos The script can recreate missing junctions automatically if the source folders exist. Why This Exists Large LaunchBox collections (especially multi-drive setups) often use: • Junction links • Symbolic links • Split storage across drives • Network shares If one of those links breaks, LaunchBox may suddenly show missing games, empty platforms, or startup errors. LaunchBox Doctor helps identify and repair those problems quickly. Typical Problems This Script Fixes Examples of issues LaunchBox Doctor can detect or repair: • Platform suddenly showing 0 games • Games missing after drive letter change • Broken LaunchBox\Games junctions • LaunchBox failing to load certain platforms • Broken symlink libraries after drive reconnect • Incorrect folder mappings Safety LaunchBox Doctor is designed to be non-destructive. The script: • Does not delete games • Does not modify ROM files • Only recreates missing links when the source exists If a required source folder cannot be found, the script will skip it and report the issue instead of making changes. Requirements • Windows • PowerShell • Administrator privileges (required for junction creation) LaunchBox / Bigbox itself should not be running while the script runs. How to Run Place the script anywhere and run it with PowerShell as an Administrator inside that location: powershell -ExecutionPolicy Bypass -File .\LaunchBox-Doctor-v1.0.ps1 Follow the prompts to select your LaunchBox installation and check paths. The script itself can be updated with these paths using Notepad, although last-run paths are remembered. Example Use Case Example scenario: You store games across multiple drives: H:\LaunchBox\Games K:\More\Games J:\Games LaunchBox Doctor can detect if a junction under LaunchBox\Games has broken and automatically recreate it pointing to the correct location. Typical Output See example image. Recommended Usage Run LaunchBox Doctor if you experience: • Missing platforms • Empty game lists • Broken junction libraries • Problems after moving drives • Issues after rebuilding storage • Missing Platform or Playlist videos It can also be useful as a quick audit tool for very large LaunchBox installations. Notes If you use: • NAS storage • Multiple SSD/NVMe drives • Junction-based libraries this script can save a lot of time when troubleshooting missing content. Feedback This tool was written to support large LaunchBox collections. If you find bugs or have improvement ideas, feel free to post feedback. -
© Mcfly
-
© Mcfly
-
© Mcfly
-
© Mcfly
-
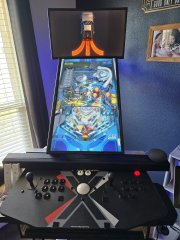
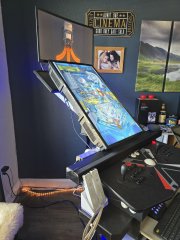
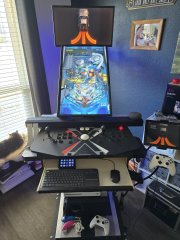
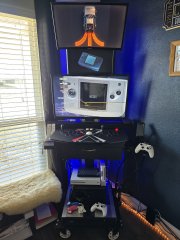
Mcfly Cabinet build - Standard and Pinball modes
-McFly- posted a gallery image in Photos of Your Builds
 These are the latest (version... 6 I think?) images of my Arcade setup. I like playing slots so I designed it around that with no 'box' around it. The bottom screen rotates and tilts back to work better in Pinball mode. I basically wanted my cabinet to be multi purpose and hadn't seen anything I liked online, so I designed and built this myself.
© Mcfly
-
Over 1.5 million titles as of now. I've just uploaded my Playlists and all my icons, you can find them here: and here:

- 215 replies
-
- 1
-

-
- collections
- mcfly
- (and 24 more)


