Darkshade
-
Posts
16 -
Joined
-
Last visited
Darkshade's Achievements
")
8-Bit Processor (3/7)
18
Reputation
-
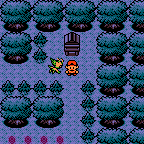
BS The Legend of Zelda: Ancient Stone Tablets Clear Logos View File Clear Logos for my (English) title screen patch for BS The Legend of Zelda: Ancient Stone Tablets for all 4 weeks. With the patch, the title screen looks like this: And it can be found here under 'BS The Legend of Zelda Ancient Stone Tablets' > Files > 'Title Screen Patches': https://bszelda.zeldalegends.net/bszelda.shtml (Direct link: https://bszelda.zeldalegends.net/sekibanzips/darkshade_newintro.zip) And these clear logos have been made to match in a similar vein to the way the title screen matches the boxart for A Link to the Past. I've also attached higher resolutions and variants of the title screen in a zip for those who might want them. Submitter Darkshade Submitted 03/30/2022 Category Game Clear Logos
-
Version 1.0.0
194 downloads
Clear Logos for my (English) title screen patch for BS The Legend of Zelda: Ancient Stone Tablets for all 4 weeks. With the patch, the title screen looks like this: And it can be found here under 'BS The Legend of Zelda Ancient Stone Tablets' > Files > 'Title Screen Patches': https://bszelda.zeldalegends.net/bszelda.shtml (Direct link: https://bszelda.zeldalegends.net/sekibanzips/darkshade_newintro.zip) And these clear logos have been made to match in a similar vein to the way the title screen matches the boxart for A Link to the Past. I've also attached higher resolutions and variants of the title screen in a zip for those who might want them. -
No worries, let me know how you get on.
-
As long as you've placed the shortcut creator in the same directory as the 'eka2l1.exe - Shortcut' file, it should work. It may be a permissions issue, so you could try running the .bat file as an administrator. That said however, I've since developed a better method as of last night, it is as follows: - Set up your emulator and install your games into the EKA2L1 Emulator as per the advice given in the video linked in the original post or similar. - Download the 'Command Line Files.zip' attached to this post. These are not ROMs, they are simply blank files with the appropriate names to feed into the emulators command line. - Extract these files to a location of your choosing. - Import these files into LaunchBox as ROMs, and assign them EKA2L1 (eka2l1.exe) as an emulator. It will need the following settings: Make sure 'Use file only without file extension or folder path' is ticked. In the default command line parameters, add the following: --app %romfile% --fullscreen - After they've been imported as ROMs and assigned the emulator, Close LaunchBox. - Download the 'Nokia N-Gage.xml' file attached to this post (IGNORE THE ONE IN THE PREVIOUS POST) - Open it in your favourite text editor of choice capable of Find/Replace (I'd recommend Notepad++) - Find (Ctrl+F) the following phrase: "REPLACE\THIS\DIRECTORY\" and replace it (Replace All) with the directory you placed your Game Shortcuts in earlier. For example, mine is: C:\Users\Administrator\LaunchBox\Games\Nokia N-Gage\Game Shortcuts Be sure to add a "\" on the end of the directory. so "C:\Users\Administrator\LaunchBox\Games\Nokia N-Gage\Game Shortcuts" would become: "C:\Users\Administrator\LaunchBox\Games\Nokia N-Gage\Game Shortcuts\" - Once you have replaced all, save and close the 'Nokia N-Gage.xml' file. - Copy the newly saved 'Nokia N-Gage.xml' file into your LaunchBox\Data\Platforms\ directory and overwrite the existing file. You should now be able to launch all Nokia N-Gage games successfully through LaunchBox/BigBox. Of course only those supported by the emulator will play successfully. To play NCAA 2004 and X-Men legends you need to make sure you're using the latest version of the emulator. Enjoy. Nokia N-Gage.xml Command Line Files.zip
-
So having gone through the process of setting the N-Gage emulator up thanks to the advice in the Original Post, I thought I'd also try to give something back to help save people a lot of time (Windows Only). So I created a rather rudimentary batch script to generate a full set of pre-named shortcuts to the EKA2L1 emulator, and have decided to share my platform XML. Here's a quick step by step: - Set up your emulator and install your games into the EKA2L1 Emulator as per the advice given in the video linked in the original post or similar. - Download this: N-Gage_Shortcut_Creator.bat and place it in the root directory of your emulator (where your eka2l1.exe can be found) - Right click the eka2l1.exe and select 'Create Shortcut'. You should now have a shortcut to the exe file named 'eka2l1.exe - Shortcut' If not, make sure it is named this. - Run the 'N-Gage_Shortcut_Creator.bat'. It should now output a folder full of pre-named shortcuts into a folder called 'Game Shortcuts' and also automatically delete the 'eka2l1.exe - Shortcut' file. - Place these game shortcuts in whichever directory you'd like to run the games from. - Import them into LaunchBox as ROMs under the Nokia N-Gage Platform but don't assign them an emulator. - Close LaunchBox - Download the following: Nokia N-Gage.xml - Open it in your favourite text editor of choice capable of Find/Replace (I'd recommend Notepad++) - Find (Ctrl+F) the following phrase: "REPLACE\THIS\DIRECTORY\" and replace it (Replace All) with the directory you placed your Game Shortcuts in earlier. For example, mine is: C:\Users\Administrator\LaunchBox\Games\Nokia N-Gage\Game Shortcuts Be sure to add a "\" on the end of the directory. so "C:\Users\Administrator\LaunchBox\Games\Nokia N-Gage\Game Shortcuts" would become: "C:\Users\Administrator\LaunchBox\Games\Nokia N-Gage\Game Shortcuts\" - Once you have replaced all, save and close the 'Nokia N-Gage.xml' file. - Copy the newly saved 'Nokia N-Gage.xml' file into your LaunchBox\Data\Platforms\ directory and overwrite the existing file. You should now be able to launch all Nokia N-Gage games successfully through LaunchBox/BigBox. Of course only those supported by the emulator will play successfully. To play NCAA 2004 and X-Men legends you need to make sure you're using the latest version of the emulator. Enjoy.
-
Hi JayJay, After suffering from this problem for some time today, your latest focus.zip remedied it, so I just wanted to say thank you.
-
Yes, unfortunately that's the issue I ran into also. If the option you mention here is feasible, that's a pretty solid way of handling it, as the script could then be adapted to any users needs, with not much extra work aside just launching it. I'd assume the easiest method would be to have the path be in the same place as the Launcher EXE and detect it that way? As a solution though, assuming it works; that would be fantastic.
-
Just tested, it works nicely! Thank you. As for the AHK script, give it a try, it should be capable of reading controller input (at least, it's doing so on my end; I hope it does for you also.). I'm updating all of my emulators to use it, so I'd love to use it for this too. EDIT: To make it work with the launcher you might need to change: WinClose, ahk_exe {{{StartupEXE}}} to Process, Close, PhoenixEmuProject.exe
-
Thank you! Whenever time permits, I greatly appreciate it. Also, I hope I'm not asking too much, but I wonder if you could incorporate my AHK script for confirming Emulator Quit upon pressing Escape, over the one that is currently being used. (Or at least as an optional addition). You can find it here (Variation 2):
-
Much like I'm sure everybody else has, I've been using the script to close an emulator (or application) upon pushing Esc. However despite this working well, I wasn't fully satisfied with this solution, as it felt very abrupt and didn't leave much room for mistakes (Pushing Esc by accident). So I've put together a script (with the help of the guys over at the AHK Discord) which prompts a message box asking if you'd like to quit, with Yes/No options upon pushing Esc. The default selection is 'No', so you have to actively select 'Yes' for it to quit successfully. 'No' of course closes the message box, and it can be prompted again at any time via the Esc key. I've put together 2 variations of this script. The first one simply supports Mouse/Keyboard input. However if you're like me, you likely have a button on your controller (Or multiple buttons) mapped to your Esc key to close the emulator. So, the second variation temporarily maps Button 1 & Button 2 (usually A & B) to 'Enter', and maps the Joystick and the D-Pad to the arrow keys for the duration that the message box is active - allowing you to use a controller to select Yes or No. I think this script might be useful to a lot of people, so I've decided to share it here. Enjoy! Variation 1 (Keyboard and Mouse Only): ;Keeps the MsgBox active. stayactive() { if !winactive("Quit") winactivate Quit } ; Makes sure the script doesn't overlap itself. #Singleinstance, force ; Prevents the showing of a tray icon. #NoTrayIcon $Esc:: { ; Sets the timer for the stayactive function. settimer stayactive, 1 ; Stores currently active window WinGetActiveTitle, Var_Active_Window ; Hides AHK Script from appearing in the taskbar and puts the MsgBox always on top. Gui +OwnDialogs +AlwaysOnTop ; Create a message box with Yes/No options, 260 sets the message box default to 'No'. MsgBox, 260, Quit, Are you sure you want to quit? ; Turns off the stayactive timer settimer stayactive, off IfMsgBox, Yes { WinClose, ahk_exe {{{StartupEXE}}} } IfMsgBox, No { ; Activates emulator window WinActivate, %Var_Active_Window% exit } } Variation 2 (Also supports Controller Input): ;Keeps the MsgBox active. stayactive() { if !winactive("Quit") winactivate Quit } ; Makes sure the script doesn't overlap itself. #Singleinstance, force ; Prevents the showing of a tray icon. #NoTrayIcon $Esc:: { ; Sets the timer for the stayactive function. settimer stayactive, 1 ; Stores the emulator as active window WinGetActiveTitle, Var_Active_Window ; Sets the timer for the Joystick mapping function. SetTimer, WatchAxis, 5 ; Sets the timer for the D-Pad mapping function. SetTimer, WatchPOV, 5 ; Hides AHK Script from appearing in the taskbar and puts the MsgBox always on top. Gui +OwnDialogs +AlwaysOnTop ; Create a message box with Yes/No options, 260 sets the message box default to 'No'. MsgBox, 260, Quit, Are you sure you want to quit? ; Turns off the stayactive timer settimer stayactive, off IfMsgBox, Yes { SetTimer, WatchAxis, Off WinClose, ahk_exe {{{StartupEXE}}} } IfMsgBox, No { SetTimer, WatchAxis, Off ; Activates emulator window WinActivate, %Var_Active_Window% exit } } #IfWinActive ; This section maps Button 1 & Button 2 to Enter while the MsgBox is active. Joy1::Enter Joy2::Enter ; This section maps the Joystick to the Arrow Keys while the MsgBox is active. WatchAxis: JoyX := GetKeyState("JoyX") ; Get position of X axis. JoyY := GetKeyState("JoyY") ; Get position of Y axis. KeyToHoldDownPrev := KeyToHoldDown ; Prev now holds the key that was down before (if any). if (JoyX > 70) KeyToHoldDown := "Right" else if (JoyX < 30) KeyToHoldDown := "Left" else if (JoyY > 70) KeyToHoldDown := "Down" else if (JoyY < 30) KeyToHoldDown := "Up" else KeyToHoldDown := "" if (KeyToHoldDown = KeyToHoldDownPrev) ; The correct key is already down (or no key is needed). return ; Do nothing. ; Otherwise, release the previous key and press down the new key: SetKeyDelay -1 ; Avoid delays between keystrokes. if KeyToHoldDownPrev ; There is a previous key to release. Send, {%KeyToHoldDownPrev% up} ; Release it. if KeyToHoldDown ; There is a key to press down. Send, {%KeyToHoldDown% down} ; Press it down. return ; This section maps the D-Pad to the Arrow Keys while the MsgBox is active. WatchPOV: POV := GetKeyState("JoyPOV") ; Get position of the POV control. KeyToHoldDownPrev := KeyHeld ; Prev now holds the key that was down before (if any). ; Some joysticks might have a smooth/continous POV rather than one in fixed increments. ; To support them all, use a range: if (POV < 0) ; No angle to report KeyHeld := "" else if (POV > 31500) ; 315 to 360 degrees: Forward KeyHeld := "Up" else if POV between 0 and 4500 ; 0 to 45 degrees: Forward KeyHeld := "Up" else if POV between 4501 and 13500 ; 45 to 135 degrees: Right KeyHeld := "Right" else if POV between 13501 and 22500 ; 135 to 225 degrees: Down KeyHeld := "Down" else ; 225 to 315 degrees: Left KeyHeld := "Left" if (KeyHeld = KeyToHoldDownPrev) ; The correct key is already down (or no key is needed). return ; Do nothing. ; Otherwise, release the previous key and press down the new key: SetKeyDelay -1 ; Avoid delays between keystrokes. if KeyToHoldDownPrev ; There is a previous key to release. Send, {%KeyToHoldDownPrev% up} ; Release it. if KeyHeld ; There is a key to press down. Send, {%KeyHeld% down} ; Press it down. return
-
My Jaguar ROMs are compressed, Launchbox unzips them to the default Launchbox/ThirdParty/7-Zip/Temp/ directory, which is also where my Phoenix cartridge path(s) are. As such, this solution doesn't quite work for me, and I don't wish to rename the name of Temp folder for the sake of one platform. I did try recompiling the script with changes to make this work, but I kept running into compiler errors on various external references. Would you mind compiling a version of this script without this requirement? Or an alternative that just looks for 'Temp'? I have jophran's original launcher working correctly, but am struggling to get AutoHotKey to close the emulator on hitting ESC. His currently suggested solution is to use your script. Many thanks.
-
Has there been any consideration on perhaps using neural translation such as DeepL? All of the description translations could be near automated, and its much more accurate than other notable Machine learning sites. It would of course cost money with the amount that requires translating, but worth a look. I'm not suggesting the translation will be perfect across the board, but it will be decent enough for most cases,
-
Thanks for the response Jason and I appreciate you taking it on board! Understood in regards to time-commitment:user participation, hopefully we'll see something of it in the future.
- 2 replies
-
- 1
-

-
- feature suggestion
- feature request
- (and 4 more)
-
@Aevans0001 Hi! First of all, thank you for the interest in my feature suggestion, I'm eager to draw attention to it, as it should be fairly easy to implement and I think many people interested in a multiplayer experience would benefit a lot from it. To answer your question in terms of my proposal: The tl;dr version is that Launchbox support would be added to recognize additional directories for multiplayer purposes. These emulator directories are set as separate directories per-player and exist (in multiple instances) for each console. An example I gave in the ticket was 4 Gameboy Advance emulators, each in separate directories which have already been configured to work in a multiplayer environment, with each being already set up to occupy a quarter of the same screen. The user would select Multi-Console Multiplayer in the Big Box menu once a game has been chosen, and the amount of players and then the console and game each player wishes to use individually (for things like cross-play, trading or hooking up a Gameboy Advance to a Gamecube for example). BigBox/Launchbox would then boot up all of the emulators selected based on player count and the slot the player is in. (If player 2 picked Gameboy Advance, it would pick the directory for the 'Player 2' Gameboy Advance emulator etc.) This is not limited to a single screen, as you could configure each emulator to its own separate screen or screen space, depending on your set up. It's also not limited to just handhelds; all of the heavy lifting is done within emulator settings (Where it's placed on the screen, which controller it uses, whether it's able to auto-link to another device, go online etc.) So provided the emulator(s) you're using have support for local (or even online) multiplayer, this feature request would allow LaunchBox/BigBox as a front end to boot a multiplayer configuration automatically, and since the directories are separate from your standard single player emulation settings (unless of course you set them to use the same directory) they won't interfere with your standard settings either (meaning you'd need to resize the screen again, reset controls etc.). I hope this helps!
-
Darkshade changed their profile photo
-
My wife recently received some time off, and as such, I thought that it would be a nice idea to spend time playing some games together. The sort of games I wanted to play with her were multiplayer co-op games, where we could go through a story together and actively complete the game together. She's a fan of The Legend of Zelda series, so Four Swords on the Gameboy Advance, Four Swords Adventures on the Gamecube and Four Swords Anniversary Edition (DSiWare) came to mind immediately. Alongside games like Kirby's Amazing Mirror (Gameboy Advance). I also wanted to give Triforce Heroes (3DS) a shot, before being reminded that it's 3-Player only. We started with Four Swords on the GBA. I opted to do this through emulation because it would allow us to effectively play 'Split screen' while sitting on the couch and playing the game(s) through HDMI-out (mirrored) on the TV. For my purposes, I found that the ideal setup was to have two of the same emulator in separate locations from my usual Emulator directory for Launchbox (as not to mess with the settings). They would each be set up with separate settings (for controller input and any other quirks required) so it would simply be a case of booting them up each time and selecting the game I wanted to play. It works rather nicely, however of course this all has to be done outside of Launchbox/BigBox, because Launchbox does not support Multi-Console Multiplayer. This is a real shame as I thoroughly enjoy the ability to boot straight into BigBox and set everything up from there via controller input as I'm sure many of us here do. This got me thinking on how such a feature could be implemented, and I think I have a pretty reasonable solution: BigBox already has an "Additional Apps/Versions" option when selecting a game, as well as a "Launch With" option. I'd like to apply similar ideas here, with a "Launch with Multi-Console Multiplayer" option (Obviously it can be named differently). Technically, how would this work? First, it's important to note that almost all of work is done on the emulator-end, but it requires support to function in a front end. It requires some pre-requisites: In addition to current emulator support, LaunchBox/BigBox would need to understand Multiplayer 'slots'. I'll try my best to explain this: Right now, LaunchBox understands that (for example) VisualBoy Advance is a Gameboy Advance Emulator, because I've told it that's the case. What it currently has no concept of, is whether I wish to launch multiple emulators, and whether or not those emulators are all separate from each other and/or correspond to a particular player slot. So, continuing on with the example of Four Swords for the Gameboy Advance, this game (for multiplayer) requires 2-4 instances of a Gameboy Advance and the game to play with friends. What I'd like to be able to, is to set these multiplayer emulators from within LaunchBox. So under 'Gameboy Advance', I'd have my regular Gameboy Advance emulator (when I'm playing regularly without multiplayer) and 4 additional directories for each potential player. I'd have a directory set specifically for Gameboy Advance Multiplayer Player 1, another for Gameboy Advance Multiplayer Player 2, and so on. What's the purpose of this? Going back to the launch option mentioned above, you'd select "Launch with Multi-Console Multiplayer" > Select the number of players (the maximum could be presented based on the max players field). Let's say I pick 3. It would then ask me to select a console for Player 2 (We already know what Player 1 is using, because we've already selected our ROM/Console, so it would pick the emulator directory set for multiplayer slot 1 for that console). By default, this would also the same console as Player 1, however it should be possible to pick other consoles from your emulator list. (I'll explain why the ability to pick another console is important in a moment). It would then ask me to select a game (based on the ROM list of the previously selected console/emulator) for Player 2. If I've selected the same console as Player 1, I will have the default option of the same ROM/Game, or the option to pick another. Once Player 2's options have been selected, Player 3s options are selectable. Once the respective options for all 3 Players have been selected, Launchbox will open each emulator and selected game based on the respective slot. For example: I've set my Gameboy Advance (Multiplayer) slot 1 to: C:\LaunchBox\Multiplayer\Emulators\VisualBoy (Player 1)\vbam.exe I've set GBA (Multiplayer) slot 2 to: C:\LaunchBox\Multiplayer\Emulators\VisualBoy (Player 2)\vbam.exe I've set GBA (Multiplayer) slot 3 to: C:\LaunchBox\Multiplayer\Emulators\VisualBoy (Player 3)\vbam.exe and so on. The benefits of storing this information in 'slots' are as follows: - Easy to understand - Controller configuration will always be consistent regardless of consoles picked (assuming it's set up correctly on the emulator) - Sizing/Screen positioning of the emulator(s) will always be consistent regardless of consoles picked (assuming it's set up correctly on the emulator) So to answer the questions from earlier: Why allow people to select a console at all? Why not just launch the same console type automatically? Two reasons: Games such as The Legend of Zelda: Four Swords Adventures on Gamecube (and many others such as Wind Waker, Phantasy Star Online 2 or Pokemon Colosseum), require linking to other consoles (in this case a Gameboy Advance) to participate in multiplayer features. It allows for games with cross-platform support (usually online) to play with each other. Why allow people to select another game at all? Why not just launch the same game automatically? In the same vein as the above, due to some games require linking to different consoles, you need to be able to select the respective ROM associated with the console you've selected (GBA Bios for Four Swords Adventure, or Sonic Advance in the case of linking to Phantasy Star Online 2) Even if you're selecting the same console for every player, you may wish to perform a trade or link between different games, such as between Pokemon Ruby and Pokemon Sapphire. Other ways to improve the idea would to be able to manually select the defaults for each game individually, or base it on something in the ROM information field, but I don't believe such a field exists yet. One potential issue some emulators may be compatible with multiple 'consoles' but only be able to be set up to link with 1 console type at a time. For this reason maybe a set of slots per link type might be a potential solution. So that's the idea, a long winded write up I know, but the concept is actually rather simple. If anyone has any questions or my explanation didn't help, please feel free to ask. There might be a better method of achieving what I am presenting here, however this is the best "Plug and play" method I could come up with from my experience setting some of this stuff up manually, while also giving full compatibility with almost all link types.
- 2 replies
-
- 3
-
-
- feature suggestion
- feature request
- (and 4 more)