
.png.d63b88dc3d5c6db8803dfbd996ce65fc.png)
JoeViking245
-
Posts
5,027 -
Joined
-
Last visited
-
Days Won
36
Content Type
Profiles
Forums
Articles
Downloads
Gallery
Blogs
Everything posted by JoeViking245
-
.thumb.png.c9faf450e4d2b690a819048b18173f61.png)
Getting a AHK file to work on a specific steam game
JoeViking245 replied to nutter1980's topic in Troubleshooting
If you don't have AutoHotkey installed on your system, you can make use of the one that comes with LB (link is to a specific post within that topic). Send Alt + Enter to a .Lnk shortcut? - Noobs - LaunchBox Community Forums (launchbox-app.com) You'll need to make a different script for each game as the exe's are each different. i.e. $Esc:: WinClose, ahk_exe mySteamGame.exe ExitApp You could make 1 generic one that will close the "active" window. The risk is, if they start a [Steam] game and somehow set focus to another window and press Escape, the 'another' window will get closed. $Esc:: WinClose A ExitApp If you do go this route, you can then add this Additional App (set to Run Before) to all your Steam games at once using this plugin: -
Getting a AHK file to work on a specific steam game
JoeViking245 replied to nutter1980's topic in Troubleshooting
1) You (they) really SHOULD be exiting those through the game's menu. You might be able to create a script that has your Exit routine in it and set that as an Additional App to the Steam games. Otherwise refer to item 1. You might need to help the 2-year-olds with that, but anyone over 5 can figure it out. -
Once you go to the 1st search result, login and download.

-
Ya, that works much better. Since this is a web-based JavaScript app, I presume that we need to drop each individual file vs the script being able to "grab" files based on a relative path. (This may be where re-learning C# & plugin creation skills could definitely help to 'trim the process'. lol) My suggestions*: Step #1: Use \LaunchBox\Data\Platforms.xml. From it, grab the users platforms' Name and also grab its ScrapeAs value (to use later). Then use those Names to populate the dropdown box in step 2. aka. Show only the platforms the user actually has. (i.e. I might have simply "Famicom" and not "Nintendo Famicom Disk System") Step #3: Can Java set filters for the open file dialog? If so, set the filter to the Name selected in step #2, .xml. This way, people [that aren't stress testing the app] can't inadvertently choose the wrong platform_name.xml. Compare: Use the ScrapeAs value from step #1 to grab the platform from Metadata.xml. (ref: "Famicom") Total missing count: No cheating! lol Maybe break it down. Total LBDB games xxxx. Your total yyyyy. Then have the missing games be a count of the datagrid items. Save results to a text file(?), Excel file(?) button? *These are my thoughts only and may only be worth the 2 pennies you found on the ground or the piece of gum you stepped on. Do with 'em what you will. 🙃
-
OK, looks like I missed something here. You're running the batch file from within DOSBox? That's completely different and I know nothing about DOSBox. Since DOSBox doesn't recognize "start", it probably won't recognize Windows Scripting Host commands either. So looks like you're back to square one. Sorry.
-
I went back and forth about using that one, but it didn't make sense to me as this was to compare my collection (held in Data) against the database (held in Metadata). I'm usually pretty good about following instructions. So according to your screenshot, it looks like Step #2 takes care of my platform-by-platform question. I'll try again tomorrow using the 'correct' file and report back.
-
What does the contents of your batch file look like? Ya, "Start" doesn't work from the command prompt. Only from within a batch file.
-
I presume you need to choose Platforms.xml located in ..\LaunchBox\Data\ Takes quite a while, which is somewhat to be expected. But after 20 minutes, it started reminding me of a song about a spinning wheel goin' round. So closed the page. Would it be possible to do this on a platform-by-platform basis instead? like selecting ..\LaunchBox\Data\Platforms\Arcade.xml
-
Ya. A batch file. You can try opening the command prompt to the folder you have the batch file in and run the batch file from there to see what error(s) it gives. If you have command line parameters to pass to it, be sure to add those.
-
To run ('start') your game (program), replace the Comment (rem [short for 'remark']) line with: start "C:\Path\Program.exe" If you're passing a parameter to the batch file, use: start "" "C:\Path\Program.exe" %1 If you have multiple parameters, use: (example showing 3 parameters) start "" "C:\Path\Program.exe" %1 %2 %3 The last line will press "1" on the keyboard for you which corresponds with "MOUSE" in your screenshot. Hint: change "1" to "2" for JOYSTICK. For a more thorough description of what's going on, click the link I gave you, and then click the 3rd link in his post ("Press Keyboard keys using a batch file"). BTW, I still haven't tested it and probably won't. So let us know when you get it working and what you came up with.
-
The games' settings file (..\ini\polepos2.ini) might be telling it to load a different controller config file (on the ctrlr line), but I believe in the order of precedence, the games' configuration file (..\cfg\polepos2.cfg) will supersede. So you may try deleting both of those. If Pole Position 2 is still acting up, and it's the only one doing that, the easiest (only?) thing to do is start the game, once loaded press Tab and go into the configure inputs section and set it up manually [for this one game]. It'll automatically save polepos2.cfg for you.
-
It looks like you can send keypresses via a batch file by incorporating Windows Scripting Host. I've never tried this myself but looks intriguing and appears simple enough. @if (@CodeSection == @Batch) @then @echo off CScript //nologo //E:JScript "%~F0" rem Run Your Game Here goto :EOF @end WScript.CreateObject("WScript.Shell").SendKeys("1"); https://stackoverflow.com/a/25373908/11132805
-
I can't say for certain if it filters on emulation status or not, but [to me] it'd make sense to include "not Working" as Unplayable. But since you didn't select that filter, switch Views to Genre and scroll down to "System / Device" and remove those. There may also be a "System / BIOS" genre. If when removing those from LaunchBox, you're given the option to delete the ROMs also, don't.
-
Devices and others you mentioned fall under Skip games unplayable in MAME.
-
There is not a direct [built-in] way to do this. But I will always contend that there is pretty much always a way to do anything. It comes down to how determined you are and if what you say you want is really what you want. One way to do what you're asking: Start LaunchBox Start the MAME Arcade Full Set Import Wizard Create a new platform. "Arcade-Temp" or any name other than your existing platform Select your ROM folder and Manually Configure MAME Emulator and select MAME Skip leaderboards but do check Search for game information... Check None for all images and skip bezels Set clones and region to whatever you like Click Check All for Game Type and Features Then Un-Check Skip non-arcade games Under Create Playlists, click Uncheck All Then Check Create Playlists for genres After importing has completed, switch Views to Genre. Scroll down to and select Handheld / Electronic Game. Select one of the games Press Ctrl+A (to select all) Press Ctrl+E (to start the Bulk Edit Wizard) For Field:, select platform For Value:, enter a name you want to call your new platform ("MAME Handheld Electronic Games" or whatever) Click Next, Next, to finish up. Since we didn't import images, you won't need to migrate those. No more changes Now switch Views back to Platform. Right-click on your new platform and select Edit and set Scrape As to Arcade. Click OK. You can now remove Arcade-Temp. (right-click, Delete)
-
Having Trouble Getting LaunchBox to Acknowledge a Game.com Import
JoeViking245 replied to St_Eddie's topic in Noobs
You should be able drag and drop the single game ROM (can do it with multiple games ROMs as well) onto LaunchBox. Then follow through the prompts. If on the last page it still shows 0 games to import, click Back and check the box Force importing duplicate games. Alternatively, Click Tools, Import, Manually Add Game. This will open a blank Edit Game window. -
Glad you got bsnes figured out. As for the black screens, are you able to Alt+Tab to switch back to the mesen window? You may try turning off the startup screens for that emulator. At least until you get the other things resolved.
-
I'm not real familiar with those emulators but based on your many attempts, if your press "E" on the keyboard, they'll exit? If that's the case, along with a key delay (sleep 50), you may need a longer key-press duration to be able to send from AHK. SetKeyDelay, 125, 50 Send, e Using Process, Close is sort of like pulling the computer plug out of the socket to exit Windows. The "nice" way is to use WinClose. The 'nice' default way is to use: WinClose, ahk_exe {{{StartupEXE}}} If that doesn't work, you can get a little more direct: WinClose, ahk_exe bsnes.exe
-
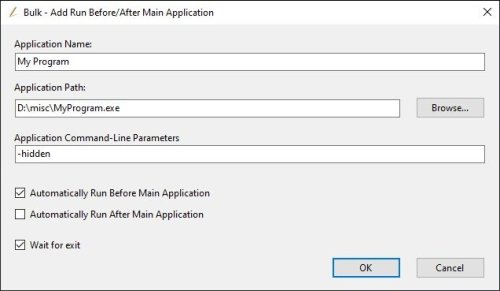
Bulk Add/Remove Additional Applications View File Thanks to the new (since v13.5) plugin feature that supports menu nesting, 2 plugins have been combined into 1. (Bulk) Add Additional Applications - https://forums.launchbox-app.com/files/file/2866-bulk-add-additional-applications/ (Bulk) Remove Additional Applications - https://forums.launchbox-app.com/files/file/2980-bulk-remove-additional-applications/ These combined plugins have both been overhauled both functionally and visually to 'keep up with the times' and have a smaller footprint plus added features. This plugin Requires LaunchBox v13.5 (or newer) If you haven't updated to LaunchBox v13.5 (or newer), you really should. But until then, the original versions of the plugins (for now) still work. (see links above) Installing: After downloading the file, open the zip file and copy the contents into \LaunchBox\Plugins\ i.e. D:\LaunchBox\Plugins\BulkAddRemoveAdditionalApps\BulkAddRemoveAdditionalApps.dll If you didn't use 7Zip to extract the contents, Navigate to the plugin folder and right-click the file. Select 'Properties' Click "Unblock" and then click OK. If switching to this plugin from either of its predecessors, be sure to remove the older version(s) from your 'Plugins' folder. Using: Select one or more games Right-click on one of the selected games Select Bulk Add/Remove Additional Apps to expand 2 more options Select either: Bulk Add Additional Apps Bulk Remove Additional Apps Bulk Add Additional Apps The intent of this is to add the same Additional Application to more than one game, all in one shot. It can also be used to add an Additional App to a single without having Edit the game. What's new: UI completely overhauled for that 'modern look' Removed restriction requiring multiple games be selected aka: You can now add an Additional App directly to a single game without having to Edit the game NEW Feature: Add %romfile% to the Command-Line Parameters to insert the "full\path\to\ROM\file.ext" (including quotes) when saved Option: Remove quotes Option: Remove file extension and folder path Tip: press Ctrl+R to insert %romfile% Bonus Feature: Add %title% to insert the games full Title Add %platform% to insert the games platform Name Tip: press Crtl+T or Ctrl+P to insert these (respectively) Hint: You may want to enclose these in quotes if they consist of more than 1 word %platform% = Atari 2600 "%platform%" = "Atari 2600" Huge Thanks to @Headrush69 for the idea of adding the %romfile% option!!! (%title% and %platform% was also his.) Bulk Remove Additional Apps The intent of this plugin is to Remove the same* Additional Application for all games in a given Platform, all at one time. *Same is determined by the Additional Applications Application Name and Application Path. If they match exactly, they are the ‘same’. Why use this? Quite possibly you used Bulk Add Additional Apps and you clicked “OK” before realizing you forgot to add in the Command-Line Parameters, or the Additional App is simply not needed anymore. Using: When opening, the plugin will default to the selected games' Platform. You can select a different platform using the dropdown box. By default, the plugin will 'combine' all Additional Apps that have the exact same Application Name AND Application Path, and only display one of those. When you remove that "one", all occurrences (having the same Name and App Path) will be removed. Regardless of Command-Line parameters. To separate these out by Command-Line parameters, check Split By Command-line. Once you click Remove, there's no going back. Some icons by Yusuke Kamiyamane Submitter JoeViking245 Submitted 07/10/2023 Category Third-party Apps and Plugins
-

Version 1.2.0
1,134 downloads
Thanks to the new (since v13.5) plugin feature that supports menu nesting, 2 plugins have been combined into 1. (Bulk) Add Additional Applications - https://forums.launchbox-app.com/files/file/2866-bulk-add-additional-applications/ (Bulk) Remove Additional Applications - https://forums.launchbox-app.com/files/file/2980-bulk-remove-additional-applications/ These combined plugins have both been overhauled both functionally and visually to 'keep up with the times' and have a smaller footprint plus added features. This plugin Requires LaunchBox v13.5 (or newer) If you haven't updated to LaunchBox v13.5 (or newer), you really should. But until then, the original versions of the plugins (for now) still work. (see links above) Installing: After downloading the file, open the zip file and copy the contents into \LaunchBox\Plugins\ i.e. D:\LaunchBox\Plugins\BulkAddRemoveAdditionalApps\BulkAddRemoveAdditionalApps.dll If you didn't use 7Zip to extract the contents, Navigate to the plugin folder and right-click the file. Select 'Properties' Click "Unblock" and then click OK. If switching to this plugin from either of its predecessors, be sure to remove the older version(s) from your 'Plugins' folder. Using: Select one or more games Right-click on one of the selected games Select Bulk Add/Remove Additional Apps to expand 2 more options Select either: Bulk Add Additional Apps Bulk Remove Additional Apps Bulk Add Additional Apps The intent of this is to add the same Additional Application to more than one game, all in one shot. It can also be used to add an Additional App to a single without having Edit the game. What's new: UI completely overhauled for that 'modern look' Removed restriction requiring multiple games be selected aka: You can now add an Additional App directly to a single game without having to Edit the game NEW Feature: Add %romfile% to the Command-Line Parameters to insert the "full\path\to\ROM\file.ext" (including quotes) when saved Option: Remove quotes Option: Remove file extension and folder path Tip: press Ctrl+R to insert %romfile% Bonus Feature: Add %title% to insert the games full Title Add %platform% to insert the games platform Name Tip: press Crtl+T or Ctrl+P to insert these (respectively) Hint: You may want to enclose these in quotes if they consist of more than 1 word %platform% = Atari 2600 "%platform%" = "Atari 2600" Huge Thanks to @Headrush69 for the idea of adding the %romfile% option!!! (%title% and %platform% was also his.) Bulk Remove Additional Apps The intent of this plugin is to Remove the same* Additional Application for all games in a given Platform, all at one time. *Same is determined by the Additional Applications Application Name and Application Path. If they match exactly, they are the ‘same’. Why use this? Quite possibly you used Bulk Add Additional Apps and you clicked “OK” before realizing you forgot to add in the Command-Line Parameters, or the Additional App is simply not needed anymore. Using: When opening, the plugin will default to the selected games' Platform. You can select a different platform using the dropdown box. By default, the plugin will 'combine' all Additional Apps that have the exact same Application Name AND Application Path, and only display one of those. When you remove that "one", all occurrences (having the same Name and App Path) will be removed. Regardless of Command-Line parameters. To separate these out by Command-Line parameters, check Split By Command-line. Once you click Remove, there's no going back. Some icons by Yusuke Kamiyamane -
Movie Scraper (Reboot 2023)
JoeViking245 commented on JoeViking245's file in Third-party Apps and Plugins
 Seems to still be scraping it here. Troubleshooting: Edit one of the movies you scraped with the plugin and go to the Media - Images section. Scroll through the images there to verify that there is/is-not a Fanart-Background image. Take a look at the log file (located in \LaunchBox\Plugins\MovieScraper2023\Logs\) for that session. See if indicates anything like "No Fanart-Background (moviebackground) for this movie". If it gets it from TBDB, you will see "TMDB Downloaded Fanart-Background" and then down below under "Attempting to get images from FanArt.TV...", you should see "Fanart-Background image already exists". If it's a single movie you're having this issue with, go to TMDB and FanArt.TV websites and confirm that they even offer a Fanart-Background image. TMDB might call it a 'backdrop' image and TanArt.TV, 'movie background'.
 -
Thanks for the thumbs up (and noticing the (possibly tldr:) instructions )! Regarding the request/suggestion for adding the option for game specific bezels, I was happy just to be able to get the platform bezels working on my PC. I will add it to feature request list. However, at this time with only 3 'it works' (4, including me), I'd like to see more interest and confirmations for the project before dedicating any more time to it. (and hopefully get it out of beta someday)
-
(Bulk) Add Additional Applications
JoeViking245 commented on JoeViking245's file in Third-party Apps and Plugins
 My thoughts are, "why didn't anyone think of this before"? This is an OMG, forehead-slap, better-than-sliced-bread and probably game-changing idea!! THANKS!! I'll see about getting my team on this right away. It should be pretty straight forward and easy to implement. The plugin is probably due for a facelift as well. Thanks again for the excellent idea/suggestion!
 -
MAME Software Lists Import Tool - plugin
JoeViking245 commented on JoeViking245's file in Third-party Apps and Plugins
 New - version 6.0 Requires LaunchBox 13.3 or newer* Slightly different look. Same old features. A lot of (behind the scenes) code improvement. This update has been rewritten in .NET 6.0 to “keep up with the times”. *If you’re using LaunchBox version 13.2 or older, download version 4.5 of the plugin. (For now, at least) v4.5 will still work with LaunchBox 13.3 and newer.
.thumb.png.c9faf450e4d2b690a819048b18173f61.png)


