

malarrya
-
Posts
60 -
Joined
-
Last visited
Content Type
Profiles
Forums
Articles
Downloads
Gallery
Blogs
Files posted by malarrya
-
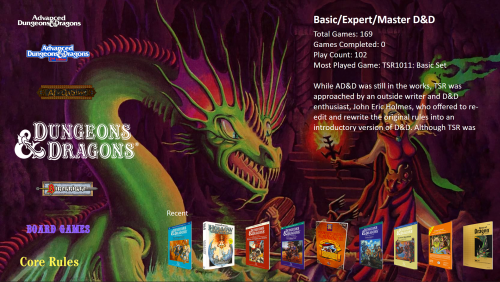
Dungeons & Dragons Manuals & Modules Platform
By malarrya in Platform Media
Version 5.0.0 of the D&D Manuals & Modules Platform
A surprising new version of the D&D M&M Platform that includes the following changes:
Renamed the Dungeons & Dragons Platform to D&D Classic Editions (***see instructions below***). This is the main reason for the revision 5.0.0 release. This rename of the Platform will likely require a reinstallation of the data found within the archive. This is a reorganization of sorts as the Platform Category is named Dungeons & Dragons while the Platforms contained within indicate each D&D Edition. Classic Editions contains Original, BECMI (Basic, Expert, Companion, Master, & Immortal), AD&D 1st edition, and AD&D 2nd Edition. This allows for the future expansion of the Platform Category with 3rd and 4th Editions. The updated pack includes icons/images for both the D&D Classic Editions Platform and the Dungeons & Dragons Platform Category. An update to 5th Edition will be released in the near future with similar changes as those listed below. Renamed 9 items for improved consistency with the original titles, including: TSR3102 - Birthright - Official Game Adventure - BR1 - Sword and Crown. TSR3117 - Birthright - Accessory - BR3 - The Book of Magecraft. TSR3123 - Birthright - Domain Sourcebook - Player's Secrets of Khourane. TSR9279 - Greyhawk Adventures - Official Game Adventure - WGA1 - Falcon's Revenge. (Added a dash after WGA1). TSR9281 - Forgotten Realms - Official Game Adventure - FRA1 - The Horde - Storm Riders. TSR9290 - Forgotten Realms - Official Game Adventure - FRA2 - The Horde - Black Courser. TSR9395 - DragonLance - Official Game Adventure - DLT1 - New Tales - The Land Reborn. TSR9439 - Ravenloft - Official Game Adventure - Adam's Wrath. (Removed RE1 series designation). TSR9448 - Official Game Adventure - Temple, Tower, & Tomb. (Added a comma after Tower) Added Wiki links to ALL items. Now every item offers the ability to further investigate the title with online documentation. Many items redirect to Wikipedia, if a source for that item exists there, but there are several other websites used in order to produce the best collection of related information. Other sites include: RPGGeek, forgottenrealms.fandom.com, dungeonsanddragons.fandom.com, ravenloft.fandom.com, dragonlance.fandom.com, diablo.fandom.com, BoardgameGeek, etc. Added a new item! TSR1106 - The Classic Dungeons & Dragons Game - 2nd Printing. This is an alternate cover produced for TSR1106 - The Classic Dungeons & Dragons Game. This brings the total items for the D&D Classic Editions to 992. Moved or copied data in certain custom filters to more permanent categories in the main metadata. Category ---> Genre Format ---> Release Type Series ---> Series Rule Set ---> Play Mode Thanks to @dukdukgoos and @Dragonsys for these suggestions. Added Player Character Level Suggestion for all adventure modules into the RATING field within the metadata This assists in finding collections of modules geared towards specific character levels. Renamed the Basic/Expert/Master D&D playlist to D&D Original/BECMI This is the proper designation for anything that is not AD&D. BECMI = Basic, Expert, Companion, Master, & Immortal. Minor image updates: TSR1021 - Set 4 - Master Rules - Box Spine and Box 3D images updated with corrected text. TSR1017 - Set 5 - Immortals Rules - Box Spine and Box 3D images updated with corrected text. ***If you already have a prior installation of this Platform, you should probably remove some of the previous D&D files from the earlier versions BEFORE installing this new one as the Platform rename could likely cause duplicates and/or confusion. You should end up with a D&D hierarchy that looks like this:
To do this, delete the following files:
..\LaunchBox\Images\Dungeons & Dragons (delete the whole folder)
..\LaunchBox\Data\Platforms\Dungeons & Dragons.xml
..\LaunchBox\Data\Playlists\Basic_Expert_Master D&D.xml
Overwrite any other files when prompted.
Thanks so much to websites like TSRArchive, RPGGeek, DriveThruRPG, eBay, and Worthpoint which without these amazing sites, none of this would be possible. I must remind everyone, however, that NO PDFs or Software are included with this platform. This retrospective image and data compilation is for the preservation, enjoyment, and appreciation of the mythology, artwork, history, development, and universe that is D&D.
---------------------------------------------------------------------------------------------------------------------------
INSTALLATION INSTRUCTIONS
For a new installation, just extract the LaunchBox folder in the archive into the same folder where your LaunchBox installation exists. ***See Important note above for those with a prior installation. This should update everything properly. However, there may be playlists and images with defunct filenames left over from any previous D&D installations. Delete these, if desired. Be sure to clear your image Cache in LaunchBox and BigBox to see the newest images. The paths to the Game/PDF files are all now set to Z:\ in the D&D Classic Editions.xml, since I am currently using a network drive that contains my files.
You can change this to your path by doing the following: Navigate to your \LaunchBox\Data\Platforms folder and open the D&D Classic Editions.xml file in TEXT Editor program (such as Notepad++). Find/Replace Z:\ with yourpath\ - You can use a RELATIVE (no specific drive letter) path such as ..\D&D\ or an ABSOLUTE path such as C:\DnD\
I've included a couple D&D Classic Editions XML files in the DnD RAR archive that already have this step done for you. Just rename the file of your choice to D&D Classic Editions.xml Be sure to back up your existing D&D Classic Editions.xml before overwriting. Setting Up the D&D Platform after copying:
Using your PC's Explorer/file system: Place your D&D PDFs in a folder that is at the same level as your LaunchBox directory (I use a network drive mapped to z:/D&D). See the image above on how to change that. Use FATMATCH or a similar program to rename your PDFs so they are similar to the image filenames: https://emumovies.com/files/file/227-fatmatch-file-renamer/ Selecting Platform Categories should make the D&D Platform automatically appear. If it doesn't, you can do the following:
Within the LaunchBox Application Add a new Platform by selecting TOOLS ==> IMPORT ==> ROM Files Select the folder where you've stored your PDFs. In my case it's c:/D&D If you use a folder named D&D that's at the same level as your LaunchBox folder, you'll only need to scan in a few files. This is just to get the Platform to show up. The relative paths for the PDFs are already set to ..\D&D\ in the LaunchBox D&D Classic Editions XML. If you store your PDFs in a different named folder or at a different level then you'll have to rescan all the files. It's easier just to rename the directory. You can also FIND/REPLACE the ..\D&D\ path in the Dungeons & Dragons XML with your path. For example, if your D&D PDFs folder is c:\Emulators\Dungeons & Dragons, you would need to set the <ApplicationPath>..\D&D\ for every game in the XML to <ApplicationPath>..\Emulators\Dungeons & Dragons\ I have done this installation numerous times on different PCs to test. If you need help, please ask. I am not responsible if you mess up your LaunchBox installation In order to attach a D&D playlist to the D&D Classic Editions Platform, perform the following steps within LaunchBox:
On the left drop-down menu select Playlists. This should allow you to see all the D&D Playlists I've created. Right-click on a playlist and select EDIT. Click the Parents tab Uncheck the ROOT checkbox Check the box next to D&D Classic Editions To get the D&D 3D images to show up do the following:
Select the D&D Classic Editions menu item in LaunchBox Navigate to TOOL ==> VIEW ==> IMAGE GROUP ==> 3D BOXES To have the PDFs Launch with the PDF reader of your choice:
In LaunchBox, select ALL images that pertain to PDFs Right-click on one of the images and select EDIT. The BULK Edit window will pop up. Select EMULATOR from the Field and change the value to either Adobe Acrobat or Rocket Launcher In order to launch your PDFs, you can set up Adobe Acrobat (or some other PDF Reader) as an emulator in LaunchBox. Click on the 3 horizontal lines near the top left then navigate to TOOLS ==> MANAGE ==> EMULATORS Click ADD then add Adobe Acrobat as a new emulator as seen in this image.
Add D&D Classic Editions as an associated Platform for the Adobe Acrobat emulator.
To have the background image in LaunchBox be the same as the Box-Front image, perform the following steps:
Navigate to TOOLS ==> OPTIONS Click on Background Priorities and check the BOX-FRONT checkbox. Set the Default Background to Use Blown Up Art To get all D&D screenshot images to display for previewing, check the BOX-FRONT, BOX-BACK, BOX-3D, and BOX-SPINE checkboxes in SCREENSHOT Priorities.
If you are missing artwork for the Video Games Playlist, do the following in LaunchBox:
Open the D&D Video Games Playlist do CTRL+A to select all items in the playlist. Click the Main Menu (the 3 horizontal lines) near the upper left-hand corner. Select Download Metadata and Media. The D&D Video Games Playlist is by no means complete for every console and arcade title out there. It presently contains mostly PC games. If you have an extensive library, add any and all games you'd like to the playlist. If you want to add a description to the main D&D Platform, do the following in LaunchBox:
Open the D&D Classic Editions Platform Notes text file provided here: LaunchBox D&D Platform Notes.txt. Right-Click on the D&D Classic Editions Platform and select EDIT. Click on the Notes tab. Copy then Paste the text from the D&D Classic Editions Platform Notes into the NOTES text box. Click OK Do the same for the D&D Platform Category. ---------------------------------------------------------------------------------------------------------------------------
Installing and Running the D&D Software Applications.
The D&D collection contains 5 PC CD-ROMs which require special handling to get working.
If you want to set up these PC CD-ROMS to work with the Dungeons & Dragons LaunchBox System, you can set them up through Rocket Launcher or through LaunchBox.
Both methods are described below. If you need help, please don't hesitate to ask. There are seemingly a lot of steps but all of them are fairly easy.
This tutorial is for running ONLY the following 4 programs*:
TSR2176 - Core Rules - CD-ROM 2.0
TSR11543 - AD&D Core Rules 2.0 Expansion
TSR11448 - Dragon Magazine Archive - 250 Issues of Dragon Magazine - CD-ROM
TSR11451 - Forgotten Realms - Interactive Atlas
You can find some updates to these software applications at https://web.archive.org/web/20110322093635/http:/www.wizards.com/dnd/article.asp?x=dnd/ex20020218a
Create 1 ISO from 5 ISOs for the Dragon Magazine Archive program
The Dragon Magazine Archive usually has 5 ISOs associated with the program. To avoid mounting all those ISOs, you can easily turn these 5 ISOs into 1 by doing the following: Mount each ISO separately in Windows 10/11 by right-clicking and selecting MOUNT from the menu. Extract/copy all the files from each disc into one new folder on your hard drive.
The first disc has all the installation files while the other 4 just have the Dragon Magazine PDFs located in the Mags folder Download, install ImgBurn, and follow the simple GUI directions to create 1 new fully contained ISO.
Name the new ISO TSR11448 - Dragon Magazine Archive - 250 Issues of Dragon Magazine - CD-ROM and place it in your D&D ISOs folder. D&D PC Software Setup Using Rocket Launcher
1. Install Core Rules 2.0 (and Core Rules 2.0 Expansion) onto the drive you choose - i.e. C:\D&D\AD&D Core Rules 2.0 folder.
The main executable for this program will then be found in C:\D&D\AD&D Core Rules 2.0\Program\tsrp3.exe The BAT files should be put inside this same folder C:\D&D\AD&D Core Rules 2.0\Program\AD&D Core Rules 2.0 - CD Mount.bat C:\D&D\AD&D Core Rules 2.0\Program\AD&D Core Rules 2.0 - CD Unmount.bat You can further suppress any visible CMD windows from popping up by creating shortcuts to these BAT files inside the same folder, then setting the shortcuts to minimized in the properties.
2. EXTRACT the DUNGEONS & DRAGONS.ini file from the RocketLauncher\Modules\PCLauncher folder in the RAR archive and place it into the same Rocket Launcher folder found at (drive Letter)\RocketLauncher\Modules\PCLauncher .
Edit any and all folder paths in the INI file to the path where you installed the program on your device. Wherever you decide to put the BAT/LNK files, you must change the paths in the Dungeons & Dragons.ini file to point to these BAT/LNK files (see image below). 3. The Rocket Launcher Dungeons & Dragons.ini file then should contain a code block like this one for EVERY added CD-ROM. Notice the reference to the LNK shortcut files and not the BAT files.
[TSR11543 - AD&D Core Rules 2.0 Expansion] Application=..\..\D&D\AD&D Core Rules 2.0\Program\tsrp3.exe ExitMethod=Process Close Application PreLaunch=..\..\D&D\AD&D Core Rules 2.0\Program\Core Rules 2.0 Expansion - CD Mount.lnk PostExit=..\..\D&D\AD&D Core Rules 2.0\Program\Core Rules 2.0 Expansion - CD Unmount.lnk PostExitSleep=5000 4. Place the NirCmd program in the same folder as your BAT files as it helps with changing resolutions on the fly - http://www.nirsoft.net/utils/nircmd.html
This is only if you want AD&D Core Rules 2.0 and Core Rules Expansion to show in full-screen. It also works fine as a small windowed screen with a black background. In the Core Rules 2.0 Expansion - CD Mount.bat file you can see where the ISO file and the NIRCMD.EXE are referenced: @echo off PowerShell Mount-DiskImage -ImagePath \"C:\D&D\D&D ISOs\TSR11543 - AD&D Core Rules 2.0 Expansion.iso\" nircmd.exe setdisplay 800 600 32 This should then successfully and very discreetly launch the Core Rules 2.0 Expansion application without any interfering windows or popups.
Upon exit, the program should shutdown and unmount the ISO from the virtual drive.
Follow the same steps for the other 2 programs:
TSR11448 - Dragon Magazine Archive - 250 Issues of Dragon Magazine - CD-ROM
TSR11451 - Forgotten Realms - Interactive Atlas
D&D PC Software Setup Using LaunchBox
For this tutorial, we will use TSR11448 - Dragon Magazine Archive. Extract the BAT files from the archive. They can be found at the root of the RocketLauncher folder. Put them in the same location as your D&D PDF files. You can further suppress any visible CMD windows from popping up by creating SHORTCUTS (LNK files) to these BAT files inside the same folder, then setting the shortcuts to minimized in their properties. Core Rules 2.0 - CD Mount and Unmount BATs are are copies of Core Rules 2.0 Expansion - CD Mount and Unmount BATs, just named differently to correspond to the associated application. You may need to edit the BAT files so the paths correspond with the location where your ISO files exist. My ISOs are located in D:\D&D\D&D ISOs. Use Notepad++ for this. @echo off PowerShell Dismount-DiskImage \"D:\D&D\D&D ISOs\TSR11448 - Dragon Magazine Archive - 250 Issues of Dragon Magazine - CD-ROM.ISO\" You will now need to install the Dragon Magazine Archive software into any folder of your choice. I use my main D&D PDF folder for all these software installations. Mount the ISO you created in step 5 in Windows 10/11 by right-clicking and selecting MOUNT from the menu. Once the software is installed, make sure it runs properly. Create a shortcut (LNK file) for the main program file and place it in your main D&D PDF folder. Rename the shortcut to TSR11448 - Dragon Magazine Archive - 250 Issues of Dragon Magazine - CD-ROM.lnk Click on Additional Apps in this same editor and ADD 2 items The first item should point to the main ISO image file. Check the box that says Automatically Run Before Main Application.
The second item points to the Dragon Magazine Archive - CD Unmount.LNK file. Check the box that says Automatically Run After Main Application.
The program should now mount the disc and run from LaunchBox. It should also dismount the disc once the program is exited. IMPORTANT NOTE: The TSR2176 - Core Rules - CD-ROM 2.0 and TSR11543 - AD&D Core Rules 2.0 Expansion have different EXE files to launch the program. TSR2176 - Core Rules - CD-ROM 2.0 uses EVERMORE.EXE TSR11543 - AD&D Core Rules 2.0 Expansion uses TSRP3.EXE If you install the Expansion software, the EVERMORE.EXE file gets deleted and only TSRP3.EXE will remain. If the Core Rules Expansion is installed, point both programs and BAT files to use TSRP3.EXE
*SPECIAL NOTE: The above methods WILL NOT work for TSR2167 - Core Rules - CD-ROM because it is a Windows 3.1 program. To install this program, you will need to use this DOSBox tutorial:
TSR2167 - Core Rules - CD-ROM Installation Instructions
These same installation instructions can also be found in the readme.txt file inside the RocketLauncher folder within the D&D RAR archive. Supporting media files can be found there too.
1,096 downloads
-
.thumb.png.cd8f93f27189db6ec2062e980cea61b2.png)
Visual Pinball - 300+ Clear Logos
Visual Pinball clear logos pack consisting of 300+ images collected and edited from sites like VPForums, Pinsimdb, Google image search, Hyperspin Forums, and other users' collections.
NOTE: These logos may be large and, in most cases, were originally intended for use with HyperPin and HyperSpin. They can be easily resized in HyperSpin and LaunchBox but BigBox apparently doesn't allow for resizing (that I can find). If you need smaller versions of the images, let me know and I will post an update.
TO VIEW THESE IMAGES DO THE FOLLOWING:
1. Remove any images in your ..\LaunchBox\Images\Visual Pinball\Clear Logo folder
2. Unzip the archive to the same folder.
3. Delete your LaunchBox and/or BigBox cache.
4. Set LB/BB to show Clear Logos for the Visual Pinball games.
The Visual Pinball Videos can be found at EmuMovies: https://emumovies.com/files/file/1393-visual-pinball-pack/
743 downloads
-
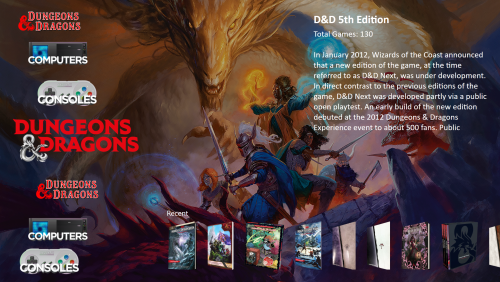
Dungeons & Dragons 5th Edition
By malarrya in Platform Media
Version 2.0.0 of the D&D 5th Edition Platform
The relaunch of the D&D 5th Edition Platform has arrived!
Quite some time ago (several years in fact) I had created a 5th edition version of the D&D Platform but eventually removed it. It had too many items with no artwork, no real content, or any real collectability. It was all 5th edition related content, just very unruly and not as graphically fleshed out or robust and my D&D Manuals & Modules Platform. Once I finally finished the D&D M&M Platform I was able to refocus my efforts on this 5th Edition with the experience points to produce a much more solid platform; worthy of sitting alongside the original. I create these platforms not only for those to use in their gaming sessions but to illustrate the amazing artwork, preserve the history and mythology of D&D, and as checklists for RPG/D&D collectors. There are so many variations, limited editions, rereleases, etc. that pulling them together in one place makes it much easier to manage and perhaps helps others discover items that were previously unknown. However, that meant leaving out a lot of the old miscellaneous supplementary content and only focusing on actual official retail releases from Wizards of the Coast.
I hope you like the new platform. I am sure there will be updates as I discover more items to add, mistakes in the data, and find better quality images.
Thanks so much to websites like TSRArchive, RPGGeek, eBay, and Worthpoint which without these amazing sites, none of this would be possible. I must reiterate, however, that NO PDFs or Software are included with this platform.
This contemporary image and data compilation is for the preservation, enjoyment, and appreciation of the mythology, artwork, history, development, and universe that is 5th Edition D&D.
---------------------------------------------------------------------------------------------------------------------------
INSTALLATION INSTRUCTIONS
For a new installation, just extract the LaunchBox folder in the archive into the same folder where your LaunchBox installation exists. There should not be any prompts asking to overwrite any core LaunchBox files. Only images and platform data files are included. You may need to clear your image cache in LaunchBox and BigBox to see the latest images. The paths to the Game/PDF files are all now set to Z:\5th Edition\ in the D&D 5th Edition.xml, since I am currently using a network drive that contains my files.
You can change this to your path by doing the following: Navigate to your \LaunchBox\Data\Platforms folder and open the Dungeons & Dragons.xml file in TEXT Editor program (such as Notepad++). Find/Replace Z:\5th Edition\ with yourpath\ - You can use a RELATIVE (no specific drive letter) path such as ..\D&D5E\ or an ABSOLUTE path such as C:\DnD5E\
Setting Up the D&D 5th Edition Platform after copying:
Using your PC's Explorer/file system: Place your D&D PDFs in a folder that is at the same level as your LaunchBox directory (I use a network drive mapped to z:/D&D). See the image above on how to change that. Use FATMATCH or a similar program to rename your PDFs so they are similar to the image filenames: https://emumovies.com/files/file/227-fatmatch-file-renamer/ I've included a file named D&D 5E File Names.txt in the ZIP archive that contains all the filenames used. This may help you in renaming your files. I've also included a text file with XML code from the platforms XML named D&D 5th Edition Platform XML Snippet.txt. If you know how to edit XML, you can simply paste this in. This code snippet also contains the Platform Description that shows in the right-side display. Be sure to back up your Platforms.xml BEFORE editing. You can also right-click on the D&D 5th Edition menu icon to edit the platform them paste in the description. Selecting Platform Categories should make the D&D Platform automatically appear. If it doesn't, you can do the following:
Within the LaunchBox Application Add a new Platform by selecting TOOLS ==> IMPORT ==> ROM Files Select the folder where you've stored your PDFs. In my case it's Z:\5th Edition\ If you use a folder named D&D that's at the same level as your LaunchBox folder, you'll only need to scan in a few files. This is just to get the Platform to show up. If you store your PDFs in a different named folder or at a different level then you'll have to rescan all the files. It's easier just to rename the directory. You can also FIND/REPLACE the ..\D&D\ path in the Dungeons & Dragons XML with your path. For example, if your D&D PDFs folder is c:\Emulators\Dungeons & Dragons 5E, you would need to set the <ApplicationPath>..\D&D5E\ for every game in the XML to <ApplicationPath>..\Emulators\Dungeons & Dragons 5E\ I have done this installation numerous times on different PCs to test. If you need help, please ask. I am not responsible if you mess up your LaunchBox installation Included in this archive is a 5th Edition directory that contains BAT files and LNK (shortcut files) to these BAT files. I created these a simple and seamless way to open multiple PFDs at one time. These are used to open all the books contained within a boxed set; such as the Core Rules Gift Sets or the Planescape book sets. You will likely need to edit the BAT file so the text commands point to your PDF's location. The shortcuts are used to open the BAT files so the multiple PDFs launch without showing any command prompt windows. You may need to edit the book sets images so they point to these shortcut files. I have already done this but your location may be different than what I used. These BAT and LNK files DO NOT contain any PDFs or website links. To get the 5th Edition D&D 3D images to show up do the following:
Select the D&D 5th Edition menu item in LaunchBox Navigate to VIEW ==> IMAGE GROUP ==> 3D BOXES
To have the PDFs Launch with the PDF reader of your choice:
In LaunchBox, select ALL images that pertain to PDFs Right-click on one of the images and select EDIT. The BULK Edit window will pop up. Select EMULATOR from the Field and change the value to Adobe Acrobat. In order to launch your PDFs, you can set up Adobe Acrobat (or some other PDF Reader) as an emulator in LaunchBox. Click on the 3 horizontal lines near the top left then navigate to TOOLS ==> MANAGE ==> EMULATORS Click ADD then add Adobe Acrobat as a new emulator as seen in this image.
Add D&D 5th Edition as an associated Platform for the Adobe Acrobat emulator.
To have the background image in LaunchBox be the same as the Box-Front image, perform the following steps:
Navigate to TOOLS ==> OPTIONS Click on Background Priorities and check the BOX-FRONT checkbox. Set the Default Background to Use Blown Up Art To get all D&D screenshot images to display for previewing, check the BOX-FRONT, BOX-BACK, BOX-3D, and BOX-SPINE checkboxes in SCREENSHOT Priorities.
If you want to add a description to the main D&D Platform, do the following in LaunchBox:
Open the D&D 5th Edition Platform XML Snippet.txt text file included in the ZIP archive. Right-Click on the Dungeons & Dragons Platform and select EDIT. Click on the Notes tab. Copy then Paste the text from the NOTES section of the D&D 5th Edition Platform XML Snippet.txt into the NOTES text box. Click OK SPECIAL NOTE: When installing the D&D Platform on the FREE version of LaunchBox, the LaunchBox application will automatically remove the custom filters from the D&D 5th Edition XML file. If LaunchBox is later updated to the PAID version, it will no longer show/contain the custom filters. You will need to re-extract the D&D 5th Edition XML from the ZIP archive (\LaunchBox\Data\Platforms) then overwrite the existing XML in the ..\LaunchBox\Data\Platforms directory on your local drive. This must be done while the LaunchBox application is shut down.
20 downloads
(0 reviews)0 comments
Updated
-
.thumb.png.2c84ae25f4f8048ff0e79673159342c6.png)
Future Pinball - 700 Clear Logos
Future Pinball clear logos pack consisting of 700 images painstakingly collected and edited from sites like VPForums, Pinsimdb, Google image search, Hyperspin Forums, and other users' collections. Many of these images are very high quality and most are as close to the table logos as possible. Some have been fabricated by me and others but this group contains tables that mostly have a corresponding video. This set was originally developed and posted by me for Hyperspin. Hope you enjoy.
NOTE: These logos are quite large, in most cases, as they were originally intended for use with HyperPin and HyperSpin. They can be easily resized in HyperSpin and LaunchBox but BigBox apparently doesn't allow for resizing (that I can find). If you need smaller versions of the images, let me know and I will post an update.
TO VIEW THESE IMAGES DO THE FOLLOWING:
1. Remove any images in your ..\LaunchBox\Images\Future Pinball\Clear Logo folder
2. Unzip the archive to the same folder.
3. Delete your LaunchBox and/or BigBox cache.
4. Set LB/BB to show Clear Logos for the Future Pinball games.
The Video clips can be found here: https://mega.nz/#F!cBly1Q7b!9yw3zCrpmnym0K4KgitKTQ
Also... check out my Dungeons & Dragons Manuals & Modules Platform!
1,294 downloads
-
Arcade Classics Windows 10 Desktop Theme
By malarrya in Third-party Apps and Plugins
This is the ONLY Windows 10 Arcade Classics Desktop Theme available anywhere (that I could find)! I know this is not specifically LaunchBox related but it is retro-gaming related so I though I would share.
NOTE - YOU DO NOT NEED LAUNCHBOX TO USE THIS THEME.
I created this desktop theme for Windows 10 from 33 images and 30 wave files found around the internet and use them for my arcade cabinet. I take no credit for any of the images or sounds but thought I would share the theme in case anyone's interested. I put the Sound Scheme and Images together to create an ARCADE CLASSICS WINDOWS 10 DESKTOP THEME. Most images are 1920x1080 except for 2 that are a bit bigger and don't look that good scaled down.
IN ORDER TO GET THE SOUND SCHEME AND DESKTOP THEME TO WORK TOGETHER:
1. Place the Arcade Classics Folder containing the WAV files into your %WINDIR%/media folder. Press WINDOW KEY + R then type in %WINDIR%/media to open the folder.
2. Double-click on the ARCADE CLASSICS THEME file (Arcade Classics.deskthemepack). It should connect the sound scheme to the desktop theme.
I also included a VBS script that makes the desktop wallpaper rotate to the next random image and a shortcut to this script that makes it easy to double-click and run the script. You WILL NEED TO EDIT THE SHORTCUT depending on where you move the VBS script but I included it for completeness. Put the VB-SCRIPT wherever you'd like then edit the shourtcut to point to the vb-script. I have my script in my ../Hyperspin/ folder and the shortcut on my desktop but you can place it in your Launchbox directory or wherever you'd like.
Enjoy, and let me know in the comments below if you have any issues with the theme or what your favorite images are. I like Space Invaders, Star Wars, and Battle Zone the best.
352 downloads
-
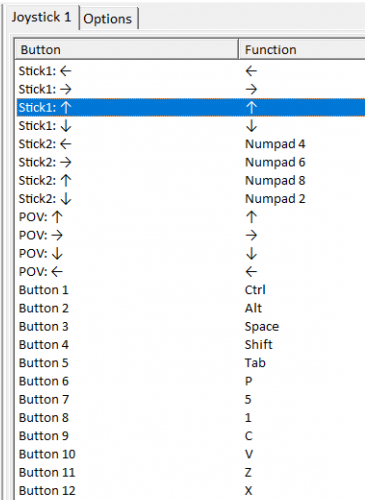
JoyToKey Profiles for LaunchBox and Rocket Launcher
By malarrya in Third-party Apps and Plugins
What's New for Version 1.1.0:
ADDED 7 New Systems (80 TOTAL) + LB/HS/RL/Default profiles. New systems include Sega Model 1, Sega System 16, Sega System 24, , Sega X Board, Sega Y Board, Pop-Cap, and Microsoft MS-DOS. Changed the ESC key functionality to buttons 7 + 8 (COIN+START). You must now press both to exit the game. Placed the ESC key location on Button 25 (a dummy location good for using combo buttons). Changed Button 5 to TAB. Changed Button 6 to P (PAUSE). Changed Button 9 to C. Changed Button 10 to V. Changed Button 11 to Z. Changed Button 12 to X. I'll see how this configuration works for me for the time being. If it's a pain or something is not quite right, I'll continue tweaking it until I find what's best.
*********** BACK UP YOUR OLD PROFILES IN CASE YOU DON'T LIKE THE CHANGES ***********
If you use Rocket Launcher as the primary emulator for Launch Box then this is for you.
I created about 75 profiles for various systems, added them to a RAR archive, and attached to this post. All you have to do is unrar and place the folders within the archive into your ..\RocketLauncher\Profiles\JoyToKey directory. For example, mine is -- ..\RocketLauncher\Profiles\JoyToKey.
You may need to edit the profiles so they are more to your liking or work correctly with your setup. I use the default MAME setup for everything. If you want to change one or all of them, all you have to do is edit only one CFG file, copy the CFG file to every other folder, and rename the CFG file and FOLDER to the name of the emulator you're using for the system.
For example -- I use Rocket Launcher as the emulator for ALL my systems but, once RL starts, I use Stella for the Atari 2600. My path is then ..\RocketLauncher\Profiles\JoyToKey\Atari 2600\Stella\Stella.cfg
Maybe you don't use Stella for the Atari 2600 but use RetroArch. Here's how to change it:
You would simply rename ..\RocketLauncher\Profiles\JoyToKey\Atari 2600\Stella\Stella.cfg to ..\RocketLauncher\Profiles\JoyToKey\Atari 2600\RetroArch\RetroArch.cfg.It's the same path\folder\file but the innermost folder and cfg file have simply been renamed to match the emulator being used.
It's tedious to copy, paste, and rename but it doesn't take too long. I've copied these files to from my Hyperspin machine to another PC that uses Launch Box, set up JoyToKey in Rocket Launcher via the tutorial link below, and found it working beautifully. MAME is a bit of a jerk, however. Sometimes it works straight away and sometimes you still have to map the game within the MAME TAB menu.
I ONLY HAVE CONTROLLER 1 MAPPED IN THESE FILES!
NOTE: There are NO games or programs within this archive. There are, however, 2 other files -- a BAT file for killing the JoyToKey process and a shortcut that gives that BAT file ADMIN privileges. As I use Hyperspin for my main machine, I am not yet sure if there is a way to have Launch Box use the JoyToKey.exe as the startup program and JoyToKeyKill.lnk as a shutdown program. Once I find out a way to get them to function, I will update this post. In the meantime, there shouldn't be too much trouble with it. You can always exit JoyToKey manually if it causes you any issues.
All files were created manually by me so there's no copyright issue. Launch Box doesn't need a JoyToKey profile as, from my testing, it has its own ability to use a joystick/controller.
**** Here is a very good tutorial on how to set up JoyToKey with Rocket Launcher - READ IT CAREFULLY!:
http://bit.ly/2oA2CJ4
Here's a tutorial on how to use Rocket Launcher with LaunchBox:
----------------------------------- ONLY FOR THOSE USING A MOGA PRO CONTROLLER-----------------------------------
In case you have a Moga Controller, download and install the Moga Serial program:
https://github.com/Zel-os/MogaSerial
NOTE: I can only get it to work in Mode A on the PRO Controller but it works great!
Your computer will also need BlueTooth enabled and successfully linked to the MOGA.
Here is where you can get the latest vJoy USB Controller Driver (you'll need this for the MOGA Controller):
http://vjoystick.sourceforge.net/site/
561 downloads
- controller
- rocket launcher
- (and 4 more)

.thumb.png.cd8f93f27189db6ec2062e980cea61b2.png)

.thumb.png.2c84ae25f4f8048ff0e79673159342c6.png)

