

klyze_pt
-
Posts
25 -
Joined
-
Last visited
2 Followers


klyze_pt's Achievements
")
8-Bit Processor (3/7)
22
Reputation
-

 sorry man, this is for retroarch, stand alone mame uses another type of configs. you can however use it with mame core retroarch
 -
hi Unfortunally wont be updating this anymore., its deprecated, i rather use megabezel versions and migrating this for megabezel shader is alot of work. Not seeing myself doing that manually. yes im using too the multigame.slangp in my collection but with megabezel shaders, i dont have per-game art yet, although i use it mostly for for distinguish from vertical/horizontal games.
- 16 comments
-
- 1
-

-
- real bezels
- 1080p
- (and 2 more)
-
hi there, i appreciate it. unfortunally it will be a while until i have time to do that. but if you want fiddle with it , check the comments above, the user bakala posted a script to do that
-
you just need to create a copy of "crimfght.cfg" in "RetroArch\config\FinalBurn Neo" and rename that copy to "crimfghtj.cfg" . nothing more. basically the .cfg filename in the config folder must match the .zip filename of the rom. In this case the artwork is the same, its the same game, so no need to create a different overlay and edit the cfg etc etc
-
 Great work, this theme is awesome! I dont know if you are still updating it or not, but if its not too much to ask, can you release the unedited art files? so we can do minor tweaks? Or at least a nice clean TV art to replace the "theme/platform/device/_Default.png" and "theme/system/device/_Default.png" files without the "under construction tag". Even if you wont update this theme its a big help. thank you in advance!
 -
fantastic theme, old but better good looking than most new ones. i just wont give 5 starts because its not finished yet, it wont be fair, but it definetely deserves.
-
Hi there, Basically if you just need to download and extract the files to their respective retroarch folders. 1 - download all the overlay files, extract everything and move/copy the overlays files to the "overlays" retroarch folder, it should look something like "retroarch/overlays/arcade4k/ .. " 2 - download the "shaders_v110.zip" and extract to the "shaders" folder of retroarch 3 - now you need to choose what resolution you are using, if its 1080p ( download config_1080p_v12.zip) or 4K (download config_4k_v12.zip) and extract the files to the "retroarch/config/" folders inside the config folder it has a folder with config files for each retroarch core, my setup uses both mame and final burn neo cores so has files for both. NOTE: Its important that you choose the correct resolution for your system, if your monitor is a 1440p or something diferent the overlays wont display properly regardless what config files you choose. 4- now download the "Main MegaBezel Shader pack.zip" or "Optional Normal Shader pack.zip", and also extract one of them to the "retroarch/config/" folder, the megabezel pack is my favourite but its slower to launch a game, just to launch, the game will run perfectly fine after that. The optional pack is faster, its a run of the mill shader setup, also looks nice, but not as fancy as the mega bezel one. Now just launch a rom with retroarch using final burn neo or MAME cores and have fun.
- 16 comments
-
- 1
-

-
- real bezels
- 1080p
- (and 2 more)
-
Oh nice thank you very much Im trying to find a way to fully convert this bezels and merge them with HSM mega bezel shader, so it will be compatible with everything. Im really busy mas this script may be really helpfull in the future, thank you!
-
Hi There My apologies if i took too long to reply, ive been really busy lately. the easiest way is to download config_4k file and mass edit the values in the *.cfg files. example: if you want to convert to 1080p, just divide all below values by 2 (using zingzip.cfg as an example) custom_viewport_height = "2055" custom_viewport_width = "1504" custom_viewport_x = "1178" custom_viewport_y = "54" for 1440p, it should be divided by 1.5 (result rounded up maybe), you can manually edit on game cfg and try it out. After converting Mr Retrolust MAME files to retroarch, i used notepad++ and a math addon (used python script) Basically just open ALL the 4k game cfg files in notepad++ (yes all) well the mame and finalburn cfgs are basically the same you just need convert a folder and copy paste to the other one) and run the script in the addons python scripts in notepad++ (iirc) try this .py script, i basically just changed 2 > 1.5 in the script it should do the job, i dont have a 1440p monitor so i cant test that properly. warning: the script will divide by 1.5 ALL the number values in the cfgs (that include the folder name for the game overlays "overlays/arcade2k", but because its round up it will become arcade2k again and not arcade1.5k, so it will fix itself.. the cfgs dont have any other relevant data that could be changed so it should work nicely. it will take a while btw. divide.py
-
 Thank you for your awesome work man! All these years using launchbox and i finally have some dope overlays for arcade games in 4K
 -
klyze_pt changed their profile photo
-
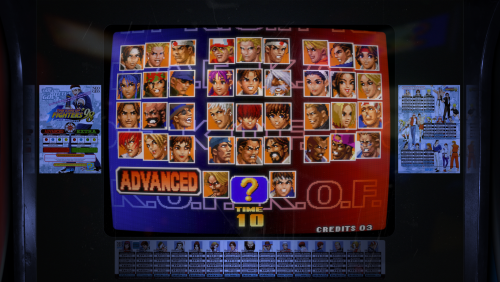
Mr. RetroLust's - Mame 4K - Lights Out - Realistic Bezels / Artwork
klyze_pt replied to Mr. RetroLust's topic in Game Media
Just uploaded to retroarch and simplified the install process you can check it here Mr. RetroLust's Mame 4K Bezels - non official retroarch conversion - (4K only!! for now) -
Mr. RetroLust's Mame 4K Bezels - non official retroarch conversion - (4K and 1080p only!!) View File First of all i wanna thank @Mr. RetroLust, you can find the official post here Mr. RetroLust's - Mame 4K - Lights Out - Realistic Bezels with his awesome work. This is just a mass scripted conversion of Mr. Retrolust work added a Mega Bezel shader and some manual tweaks for retroarch, all credits to @Mr. RetroLust and Mega Bezel Community. First a warning, this is for 4K and 1080P resolutions only!! it wont work as intended in other screen resolutions. Instructions: 1- Choose and unzip your config.zip (1080p or 4k) to the retroarch folder, it has the individual game cfgs for finalburn neo and mame cores and mega bezel shader already setup. regardless of what core run what, the rom names are shared, so for the sake of simplicity, with the exception of the core main .cfg files (MAME.cfg / FinalBurn Neo.cfg) all the other game individual .cfg files are exactly the same. 2. extract "shaders_v110.zip" to the shader folder, it has the default retroarch ":\shaders\shaders_slang\" shaders and the mega bezel special shaders in ":\shaders\shaders_slang\bezel\Mega_Bezel\Presets\", this pack presets in the klyze folder Or you can go to Mega Bezel Community and add the latest version manually, just dont forget to add my presets. The shader is curved by default and looks great in most games but you may find flat is the way to go in some games. to change that, go to "shader > shader parameters > curved = 0" > save shader game override for that game. (P.S. in a future update each games will have the proper flat / curved shader) 2a. if you think the mega bezel shader is too taxing for you pc just choose a simple shader the in \shaders\shaders__Slang\ folder (ex. CRT geom) and save core preset. 3. unzip all the "overlays_partX.zip" files and place them in the overlay folder ":\overlays\Arcade4k\" This was tested in a clean retroarch install, so if you have a retroarch with some weird settings you may have to adjust the main core cfgs yourself. Again, this was a mass conversion, so you may find some unexpected issues i missed, so just give me some feedback. Submitter klyze_pt Submitted 09/15/2022 Category Platform Bezels/Overlays
-
Version 1.2.0
2,448 downloads
First of all i wanna thank @Mr. RetroLust, you can find the official post here Mr. RetroLust's - Mame 4K - Lights Out - Realistic Bezels with his awesome work. This is just a mass scripted conversion of Mr. Retrolust work added a Mega Bezel shader and some manual tweaks for retroarch, all credits to @Mr. RetroLust and Mega Bezel Community. First a warning, this is for 4K and 1080P resolutions only!! it wont work as intended in other screen resolutions. Instructions: 1- Choose and unzip your config.zip (1080p or 4k) to the retroarch folder, it has the individual game cfgs for finalburn neo and mame cores already has the "mega bezel shader pack" included. regardless of what core run what, the rom names are shared, so for the sake of simplicity, with the exception of the core main .cfg files (MAME.cfg / FinalBurn Neo.cfg) all the other game individual .cfg files are exactly the same. 2. extract "shaders_v110.zip" to the shader folder, it has the default retroarch ":\shaders\shaders_slang\" shaders and the mega bezel special shaders in ":\shaders\shaders_slang\bezel\Mega_Bezel\Presets\", this pack presets in the klyze folder Or you can go to Mega Bezel Community and add the latest version manually, just dont forget to add my presets. Games with flat overlay have a dedicated flat shader, but some look good with either flat or curved, so its up to you. 2a. if you think the mega bezel shader is too taxing for your pc just download "Normal Shaders pack" and overwrite the megabezel ones. 3. unzip all the "overlays_partX.zip" files and place them in the overlay folder ":\overlays\Arcade4k\" This was tested in a clean retroarch install, so if you have a retroarch with some weird settings you may have to adjust the main core cfgs yourself. Again, this was a mass conversion, so you may find some unexpected issues i missed, so just give me some feedback.- 16 comments
- 1 review
-
- 11
-
-

-

-
- real bezels
- 1080p
- (and 2 more)
-
Mr. RetroLust's - Mame 4K - Lights Out - Realistic Bezels / Artwork
klyze_pt replied to Mr. RetroLust's topic in Game Media
unfortunally i had to rename every png, and even change a couple of them. some mame overlays have more than one png and i had to setup up manually. but ill definetly credit @Mr. Retrolust, i just basically mass converted the files and did some small changes -
Mr. RetroLust's - Mame 4K - Lights Out - Realistic Bezels / Artwork
klyze_pt replied to Mr. RetroLust's topic in Game Media
good point, i usually use it free for small files, completely forgot the annoying limitation in bigger files.


