
.png.d63b88dc3d5c6db8803dfbd996ce65fc.png)
JoeViking245
-
Posts
4,111 -
Joined
-
Last visited
-
Days Won
34
Content Type
Profiles
Forums
Articles
Downloads
Gallery
Blogs
Everything posted by JoeViking245
-
No idea about your white screen issue. But think this may help with the "maximize when minimized". Loop { WinGet,WinState,MinMax,ahk_exe notepad.exe If WinState = -1 WinMaximize, ahk_exe notepad.exe ;msgbox, Window is Minimized If WinState = 0 Continue ;msgbox, Window is neither If WinState = 1 Continue ;msgbox, Window is Maximized sleep 500 } You can of course remove the last if statement. The 2nd one is up to you. They "Continue" right now so nothing happens.
-
.thumb.png.c9faf450e4d2b690a819048b18173f61.png)
Update emulators without losing plugins
JoeViking245 replied to playingmax's topic in Troubleshooting
The update you picture there is for the LaunchBox emulator-updater-plugin only. (That's probably not the technical name for it. But seemed descriptive.) Updating that doesn't touch your emulators at all. After updating the above plugin(s), LaunchBox will need to restart. If your specific emulator has an associated "emulator-updater-plugin" (which Dolphin and RetroArch do), you can go to Tools < Manage< Emulators. In that window, it will show if your emulator(s) have an update available. Edit the emulator and click Update. This will update your emulator to its latest release, without losing any of your emulator settings. But if you click Reinstall, you WILL lose all your emulator settings. -
The menu systems in LaunchBox/BigBox are designed to be 'somewhat' intuitive. Ya, you'll need to look through them to see what's there. For your example you go to the System Menu < Options < Keyboard Mapping. Fortunately, there's not a bazillion menus/sub-menus to navigate through like you'd find in, say, PhotoShop. (maybe not the best example. But you get the idea.) The search feature here on the Forums is 'OK', at best. But you kind of need to know exactly what you're looking for. No fuzzy matching of search terms. I'm sure you'll find that the case on any forum. I find that internet search engines (i.e. Google) can do a real good job of finding what you need. When searching, start the query with LaunchBox (or BigBox) and then the terms you're looking for. i.e. "BigBox keyboard control". The 2nd hit on that search was a Reddit post "How to control BigBox with the keyboard?". So you might could say, the Forums is the documentation, and Google is the index.
-
OK. So it's definitely an emulator issue rather than a LaunchBox one. I'm not real knowledgeable about Xemu and don't think they have a Forum. But do see they have a Discord page. When troubleshooting an emulator, it's usually best to ask them directly. That said, maybe someone else here may be able to help with your emulator settings. At least the first step in troubleshooting is now taken care of.
-
When you run the game directly from Xemu (aka not launching from LaunchBox), are the graphics all blocky?
-
Anything's possible. Best thing you can do is, at the top of this page, click Help & Support < Request a Feature. You will need to login into BitBucket, which is a separate login than the forums (which is also separate from the LB Game Database).
-
Sounds like you're after some sort of bulk edit feature. Say you added a Custom Field to game and named it "Worth Playing?" and set the Value to "Yes". Now you want to have a billion other games have that same Custom Field and Value ("Yes"). What I'd do is add a Custom Field to game and name it "Worth Playing?" and set the Value to "Yes". Then for the other games I want to have that same Custom Field, select those other games then either right-click one of the then and select Edit, or press Ctrl+E to start the Bulk Edit Wizard. In the Field dropdown, search for and select that Custom Field and for the Value, type "Yes". When looking at the Fields in the dropdown, you'll see what other fields/metadata you can have changed, all at once.
-
No. The only parameters that can be passed are the ones @sundogak mentioned and a couple more found here:
-
@Andy911 Looks like you're running a version of LaunchBox prior to 13.15. (%romfilename% became available in 13.15.) Otherwise, you would see RomFile in the sample command. But for your purposes, you don't need that parameter. Remove it and have the batch file just pass %1.

-
Not really sure what "date" you're referring to. Edit the 'emulator' you created that points to the batch file. Share a screenshot of the Details section so we can see what you have.
-
When you say "category", I'm hoping you mean "Platform" because that'd make it a lot easier. To move them to a different Platform: When in the Super Nintendo Entertainment System Platform, Select the games that you want moved and then press Ctrl+E to start the Bulk Edit Wizard. For the Field, select from the dropdown, Platform. For the Value, select (or you can manually type it in) Nintendo Super Famicom (or however you want to word and spell it). Follow through the prompts to complete the process.
-
It does. Having %romfile% be the only thing in the command-line parameters is the same as leaving it blank. With the command-line parameters blank, you capture that [%romfile%] in the batch file as %1. What's all included in %romfile% depends on the check boxes you have checked [in the emulator]. Say the MAME game is "1942". Per the above set checkboxes, that's what %1 will be. "1942" (without quotes). To run this game from a batch file which is the 'emulator', the batch file would look like: (again, using the above check boxes) set game=%1 cd "D:\LaunchBox\Emulators\MAME\" "D:\LaunchBox\Emulators\MAME\mame.exe" %game% And to confuse matters more... you can put %romfilename% as the only parameter, and %1 will be "1942" (without quotes) regardless of the checkboxes. Note: %romfile% will still be added to the end of the parameters that are passed to the 'emulator' and can be captured in the batch file as %2.
-
 You are very welcome! Thanks for the heads up. I think this error occurs when you don't have a platform named "Arcade" (with a capital "A"). At least that's how I was able to reproduce the error. A presumptuous assumption on my part. 😊 This should be fixed now in v1.0.1.
 -
Parameters cannot be passed to Additional Apps or Running Scripts. The quick and dirty, yet effective way to do what you need is to create a new emulator. This 'emulator' can be anything you can execute, like a batch file, AutoHotkey script, Python script etc. LaunchBox will pass the parameters (mentioned above) to the 'emulator'. From there, have it do whatever pre-launch things need to be done and then have it launch MAME with its required parameters. You can also have your 'emulator' wait until MAME exits and run something else before exiting itself [if needed]. If you don't need to run anything after MAME exits, you may still want to have your 'emulator' wait for it (MAME) to exit before closing the script so that the LaunchBox 'closing' screen will show ("Thank you for Playing").
-
 If an exact Title match is found, I didn't see the need to use the resources to populate the remaining 'fuzzy matches'. Thought being, they'd never get used/accessed. To me, it sounds like the 'bug' might be a [game] naming issue. If you search for a specific game on SteamGrid, you'll get various grids for that game, covering the various platforms it can be found in. Say your games Title is "1942", the results will be for "1942". But if your game is actually "1942: The Pacific Air War", you won't see results for that game ("1942: The Pacific Air War"). Rightfully so, as they're 2 different games. ...or maybe I'm completely missing what you're saying. Which happens. 😊 If you can give an example where even though the Title is correct, the results aren't, I can attempt to find why that's happening. And possibly discover a cure for the bug. Otherwise, it does sort of sound like it is a feature request.
 -
Are you still talking about Startup Themes? Its default background pallet (for at least the Default Startup Theme) is hardcoded to black (like your original image above). Then the [whatever it finds. If any] background image for the game sets on top of (and covers) that. If you're talking about the background in LaunchBox behind the main middle section, that's a discussion for a different [unrelated to Startup Themes] topic. That said, that 'background' is customizable in the LaunchBox setting (Tools < Options).
-
The Default StartupTheme binds the background to 'BackgroundImagePath'. Double check in LaunchBox in Tools-Options-Media-Background Priorities that you have Fanart - Background checked.
-
Version 1.2.5 Released Fixed: When selecting Previous/Next during bulk edit, existing image count doesn't update for the game Fixed: When selecting Previous/Next during bulk edit, the multiple-games-found window still shows if you didn't select a game Thanks @Tayley for letting me know.
-
What am I doing wrong? Mame refuses to load HLSL or BGFX settings....
JoeViking245 replied to becausereasons's topic in Noobs
Try: Change writeconfig to 0 (zero). Then, either in MAME's root folder and/or in the ini subfolder, delete all the rom_name.ini files. -
K. Then have it not check for updates for that emulator. Tools < Manage < Emulators - Click on your emulator then right-click on the Status column (for that emulator) and select Don't check for updates.
-
v1.2.2-b released Fixed: Would get an error if game Title has a forward slash in it @PlayingKarrde This should also fix the issue you had when bulk scraping with your Nintendo 64 and Sega Saturn platforms.
-
Look in Tools < Manage < Plugins and see if there's an update for the Dolphin plugin. If so, update it and see if that resolves it. If not, what version of Dolphin do you currently have installed? If it's a TriForce version (that you don't want to have updated anyway), select to not have that specific emulator not-check for updates.
-
I'll do some checking and see what I can find. Thanks for the heads up.
-
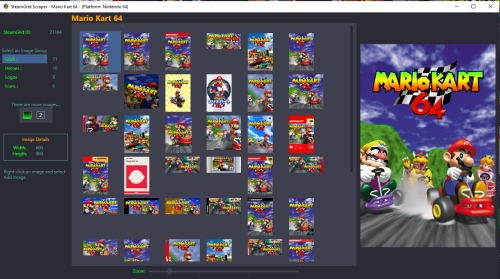
Having an interactive "Just grab 'em all" would pretty much defeat the purpose of what made this plugin useful to you. As for adding something like that to the original one-by-one method, it's been discussed previously. In short: "The problem is, sometimes (a lot of the times? Occasionally? Rarely?) the file will be [temporarily] locked by LaunchBox. And can't be deleted." I've tried various methods to work around this hiccup and the result was "Deleting existing images ain't gonna happen with the plugin." Discussed above: "Those official Steam images don't appear to be available via the API. But I'm pretty sure when you import a Steam game, there's an option to prioritize Steam Images, which should get those. I presume the auto-import feature grabs those as well." Version 1.2.3 added a clickable SteamGrid hyperlink. When doing one-by-one, click the Games Title to navigate to the games SteamGrid page. From there you can click View Original Steam Assets. When searching one-by-one, the plugin 1st attempts to search by the game title and platform. If a direct match isn't found, then it searches by just game title. My findings indicate the 1st rarely gets a hit but the 2nd one (when using the one-by-one method) will show images covering various platforms. "In cases where an exact match for the game Tite is not found, a window will popup listing 'close matches'." With "Just grab 'em all", it'll do the 1st and 2nd attempts then move on. An interactive popup with close matched does not occur. If a match is found meeting your criteria (i.e. "grids" and " 600x900"), it grabs the 1st one in the results. I presume your incorrectly matched example "Wipeout" produce a grid image for a different platform? Glad it now has some value for you.
-
Thanks!! Glad it useful and a time saver. I thought I had changed things to not get that error. I guess I only thought about changing things. Thanks for using that feature and thanks for letting me know. v1.2.4-a Fixed: Error would occur when checking "See All available image types" in the Add Image panel.
.thumb.png.c9faf450e4d2b690a819048b18173f61.png)


