
faeran
-
Posts
3,034 -
Joined
-
Last visited
-
Days Won
143
Content Type
Profiles
Forums
Articles
Downloads
Gallery
Blogs
Everything posted by faeran
-
 Hi @nearvanaman, Have you checked the first post in the beta thread to see if it relates to your situation?
 -
This is based on your screenshot priorities. You can adjust this in Options > Screenshot Priorities
-
Beta 4 is now out with the following changes: New Premium Feature: Added a Documents badge for games with manuals and other documents New Feature: MAME can now be automatically downloaded (or updated) and installed via the MAME Full Set Importer. This makes it super easy to get up and playing just by running the MAME Arcade Full Set Wizard and nothing else. New Feature: Game Details in LaunchBox has been overhauled with a new, modern look New Feature: Added new controls and bindings for use inside of LaunchBox Game Details (for theme devs) For any prospective LaunchBox theme devs, the new view should show off some new functions that you can use in your own themes. Most notably, we added a Media Carousel Control, and an Achievements summary panel. Tagging previous LaunchBox theme devs, just in case you want to check it out: @Karoline @Mr. RetroLust @Rincewind @raviol @Natouse @shadowfire @Lordmonkus @Grila @nosh @harryoke
- 156 replies
-
- 13
-

-
With the way the forums work, you'll have to click on the image first, so it displays in the pop-up, and then save it.
-
You can check the first post out: Also, another way I missed is to update via Big Box. That should work too if you have access.
-
Email support@unbrokensoftware.com with the Google Play email address you used while purchasing the app. You can also check out the Android License page for more info: https://www.launchbox-app.com/android-license
-
While I'm not entirely following what you are saying here, you can create favorite playlists that will auto-update depending on which games you favorite. It is independent, and has no bearing, to what platform a game is in.
-
You can change the code of any custom theme. You would need to know some simple XAML, so you can dive into the code and change what you want. Unified Refried files would be located in LAUNCHBOX\Themes\Unified Refried There's a good pdf that helps with Big Box specific bindings, located here: LAUNCHBOX\Themes\Documentation.pdf It would require you to find the game view you use, then the piece of code that deals with the background, and replace it with a background transitionpresenter.
-
There are a few general Pause Screen settings you can play around with to see if you get different results. In LaunchBox: Go into Tools > Options > Gameplay > Game Pause In LaunchBox: Go into Manage > Emulators > [Your MAME entry] > Pause Screen In Big Box: Go to Options > Game Pause Sounds like you'll want to make sure you are muting the audio and suspend the emulator. There should be options for these.
-
The author of Eclipse would most likely be the best person to ask on this: @Fry. I would guess you may have some files in your Plugins folder that could be causing what you are seeing.
-
I haven't looked at the code, but if I had to guess, it's just displaying any Fanart - Background images that you downloaded. I can think of 3 options you can use to stop this from appearing in the theme: Remove everything from your Background Image Priorities. In LaunchBox, go to Tools > Options > Background Priorities and uncheck everything in there. You can delete every Game background image (especially if you don't want to use them, you'll save space). In a file explorer, go into LAUNCHBOX\Images\[platform name]\, and delete the Fanart - Background folder for each of your systems. You may also need to delete the storefront specific Background folders as well (if you've imported any). Delete the line of code within the theme files in LAUNCHBOX\Themes\Unified & Ultrawide\Views. Which file you edit will be determined by which view you use in Big Box. If you use Vertical Wheel 1, you'd open up WheelGamesView.xaml, if you use Vertical Wheel 2, you'd open Wheel2GamesView.xaml, etc... Then, delete the following line of code: <transitions:TransitionPresenter Grid.Column="7" Grid.Row="0" Grid.RowSpan="8" Panel.ZIndex="-2" TransitionSelector="{Binding BackgroundTransitionSelector}" Content="{Binding BackgroundView}" Height="{Binding ElementName=Canvas, Path=ActualHeight}" Width="{Binding ElementName=Canvas, Path=ActualWidth}" IsContentVideo="true" />
-
The most common reason for graphical issues like this is when you have a Service called Nahimic installed on your computer. Check Task Manager for that service and see if it helps to stop it. If it does, you'll have to go into your Service console to disable it permanently.
-
Hi Everybody, Beta 3 is now out with the following changes: New Premium Feature: Compatibility options have been added in Big Box for various types of wonky marquee screens that cut off or stretch the image (see the new Marquee Screen section in the Big Box options) New Premium Feature: Big Box users now have the option to stretch marquee images to fill the screen or keep their image aspect ratios (also in the new Marquee Screen section of the Big Box options) Improvement: Big Box will now use platform clear logos with fanart backgrounds on marquee screens if no marquee image exists (just like the games views previously already did) Improvement: Big Box marquees are much lighter to run and should have less performance bottlenecks on lower-end hardware Improvement: Clear logos and fanart backgrounds will no longer occasionally flicker behind marquee screen images during transitions Fixed - Restored ability to delete rows from the Drag and Drop ROM import wizard Fixed - Corrected some Tools menu items from always being disabled For Users on Beta 1 or Beta 2: There's the potential that your update will not initialize after it downloads. If this happens to you, there are 2 workarounds to get you up and running on Beta 3. Go into Options > General > Updates and turn on the option Automatically Download Updates in the Background, and press Okay. Once LaunchBox has downloaded in the background, it will prompt you to install it. Check your Updates folder for the following file and run it: LaunchBox-12.7-beta-3-Setup.exe. During installation, double check your install path is correct (It is common to mistakenly install a second version of LaunchBox inside of your LaunchBox folder, creating a LaunchBox\LaunchBox folder scenario). If you do require a manual link to Beta 3, please use the following: https://www.dropbox.com/s/44fixb7cmdhx3fr/LaunchBox-12.7-beta-3-Setup.exe?dl=0
-
You can try and use the lost license page to get a fresh copy of your license sent to you and then reapply it to your LaunchBox. See if that helps with opening Big Box: https://www.launchbox-app.com/premium/lost-license
-
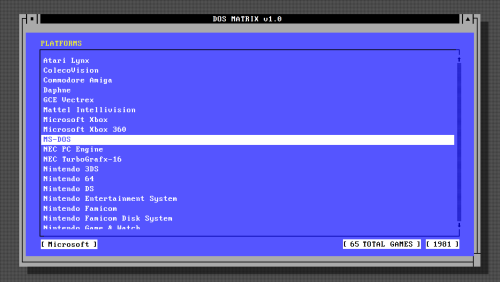
RetroMags Issue 43 - [Theme Workshop] View File RetroMags was built during a Theme Workshop live stream. If you are interested in creating themes, subscribe to the Unbroken Software YouTube channel. RetroMags Issue 43 This is a 4:3 aspect ratio port of the RetroMags Big Box theme, which is designed to look like the Retro Magazine's of old. The theme was designed using the COMMUNITY Theme Creator, along with some manual code changes in order to utilize the new wheel CoverFlow features not yet currently in the Theme Creator. This theme relies on 1 System Hardware graphic and 3 platform specific game graphics for each platform/playlist/category. I did not include a graphic for every platform out there. If people would like to help contribute platform specific graphics, PM me, or post in this thread and I'll add them to the main theme in a future update. Graphic locations: System Hardware: LaunchBox\Themes\RetroMags\Media\Console Images Graphic 1: LaunchBox\Themes\RetroMags\Media\Platform Image 1 Graphic 2: LaunchBox\Themes\RetroMags\Media\Platform Image 2 Graphic 3: LaunchBox\Themes\RetroMags\Media\Platform Image 3 Please note: The COMMUNITY Theme Creator Project Files are provided for you to learn. If you would like to publish the theme, it will be missing the Platform Wheel and the 2 Wall View wheels. These would have to be added back manually to the theme. They can be found in the theme files within their respective xaml files. Watch this theme being built: Watch on YouTube: https://www.youtube.com/watch?v=2CfCDOXo8k8 Credits COMMUNITY Theme Creator by @y2guru. Find it here: https://forums.launchbox-app.com/files/file/2115-community-theme-creator-for-bigbox/ Rincewind's awesome character graphic's pack is included (at a much reduced resolution) Subscribe to catch future live stream: https://www.youtube.com/channel/UCSIht6UXIEXIgz4eXAEShxA Submitter faeran Submitted 01/10/2022 Category Big Box Custom Themes
-
![More information about "RetroMags Issue 43 - [Theme Workshop]"](//forums.cdn.launchbox.gg/monthly_2022_01/PlatformView1.thumb.jpg.851d7b84c39868d57e6ccd9502b55e6a.jpg)
Version 1.0
170 downloads
RetroMags was built during a Theme Workshop live stream. If you are interested in creating themes, subscribe to the Unbroken Software YouTube channel. RetroMags Issue 43 This is a 4:3 aspect ratio port of the RetroMags Big Box theme, which is designed to look like the Retro Magazine's of old. The theme was designed using the COMMUNITY Theme Creator, along with some manual code changes in order to utilize the new wheel CoverFlow features not yet currently in the Theme Creator. This theme relies on 1 System Hardware graphic and 3 platform specific game graphics for each platform/playlist/category. I did not include a graphic for every platform out there. If people would like to help contribute platform specific graphics, PM me, or post in this thread and I'll add them to the main theme in a future update. Graphic locations: System Hardware: LaunchBox\Themes\RetroMags\Media\Console Images Graphic 1: LaunchBox\Themes\RetroMags\Media\Platform Image 1 Graphic 2: LaunchBox\Themes\RetroMags\Media\Platform Image 2 Graphic 3: LaunchBox\Themes\RetroMags\Media\Platform Image 3 Please note: The COMMUNITY Theme Creator Project Files are provided for you to learn. If you would like to publish the theme, it will be missing the Platform Wheel and the 2 Wall View wheels. These would have to be added back manually to the theme. They can be found in the theme files within their respective xaml files. Watch this theme being built: Watch on YouTube: https://www.youtube.com/watch?v=2CfCDOXo8k8 Credits COMMUNITY Theme Creator by @y2guru. Find it here: https://forums.launchbox-app.com/files/file/2115-community-theme-creator-for-bigbox/ Rincewind's awesome character graphic's pack is included (at a much reduced resolution) Subscribe to catch future live stream: https://www.youtube.com/channel/UCSIht6UXIEXIgz4eXAEShxA -
The default theme does have a Favorite and Most Recently played section to their platform views, but not a lot of themes utilize this. You could also create playlists that can include all your favorited games and/or games that were played recently. You could also reorganize your Platform Categories hierarchy to make it less overwhelming for the specific people that you are wanting to have use it.
-
 I'll add it to the list of themes to do. This one would definitely require a whole new set of theme graphics that I'd have to recreate to fit 4:3, but it's doable.
 -
Problem launching arcade games using Retroarch's FBNeo core
faeran replied to drorin's topic in Troubleshooting
@thykingviking, you may need to uncheck "Extract ROM archives before running" It's under Tools > Manage > Emulators, and edit your RetroArch emulator that controls FBNeo. -
LaunchBox 12.7 Beta 1 thread can now be found here:
-
For Users on LaunchBox 11.7 Beta 1 or Beta 2: There's the potential that your update will not initialize after it downloads. If this happens to you, there are 3 workarounds to get you up and running. Preferred option: Go into Options > General > Updates and turn on the option Automatically Download Updates in the Background, and press Okay. Once LaunchBox has downloaded in the background, it will prompt you to install it. Premium option: Run Big Box. It will notify you that there is an update and run you through the update process. Manual option: Check your Updates folder for the following file and run it: LaunchBox-12.7-beta-3-Setup.exe. During installation, double check your install path is correct (It is common to mistakenly install a second version of LaunchBox inside of your LaunchBox folder, creating a LaunchBox\LaunchBox folder scenario). Happy New Year everyone. LaunchBox 12.7 Beta 1 is now out with the following changes: Improvement: Updated several forms to utilize the new dialog theming colors Improvement: LaunchBox and Big Box startup process has been overhauled, should result in faster start-up times Improvement: LaunchBox context menus should now open more quickly Fixed: Amazon Games importer was not detecting all games in a user's library Fixed: Error when selecting a controller in Big Box while no controllers were connected Fixed: Various issues when using FlowVideo outside of a FlowContext (for theme developers) Beta 3: New Premium Feature: Compatibility options have been added in Big Box for various types of wonky marquee screens that cut off or stretch the image (see the new Marquee Screen section in the Big Box options) New Premium Feature: Big Box users now have the option to stretch marquee images to fill the screen or keep their image aspect ratios (also in the new Marquee Screen section of the Big Box options) Improvement: Big Box will now use platform clear logos with fanart backgrounds on marquee screens if no marquee image exists (just like the games views previously already did) Improvement: Big Box marquees are much lighter to run and should have less performance bottlenecks on lower-end hardware Improvement: Clear logos and fanart backgrounds will no longer occasionally flicker behind marquee screen images during transitions Fixed - Restored ability to delete rows from the Drag and Drop ROM import wizard Fixed - Corrected some Tools menu items from always being disabled Beta 4: New Premium Feature: Added a Documents badge for games with manuals and other documents New Feature: MAME can now be automatically downloaded (or updated) and installed via the MAME Full Set Importer. This makes it super easy to get up and playing just by running the MAME Arcade Full Set Wizard and nothing else. New Feature: Game Details in LaunchBox has been overhauled with a new, modern look New Feature: Added new controls and bindings for use inside of LaunchBox Game Details (for theme devs) Beta 5: Fixed: Game Details background no longer stops you from deleting the file being shown Fixed: Videos now only take the space required to play them (Which caused the black box on either side even when PreviewBackground was Transparent) - For Theme Devs Fixed: Items were showing twice in the carousel previews if the item was used both in Background and Screenshot Image Priorities Fixed: Wikipedia and YouTube link mouse-over wasn't working on the transparent sections of the icons Fixed: Some menu items weren't updating their strings correctly Fixed: Document badge wasn't showing up correctly for all items with a manual Fixed: Completed check box was missing it's tooltip Fixed: Carousel play button flickering when GameDetails is first opening up Fixed: Carousel video now responds to volume change correctly Fixed: Carousel video can now be double clicked to open a full screen player like you used to be able to in previous versions Beta 6: Fixed: Videos in the LaunchBox carousel with embedded thumbnails of different aspect ratio from its source (like some EmuMovies videos) will now play correctly in the default theme Fixed: Videos in the LaunchBox carousel now have the right-click context menu to Fullscreen and Delete Fixed: Viewing a video fullscreen in the LaunchBox carousel now opens a window inside of LaunchBox instead of a VLC instance Beta 7: Fixed: Restored ability to use platform specific game marquee views Fixed: Helped correct some of the issue regarding LaunchBox Game Detail's audio playing after the video closes Fixed: Added more logic to avoid Uri errors while attempting to load a Game Details video Fixed: Carousel preview items can now be navigated correctly using a keyboard
- 156 replies
-
- 18
-
-
Sounds like some of the things you've done may have caused more issues. If you import your new romset and then combine with the broken ROM, you still have many game entries with broken ROM paths combined with ROM paths that do work. One way you could try to clean this up is to first right click one of your platforms on the side panel and go into Edit. In the Folders tab, Point the Game field to your ROMs folder, and then press OK. You'll now need to run the Tools > Scan > For Removed [platform] ROMs... Then you can run the Tools > Scan > For Added [platform] ROMs...
-
Not sure if it's related, but I know when I upgraded my computer, I lost permissions on my secondary drives. I ended up having to take ownership of them and apply permissions to all my folders and files once again to my username.
-
Hi @Truest1. Possibly worth it to share the theme you are using. I believe the pictures you took with your phone show Unified & Ultrawide. If this is the case, you can look inside the following folder: LaunchBox\Themes\Unified & Ultrawide\Images\Platforms\Fanart You'll see all the images in there. You should be able to remove the ones you want, or replace them with something else.
-
Hi @Kan. This is unfortunately a known issue. While some people have no problem, others are seeing the -200 error. It has not been an easy one to pin-point. Personally, I see it intermittently, and only with certain files.


![More information about "RetroMags Issue 43 - [Theme Workshop]"](http://forums.cdn.launchbox.gg/monthly_2022_01/PlatformView1.thumb.jpg.851d7b84c39868d57e6ccd9502b55e6a.jpg)
