skizzosjt
-
Posts
753 -
Joined
-
Last visited
-
Days Won
1
Content Type
Profiles
Forums
Articles
Downloads
Gallery
Blogs
Everything posted by skizzosjt
-
-
user uses directory path "ABC" for some path or paths regarding one or more platform but then they changed that path within Windows, so it would now be "XYZ" LB is still looking for directory "ABC" and will crash when you try to do something that uses this "ABC" path still, like editing a platform because "ABC" no longer exists (refer to last point, it was changed to "XYZ") I have same issue due to using external disks. If I forget to connect one of them and I try to edit a platform that uses paths to an external disk that isn't connected the program will crash. I keep TV shows and movies on a disk given drive letter M: .....for example "M:\TV Shows\" is listed as the "Games" directory for my "TV Shows" platform, if it cannot be found due to the disk not being connected when I try to edit the TV Shows platform...boom....crash! The way I try to get around this is to change this "Games" directory for this platform to some relative path such as \LaunchBox. This way the crash will not happen if I forgot to connect the disk prior to making some edit. Problem is anytime I import new content the Games directory automatically updates to the directory where I imported those files from....which is going to be the external disk. So, I have to remember to change this path after anytime I import new files for this platform from that disk. The issue is silly. I get an error should pop up, but the program shouldn't have to crash. The program should instead fail "gracefully" with a standard error prompt stating the directory could not be found and the edit could not be saved as a result. Though, this suggestion would only fix the crashing. Users would still be stuck having to edit the non-existent path to a path that actually exists through the relevant XML file(s). So, going one step further, when said error appears it would need to prompt users "Would you like to update the path?" and then we can select Y/N depending on if we wanted to update it or not. If yes, then we can select the new path and problem solved! If no, problem continues but there could be some reason a user does not want to update the path so I think giving the option would still be important. Back to your question though. Since the OP apparently could not (or just didn't want to) change their "XYZ" path back to "ABC" within Windows they would consistently crash in LB. So, since they cannot get to the proper window to edit this within LB, the only way to edit this would be through the actual data file, which for their issue the path(s) were in /Data/platforms.xml and /Data/Platforms/ (specific_system_name).xml so you folks need to change or create the path(s) in Windows to what LB is expecting, or edit the path(s) to what LB is looking for manually through the XML file(s) that means you have the issue on multiple platforms. so, keep editing them until they are all fixed!
-
The one liner here is closing the active window when the Escape key is pressed. The script you have doesn't do what you think it does, the Guide button and Start button are not being told to do anything here. But, there is a much simpler way built right into the frontend! You should instead be doing this through LaunchBox. Go into Tools > Options > Game Controllers > Mappings and simply change the hotkey to what you want. In this case you want the Guide button and Start button (mine is showing the View button and Start button) In LaunchBox it will be called "Exit Game"

-
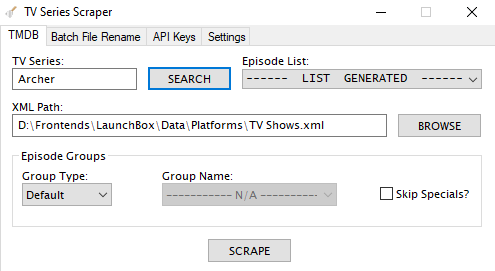
TV Series Scraper
skizzosjt replied to skizzosjt's topic in Third-Party Applications and Plugins (Released)
Hi there! If the GUI never shows up, it is not finishing a specific startup task. Can you please open a CMD Prompt window and then run this line? winget install jqlang.jq this is a Windows package utilized by the script to "pretty print" JSON responses in a human readable format rather than one giant string blob. the GUI waits to be shown until this package is first checked and downloaded if not already present on your system. your system must be getting hung up here on not being able to download it then. The response you should get should look like this. If you are getting something else, please post that and maybe we try and find a solution!
-
Can I zip a pc game and have LaunchBox unzip it and run it.
skizzosjt replied to VisionsIC's topic in Troubleshooting
I don't actually employ this tactic. I just knew it was possible, so provided the answer. In my opinion this only makes sense for a DRM free game, which likely means something old, or maybe a more modern game from GOG could fit the bill. I provided an example using a game from 1998. It's a few GB's in size (maybe less! cannot recall off the top of my head) and would take less time than the frontend's startup screen to unpack it! Meaning, if this method were used optimally a user would have no idea this is how things are being handled under the hood. The amount of space being saved is likely not going to matter much unless you have quite a collection of games that fit this niche use case. Slower is factually correct because even if it's only 1.5 secs long to unpack it, that is longer than not unpacking it. I could not make any argument that it is not slower, but most use cases the extra time will not be meaningful. It would be silly to use this for some monster 100GB+ game for ex. Making clutter though.....meh.....that's a stretch. Consider LB does this with emulators that need ROM files unpacked, and also creates temp AHK files anytime a script is ran that was inputted to a field in LB (like the "Running Script" field). I wouldn't consider that clutter. Users aren't going to care if something is created/deleted for temp use, you gotta go outta your way to find these things. Though LB does this for more operational/functional reasons rather than saving disk space -
the software is not the bottleneck, any third party program claiming they can magically increase transfer speeds is literally a scam/lies. stay away from any company pushing that BS! HDD is likely not going to be getting over 125 MB/s which is not impressive by today's standards when considering NVMe's and the like I've backed up 8TB HDD's over USB before and it does not take 9-10 days so you must have a horribly slow disk or something else is creating the bottleneck. Even USB 2.0 exceeds the speeds of any HDD. USB 2.0 max is 480 MB/s. So, the protocol is not the bottleneck either. RPM of a disk shouldn't impact much in this regard, ie difference of a 5400 vs 7200 RPM HDD isn't going to make a meaningful difference in transfer speeds Consider this, and this aligns with my experience. This should take less than 1 day. Any calculator could determine this, for ex Look at how slow your disk would need to be to predict 9 days of time! 10 MB/s !!!! lol if your disk is this slow it's about to die or has something failing about it. I'd like to think your disk is getting better speeds than 10 MB/s because that is how slow it would need to go in order for this to take 9 days! 222 hours / 24 hours = 9.25 days! USB 2.0 is fine until you get into talking about NVMe drives. Yes, technically, a decent 2.5" SSD could exceed USB 2.0 max rate of 480 MB/s (maybe getting up to around 550 MB/s) but it wouldn't be a huge blow to performance. So, point being here going to USB 3.0 would not be helpful. With the little info shared, I have to assume you are using slow hardware, a spinning platter HDD and though excellent for backups, they are nowhere near the speeds of various SSD's. But your speeds are still a fraction of what they should be! A quick test would be you should connect this HDD via SATAIII (assuming it has SATAIII connection) and see if there is a meaningful improvement. Maybe your USB port/hub is messed up. Also, any chance you are doing multiple things over that USB hub simultaneously? Just because your motherboard has, say, 4 USB 2.0 ports doesn't mean they all have a separate controller. They are normally going to the same controller, making those 4 ports essentially a hub. Meaning if you are doing other stuff at the same time over those USB 2.0 ports these other tasks could be hogging all the bandwidth and forcing this disk transfer to run at a snail's pace
-
Can I zip a pc game and have LaunchBox unzip it and run it.
skizzosjt replied to VisionsIC's topic in Troubleshooting
Here is a working example doing what I describe in my previous post RunWait, 7z.exe x "E:\PC Games\Commandos\Commandos - Behind Enemy Lines.7z" -o"E:\PC Games\Commandos\Temp", C:\Program Files\7-Zip, Hide Run, commandos.exe, E:\PC Games\Commandos\Temp\Commandos - Behind Enemy Lines WinWait, ahk_exe commandos.exe WinWaitClose, ahk_exe commandos.exe FileRemoveDir, E:\PC Games\Commandos\Temp, 1 -
I would use additional applications for launching the Sinden software and enable checkbox for Run Before Main Application. This is just an example. Script will need to run the Sinden software, wait for Retoarch to exist, then not exist, at that point it will close the Sinden Software Run, X:\path\to\sinden\software\sinden.exe WinWait, ahk_exe retroarch.exe WinWaitClose, ahk_exe retroarch.exe WinClose, ahk_exe sinden.exe If it stays open I would change the WinClose line to this Process, Close, sinden.exe
-
I think you obtained some funny NES ROM set because they should not be combined into a single archive file like that. it's going to run the first file found in the archive. If it were me, I would deal with this by unpacking all of those archives, then import the actual ROM files that were unpacked. You will essentially be reimporting your NES library because the way you got it setup now is not ideal
-
In LaunchBox, highlight the game, and right click it and click on Edit Go to Additional Applications, this is also were additional versions are Then change which version is the default by highlighting that line and using the Default button
-
there is no auto import process for native PC games if they are not part of some storefront like Steam, Epic, Uplay, etc. so you need to manually import them if that is the case. use the standard import wizard for this
-
this is STEAM'S on screen keyboard. the Game Bar doesn't come into play here. this should by default get triggered by holding down the Guide button then pushing the View button, or by holding down the Guide button and then pushing the X button. You must have stuff remapped in a funny way because Start and the triggers have nothing to do with this. It is part of the "Guide Button Chords" system of Steam. Press the B button to hide the on screen keyboard edit: another workaround is to not have Steam running. if Steam isn't running, their on screen keyboard can't pop up!
-
for the video I use "update once selected" radio bubble and have a visibility condition that it is hidden unless the file exists. additionally I use animations to reduce opacity during selection, and return it to opaque once selected. I just tested a theory and if I remove the opacity animation setting that is making it 100% transparent (aka 0% opacity per CTC's slider parameter) during selection, it will now play sound during selection. so I would def make sure you use animations for 0% opacity during selection, and then 100% opacity once selected for the "s" in games I would change it to something else like different font, size, color, etc, publish, and see what happens. do the changes actually go through? if not, then something is messed up. worse case scenario would be you can delete that element and recreate it. make sure font type and size matches the other bits of text boxes. also, font looks messed up all together in the bottom example. none of the font matches or is correct to top example. So another thought is you might not have the right font files installed. so make sure whatever font is being used in CTC, you have installed on your PC. you can include the font files within the theme's folder structure too. you can download all the Roboto family fonts for free if you don't have them, I think that was the majority if not all fonts.
-
that likely makes sense. if there is no video file, and you removed the Screenshots - Fallback element, then there might be no element existing in that area. So what you are seeing is likely the bottom most layer, a black background. you might want to consider adding that back in or coming up with another idea to prevent seeing a black background when that situation arises.
-
the larger one towards the right, I think you're looking for the fallback image. I think what that is, is when a video file isn't found it falls back to an image. might be called "fallback image"? not really sure what it would have been called originally because I have renamed a lot of stuff to make more sense to me you can click on stuff in CTC to bring up the editing controls for that element. since everything operates in layers, if some other element is on top of what you are trying to select, you would select the top most element. so to click on elements in layers that lower in the layer stack, you can try hiding or locking the ones that are higher up. I think it is a lock icon (like a typical MasterLock key lock) for locking elements. And it is an eyeball icon for making an element visible/invisible. you can toggle these icons on/off as you wish. this would also help you identify what you see in the theme is what element, and therefore what specific element needs adjustments. locked and invisible elements allow you to click on stuff that are lower in the layer stack. give it a shot, you'll see what I mean once you try it because I'm guessing my description here sounds a little funny lol
-
I'm not sure exactly what bit of code change that created this issue, most of this WPF/XML stuff is over my head honestly lol. But I can say with certainty it is related to you using CTC 3.1.5 but it can be mitigated with adjustments! The timing/execution of anything tied to the "update during selection" or "update after selection" radio bubbles behave different between older CTC versions (2.5.5 and prior) and more recent 3.X.X+ versions. I made a post about it a few posts back and on the previous page detailing how I made adjustments to get all this stuff back in sync with each other. I know of no way to get an older version of CTC and the older version is not as good anyways. Slower, less features kinda thing. I prefer using the newest version so I took it upon myself to make the adjustments to restore the original intended look of the theme. If you get stuck with the adjustments, come back and I'll see what I can do to help.
-
I have a feeling this is related to using the CTC files which were designed in CTC v2.3 but you would be using a newer version of CTC I bet v3.1.5 ? can you confirm which version of CTC you are using?
-
well one of them finally made it through! as Luigi would say....."yahoo!" https://gamesdb.launchbox-app.com/games/details/404505-luigis-mansion-2-hd
-
when any AHK script is running there should be a tray icon visible. double click on it to bring up a window, it will default to showing all the most recent lines executed by the script. it's very useful for troubleshooting. Seems the Return got removed so it is triggering the Esc hotkey / ExitRoutine when you execute the MButton hotkey. So change it to this, just adding Return after all of it ;Start Button $MButton:: { send {LButton down} sleep, 60 send {MButton down} sleep, 20 send {MButton up} sleep, 60 send {LButton up} } Return
-
went to add it to my library over the weekend and it was not there. I set my entry up but didn't feel like going through the trouble with DB submission, I assumed someone else would take the task on. it's def not coming up in any database search still. it doesn't exist in the LB database as far as I can tell. assuming you had everything correct for the submission, then the folks rejecting it need to quit that and instead approve it.
-
hi @cybermat my experience is different than yours. consider what we are doing with this profile setting. we turn VRR off for a single program, Big Box. it has no impact on any other program or game and its use of VRR. this is the point of making it a profile adjustment, rather than a global adjustment. I use a variety of emulators and play many storefront games all being launched from Big Box and VRR works as expected for everything else. I've never had an issue with VRR engaging when a game is launched from Big Box, even when VRR is disabled for just Big Box through a game profile in AMD Radeon Settings. edit: test with a modern game that is going to push your GPU. prove to yourself that VRR doesn't work if you launched a modern game from Big Box that cannot run at the max Hz of your display. the old consoles you mention can run on a low spec potato system. VRR isn't really very helpful there since they should be at their max FPS output the whole time. you could enable v-sync and get the same benefit which is just preventing screen tearing. unless you're getting screen tearing on these NES/SNES/Genesis games then VRR is working (assuming v-sync is off too.....if v-sync is on then turn that off to make sure VRR is engaged)
-
excellent news. glad to hear the issue is identified and good luck with the new build!
-
I've never used the full set importer but as far as I know you need to have the actual full set of ROMs to use that option so I would hazard a guess what you got is incomplete one way or the other. if you didn't intend on importing a full set, then use the standard import wizard and it will go ok, it doesn't care if you have a full set or not. So it sounds like your structure is like this? ROMS = \ROMS\MAME ROMS\ROMS CHDS = \ROMS\MAME ROMS\CHDS By default MAME looks for CHDs in a different spot. You should set up the folder structure like this format ROMS = \ROMS\MAME ROMS CHDS = \ROMS\MAME ROMS\<CHD GAME NAME> CHDs by default need to go in a subfolder where the zip file is, using the same name as their zip file. I'll use Blitz as an example ROMS = \ROMS\MAME ROMS\blitz.zip CHDS = \ROMS\MAME ROMS\Blitz\blitz.chd If you follow this structure MAME will find the CHDs by default. alternatively they can go anywhere, but you would need to setup the custom path in the MAME.ini
-
it is correct. Retroarch changed it at some point though so you're on an different version is all. You must have a version that uses Settings > On-Screen Display > On-Screen Overlay. that was the whole problem correct? that you had overlays off? overlays should automatically load up now with games that have them as long as overlays are turned on in your default config. that comment was me trying to say unless you're using the "save on exit" option (not recommend from me, personally I turn that OFF because you will at some point accidentally save a setting you didn't want to change) then anytime you make any changes you need to save them before exiting. but at this point you shouldn't need to make any saves or changes as the bezel project would have created all the proper config files and overrides etc. essentially I was saying if you selected the specific config to have the game overlay display, you would have needed to save an override so it automatically loads on future boots of that game. otherwise as you already know you would need redo it every boot.
-
yes, that is intended for such situations. you can delete games, or a whole platform, or your entire library in LaunchBox and all the images and videos will stay in tact. so when you reimport games, the media will link right back to up to them with no further user input. if you end up reimporting less games than you original had or end up using less images/videos this time around, you can use the clean up media tool to help deleting unused media to free up space you do not necessarily need to remove MAME from your emulator list to update it to a new version. but if you got a new version of MAME you would at the very least need to update it's application path in the emulator list, assuming the file has a different name or folder path. if the new MAME version has the exact same file name and path, you wouldn't need to change anything in the emulator list. so you don't need to delete the emulator to clear games and reimport them. you can delete the games out of the platform, and then reimport the newer set just as you did the older ROM set. I would just edit the emulator in the emulator list, if needed, rather than set it up from scratch again I'm guessing you mean MAME controller stuff? that would be stored in the emulator's folder and likely is going to be saved on a per game basis. you would need to copy those config files over to the newer MAME version When I want to update an emulator I do not delete the current version right away. I instead rename its folder. Say going from "MAME" to "MAME OLD". Then I get the new version setup using the same folder name as the "old" one, so "MAME" in this ex. Then test out the new version, make sure it is working as intended. Once you feel confident everything is setup OK you can then delete the "MAME OLD" version. The folder renaming gives you chance to grab files out of the old version and bring them to the new one. It also reassures the new version is working properly and isn't only working due to the "old" version still existing due to the new version using default paths for stuff that are actually part of the "old" version.