
.png.d63b88dc3d5c6db8803dfbd996ce65fc.png)
JoeViking245
-
Posts
5,299 -
Joined
-
Last visited
-
Days Won
38
Content Type
Profiles
Forums
Articles
Downloads
Gallery
Blogs
Everything posted by JoeViking245
-
.thumb.png.c9faf450e4d2b690a819048b18173f61.png) [try] Look in /LaunchBox/Videos/Windows/Trailer/. If there are videos in there, move them to /LaunchBox/Videos/Steam/Trailer/.
[try] Look in /LaunchBox/Videos/Windows/Trailer/. If there are videos in there, move them to /LaunchBox/Videos/Steam/Trailer/. -
May want to check the Downloads section. Though it says "Genesis", there is some Mega Drive stuff mixed in there. Sega Genesis - LaunchBox Community Forums
-
MAME DATs Viewer
JoeViking245 replied to JoeViking245's topic in Third-Party Applications and Plugins (Released)
Thanks for letting me know. Arcade-History has readded the "Verify you are human" feature to their webpage, making it impossible to check/download updates via code. Even with all the AI shtuff going on, code is still "not human". So you will need to check/download history.xml manually, as a human. To check for and download history.xml updates: Open your web browser to https://www.arcade-history.com/index.php?page=download Once 'verified', click Download Ver. 2.xx (where "xx" is the updated version number) Once downloaded, open the zip file Go into the zips history folder Extract (copy) history.xml into the plugins Data folder, replacing the existing file e.g. D:\LaunchBox\Plugins\MAMEdatsViewer\Data\history.xml
-
Problem with thumbnail image of list details bar (right)
JoeViking245 replied to DeCeballos's topic in Troubleshooting
(pretty sure) The default images in the Game Details panel for both Last and Most Played 1st looks for Background images, then Screenshots. Verify that your last played game has a Background ["category"] image. The "Banner" you're seeing might actually be a "Fanart-Background" image (as Banner is not a default selected type under Backgrounds). You can see/change what image types fall under "Background" via Tools < Options < Media < Background Priorities. -
I wasn't discounting that at all. My point was the appreciation of the time we all spend making our LaunchBox collection the most enjoyable it can be. Then when new features like this come about, even more time is spent. But the outcome makes playing that much more fun.
-
Nice. Considering the time it took to create the backups of your personal collection, 7-9 hours is a drop-in-the-bucket.
-
Games load normally in Retroarch but won't launch in LB
JoeViking245 replied to Xerosting's topic in Troubleshooting
Sounds like a Apple/Macintosh file naming convention. -
Did you actually start the 'game' directly from Xemu before exiting? Because it's not indicating a file (game) was started. Sure you are. You noticed the commas. Edit your KOF 2003 game in LB that you're testing with and verify the path (and more so, the filename) to the ROM in the Launching section. King of Fighters 2003,, The (USA,, Japan).iso vs. King of Fighters 2003, The (USA, Japan).iso
-
Games load normally in Retroarch but won't launch in LB
JoeViking245 replied to Xerosting's topic in Troubleshooting
To help determine what's going on, in LaunchBox can you share some screenshots: - edit your emulator (in LaunchBox) and share a screenshot of - the Details section - and the Associated Platforms section. - edit [just] one of the games not launching from LB and share a screenshot of - Launching section -
Try... Run KOF 2003 directly through Xemu. Exit In your Xemu emulator folder rename the file xemu.log to [something like] xemu-direct.log Launch KOF 2003 from LB Exit [the game] In your Xemu emulator folder rename the [the new] xemu.log file to [something like] xemu-LB.log Compare the 2 files and see what (if anything) is different You'll probably want to break down the 1st line**, as it's one long arse line. And can probably ignore the lines below it after comparing (at least) the 2 "xemu_settings_get...." lines. ** break down to something readable. e.g. Created QEMU launch parameters: D:\LaunchBox\Emulators\Xemu\xemu.exe -machine xbox,bootrom=D:\LaunchBox\Emulators\Xemu\bios\mcpx_1.0.bin,kernel-irqchip=off,avpack=hdtv -device smbus-storage,file=D:\LaunchBox\Emulators\Xemu\eeprom.bin -bios D:\LaunchBox\Emulators\Xemu\bios\complex_4627v1.03.bin -m 64 -drive index=0,media=disk,file=D:\LaunchBox\Emulators\Xemu\saves\xbox_hdd.qcow2,locked=on -drive index=1,media=cdrom,file=D:\LaunchBox\Games\Microsoft Xbox\Disney's The Haunted Mansion (USA).iso -display xemu -device usb-hub,port=1,ports=4 -full-screen
-
Visual Pinball X – Top Scores (hiscore) Viewer
JoeViking245 commented on JoeViking245's file in Third-party Apps and Plugins
 @Elmo80 @Sbaby A note from DNA Distributer RE: the new release 3.6.8
 -
Visual Pinball X – Top Scores (hiscore) Viewer
JoeViking245 commented on JoeViking245's file in Third-party Apps and Plugins
Not sure off hand. But in the ini file, I believe there is a setting to not have it popup, so you don't have to press L (which BTW, can be assigned to a different character if you'd like). -
It looks like you might have 2 spaces in Vol. 1 (could be wrong). Try adding a space [also] for Vol. 2. That way you should have the first 3 'correct' and then look at their order. Currently, the sort order appears correct because a {space} (e.g. {space}10) does come before an alphanumeric character (e.g. {no-space}2).
-
Visual Pinball X – Top Scores (hiscore) Viewer
JoeViking245 commented on JoeViking245's file in Third-party Apps and Plugins
Wow, that was like just released. Be sure to follow the instructions about the ini file. The new ShowBoard looks like it'd be pretty cool on a pincab! -
He was referring to setting the Sort Title for the games. But looking at your screenshot, your game Titles are different than what you said they were in your OP. ACA NEOGEO Selection Vol. 1 ACA NEOGEO Selection Vol.1 You screenshot has no space between Vol. and 1, giving you a different type of sort order. So you have (at least) 2 options. You can set the Sort Title as C-Beats mentioned. Or you can change the games actual Title similar to what you mentioned, but just add a space instead.
-
(Bulk) Add Additional Applications
JoeViking245 commented on JoeViking245's file in Third-party Apps and Plugins
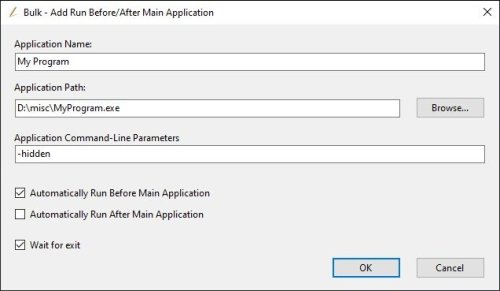 Ahh.. I see what you're saying now. The 2.0 version on this page. vs. its successor (the other plugin) that's listed currently as version 1.2.0. Sometimes I keep 2 versions of a [single] plugin in its' download section when I do a major update. So I was thinking this one was a similar case. The one on this page (2.0) may very not work at all. The issue with the other plugin (1.2.0) should be posted in its own page. As you can see, I get confused between the 4 or 5 (or is that 45?) plugins I've released and keeping them sorted on their own page is what's barely keeping my sanity alive.
 -
(Bulk) Add Additional Applications
JoeViking245 commented on JoeViking245's file in Third-party Apps and Plugins
Very top of this page... (and sounds like "for now" has expired. ) (July 10, 2023) This plugin is no longer supported. But [for now] still works. Please see its successor: Bulk Add/Remove Additional Applications -
Maps and text passwords - What do i do with them?
JoeViking245 replied to Shredder_guitar's topic in Game Media
[devil's advocate] Would you do the same with pdf's? vs. [both of these] having their respective reader apps installed on your system. Granted, having them 'installed' would negate the portability aspect of LB/BB. Devil be damned. So your request would/could be, (something like...) when loading the Pause Menu, have LB look at the Additional Apps Application Path's file extension to determine if it should be added to the Menu (like it currently does). But then if the Additional App uses an emulator, don't negate it based on that. But rather look at the ROM Path's (which was called the Application Path before checking Use Emulator) file extension and proceed accordingly. -
Maps and text passwords - What do i do with them?
JoeViking245 replied to Shredder_guitar's topic in Game Media
Additional Apps that are executables ([with the exception of batch files] or use an emulator) are considered Alternate Versions. To expand on the Feature Request, you'd need a checkbox [or something] to distinguish between it being an Alternate Version, or otherwise. From some old notes.... Additional Apps that show in Game Details .txt .pdf .cbr .cbz .html docx https//..../ http//..../ According to this list, you can add your comic book zip files as Additional Apps to appear in at least in the games Details Panel. As we discovered earlier, .txt files won't show in the Pause Menu. And this may simply be an oversight. [tested] .docx (MS Word docs) won't appear there either. So the cbr and cbx most likely won't either. We do that web links will appear in the Pause Menu. Personally, I'm still not sold on having batch files in the Pause Menu is a means to an end. But someone in need making a Feature Request to add txt, cbr/cbz files to it seems quite reasonable. Also, keep in mind, the number of the added documents to the Pause Menu is limited to the available real-estate in its UI. So do you add an additional checkbox to show/not-show in the Pause Menu? -
Maps and text passwords - What do i do with them?
JoeViking245 replied to Shredder_guitar's topic in Game Media
So, your game's Manual Path points to a batch file? Just tested and it does work (except of course from the Pause Menu). You can only set one Manual path per game. Hence your batch file to allow opening several docs/pdf's/images etc. at once. If you have several docs (e.g. Strategy Guide, User Guide, Reference Card, Tips & Tricks) per game, chances are you really only want to open one of those. Rather that all-of-them-at-once. This is where Additional Apps come in handy. Note, in BB you do have the option to not use its built-in PDF viewer.
-
Visual Pinball X – Top Scores (hiscore) Viewer
JoeViking245 commented on JoeViking245's file in Third-party Apps and Plugins
Thanks! I not good enough to get high scores to know. 😊 I know @Sbaby has gotten good at this. Maybe they can chime in with some ideas. -
You might ask on the Sinden Discord page if anyone's found a good way to automate that. I couldn't find anything that appeared to work for toggling enhance pointer precision. But I'm sure there's something out there. For mouse speed, you can run this in a script. Set the 2nd to last number to your desired speed. My default is 15. Hint: that's the number to change. ; Sets mouse speed 1 (slowest) to 20 (fastest) DllCall("SystemParametersInfo", UInt, 0x71, UInt, 0, UInt, 15, UInt, 0) To see what your current mouse speed setting (so you know what to set it back to), run this: DllCall("SystemParametersInfo", UInt, 0x70, UInt, 0, UIntP, MouseSpeed, UInt, 0) MsgBox, Current Mouse Speed is %MouseSpeed% ; 1-20
-
Maps and text passwords - What do i do with them?
JoeViking245 replied to Shredder_guitar's topic in Game Media
No idea what cbz is. The interweb says something about banking and stocks. But have a feeling that's not what you're referring to. Regardless, Feature Requests can always be made, top of this page, under Help & Support. Another option for the images is... Create a new emulator that the app path points to C:\Windows\explorer.exe Name it what you want Add an Associated Platform. Any platform. Just don't make it default Save and close Edit your game (e.g. Alien Syndrome) Add an Additional App Check the box Use Emulator and select the one you created above for the apps "ROM path", type in the full path to your stage maps folder Click OK to save and close. Caveat: you can only access this via right-click the game, click Play Version and select the "Additional App". But it will open the folder containing the images. -
50's pretty close to the # I posted above. And is way better than 640. The CHD's infrequently update. You may very well be able to use the 0.280 CHD's with MAME 0.286.
-
Maps and text passwords - What do i do with them?
JoeViking245 replied to Shredder_guitar's topic in Game Media
Nope. Just a link to a .pdf or web link as shown above. When I said '[At least] pdf files (and web links) will appear in the pause menu`, I failed to mention .txt files will not appear in the Pause Menu. But they will in the game Details Panel.
.thumb.png.c9faf450e4d2b690a819048b18173f61.png)


