
.png.d63b88dc3d5c6db8803dfbd996ce65fc.png)
JoeViking245
-
Posts
5,282 -
Joined
-
Last visited
-
Days Won
38
Content Type
Profiles
Forums
Articles
Downloads
Gallery
Blogs
Everything posted by JoeViking245
-
.thumb.png.c9faf450e4d2b690a819048b18173f61.png)
RetroArch command line loading options files?
JoeViking245 replied to crusadeRGP's topic in Emulation
The above shows using --appendconfig{space} vs. --appendconfig=. -
MAME (Arcade) - What's New
JoeViking245 replied to JoeViking245's topic in Third-Party Applications and Plugins (Released)
Glad that worked. I'll add to my to-do list to check the code about cross-checking that file and updating it as necessary. (although I thought I did. 😊) -
MAME (Arcade) - What's New
JoeViking245 replied to JoeViking245's topic in Third-Party Applications and Plugins (Released)
Try: Exit LaunchBox Go to the plugins' folder and the delete the file ADBcategories.json Start LaunchBox Try the plugin again -
MAME (Arcade) - What's New
JoeViking245 replied to JoeViking245's topic in Third-Party Applications and Plugins (Released)
Not sure what's going on then. Are you on v1.0.1? It should show when it loads, that MAME is 0.287 and ADB has 0.287 data. Then if you type in 0.287 (be sure to have the zero in front. Otherwise you'll get a message "The release number is not a valid #") and press enter, the 11 games should then populate. When you press enter after inputting the release number, the plugin gets data direct from ADB website. aka, the plugin doesn't store data. If there's a connection issue with ADB, then that'd cause a problem. But you'd know if there was because there wouldn't be a number next to Latest available from ADB. Is it showing a number there? Above that, is it showing a Total Arcade Games number? Are you getting any error messages?
-
MAME (Arcade) - What's New
JoeViking245 replied to JoeViking245's topic in Third-Party Applications and Plugins (Released)
Usually within about 2 seconds. Or however long it takes your internet to check MAME's Github site for their current version and to check the Arcade Database site for the version it has data for. Is it showing that the Latest MAME Release is something other than 0.287? Can you share a screen shot? example stock photo
-
There is a fix in place in the latest beta release (13.27-beta-3) that is requesting some end-user "stress testing".
-
Most likely it's a beta thing (e.g. version numbering) that gets resolved with the official release. (@faeran?) Installed ones will (pretty sure) always have the repair option available. (Option "B" would be, if there's an issue with a particular integration plugin, tell you to close LB, delete the folder, then restart LB. This way it's "right at your fingertips". )
-
I believe the "check marks" would show something different if they weren't up to date. Also, LaunchBox will look for and find plugins recursively within the /Plugins/ folder structure. That is, it will dig through subfolders looking for plugin files. Try moving your BAK folder to somewhere outside of the LaunchBox folder structure.
-
MAME DATs Viewer
JoeViking245 replied to JoeViking245's topic in Third-Party Applications and Plugins (Released)
Thanks for letting me know. I had some other behind-the-scenes changes ready and now also changed how it looks at the version in the xml file. A new version had been uploaded.- 7 replies
-
- 1
-

-
- command.dat
- gameinit.dat
- (and 2 more)
-
To help the developers better help you, what version of LaunchBox/Big Box are you using?
-
You can map your controller buttons to exit the games. Note, they are separate mappings between LaunchBox and Big Box. (as in, you have to map them in each app separately.) LaunchBox Tools < Options < Game Controllers < Mappings "Exit Game" Big Box System Menu < Options < Controller Mappings "Close the Active Window" ("Exit" is for exiting Big Box)
-
Double check you're in the main [middle] panel (e.g. click a game), then start typing. Tested in both Default and Omni themes in beta-2 and is still working here.
-
 This emulator has a toolbar that doesn't seem to natively be able to be removed when windowed. In BezelLauncher Setup, select your platform then emulator. Click the Test button and set the frame to the bezel per the instructions. Then stretch the window so that the top Y value is set to -5 (negative five). This will "push" the top menu bar off screen (or pretty close. Can play with the values.). If you see side and bottom borders, you can stretch them slightly behind the bezel and/or below the bottom. Respectively. Be sure to click Save before closing the resizing window.
 -
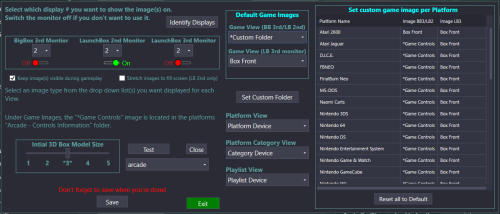 Thank you. Changing the image shown via a button (or keyboard) press without changing the selected game you're looking at would be a little more involved than I'd like to get for this plugin. You might try looking at the ThirdScreen plugin and see if something like that is possible with it.
 -
Is the game showing fullscreen when it does load? Or windowed? Be sure to remove --fullscreen from the Default Command-line Parameters. Also make sure there's nothing there in the Associated Platforms section as well. Is there anything in the Running Script section that sends the hotkey F11? (toggle fullscreen [default]) Did some testing and the only I could get it to hide the bezel is when --fullscreen was present in the command-line parameters. I could also get it to hide when pressing F11. Pressing it again makes it reappear. If it's still getting hidden ('disappearing') after loading a game, try pressing F11. If that makes the bezel appear, then somewhere/somehow your emulator is starting in fullscreen mode.
-
Update to handling CHD paths using LaunchBox's built-in parameters and negating the need to edit mame.ini. When your CHD folders are not subfolders of where your [regular] ROMs are located: Example: G:\Roms\MAME\MAME 0.287 ROMs (non-merged)\area51.zip G:\Roms\MAME\MAME 0.287 CHDs (merged)\area51\area51.chd In LaunchBox, edit your MAME emulator. The default command-line parameters should already contain -rompath %romlocation%. Attach to that, a semi-colon, a double-quote mark, the full path to your CHD folder and another double-quote mark. That part of the command-line parameters in this example will now look like this: -rompath %romlocation%;"G:\Roms\MAME\MAME 0.287 CHDs (merged)" Do not add any spaces before or after the simi-colon nor quotes. Also, no trailing-slash at the end of your CHD path. All thanks go to @faeran who messaged me this Unusual Gem saying, "Another way to handle this... separate paths with a semi-colon". (a kind-of Homer Simpson forehead-slap, "doh" moment. Of course this works! )
-
This link's broken.
-
Lol. Ok point taken. You have way more platforms than I do. But the ones not working does better give something for the developers to look at.
-
It's more of an emulator setup issue than a frontend issue. The emulators I use with my Gun4IR are Demul, Flycast, Model2 (emulator.exe) and [standalone] MAME. I don't use TeknoParrot, but do have a couple games using JConfig. Then alongside these, I use DemulShooter (where applicable), LUA scripts for MAME and QMamehook.
-
Did you remove -rompath %romlocation% from the command-line parameters? (Tools-Manage Emulators-Edit [MAME])
-
Assuming you're referring to MAME, yes. (be sure to read the entire post)
-
The lightgun I believe should be being seen as a mouse. When mapping the trigger and buttons (aka left/middle/right clicks) try pointing the gun at the screen when pressing them. Specific lightgun & emulator software pending, if you're not aiming the screen, the gun thinks you are shooting offscreen and uses different modes. Depending on what you selected in the lightguns' software settings.
-
Would it have been easier to list the ones that don't show achievements?
-
tldr: But here's a how-to guide that Faeran wrote about 2 months ago. Big Box Navigation Sounds - LaunchBox
-
MAME Hi-Score Display - A plugin for BigBox
JoeViking245 commented on JoeViking245's file in Third-party Apps and Plugins
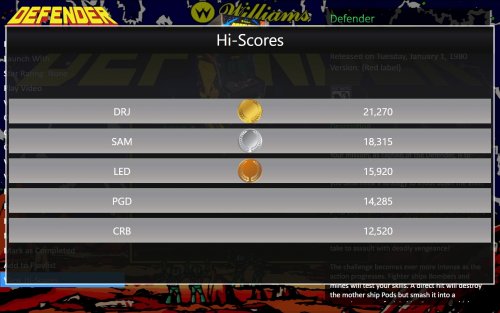 In short, no. This plugin gets the high score data directly from the games' high score file. No data is saved by the plugin. To add players initials for machines that don't keep track of them would be (initially thinking) a nightmare. Basically, an external app that you load up, extract the high score numbers from the hi file, manually add the players initials to the corresponding scores (if you go this far, you could add their full name, maybe even throw in a date and time), then save that to a file. From there, you could then parse 'that file'. That said, this would not be impossible. Could make it "automagical" similar to how DnaDistributer does his PINemHi leaderboard for Visual Pinball tables. Regardless, it's not something I'm not willing to tackle.
.thumb.png.c9faf450e4d2b690a819048b18173f61.png)


