-
Posts
2,960 -
Joined
-
Last visited
-
Days Won
25
Content Type
Profiles
Forums
Articles
Downloads
Gallery
Blogs
Everything posted by JoeViking245
-
If you edit one of those games, does it have a corresponding LaunchBox DB ID #?
-
Oh. I didn't test it. It just "looked good on paper". lol Create a Playlist then as Retro808 suggests. Then tell it to include the Platforms you want. You have to manually type the Value. So make sure you spell it correctly. Then in BigBox, choose View Playlists.
-
.thumb.png.c9faf450e4d2b690a819048b18173f61.png)
RPCS3 big box dual screen script issues
JoeViking245 replied to klwolf2000's topic in Troubleshooting
Absolutely. WinWaitActive, ahk_exe rpcs3.exe Send #+{Right} ;Send Win+Shift+Right Send, !{Enter} ;Send Alt+Enter -
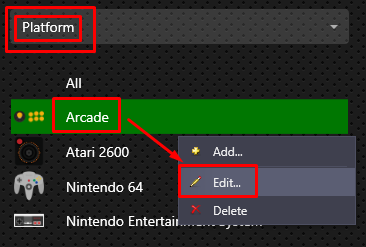
Go into BigBox's System Menu and select View Platform Categories. But you need to, in LaunchBox, when adding your Platforms to a Platform Category, is make sure "Root" is unchecked. Otherwise in BigBox, you'll see the Arcade Platform and the Arcade Platform Category. Make sure you're looking at the Platform, then right click, Edit
-
.thumb.png.c9faf450e4d2b690a819048b18173f61.png)
[MAME] Issues with hiscore and ini files location
JoeViking245 replied to exodus_cl's topic in Troubleshooting
I've moved mine to all be in the ini folder only, and high scores get uploaded to LaunchBox fine. Not sure if this is an issue when you were testing, but the default MAME inipath line is inipath .;ini;ini/presets with a period (dot) in front of the 1st semicolon (which represents the root folder). I don't think LaunchBox even looks at the ini files. It may look to see if you have a save state auto loading or cheats enabled. (or actually, probably force those to not load/be enabled). If you tested with some ini files [still] in both MAME's root folder and the ini folder, and have duplicate the_game.ini files in both, that could be an issue too. Just thinking out loud. -
.thumb.png.c9faf450e4d2b690a819048b18173f61.png)
RPCS3 big box dual screen script issues
JoeViking245 replied to klwolf2000's topic in Troubleshooting
Let the script figure out how long to wait. WinWaitActive, ahk_exe rpcs3.exe Send #+{Right} ;Send Win+Shift+Right WinMaximize, ahk_exe rpcs3.exe Then you shouldn't need the Esc routine. (removed above) -
.thumb.png.c9faf450e4d2b690a819048b18173f61.png)
RPCS3 big box dual screen script issues
JoeViking245 replied to klwolf2000's topic in Troubleshooting
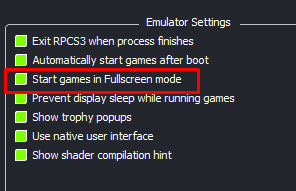
In BigBox, when you set Close the Active Window to Button 7 + Button 1 (or whatever #'s come up for your controller), they need to be pressed in that order. You can add another button combo for that action to help with 'tired fingers'. Have you tried telling it to start Full Screen in the emulator itself? Although if you're having to move it from the monitors it loads up on, I suppose this doesn't help. 😊 If this script is in your Running Script section of your RPCS3 emulator you setup in LaunchBox, it will work in BigBox as well. You may need to make some adjustments at the top of your script to allow time for RPCS3 to fully load before moving and resizing. Can you share what your script looks like? -
.thumb.png.c9faf450e4d2b690a819048b18173f61.png)
RetroAchievement Badges
JoeViking245 commented on JoeViking245's file in Third-party Apps and Plugins
Yes. I tested with my Platform called Atari 2600 new and no RetroAchievement Badges appeared. As expected. I then went into “/LaunchBox/Plugins/RetroAchBadge/RetroBadge Files” and renamed the Atari 2600 subfolder to Atari 2600 new and all RetroAchievement Badges appeared. As hoped. This leads me to believe that your game Titles are not matching those from RetroAchievements. Which is a known issue (see above). To check this, look at a Platform_Name / Game_Title that you're having issues with. I'll use Atari 2600 / 3-D Tic-Tac-Toe as an example. Go to “/LaunchBox/Plugins/RetroAchBadge/RetroBadge Files/Atari 2600” Is the Platform Name in LaunchBox the same as the subfolder above? Inside the subfolder Atari 2600, look for a text file named "3-D Tic-Tac-Toe.txt" Is the games Title the exact same as the text file (minus ".txt)? If the games Title in LaunchBox is 3D Tic-Tac-Toe, then the RetroAchievement Badge will not show. If the games Title in LaunchBox is 3-D Tic-Tac-Toe (Hack Version), then the RetroAchievement Badge will not show.- 130 comments
-
- retroachivements
- badges
-
(and 1 more)
Tagged with:
-
.thumb.png.c9faf450e4d2b690a819048b18173f61.png)
GameBase database Importer
JoeViking245 replied to JoeViking245's topic in Third-Party Applications and Plugins (Released)
You did this with LaunchBox closed. Correct? And then restarted LaunchBox. If it's still not showing after you've UnBlocked the files placed the folder (with files) in your "E:\LaunchBox\Plugins\ImportGameBase\" folder and restarted LaunchBox Make sure you have Enable Debug Logs checked. (Tools, Options, Debugging) Exit, then restart LaunchBox. Wait for it to completely load. See if it appears in the Tools dropdown menu. If not, Exit LaunchBox, go to your "E:\LaunchBox\Logs\ folder and attach the most recent Debug,,,.log file, here. -
.thumb.png.c9faf450e4d2b690a819048b18173f61.png)
GameBase database Importer
JoeViking245 replied to JoeViking245's topic in Third-Party Applications and Plugins (Released)
It would have shown at the bottom in your image #3. But it's not. Looks like the reason is you unzipped the folder (your image #2) into the ThirdParty folder. If you by chance missed step #2, you can right click on each of the 3 files (shown in your image #2) individually and select Properties and check UnBlock there (if it's not unblocked already). -
@dfsae313231 Here's a post that talks a little about combining Platforms.
-
It's not possible through LaunchBox itself, but you can create a batch file to start your apps and start LaunchBox. Something like @echo off start "" D:\MyApps\App1.exe start "" D:\MyApps\App2.exe start "" D:\LaunchBox\LaunchBox.exe Or do the same thing using an AHK script.
-
In hopes to not confuse matters more... Platform examples would be Arcade, Sega Model 3, Atari 2600, Nintendo 64, Gameboy Advance, Sony PSP, Pinball FX2, Visual Pinball (etc.). Platform Category examples would be: Arcade (consisting of Arcade and Sega Model 3 Platforms) Consoles (consisting of Atari 2600 and Nintendo 64 Platforms) Handhelds (consisting of Gameboy Advance and Sony PSP Platforms) Pinball (consisting of Pinball FX2 and Visual Pinball Platforms) I don't use Platform Categories because (again, this is just me) I prefer to see all the Platforms individually. Let's say I have a desire to play Pinball, I know I want to play something in VPX. So I scroll to "Visual Pinball", select it then select a table. Whereas of I had them in categories, I'd scroll to "Pinball" and select it, then scroll to "Visual Pinball" and select it, then select a table. This is just 1 man's opinion, but I really think what you want to do (what you're wanting to do) is import things into separate Platforms. Like the examples above. Then from there, you can create your Platform Categories, consolidating the various Platforms into a fewer number Categories.
-
That's a personal preference. But that's how my cab's set up. I do have Playlist and Categories. However, I never even look at them. But that's just me. To keep it at 3 like you're wanting to see in BigBox, you may want to stick with Playlists or even better, Platform Categories. (Technically, that's what they are.) But of course, either works. How do you have your Platforms (the basis for all importing) setup? On mine, for Arcade Machines I have for example, separate Platforms for Arcade (using MAME) and Sega Model 3 (using Supermodel). For Pinball Platforms, I have FX2, FX3, Future Pinball and Visual Pinball. For Visual Pinball, I only have 1 VP9 table (Riverboat Gambler). All the rest I've been able to find in VPX. So there's just the 1 Platform for it. Essentially separating them all by emulator (except VP). If you've imported en masse, as an option you could "hide games" you don't want displayed in Big Box, then in Big Box 'don't show hidden games', and only show them in LaunchBox. But again, for how you're wanting to see them in BB, Platform Categories seems to be the way to go. I'll take a look at the plugin and see if it's possible to accommodate Playlists and/or Categories. But don't hold your breath. Until then, Press Select twice to launch your Jukebox.
-
There's a plugin that will do [almost] exactly that. The problem is it was made to be used for Platforms. I'm not sure if it can be adapted to accommodate Playlists.
-
Acorn Electron is not innately part a MAME's 'regular' full set [of Arcade machines]. Thus not included in LaunchBox's MAME full set [Arcade] import wizard. It is however within MAME's softlist (Software List) sets as Neil mentioned. Because of how the 2 are handled differently by MAME, coupled with the fact the 1 is Arcade and the other consists of computers, consoles, handhelds etc., to combine them into the existing full set importer for MAME would become quite convoluted. [For my own personal reference] When you selected RetroArch as your emulator when doing the standard import, was it able to get the proper game Titles? I assume you had MAME softlist roms which are stored using their 'short name'. Or did you have a different set of roms, named accordingly that MAME is able to read/launch? Again, just curious.
-
.thumb.png.c9faf450e4d2b690a819048b18173f61.png)
GameBase database Importer
JoeViking245 replied to JoeViking245's topic in Third-Party Applications and Plugins (Released)
Then you're 2 steps ahead of me. lol At the very top of this page you'll see "View File". Click that. On the page that it takes you to, on the right you'll see "Download this File". Click it. Once you have that downloaded, follow the steps for: and after that.. But I strongly recommend that you read the ENTIRE post first, BEFORE continuing. -
That shouldn't be the issue. I guess maybe backtrack a little and determine what window is taking focus after exiting and game. After the games exits, if you press and hold Alt and then hit TAB once (while still holding Alt), You'll see all open windows and the Active window will be the left most one.
-
As stated, both LB and BB should just regain focus when you exit. Have you tried reassigning the "Quit RetroArch" key in RetroArch itself to F12? Then you wouldn't (shouldn't) need the Running Script at all. Open RetroArch, go to Settings, Input, Hotkeys, and reassign Quit RetroArch. (Just in case it's not already, make sure Confirm Quit is set to Off.) During game play, are you Alt-Tabbing to another window? That could screw up the window order making WinActivateBottom grab the wrong window. BB could still be "Active", but may not "have focus".
-
To compile the AutoHotkey script you need to have the full AutoHotkey program installed on your system. Alternately, when you create your 'new emulator', instead of pointing to a compiled AHK script (script_name.exe), you can use the AutoHotkey executable that comes bundled with LaunchBox and directly use your uncompiled script_name.ahk. Here's a little how-to do this. See the part "Add the "new" Emulator:". (You can skip the end part regarding the Startup Screen.)
-
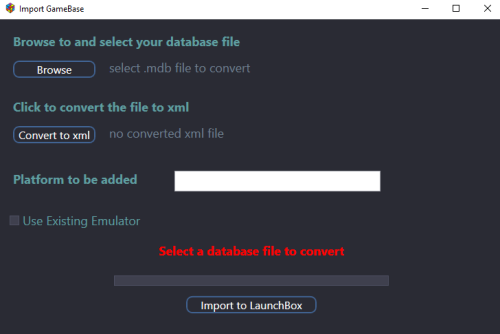
GameBase database Importer View File GameBase database Importer Import games and metadata from GameBase database file(s) into LaunchBox. Based on information in your GameBase database file(s), this plugin will: Create a new Platform Add games to the new Platform Add game “Extras” as Additional Applications Add available information to each game: Metadata Title Release Date Genre Developer Play Mode Max Players Platform Publisher Favorite (check box) Media Game Manual Path Image Game Screenshot Launching Full Application Path to files If you’re not familiar with GameBase, you can check it out here: https://www.bu22.com Also check out their forums for more complete and updated databases. Installing the plugin Download the plugin Unblock “ImportGameBase.zip” by right clicking the file and checking “Unblock” and clicking “OK” Open the zip file and copy the folder (containing 3 files) into /LaunchBox/Plugins/ (For those who braved testing the beta release, delete that copy of the plugin first.) Using the plugin* Start LaunchBox Select Tools, Import GameBase Click Browse and navigate to your GameBase database folder and select the database file (i.e. “Amstrad CPC.mdb”) Click Convert to xml (may take a couple seconds) (Optional) rename the Platform to be added (Optional, but recommended) Select an emulator to use with the games being imported** Click Import to LB Once you’ve clicked Import, you’re stuck until it’s done importing! This will 1st import the games and Extras into the Platform then copy Screenshot images (if they exist) When importing, DO NOT attempt to multi-task in LaunchBox!! Just sit back and let it do its thing. Once it’s done, close the plugin window. * If you plan to use an emulator already setup in GameBase, setup the “GBLaunch” emulator in LaunchBox BEFORE running the plugin. (See Using GameBase Emulators below). Some kind of important stuff: You need to have your own GameBase database file(s), ROMs, images and manuals. You need to have your databases setup in GameBase BEFORE attempting to import. Namely setting up the Paths to the ROMs, Screenshots and Extras. To make use of the emulators through GameBase, those need to be already setup AND working. You can only import into a new Platform. The Platform will not be setup to “Scrape As...”, so you’ll need to set that yourself for when you use LaunchBox to import images***. If a database you plan to import into LaunchBox doesn’t work in GameBase, it WILL NOT magically work in LaunchBox. No files will be moved, copied (except Screenshots***) or altered in your existing GameBase installation folder(s). All games and Extras imported will point to their current location in your GameBase directory. **Setting up an emulator Since GameBase pretty much sets up the emulators for you through exhaustive scripts they’ve created, it makes sense to use those. This is easily done by using GBLauncher.exe (included with GameBase). However to access game ROMs that are located in game “Extras”, you’ll need to have GBLauncher2.exe. The other option is to setup and use your own emulator in LaunchBox. Example: RetroArch for SuperNESBase. Using GameBase Emulators You need to add 2 files to your GameBase root folder. GBLauncher2.exe and GBLaunch.ahk. Download and unzip GBLauncher2.exe and place it in your GameBase root folder. “Unblock” the file the same way as in step 2 - Installing the plugin. You can download it from here: http://www.gb64.com/forum/viewtopic.php?t=5653. Copy (or move) GBLaunch.ahk (included with the plugin) into your GameBase root folder. In LaunchBox, 1. Click Tools, Manage, Emulators… 2. Click Add 3. Give it an Emulator Name: Example: GBLaunch (But can be any name you want) 4. In Application Path: Click Browse and navigate to /LaunchBox/ThirdParty/AutoHotkey/ and select AutoHotkey.exe 5. In Default Command-Line Parameters:, type in GBLaunch.ahk 6. Now go to Associated Platforms and select an existing Platform (i.e. Atari 2600). It doesn’t matter which one. But DO NOT check Default Emulator!! You can also just type in a name like “airplane”. It doesn’t matter, as long as something is in there. 7. Click OK to save and exit. When you run the plugin, check Use Existing Emulator. "GBLaunch" (or whatever you ended up naming it in step #3) will automatically be selected. Using your own Emulator(s) These do not necessarily need to be setup in LaunchBox prior to importing. If using emulators you already have setup in LaunchBox, in the plugin, check Use Existing Emulator and select it from the dropdown list. This will automatically assign the Associated Platform to that emulator and set it as the Default Emulator for this platform. In either case, you may need to edit the emulator and assign any Default Command-Line Parameters: and in the case of RetroArch, you will need to assign the Core and Extra Command-Line Parameters (if needed). ***GameBase Images The only game images this plugin will touch are game Screenshots. The available Screenshots will be copied into the Platforms’ "Screenshot - Gameplay" folder. Any other images (box art, flyers etc.) that a database may have will not be handled by this plugin in any way, shape or form. These other images are stored too inconsistently among the various databases with respect to the folders they reside in. To add other images from the database into LaunchBox, you’ll need to copy them from the respective database folder to the corresponding LaunchBox/Images folder. For example, Box – Front images (as LaunchBox sees them) would come from: Vic20_v03 \Extras\Cover\Cart Box\Front\ Amiga 2.3 \Extras\Cover Scans\[letter or number]\ SuperNESBase \Extras\Boxart - Front\[country]\[letter or number]\ …and copied into /LaunchBox/Images/platform_name/Box – Front/ (It’s recommended you close LaunchBox prior to copying the images) Disclaimer I don’t use GameBase myself. I only know how to get the database to Import into LaunchBox. So that part I know works. 😎 If you need any help getting GameBase setup with databases and emulators they use, or setting up your own emulator(s) in LaunchBox for use with the database ROMs, ask somewhere else. These go far beyond the scope of this plugin and my personal knowledgebase. Only a select few databases have been tested. So I imagine some refinements will need to be made to accommodate other databases. Accommodations considered will be in the form of ROMs that are listed as a games “Extras”. Examples: Extras using “WHDLoad” in Amiga 2.3. And “TAP” and “Cart” in Vic20_v03. Special Thanks Huge thanks goes to @dillonm for all your time and patience. Dillon was instrumental in teaching me how GameBase works and without hesitation, took time to do testing, retesting and testing once again. Without Dillon’s guidance, contributions and willingness to help, this plugin would still be sitting in beta collecting dust. Thanks Dillon!! As always, any and all comments and suggestions are welcomed. All reasonable requests (‘reasonable’ as determined by management) will be considered. Submitter JoeViking245 Submitted 03/11/2022 Category Third-party Apps and Plugins
-
Version 1.0.0
325 downloads
GameBase database Importer Import games and metadata from GameBase database file(s) into LaunchBox. Based on information in your GameBase database file(s), this plugin will: Create a new Platform Add games to the new Platform Add game “Extras” as Additional Applications Add available information to each game: Metadata Title Release Date Genre Developer Play Mode Max Players Platform Publisher Favorite (check box) Media Game Manual Path Image Game Screenshot Launching Full Application Path to files If you’re not familiar with GameBase, you can check it out here: https://www.bu22.com Also check out their forums for more complete and updated databases. Installing the plugin Download the plugin Unblock “ImportGameBase.zip” by right clicking the file and checking “Unblock” and clicking “OK” Open the zip file and copy the folder (containing 3 files) into /LaunchBox/Plugins/ (For those who braved testing the beta release, delete that copy of the plugin first.) Using the plugin* Start LaunchBox Select Tools, Import GameBase Click Browse and navigate to your GameBase database folder and select the database file (i.e. “Amstrad CPC.mdb”) Click Convert to xml (may take a couple seconds) (Optional) rename the Platform to be added (Optional, but recommended) Select an emulator to use with the games being imported** Click Import to LB Once you’ve clicked Import, you’re stuck until it’s done importing! This will 1st import the games and Extras into the Platform then copy Screenshot images (if they exist) When importing, DO NOT attempt to multi-task in LaunchBox!! Just sit back and let it do its thing. Once it’s done, close the plugin window. * If you plan to use an emulator already setup in GameBase, setup the “GBLaunch” emulator in LaunchBox BEFORE running the plugin. (See Using GameBase Emulators below). Some kind of important stuff: You need to have your own GameBase database file(s), ROMs, images and manuals. You need to have your databases setup in GameBase BEFORE attempting to import. Namely setting up the Paths to the ROMs, Screenshots and Extras. To make use of the emulators through GameBase, those need to be already setup AND working. You can only import into a new Platform. The Platform will not be setup to “Scrape As...”, so you’ll need to set that yourself for when you use LaunchBox to import images***. If a database you plan to import into LaunchBox doesn’t work in GameBase, it WILL NOT magically work in LaunchBox. No files will be moved, copied (except Screenshots***) or altered in your existing GameBase installation folder(s). All games and Extras imported will point to their current location in your GameBase directory. **Setting up an emulator Since GameBase pretty much sets up the emulators for you through exhaustive scripts they’ve created, it makes sense to use those. This is easily done by using GBLauncher.exe (included with GameBase). However to access game ROMs that are located in game “Extras”, you’ll need to have GBLauncher2.exe. The other option is to setup and use your own emulator in LaunchBox. Example: RetroArch for SuperNESBase. Using GameBase Emulators You need to add 2 files to your GameBase root folder. GBLauncher2.exe and GBLaunch.ahk. Download and unzip GBLauncher2.exe and place it in your GameBase root folder. “Unblock” the file the same way as in step 2 - Installing the plugin. You can download it from here: http://www.gb64.com/forum/viewtopic.php?t=5653. UPDATE Oct. 22, 2023 The file in the above link appears to now be corrupt (bad CRC). An archived version of the file can be found here. Thanks @GreatGuy for the heads up! Copy (or move) GBLaunch.ahk (included with the plugin) into your GameBase root folder. In LaunchBox, 1. Click Tools, Manage, Emulators… 2. Click Add 3. Give it an Emulator Name: Example: GBLaunch (But can be any name you want) 4. In Application Path: Click Browse and navigate to /LaunchBox/ThirdParty/AutoHotkey/ and select AutoHotkey.exe 5. In Default Command-Line Parameters:, type in GBLaunch.ahk 6. Now go to Associated Platforms and select an existing Platform (i.e. Atari 2600). It doesn’t matter which one. But DO NOT check Default Emulator!! You can also just type in a name like “airplane”. It doesn’t matter, as long as something is in there. 7. Click OK to save and exit. When you run the plugin, check Use Existing Emulator. "GBLaunch" (or whatever you ended up naming it in step #3) will automatically be selected. Using your own Emulator(s) These do not necessarily need to be setup in LaunchBox prior to importing. If using emulators you already have setup in LaunchBox, in the plugin, check Use Existing Emulator and select it from the dropdown list. This will automatically assign the Associated Platform to that emulator and set it as the Default Emulator for this platform. In either case, you may need to edit the emulator and assign any Default Command-Line Parameters: and in the case of RetroArch, you will need to assign the Core and Extra Command-Line Parameters (if needed). ***GameBase Images The only game images this plugin will touch are game Screenshots. The available Screenshots will be copied into the Platforms’ "Screenshot - Gameplay" folder. Any other images (box art, flyers etc.) that a database may have will not be handled by this plugin in any way, shape or form. These other images are stored too inconsistently among the various databases with respect to the folders they reside in. To add other images from the database into LaunchBox, you’ll need to copy them from the respective database folder to the corresponding LaunchBox/Images folder. For example, Box – Front images (as LaunchBox sees them) would come from: Vic20_v03 \Extras\Cover\Cart Box\Front\ Amiga 2.3 \Extras\Cover Scans\[letter or number]\ SuperNESBase \Extras\Boxart - Front\[country]\[letter or number]\ …and copied into /LaunchBox/Images/platform_name/Box – Front/ (It’s recommended you close LaunchBox prior to copying the images) Disclaimer I don’t use GameBase myself. I only know how to get the database to Import into LaunchBox. So that part I know works. 😎 If you need any help getting GameBase setup with databases and emulators they use, or setting up your own emulator(s) in LaunchBox for use with the database ROMs, ask somewhere else. These go far beyond the scope of this plugin and my personal knowledgebase. Only a select few databases have been tested. So I imagine some refinements will need to be made to accommodate other databases. Accommodations considered will be in the form of ROMs that are listed as a games “Extras”. Examples: Extras using “WHDLoad” in Amiga 2.3. And “TAP” and “Cart” in Vic20_v03. Special Thanks Huge thanks goes to @dillonm for all your time and patience. Dillon was instrumental in teaching me how GameBase works and without hesitation, took time to do testing, retesting and testing once again. Without Dillon’s guidance, contributions and willingness to help, this plugin would still be sitting in beta collecting dust. Thanks Dillon!! As always, any and all comments and suggestions are welcomed. All reasonable requests (‘reasonable’ as determined by management) will be considered. -
Both LaunchBox (LB) and BigBox (BB) should be regaining focus when you exit a game, automatically. But since it's not doing that for you, for some reason... Move the closing emulator part to the last line. When LB/BB sees that the emulator has been closed, the "Running Script" essentially gets abandoned. Also, use the WinClose method rather than Process, Close. It's a 'nicer' way of closing an application. 2 lines can replace 10 lines of If. Also, using WinActivateBottom will grab the LB/BB GUI in case Startup/Shutdown screens. F12:: { WinActivateBottom, ahk_exe LaunchBox.exe WinActivateBottom, ahk_exe BigBox.exe WinClose, ahk_exe Retroarch.exe }
-
.thumb.png.c9faf450e4d2b690a819048b18173f61.png)
Create a Vertical Playlist from existing MAME imported ROMS
JoeViking245 replied to Wally's topic in Noobs
Even though I personally don't use playlists, this way is so much easier than explaining how to use the above plugin. lol However after running the Create Missing ... Playlists, deleting all playlists, running it again and selecting Yes to every option, I'm still not coming up with a Vertically Oriented Games (or a variant thereof) playlist. I then decided to get creative and used the Tools - Import - Mame Arcade Full Set.... It was there that the option for Vertically Oriented Games was found. It's a little bit longer process than using the plugin, but it does work. To get the Playlist here's what I did: NOTE: My existing set is a non-merged set. If you attempt this with a merged or split set, scanning for removed ROMs (step 2) WILL break things. Ran the Full Set import wizard Tools Import Mame Arcade Full Set.... For the Platform, selected my existing Arcade platform Pointed to my existing ROMs folder Selected my Full Set Version (0.241 in my case) Selected Manually Configure MAME Emulator since I didn't need to change anything and selected my MAME emulator Leaderboards set it up the same as I had it before Unchecked Search for game info.. since my current set was up-to-date (and it'll speed up this process a little) Clicked Check None for images Set the 1st filter screen to match my current Arcade Platform On the 2nd filter screen, checked ONLY Create Playlist for vertically oriented games Then let the importer do it's thing Scan for removed ROMs Tools Scan For Removed Arcade ROMs*** This got me back to my original 'curated' set. ***NOTE: My existing set is a non-merged set. If you have a merged or split set, scanning for removed ROMs WILL break things. From there I edited the new Playlist and reset its' Parent.


