
.png.d63b88dc3d5c6db8803dfbd996ce65fc.png)
JoeViking245
-
Posts
5,259 -
Joined
-
Last visited
-
Days Won
38
Content Type
Profiles
Forums
Articles
Downloads
Gallery
Blogs
Everything posted by JoeViking245
-
.thumb.png.c9faf450e4d2b690a819048b18173f61.png) If that' the case (it works in MAME stand-alone) then remove -rompath %romlocation% from the Default Command-line Parameters.
If that' the case (it works in MAME stand-alone) then remove -rompath %romlocation% from the Default Command-line Parameters. -
Copying clones along with roms and finding out missing roms.
JoeViking245 replied to Opus132's topic in Noobs
Again, it scans the imported games you have and "verifies" each games' path_to_the_file. Chances are, you have a ton of games in your Arcade platform and you may never come across [to play] the missing ones. Going back to your original post... do you mean non-merged set? Because as stated, a merged set will create the issue you're seeing with "missing ROMs". Which really, isn't an "issue" with a merged set. Think of it as a false-positive. At this point, with your ROMs in their new location/drive, you could remove your existing platform then do a 'fresh' import on the ROMs [from the new location]. Combining the clones in with the parent ROMs as additional apps if you wish. -
Copying clones along with roms and finding out missing roms.
JoeViking245 replied to Opus132's topic in Noobs
It's the Additional Apps that get ignored. If you combined your ROMs during import, then the clones (depending on your region priorities) are what's in the Additional Apps. I can see this happening with a merged. But you indicated you have a non-merged set. Have to ask, are you positive it's a non-merged set [and not a merged set]? Did you check any of those 12 to see if they actually don't (or do still) launch? MAME ROMs in LaunchBox are handled a little differently than conventional ROMs. Especially with the possibility of users having non-merged, merged, or even split sets. With merged sets, the clone ROM files don't physically exist. This is why you can't (or rather, shouldn't) use Scan for Removed ROMs. Well, it looks at the path_to_the_ROM. Then it checks if that file physically exists. I'd verify that those 12 indicated games do indeed not launch. When (if) moving your MAME ROMs and using the File Management feature to reassign their location, they should still work. And the missing ROMs (in the case of MAME) may be misleading. -
The error indicates something is up with your license file. Email support@unbrokensoftware.com and they can sort it out for you. Anytime an error code like that is tossed it's one of three situations: 1. The license is banned 2. The license has been altered (you tried to change details in the file, or the file has been corrupted). 3. You are using an Android license on PC or vice versa
-
 You're welcome. I don't really use shaders myself, so don't really know how [the more complex ones] work. The "Scanline" included in a super tiny .png file I got from MAME. You might be able to try some of the other ones they have (in their /artwork/ folder) and see if there's something better you like.
 -
Not that I've seen. You can have custom Startup screens per platform within your selected Startup Theme. But not for Shutdown screens. You can however customize the Shutdown screen (change it up to your liking) in your selected Theme. But is still a one-Shutdown-screen for all platforms.
-
To better help you, can you please share some screenshots of how it's setup in LaunchBox? Edit your MAME emulator and show screenshots of - the Main Details section - the Associated Platforms section Edit one of your Arcade games and show screenshots of - the main Metadata section - the Launching section - the Emulation section
-
"no longer work" is pretty vague and open ended. To help the plugin developer resolve your issue, you need to provide [at least] a little more detail. i.e. Is there an error message of any type? Can you see it in the Tools menu and then click it to open up settings? Again, those are just examples. The more details you can provide, the better chance there is at actually resolving your issue.
-
Version 13.21 crashes at start if...
JoeViking245 replied to Colorman3605's topic in Troubleshooting
It's because in v1 you could set the index. Which really shouldn't be done. That's why Jayjay removed it in v2. -
This plugin was written about 5 years ago. It will not work with current version of LaunchBox. (would need v13.18 or older) If you're using RPCS3, LaunchBox v13.15 (July 2024) added a new feature making this plugin unnecessary.
-
Version 13.21 crashes at start if...
JoeViking245 replied to Colorman3605's topic in Troubleshooting
It looks like you created your plugin using version 1 of the app. Try using version 2 (at the top of the page in the link). Custom Badges - Third-Party Applications and Plugins (Development and Beta Testing) - LaunchBox Community Forums -
Version 13.21 crashes at start if...
JoeViking245 replied to Colorman3605's topic in Troubleshooting
Though we can appreciate your enthusiasm and concerns, please don't post the same issue in multiple threads. I removed your other post. We can continue discussions here (in 1 location). Can you attach one of your custom badges dll files that appears to be causing the issue you described so it can be looked at tested? -
How Long To Beat (HLTB)
JoeViking245 commented on JoeViking245's file in Third-party Apps and Plugins
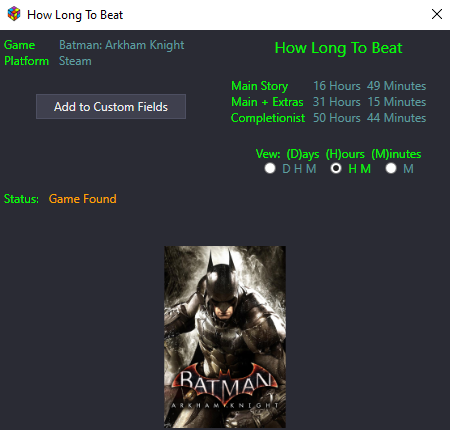 Thanks! v2.3.2 released Super Hot Fix: Fixed calls to HLTB The previous "epiphany" (v2.3.1) turns out was only half implemented. I expect a long run after this.
 -
You might try asking on the ThirdScreen plugin's Download or Support page. That way the author gets notified earlier than if waiting for them to peruse the LaunchBox Games Database Troubleshooting comments.
-
That plugin's been broken since LaunchBox v13.19. However, it will still work in LB v13.18 and older Due to lack of interest noted on its download and support pages, the author hasn't deemed it worthwhile to take the time to update it. Or rather, do a near complete rewrite to make it work again. Fortunately, the list of ROMs Demul can run is relatively short and can be obtained by running "demul.exe –listroms" at the Windows command prompt.
-
You should include a link to your (or whomever's) Feature Request so that others can go and upvote it, making it more viable to move "further up in the polls".
-
How do I close an Additional App (UCR) after a game quits?
JoeViking245 replied to bradbradbrad's topic in Troubleshooting
The AHK script I referenced was for creating an 'emulator'. So you'd only need to make one. Then have your Steam games use that emulator. The way it's written, it assumes your games were added to LB, by LB. Where the games ROM path is something like steam://rungameid/21130. Now if your games for some reason all point to an exe, the script could be modified to still work. It could be that the batch file just needs a little finessing. Is that a problem having the 'taskkill' line in there? Not sure I've heard of BT devices requiring admin privileges to start/stop. Running BB as admin is not advised. But if it works for you, go with it. If in the future you have any issues with BB, i.e. not launching games [with other emulators], adding images or videos etc., try them again with BB not running as admin. If the only way to change the profile is via a keyboard shortcut, you could create an AutoHotkey script to do that. But you may want to do a search to see if there's a way to do that from the command prompt. Then once you know how to switch it that way, just put that in a batch file. -
Search and music dialog boxes come up fullscreen in Bigbox
JoeViking245 replied to zombiesruuun's topic in Troubleshooting
What happens is, when a theme makes a call to a specific View (i.e. the Music Notification popup) and that view doesn't exist, Big Box will look for it in the Default themes' folder. (it's like magic ) I suspect if, instead of replacing the KeyboardView.xaml file, if you simply removed it from the /Critical Zone - BlueBox/Views/ folder, it would work [as well]. Maybe. However, replacing it with one that's known to work is probably the safest bet. Well done on using your resources at hand! -
How do I close an Additional App (UCR) after a game quits?
JoeViking245 replied to bradbradbrad's topic in Troubleshooting
The only way I've found to do that is to create a pseudo emulator. Here's an example for doing it with Steam. You can create a batch file to start Big Box. Since you have BB setup to start apps when opened, you don't need to worry about those. When you then start BB, add the wait parameter. You'll also need to start BigBox.exe from the /Core/ folder. I'm not at my main PC right now, but it's something like start "" /w "D:\LaunchBox\core\BigBox.exe" This will wait until BB closes. Add you commands to close whatever you need closed after this line. You can add above the command I show above, whatever the command is to set profile 2. Then below it, just like closing your other apps, add whatever the command is to set profile 1. -
 Per the writeup, one of the things the utility says it does is: I took that to mean, if your Theme(s) doesn't use (aka ones 'not shown') a specific media type (image), it'll add those to the 'remove list'. I could be misinterpreting that.
 -
My pleasure. Should be able to move the joy left/right to bring up the 'alphabet', move left/right to "S", then [continue to] scroll up/down. There're some things you can also to do or look at that may help with scrolling faster. About halfway down is the Big Box Troubleshooting section. But the whole thing is probably worth reading.
-
Some encoders can Xinput or keyboard input (or 'output' if you prefer). But yeah, you have to have an encoder to convert the buttons and joys to something. Mine has an older keyboard encoder, but also has a trackball that works the mouse movement and 3 buttons that are left/middle/right mouse-clicks. But even still, for LaunchBox navigation I'll use the keyboard and mouse. TBH, you won't be happy with LaunchBox if all you have are the buttons and joys. It really is designed for mouse and [full] keyboard. But once your system is all setup in there, Big Box really shines on a cab [with using just the control panel]. I think you'll find though, with any frontend, you will need a keyboard and mouse to set things up. In Big Box, a lot of the keyboard mapping is pre-setup. But you can of course customize it to your liking/needs. Use the player-1 joy for moving around and player-1 Start for Select. I'm not sure if it's the default setting, but my Back button is Pause on my cab. I don't know if you can change them in the free trial version of Big Box or not (I would think you could?), but if nothing else, you can see [and change?] the default keyboard mapping under System Menu < Options < Keyboard Mappings.

-
You could the Media Cleanup Utility for this task. You can read more about it the below link from the LaunchBox Featurebase: Using the Media Cleanup Utility in LaunchBox - LaunchBox
-
Thanks. And welcome to the community. There are a lot of knowledge members in the Community who can and will help when and if they can. Myself, I've never heard of KeyWiz nor knew what it was when you mentioned it. As I suspect is the same for many users on the forums. A quick search shows me it's a keyboard encoder. LaunchBox is more of a keyboard and mouse application. It'd be pretty difficult to navigate it with just a keyboard. Looking at the documentation for KeyWiz, their board doesn't appear to have any mouse-oriented inputs (i.e. trackball connections or mouse left/right-click). Also, LaunchBox doesn't have any custom keyboard mappings. BigBox on the other hand does have custom keyboard mappings, making it work great with a cab using a keyboard encoder. If your cab has a Shazaaam! Button, you can press and hold it, then press Player-1 Button-2 to Tab around in LaunchBox. But that can be a pain for navigating within LaunchBox. Some things you can do: (using a mouse or somehow..) select a game Assuming your cab has a Pause button press and hold Player-1 Button-1 and then press Pause If all goes well, this will launch the game Select a game Assuming your cab has 2 player controls press and hold Player-1 Button-1 and then press Player-2 Button-1 If all goes well, this will select all games Not super practical. But can be done
-
Finally. Someone gets me. lol You're welcome and glad the plugin suites your needs.
.thumb.png.c9faf450e4d2b690a819048b18173f61.png)


