
.png.d63b88dc3d5c6db8803dfbd996ce65fc.png)
JoeViking245
-
Posts
5,298 -
Joined
-
Last visited
-
Days Won
38
Content Type
Profiles
Forums
Articles
Downloads
Gallery
Blogs
Everything posted by JoeViking245
-
.thumb.png.c9faf450e4d2b690a819048b18173f61.png)
Animated GIF support for box art/backgrounds/clear logos, etc.?
JoeViking245 replied to dumlaox's topic in Noobs
This might not be what you were asking about, and you would have to edit the [LaunchBox] theme. In my test, I used the wait-spinning-circle animated gif as the games' Clear Logo ('cause I don't have any animated clear logo gif's 🙃). This is the top part of the games detail pane (right side). output.mp4 Using @faeran's Default Plus LaunchBox theme, Create a copy of the theme's folder, Edit GameDetailsView.xaml (in the Views subfolder) On line #11, insert a new line... xmlns:gif="clr-namespace:WpfAnimatedGif;assembly=Unbroken.LaunchBox.Windows" On line #238, comment out the that starts with <Image Source="{Binding Game.ClearLogoImagePath}"...... Insert a new line (or just replace the above line. same thing) <Image gif:ImageBehavior.AnimatedSource="{Binding Game.ClearLogoImagePath}" Height="110" MaxWidth="350" RenderTransformOrigin="0.5 0.5"> It should look like this Save and close. Start LB and set it to use the [copied] theme you just modified.
-
possible? adding additional apps to multiple roms at once
JoeViking245 replied to d8thstar's topic in Noobs
@stino2004 You can't pass a variable to a Running Script, an Exit Script nor an Additional App. But you can get creative and find them. -
This video is still [pretty much] relevant. Here's the LaunchBox API info Unbroken.LaunchBox.Plugins Namespaces (launchbox-app.com)
-
In order to help troubleshoot issues with MAME, please provide the following information: Do the games work when starting them directly through MAME? Start mame.exe, select a game and press Enter. Does it run? Or do you get error messages? If so, what game are you trying to run and what exactly is the error? [provide a screenshot if possible]) Screenshots Go to Tools, Manage, Emulators, select the emulator you’re using for MAME and provide a screenshot of the following sections Details Associated Platforms Select one of your Arcade (MAME) games and click Edit (or press Ctrl+E). Provide a screenshot of the following sections Metadata Launching Emulation
-
You can just put them in the root folder ..\LaunchBox\Videos\Arcade\ Just make sure they're named the same as the games Title or ROM name.
-
It should be there. When you click the little upside-down triangle, you'll need to scroll up the list of options to see it. Then for EmuMovies, once you've confirmed you subscription is active, in LB, go to Tools - Options - Integrations - EmuMovies and enter you credentials there. Then click test to make sure it works.
-
In the left panel in LaunchBox, select from the dropdown, Games Missing Media. Then click on Games Missing Videos. If the 2 #'s at the bottom are the same, you have no videos.
-
How to import Tiger Electronics handhelds to Launchbox?
JoeViking245 replied to azorean's topic in Noobs
Yes. They'll load/run just like the arcade games. Easy way is to use the Import MAME Arcade Full Set Wizard. When you get to the "How would you like to filter your games?" section, you need to un-check "Skip non-arcade games". But do keep all the other 'skips' checked. I don't know if this will import a bunch of other crap non-desirable games also. But that's where these handhelds are "hidden". However, with all the other skips checked, it may not be that big if a deal. Another way is to find a list of the ROM names and drag and drop those files [from your full set] onto LB and import them that way. Here's a list that @wallmachine procured. (scroll down to "Tiger Electronics") Unfortunately, the ROM names are all intermixed with the Arcade ROMs. -
This is not a LaunchBox/BigBox issue. Your controller/keyboard needs to be setup in the actual emulator that your games are running in. Side note: If "5" inserts a coin, try "1" to start the game.
- 1 reply
-
- 1
-

-
I'm not a theme expert by any means. Only know enough to be dangerous. 😊 So I may be troubleshooting the-long-way. Since it's set to Vertical Wheel 1 but displaying one of the Wall Views, do you have "Remember Separate View for Each Platform" checked? If not already, set a Keyboard and/or Controller Mapping for Switch View and then try using that while in the games view.
-
The plugin looks for games pointing to the .cue file. Yours are pointing to the .bin file. (I'm almost surprised the game launch this way. But I'm not an expert in that.) For future, when importing games that have bin/cue files, you want to import just the .cue files. To test (assuming in your PS ROMs folder you have "Tekken 2 (USE).cue" as well as "Tekken 2 (USE).bin")... in your screen above, change .bin to .cue and click OK. Now run the plugin again. However, I'd suggest you NOT check "Delete old files when complete." just in case some other issue arises. Another "For future", (though not totally necessary) when having issues with a LaunchBox plugin, post them on the plugins "Get Support" page. You'll have a better chance of the plugin author seeing it and responding. This will also help others that may come across the same (or similar) issue with the plugin.
-
Did you try changing it to Vertical Wheel 1? System Menu - Options - Views - Games List View
-
Can you edit one of your Sony Playstation games and share a screenshot of the Launching section where it shows the Application Path?
-
You didn't indicate what theme you're using. But regardless of which theme you're using (pretty sure it will work on any theme?), you can change and set the Image Group on a per platform basis in LaunchBox. But of course that won't reflect in BB. To do what (I think it is) you're wanting, you can prioritize the cart images above box fronts. The problem here is, if you want Nintendo 64 to show actual box fronts, and your N64 games have cart front images available, it'll show the carts in there. To remedy, remove the cart fronts from N64. But that's not ideal as your BB theme may have a spot to show them. Copying the images from 1 folder to another is probably the 'easiest' way. Note that the varying region subfolders shouldn't matter. Another option (a bit more involved) is to create a copy the BB View your using and rename and edit that view. You'll need to place the edited view in a new subfolder. You can see an example of this in the Default theme. \LaunchBox\Themes\Default\Views\Wall2GamesView Note that under \Views\, there's the subfolder \Wall2GamesView\. When using "Wall View 2", the platforms listed in this subfolder will have their game views overridden by their respective xaml file. Ones not listed in the subfolder will use the default \Views\Wall2GamesView.xaml view file. Continuing with N64 as an example, in the subfolder, there's "Nintendo 64.xaml". If you open that file and go to line #194, it has ImageType="Boxes". You can change that to Carts. <coverFlow:FlowImage x:Key="BoxImage" ImageType="Carts" Stretch="Uniform" CreateFallbackImage="False" HorizontalAlignment="Center" /> Save and close, start BB. Select the Default theme (actually make a copy of the Default theme folder and edit and use the "copy") and set your games view to Wall View 2. When you look at games in the various platforms, they'll show Box Front images (unless you changed the image priorities as noted above). But for N64, they show carts because of the above overriding change. You can do this for any of the games views and any platform. The method is the same, but the new subfolder and platform name will change accordingly.
-
Huh. I'll be daw gon. Helps if I click on the High Score tab (on the LB theme I'm using) to see them. lol Two possibilities I can think of. 1) Somehow LB and hi2txt know about galaga88 and you didn't get on your local high scores (where you get to enter your initials) 2) Shad8w noticed the discrepancy in the hi2txt.zip and changed galaxy99 to galaxy88 (inside the zip). I'm not good enough to get on my local high scores to be able to test it. And the thing is, if you rename galaga99.xml to galaga88.xml, you need to launch the game from LB AND get onto you local high schore. Older high scores won't get uploaded.
-
LaunchBox launching on top other programs
JoeViking245 replied to DeadVoivod's topic in Troubleshooting
OK. So it's only an issue when you 1st start LB. When it launches though, it is nice that is remembers its size and location. The only thing I know of you can do with the splash screen is use the script I showed above. Unlike the splash screen you see with say, MS Word, you can't minimize it manually or focus another window on top of it. The nice thing with this script is you don't actually have to do a full install of AHK as the program resides in /LaunchBox/ThirdParty/AutoHotkey. So that's a plus. As far as adding an innate option to launch the application minimized, that would probably need to be requested (bitbucket) and the developers deem it necessitated (or highly voted on). For me, it seems odd to open an app just to minimize it out of the way. But I understand your use case scenario. I do that similarly on occasion (3/4 window, Windows explorer, editing etc.) and make use of the minimize 'button' (minus sign) and more-so, Alt+Tab to switch between windows. In fact, I may make use of that script myself. If you make a bitbucket feature request, post a link here on the forums. I'll add a +1. -
LaunchBox launching on top other programs
JoeViking245 replied to DeadVoivod's topic in Troubleshooting
LaunchBox opens just like any other Windows application. It doesn't have a true fullscreen option, so it opens in a window (unlike BigBox). When you start LaunchBox and then minimize it out of the way just as any other application, is it inadvertently popping up on its own? It shouldn't be. Maybe I'm misunderstanding your issue/concern.?.?. If you're wanting to start LB and have it minimized so you can get to it later, there is always the traditional way. Start it, then when it comes up, click the 'minus' sign in the upper right corner to minimize it. The only other way I can think of would be to create a script of some sort to open it. Here's a quick and dirty AutoHotkey script that can do that. Run, "D:\LaunchBox\LaunchBox.exe" WinWaitActive, ahk_exe LaunchBox.exe WinMinimize WinWaitActive, ahk_exe LaunchBox.exe WinMinimize The 1st WinMinimize minimizes the startup splash "loading" screen. The 2nd one minimizes the main LaunchBox window when it appears. Note also, there are some system tray options you can choose to get LB even further out-of-the-way when not actively using it, without actually closing it. (Options - General - System Tray) -
I don't see Galaga '88 listed in with hi2txt so it wouldn't be available in the MAME Community Leaderboards. Though there's a good chance it's listed in there incorrectly as "galaga99.xml". But I don't know that for certain. You can find this in \LaunchBox\ThirdParty\hi2txt\hi2txt.zip
-
 Hmmm... I have no idea. I was just kind of happy I learned how to add in a working, manipulatable 3D Model. I can take a look, but my guess is that's all 'hardwired' into the CoverFlow control.
 -
Sound Issues in MAME Games Through BigBox
JoeViking245 replied to JonathanEngr's topic in Troubleshooting
Exactly. I wouldn't waste money on an SSD for MAME. -
Sound Issues in MAME Games Through BigBox
JoeViking245 replied to JonathanEngr's topic in Troubleshooting
I personally have never really looked into it. But you are looking at an over 12-year-old AMD CPU that is pre-Ryzen which "are not recommended at all". Whether that's it or not, I have no idea. But my 15-year-old i7-920 CPU (with 6-GB RAM) seemed to run Galaga '88 via BigBox without any audio stuttering. So again, no idea. Do you notice the same issue when launching it from LaunchBox? As for the command line parameters, if you had LB set MAME up for you, we're probably using the same ones. -artwork_crop -skip_gameinfo -nofilter -keyboardprovider dinput -rompath %romlocation% -
Visual Pinball X VideoSnap Creator
JoeViking245 commented on JoeViking245's file in Third-party Apps and Plugins
 Thanks!!! This bit of info saved me A TON OF TROUBLESHOOTING TIME!!! Confirmed with WindowSpy that it is now "B2S Backglass Server". sundogak took care of the troubleshooting for us. Exit LaunchBox. Download this file ➔➔➔➔ VPXVideoCreator (v3.0.1-beta).7z Replace your "VPXVideoCreator.dll" with the one inside the zip. (shouldn't need to unblock it if using 7-Zip.) (Re)start LaunchBox. Try recording with the backglass option again. This hasn't been tested as my single monitor setup is not really setup anymore for VPX backglass. (I can run tables showing a backglass and DMD. But I use script to adjust all the VPX settings, and that doesn't work well with the plugin.)
 -
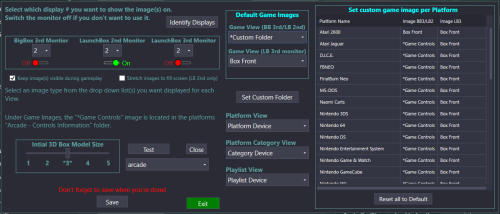
Sounds like under Media [Options], your Screenshot Priorities has Box - 3D set above any of the Screenshot - xxxx. Click Reset all to Default. This will reset all the custom game image per platform to whatever you have set under Default Game Images. Currently your custom per-platform images are set to "Screenshot".
-
Looks like maybe the xml file is wonky. Try: Close LaunchBox. Delete "Settings.xml" from the plugins' folder. Start LB. and try saving the settings again.
-
Did you try checking the "Stretch images" check box? Or unchecking it? Are both monitors ('screens') scale set to 100% [in Windows Display Settings]? Or something different? I don't know how all that works. Windows-wise. But I'd think, even if your marquee is physically above your main monitor, in Windows display settings, move them to side-by-side. Example: your main monitor on the left, and your marquee on the right. With the tops aligned straight across. Can you attach your most recent log file please. You'll find it in \LaunchBox\Plugins\MultiMonitor2022\Logs\
.thumb.png.c9faf450e4d2b690a819048b18173f61.png)


