
.png.d63b88dc3d5c6db8803dfbd996ce65fc.png)
JoeViking245
-
Posts
5,259 -
Joined
-
Last visited
-
Days Won
38
Content Type
Profiles
Forums
Articles
Downloads
Gallery
Blogs
Everything posted by JoeViking245
-
.thumb.png.c9faf450e4d2b690a819048b18173f61.png)
MAME Hi-Score Display - A plugin for BigBox
JoeViking245 commented on JoeViking245's file in Third-party Apps and Plugins
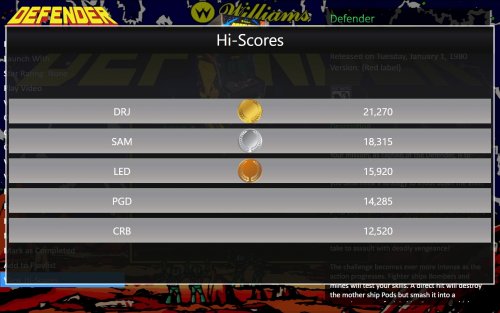 I went for the "quick" fix (not to be confused with a "cheap" fix). Hopefully this will work for everyone. Otherwise, I'll go back and actually 'spend time working on it'. v5.2.0 - unofficial release (unless it works. Then it'll be official. ) - Displayed window size should now be more autonomous. MAME_Hi_Scores (v5.2.0).7z
 -
Sorry. I read it as 'without "reading" everything'. vs. "re-adding" everything (which essentially what you wrote). Was probably still on my 1st cup of coffee at the time. Go to Tools < Download < Update Metadata and Media for All Games... When you get to the screen Would you like to download images for your games?, increase the downloads limit. Continue through the prompts.
-
MAME Hi-Score Display - A plugin for BigBox
JoeViking245 commented on JoeViking245's file in Third-party Apps and Plugins
Yes Windows. When I get a chance, I'll take look at the code. JayJay did that screen part. I'll dig through and see if I can decipher what he did.- 52 comments
-
- 1
-

-
- mame
- high scores
- (and 2 more)
-
It should Just Work©. The emulator is a derivative of MAME and pressing Escape on your keyboard will exit it. Which is what "Exit Game" is 'pressing' via the controller. I presume the controller Exit works with stand-alone MAME? Make sure you're pressing/holding the buttons in that order. Last resort: add a Running Script $Esc::WinClose, ahk_exe {{{StartupEXE}}}
-
Can you share a screenshot of your emulator settings (in LaunchBox)? The main Details section and the Associated Platforms section.
-
MAME Hi-Score Display - A plugin for BigBox
JoeViking245 commented on JoeViking245's file in Third-party Apps and Plugins
NICE!!!!! Congratulations! What do you have the Scale and Layout for the display set to? Over 100%? -
You'll have to read some things.

-
Big Box Crashing in Version 13.23? Here’s What You Need to Know
JoeViking245 replied to AstroBob's topic in News and Updates
Someone earlier had that same error. Their pc was blocking all the dlls from the custom theme. The fix was to unblock the .dll files. https://forums.launchbox-app.com/topic/91595-big-box-not-opening/#findComment-494920 -
Lokk in the menu View < Hide Games and see if any of those are checked.
-
Not really sure what to make of that, but I'll go with 'if you went to YouTube and played a video, you'd hear its audio.' I asked about the MAME version because know there were some audio issues with release 0.278. The only reason MAME would stop having audio output is if a setting was changed (in MAME) or your speaker volume is turned down or muted, or your speakers were turned off. Since you indicated your sound is working fine with everything else, I'm inclined to say it's a setting in MAME itself.
-
Have you recently updated MAME? What version of MAME are you using? The potential issue would be with the emulator itself (not LaunchBox). Do you get sound from your PC otherwise. LaunchBox game video? YouTube video in your web browser?
-
 At the top of this page.
 -
My cab has a 16:10 monitor (pretty close to 4:3) and looks pretty good. That is, no glaring visual issues. For the Default theme at least, if you look in the /LaunchBox/Themes/Default/ folder, you can edit ThemeSettings.xml (any text editor will work. e.g. Notepad). In the lower half of the document, you'll find <Force4X3AspectRatio>. You can try changing "false" to "true" (without quotes). Save and close then start BigBox. I don't recall if I changed that on the cab or not (it's not on right now). But if I did, it was years ago. Also, not sure if that's an effective element or not. (as in it may be a left-over remnant from days afore) But wouldn't hurt to try. (And if you do, let me know how it turns out. )
-
I happened to have seen that specific article before, so knew where it was at. When you said 'not documented', I thought I'd run a test. Went to the LaunchBox Strategy Guide main page and in the search box typed in "platform icons". Low and behold, the AI thingy showed me what was needed.
-
I'm not sure about the 1st part (removing games from playlist - out of my realm). But for the platform icon's [new] location, see here. https://feedback.launchbox.gg/help/articles/0459065-media-packs Though it's explicitly stated in there, it's illudes towards placing them in \LaunchBox\Images\Media Packs\Platform Icons\Nostalgic Platform Icons
-
Not sure if related to your issue....
-
The 2 that are commonly missed [for Demul] are check Remove Space... and un-check Extract ROMs.
-
Shooting from the hip.... you mentioned the file "videoActive". And it has the word "video" in it. (how am I doing so far? lol) Maybe try "the other" video player. WMP or VLC if v13.22 or older. WMP or FFmpeg for 13.23. Also (as I got to thinking about it), that debug fragment you showed was just that. A fragment of the whole kit-and-Kaboodle. I recall seeing in past logs as well, something about the ttf file (don't remember 'exactly' what). But it never stopped BB from opening.
-
Updated to 13.23. LaunchBox opens fine, Big Box crashes PC.
JoeViking245 replied to Kennerdy's topic in Troubleshooting
This may be related -
13.22 had WMP and VLC. Also note (more of an FYI), VLC and FFmpeg use the same base codec. So, in that regards they're similar. (But different in many other aspects). Yeah. Sorry about that. I actually open and looked. I knew BB has an option to prioritize soundtracks over video audio. Poor assumption (bad memory) on my part that LB did too. 😊
-
See if yours look like this.
-
To clarify (for the developers), you're talking about game-specific music/soundtracks? Do your games have video also (and presumably the videos are muted when the game has a soundtrack file)? And then in Tools < Options < General < Video Playback, are you using WMP of FFmpeg? (try the opposite and see if it makes a difference)
-
If it is that, open LaunchBox and then... Tools < Download < Force Update Games Database Metadata...
-
Looking at the error... Cannot locate resource 'views/launchbox_theme_folder/fonts/redhatdisplay-black.ttf', it seems to be looking in the wrong folder. Not knowing that particular theme (and just enough theming knowledge to be dangerous ), I think you need to find and change that (those?) lines in the xaml's. The [section of the] line should read like: FontFamily="LAUNCHBOX_THEME_FOLDER/Fonts/RedHatDisplay-Black.ttf#Red Hat Display Black" (without the views/ part.) Why it's suddenly started having issues, don't know. (and with my little bit of knowledge, surprised it worked before)
-
That most likely means you don't have the correct command-line parameters for the Associated Platform or one (or more) of the required checkboxes in the details section is checked/un-checked. When you have the Edit Emulator window open to the main details section, press Alt+PrintScreen. Reply to this message, put the cursor where you want the picture and press Ctrl+V. Do the same for the Associated Platforms section.
.thumb.png.c9faf450e4d2b690a819048b18173f61.png)


