-
Posts
3,447 -
Joined
-
Last visited
-
Days Won
30
Content Type
Profiles
Forums
Articles
Downloads
Gallery
Blogs
Everything posted by JoeViking245
-
-
Wait. What? Really? Edit: OK. Turn OFF the game Startup Screen.đ
-
I did say "But I could be totally wrong." And I was. I tried Sleep timers, Loops to check if LB is minimized, BlockInput, more Sleeps, and more Loops.. and yes, if you press a button too quickly, it can create havoc. But there is. "Wii MsgBox" is my AHK 'Emulator' I've been testing with. And of course the Default Emulator, Dolphin. And PLEASE note: I have not, will not, nor have ever even attempted to run "Dolphin" through RetroArch. Just sayin'. And so with that, I think it may be best to go back to create a new "Emulator" using an AHK script. Assuming you will typically use the Real Wiimote, have your "WiimoteNew.ini" and "Dolphin.ini" files in your Config folder be the ones for "Real". Then when you want to play using the Real Wiimote, just choose Play. Then in your AHK "Emulator" for the Emulated Wiimote, strip out all extra stuff. #SingleInstance force Emulator = "M:\Giochi\Emulatori\Nintendo Wii\Dolphin.exe" -b -e FileCopy, M:\Giochi\Emulatori\Nintendo Wii\User\Config\WiimoteNew.in#360emu, M:\Giochi\Emulatori\Nintendo Wii\User\Config\WiimoteNew.ini,1 FileCopy, M:\Giochi\Emulatori\Nintendo Wii\User\Config\Dolphin.in#_scan_false, M:\Giochi\Emulatori\Nintendo Wii\User\Config\Dolphin.ini,1 RunWait, %Emulator% "%1%" FileCopy, M:\Giochi\Emulatori\Nintendo Wii\User\Config\WiimoteNew.in#real, M:\Giochi\Emulatori\Nintendo Wii\User\Config\WiimoteNew.ini, 1 FileCopy, M:\Giochi\Emulatori\Nintendo Wii\User\Config\Dolphin.in#_scan_true, M:\Giochi\Emulatori\Nintendo Wii\User\Config\Dolphin.ini,1 Then select Launch With. (but it was fun [for me] learning all this.)
-
Do you mean these ones on the controller? You could use those too if you wanted. Looks Great!! Change "WinRestore" to "WinActivate". This will restore it AND make it active ("in focus"). No! Next thing you know, you'll want to add menu options to that too. lol That feature is already built into BigBox. Make sure you have Enable Game Shutdown Screen checked. If it's still not working, that's probably because you're doing the Minimize/Restore thing for BB. I would think that since you're putting up a Splash screen, if you Un-Checked Enable Game Startup Screen, (which isn't doing anything for you anyway) that BB would not capture any of your key/button presses (except for Pause and whatever's assigned to close/exit the game). So then you wouldn't need to minimize/restore it to begin with. And also, you'd be able to use "A" and "B" on the controller. But I could be totally wrong.
-
Big problem after changing Retroarch location *Solved*
JoeViking245 replied to Fragger's topic in Troubleshooting
Do you have Super Nintendo Entertainment System listed twice in Associated Platforms? -
That looks really nice!!!! You never clarified if you wanted the analog stick "clicks" [buttons] or "movement". You know how to use the "clicks" and you have the code (which I added in later on) for the "movement" a couple of posts back. Lines #29 - #32 are comments showing you examples for the Left-Analog-Stick Right/Left/Down/Up movements. If you move the stick LEFT (line #34), it will ["GoSub"] go to, and execute the sub-routine "$Left", which is line #44.
-
How you have it written ( b[comma]%options%), it will show [sub]text on the bottom of the image. See here on using SplashImage: Progress / SplashImage - Syntax & Usage | AutoHotkey It doesn't cover everything because it's displaying the image in it's actual size. To get Image2 to cover the entire screen, add the WinMove line below SplashImage,2:... And remember to change "MySplash" to "Splash2". BUT... the problem you'll have now is, your image2 isn't 1920x1080. So when you add WinMove, it will cover the entire screen (including the taskbar), but the image will be in the upper left corner of the screen (actual size and not centered). The easiest way to fix this is use an image that has a 16:9 aspect ratio, use b[space]%Options% and add the WinMove line. If it's not 16:9, it gets squashed If you can't find a 16:9 image, then add zx.. and zy.. (described in the link above) to center the image. My image is 650w x 974h. To calculate the zx and zy numbers to use, using my dimensions as an example, zx=(1920-650)/2= 635 , zy=(1080-974)/2= 53. I then add those in. And don't ask how to change to color of the rest of the background, because I don't know! Hold the joystick "button" down just a little longer before letting go. (press and hold. Don't just 'click' it)
-
Either remove "%Options%" from the line "SplashImage,2:....." (and probably 3 also), OR copy and paste the WinMove line to right below "SplashImage,2:....." and change %Image2% to %Splash2%. You can also set the image size manually on the "SplashImage,2:....." line by replacing "%Options%" with zw number and zh number. Play around and see what looks best with your image(s) Did they work before? Try putting a $ in front of them. i.e. $1Joy9. Since you're now using something to select your choice that doesn't cause problems in BigBox, comment out (or remove) the lines that minimize it.
-
Excellent work with the timers!! Thank you, thank you! My 1st guess is because of a loading screen (plus the main app). OK. That's actually my only guess. lol Personally I don't like doing this because I tend to somehow screw something up and can't get it back without rebooting. I did find a way to go [actual] fullscreen with 1 line of script vs the 45 lines I mentioned earlier. "WinMove" I didn't test with a 'regular' window, but it works great with SplashImage. Things to note in the script: Options - This is to set (force) the Image size (not to be confused with window size). So if it's a 640x480, you can "stretch" it to 1920x1080. The 1st one listed automatically sizes it to the monitor. The 2nd one (commented out) just shows how you can set it manually. SetTimer...off - I'm not sure if this is actually necessary [at the beginning of the script], so I commented the first 2 out. WinMove - Ahh.. A thing of beauty. So here we're moving the SplashImage "MySplash" to coordinates x=0, y=0, and setting it to the screens full width and height. "TAKE THAT taskbar!!" SetTimer, WatchAxis - This is what will look for joystick movement (vs a joystick 'click'). Examples for all directions are shown (commented) and I incorporated Left/Right/Down to give practical examples. For Left and Up, if you don't have the "&& Joy.. > 0", everything gets all screwy if the controller's not on. I didn't test this go-around actually in BigBox, but I did test the logistics of the SplashScreen and joysticks. But I tested them in sections so hopefully I copied, pasted and transposed it all correctly. I'm sure someone will let me know. lol
-
If you can find or create an XML file that's formatted the same as MAME xml's, you could try this: It won't help with any metadata or media issues you may have with "odd" games, but it will at least get whatever's listed in "the xml" into LB. The trick might be finding one that formatted like MAME's xmls. Just a thought. Maybe not the best thought. But a thought.
-
Nice job on finding out the files to use!! I'll be sure to add that to my Dolphin notes. Awesome. Thank you! And it's not going to be able to. You can manually set (force) the width and height, but it will never cover the Windows Taskbar. That's a limitation of SplashImage. The closest you'll get is with something like: (will fill the screen with any image size, but still not cover the Taskbar) SplashImage,%Image%, b H%A_ScreenHeight% W%A_ScreenWidth%,,, spl The script is running in sync vs async. So it won't go to the next line until it's done with the previous line. (mostly) Also since we're starting the emulator with "RunWait", we can't really say.... "while the emu's loading, show this image for 3 seconds". Also, your Option "on" after the Image path is not an available 'option'. But if it's not even showing at all, double check the path and file spelling. It may be easier (?) to declare another Image, and then use it. (Well, it makes the code look prettier ) Image2 = M:\Giochi\Utility\Launchbox\ThirdParty\AutoHotkey\Scripts\Wii-Dolphin-Scripts\ImageRealWiimote.png SplashImage, $Image2%, b If you MUST HAVE the 2nd SplashImage show while the emu is loading you'll have to change RunWait to Run then do some 'while emu is running, show the Image once for 3 secs, then wait for the emu to stop running...'. If you mean the joystick button-clicks (press down click, as opposed to moving the joystick left/right/up/down), for me, the Left joy-click is 1Joy9 and the right is 1Joy10. I have (mostly) something 'up my sleeve' that will make %Image% go completely full screen. But it will add in at least as much code to your script as you have right now. So you're approximately 45 lines will become about 90 lines. lol Fortunately is just a matter of copying and pasting it. But I need to do a little more testing with it first. IF I can get this to work, I MIGHT look into the 'show 2nd slashimage'. But anyone else is more than welcome to chime in here!!!
-
Ah. Good point!. And now that you mention it, the $Esc method could go in the Running Script tab for this "emulator" now. And BigBox too. The issue here is the AHK script, though is 'running', it doesn't have actual "focus". The SplashImage does, but not the script (which is the "Emulator" BigBox is looking out for). So (I think) what happens is, if you wait until after the Startup Screen goes away (like the time it takes to plug in a different controller) to press a button, the script 'catches' the button press (and acts accordingly). But so does BB. So ya, you'll want to chose a different button. I don't think there's a way to do that with Dolphin. I assumed you had that figured out for us already. lol So... didn't this start out as something like 'before a game starts, show a message to remind you to do something. Then press a button to continue.'? lol You might try looking for where Dolphin saves 'the default controller config to load' info if the game doesn't specify a specific configuration. (possibly WiimoteNew.ini?? under /User/Config/ ??). Then once you find that file(?), Run Dolphin, set you controller settings for "real" and quit Dolphin. Copy that file you found to something like wiiReal.ini (or whatever). Run Dolphin again, set it up for "emulated", and exit. Copy and save that same file to wiiEmulated.ini (or whatever). So now you have 3 4 files: WiimoteNew.ini (if that is truly the correct file) wiiReal.ini (or whatever) wiiEmulated.ini (or whatever) WiimoteNew.ini.backup (back up the original just in case ) Then in your script, right before RunWait, add in a command that will (if you want "Real") Copy wiiReal.ini to WiimoteNew.ini, and overwrite it. FileCopy, D:\myFileLocation\wiiReal.ini, D:\myFileLocation\WiimoteNew.ini, 1 ("1" tells it "YES" to overwrite) Again, I have no idea if that's the correct file or not! Also, if your game(s) have a 'default' controller profile to load, you will need to remove that. (Right click the game, select Properties, click on the Editor tab, and under User Config. Placing a pound symbol ( # ) at the beginning on the line (as shown) will comment it out (so it won't load). Or you can just delete the whole line. If you set it up for more than one player, do that for each "WiimoteProfile" line. Good luck.
-
As Homer J. Simpson would say, DOH!!! #SingleInstance force Image = D:\LaunchBox\Images\Platforms\Nintendo Wii\Device\WiiController.png EmulatorReal = "D:\Emulators\Dolphin\Dolphin.exe" -b -e -LoadReal.ini EmulatorEmulated = "D:\Emulators\Dolphin\Dolphin.exe" -b -e -LoadEmulated.ini SplashImage,%Image%,b,,,MySplash $vk07:: { WinClose, ahk_exe dolphin.exe Return } #IfWinExist MySplash { 1Joy1:: $r:: { SplashImage,off RunWait, %EmulatorReal% "%1%" ExitApp } 1Joy2:: $e:: { SplashImage,off RunWait, %EmulatorEmulated% "%1%" ExitApp } 1Joy3:: $x:: { SplashImage,off ExitApp } } Thank you @Kiinkyfoxx!! Sad thing is, I use that in my daily script that runs in the background. But you know.. Out of sight. Out of mind. lol
-
Ahhh... that's a whole 'nother story. For BigBox, I think you need to select the game, and THEN choose Launch With... . Ya. Didn't think about that. In that regards, you're out'a luck. (more below) But if you ONLY needed the splash screen as your "reminder" to plug in your controller, before actually launching the game and didn't need to assign any Buttons as hotkeys, you could use RunWait. This would keep the "emulator" running, thus making the Pause menu and the Running Script active/available. Because you're assigning Buttons for your 'menu' that are also used in game, you can't. You'll need to have another script. Otherwise when you press "A" to jump, it would also try to start another instance of the emulator. Putting the Exit script code in the Running Script for your "WiiMessage.ahk" Emulator doesn't work because the script exits right after launching the game. Another script: "ExitDolphin.ahk" $ vk07:: { WinClose, ahk_exe dolphin.exe ExitApp } And then in the prior script under the Button presses that launch the game, add in 2nd "Run" line: 1Joy1:: SplashImage,off Run, %Emulator% "%1%" Run, "D:\LaunchBox\ThirdParty\AutoHotkey\AutoHotkey.exe" "D:\Emulators\Dolphin\ExitDolphin.ahk" ExitApp This still doesn't help with the Pause menu. But I'm confident that with enough scripts calling each other, I KNOW it can be made to look like "it was all part of the plan". lol
-
You welcome. So, you want to use LaunchBox to launch a Menu that will either launch game_config-A, or game_config-B, or exit back to LB? Almost sounds counterintuitive for LB's intended purpose. How about just setup a couple "new" emulators? Have one load your "WiimoteNew[real].ini" configuration and another that loads "WiimoteNew[emulated].ini". Assuming you're doing this with a command line parameter (I don't know how to do that with Dolphin). Set your default emulator to the one that loads the real Wiimote. Then in LaunchBox, double click the game to load [real], or right click and select Launch With and choose [emulated]. Otherwise, you can always add whatever you want to happen, into the above script. Here, pressing [Xbox controller] button "A" OR "r" on your keyboard will run whatever the command you put for "EmulatorReal" (line #3) Pressing button "B" or "e" on your keyboard will run "EmulatorEmulated". Pressing button "X" or "x" on your keyboard will return you back to LB. And then whatever image you use for your splash screen will need to explain what's, what. May want a functioning command line as well.
-
@Sbaby To add a "new Emulator" that uses an AutoHotkey script, first you need the script. (this is a bit better method than the silly batch file above ) I'll use Nintendo Wii as an example and Dolphin as the emulator. #SingleInstance force MsgBox, , Hey you..., Plug in your Wiimote, then hit Enter Run, "D:\Emulators\Dolphin\Dolphin.exe" -b -e "%1%" The only lame thing is you still have to hit Enter on the keyboard because I don't have a Wiimote to test @MadK9's suggestion. (which maybe pointing the 'mote at "OK" and pressing a button will work like a mouse click.?.) Creating the script: Create a new text file and copy\paste the above code into it. On the last line, adjust the path to "Dolphin.exe" accordingly. Keep the quotes at the beginning and end of the full_path. Save the file to somewhere convenient (in the Dolphin folder might be a good place). Name the file to whatever you want, but change the file extension from ".txt" to ".ahk". i.e. "WiiMessage.ahk" Be sure that it's not "WiiMessage.ahk.txt". Add the "new" Emulator: In LaunchBox, click Tools and select Manage Emulators. Click Add... Under Emulator Name:, give it a name. Say something like "Wii Message". Where it says Emulator Application Path: click Browse and navigate to and select ../LaunchBox/ThirdParty/AutoHotkey/AutoHotkey.exe Where it says Default Command-Line Parameters:, type in the full path to where you saved the file you created above. And put quotes around it. i.e. "D:\Emulators\Dolphin\WiiMessage.ahk" Leave all boxes unchecked. The Sample Command-Line should look like AutoHotkey.exe "D:\Emulators\Dolphin\WiiMessage.ahk" "FULL\PATH\TO\ROM\FILE" Click on the Associated Platforms tab. In the Associated Platform cell, type in the name of your Platform EXACTLY as spelled, including upper and lowercase letters. As you start to type, you should see a combobox in which you can select the proper Platform. Check the box for Default Emulator. It'll ask something like 'You sure?' and 'Do you want to make this the default for games in this Platform'. Yes. This will make all games in that Platform (Nintendo Wii) use this "new" emulator. Click on the Startup Screen tab Uncheck Enable Game Startup Screen (otherwise the message box gets lost behind it) Click OK. Click Close. Play games. For your PS3, follow the same steps, changing the path to the emulator and its command line parameters in the script. Oh ya, probably change the message too. Alternative to a Message Box (and a bit more stylish) If you want to display an image [file] instead of the message box (such as an image of the Wiimote [hint, hint]), you can alter the script to something like this: #SingleInstance force Image = D:\LaunchBox\Images\Platforms\Nintendo Wii\Device\WiiController.png Emulator = "D:\Emulators\Dolphin\Dolphin.exe" -b -e SplashImage,%Image%,b Input, SingleKey, L1 SplashImage,off Run, %Emulator% "%1%" ExitApp 1Joy1:: SplashImage,off Run, %Emulator% "%1%" ExitApp Change the path to the Image and to the Emulator. Note: NO quotes for the Image path. But DO ADD quotes for the emulator path (but not any command line parameters after the path) Using this script, you can keep the games Startup Screens enabled as this image will stay on top. This script will display the Image until you hit a key on the keyboard OR press "A" on your Xbox controller (or whatever Xinput controller you have and whatever Button "1" is on it). After hitting the anykey or pressing A, it will THEN run the emulator/game.
-
You can do that as a sort of reminder, but it won't (can't) keep the game from continuing to load. As for "the best way", that's a loaded question. lol It sounds like you need it based on your emulators for Wii and PS3. The Running AutoHotkey Script in the emu's setup only run 'in conjunction' with loading a game. So like the Startup Screens, it can't keep the game from loading. (unless someone has a better idea [which happens a lot]) To accomplish what you want, you could could create an AHK script as your emulator(s). You'd need to create a new emulator in LB and point to this new script as the executable. The script would 1st popup a splash screen saying something like "Dude! Don't forget to turn on your Wiimote!! Press a button when you're ready." Then when it detects a button press, it passes the command for the actual emulator and the game [to load] it got from LB. But I don't know if AHK can "detect" a button press from a Wiimote. I know it can from an Xbox 360 controller (and of course, a keyboard). If it's only needed on a game-game-basis, something quick and dirty, fairly crude, but affective... is to create a batch file and add it as an additional app to the game. Set it to Automatically Run Before Main Application, and also, Wait for exit. The issue is you'll need to also turn off the loading (startup) screen for the game because the message will get lost behind it. @echo off start "" /w cmd /c "echo Dude! Don't forget to turn on your Wiimote!!.!&echo(&pause" But again, not sure it can detect a Willmote button press, either.
-
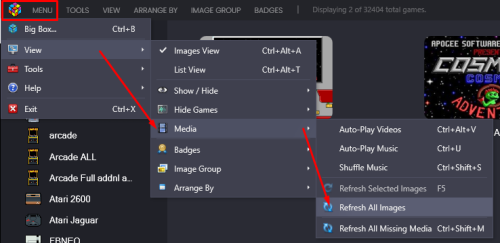
Right below Scan for Added ROMs, there's Scan for Removed ROMs. Since you're on the beta which seems to be working as expected for you, it might be easiest for you to delete your Arcade Platform and start over. When deleting it, click NO when it asks if you want to delete the media (images). Second prompt I believe. Then Import by either: A) Select Tools, Import, ROM Files and Add Folder. Select your G:/LaunchBox/Roms/MAME/ folder B) Drag and drop all the files from your /Roms/MAME/ folder C) Select Tools, Import, MAME Arcade Full Set. When asked for the folder, point to your /Roms/MAME/ folder. When the Import is complete, run Tools, Scan for Removed Roms, For Arcade. For all 3 options, select None when asked which images to import. (Assuming you already had the images from before.) And then later, you can add the ones that are missing.
-
-
You, and everyone else (I'm sure). Ran some tests using some obscure options [a feeble attempt at 'process of elimination']. LaunchBox v11.3 Created 4 (0 kb) txt files and renamed them to the 4 tmnt...zip files Tools, Import Rom Files Selected the 4 individual files (Add Files) Platform = "Nintendo 64" Emulator = "Redream" Use files in their current location Un-checked Search for game info from the LB db Select None (for both media options) Check Force importing duplicates Check Force using MAME metadata Check Import all clones. Prioritize Japan. Uncheck everything else And I got this and then... successfully imported 4 games. I also tested with a drag & drop into 'Nintendo 64', with the same [obscure] options as above and 'successfully imported 4 games.' I know it doesn't give you any answers on how to fix your situation. But it does indicate something's really screwed up. I mean, you can't really make any more "wrong" selections, and yet it still worked (for me). I was hoping that using off-the-wall options to import would help shed some light. But as they say.. "no joy".
-
Visual Pinball X â Top Scores (hiscore) Viewer View File View the Top Scores for your Visual Pinball X Tables (LaunchBox only) This plugin uses DNA Disturberâs PINemHi app to read a tables top scores that are stored in the nvram files created by VPinMAME. PINemHi currently it supports 425 roms. (Oct. 8, 2021 Updated to v1.1. See change log for details) Instead of scrolling through these (in game) See this (in LaunchBox) If youâve signed up on the PINemHi Leaderboard site, this plugin will also let you view your Personal Top 10 Scores (these scores are tracked separately from the Tablesâ top scores) as well as the Best Top 10 Scores on the Leaderboard. Signing up is free and you only need to provide a username. No email address, proof of citizenship nor vaccinations required. (See Top 10 Scores below) Requirements This plugin downloaded and setup (see Setting up the plugin below). PINemHi v3.3.1 (included with the plugin download) The emulator the table uses needs to point to âVPinballX.exeâ. This is needed to get the rom info for the table(s). Optional Requirements Sign up for PINemHi Leaderboards. (see Top 10 Scores below) Setting up the plugin Download and unblock the zip file. (right click the file, select properties and check the Unblock check box and click OK) Copy the VPXHiScores folder (from inside the zip) into your \LaunchBox\Plugins\ folder Edit the pinemhi.ini file (\LaunchBox\Plugins\VPXhiScores\PINemHi\pinemhi.ini) Under [paths] (10th line down), edit the path to the Visual Pinball (VP) ânvramâ folder located inside your Visual Pinball installation. (example) VP=D:\Emulators\Visual Pinball\VPinMAME\nvram\ The path MUST end with a slash!! (optional) Under [user] (line 25), type in your PINemHi Leaderboard name and code. (see Top 10 Scores below) Save and Close pinemhi.ini Using the plugin Start LaunchBox. Right click on one of your VPX tables and select View VPX Table HiScores. (see What to expect below) Click anywhere on the popup window and drag to move it. Click a button at the top of the window to view the different Top Scores. (see Top 10 Scores below) Click the red âXâ to close. How it works To get the top scores for a table, we 1st need to know which VPinMAME rom itâs using. To get this, the plugin uses VPinballX.exe to extract the tableâs script. It then searches the script for the name of the rom that table uses. The rom name is then passed to pinemhi.exe which extracts the top scores from the nvram file associated with the rom. What to expect The 1st time you run the plugin for a given table, you will see the Visual Pinball editor window appear, then close. This is where it extracts the tablesâ script. The script gets saved to the same folder as the VPX table, using the exact same name as the table but with a .vbs file extension. Depending on the table, the .vbs file will be somewhere between 20 KB and 150 KB in size. The next time you go to view that tablesâ top scores, the plugin will see the .vbs file and not extract it [again]. So you wonât see the VPX editor window unless you delete/move the tablesâ .vbs file. Top 10 Scores To be able to view your Personal Top 10 and Best Top 10 scores, you need to sign up at http://pinemhi.com/hiscores.php. This is where youâll get your name and code to add to âpinemhi.ini â. (See note #4 under Setting up the plugin [above]) You will also need to have PINemHiâs Rom Monitor (âpinemhi_rom_monitor.exeâ) running. This is a tiny executable that runs in the background and detects when a VPX table is loaded and then keeps track of your Personal top scores as well as downloads the Best Top 10 scores for that table. Please read through âPINemHi LeaderBoard installation and config.txtâ located in the plugin folder. (\LaunchBox\Plugins\VPXhiScores\PINemHi\ PINemHi LeaderBoard installation and config.txt) Some main points in the documentation (for use with this plugin): Setup your Visual Pinball (VP) path and user (name) and code. **Keys** Make note of which shortcut keys do which action. There are 5 different hotkeys. Change them as necessary. Controller buttons are also supported. Run âpinemhi_rom_monitor.exeâ. Other IMPORTANT notes: **** ââŠset the pinemhi_rom_monitor file to always execute with administrator rights.â âThe pinemhi_rom_monitor.exe was made with AHK (AutoHotkey). Microsoft Defender will frequently call AHK executables to be a virus/trojan This is a false positive. Feel free to test it with other anti-virus programs There is an option in Microsoft Defender to allow the program to still be used (make an exception for that file)â ****For me, setting the Rom Monitor to run as Admin created issues. As in it would not start. I get the message âThe requested operation requires elevationâ. The fix (what worked for me): Follow step #1 in Setting up the plugin. Specifically, unblock the zip file before extracting. Do not set pinemhi_rom_monitor.exe to âRun this program as an Administratorâ. With this, I would still get the UAC prompt when trying to run it from Windows Explorer. However, when starting it from within LaunchBox. (See Starting/Stopping pinemhi_rom_monitor.exe below) it ran just fine. Results may vary. This is what happened on both my main PC and on my cab. Thereâs a good chance both computers are slightly wonky, and that indeed you DO need to run the Rom Manager with admin rights. So if one way doesnât work, try the other. Starting/Stopping pinemhi_rom_monitor.exe You can toggle the Rom Monitor On/Off from the Tools menu. Depending on its state, youâll see this: Or this: When you launch a Table with PINemHi Rom Monitor running, youâll get a popup after the table loads showing your Top 10 Scores. Press âLâ on your keyboard to have it go away (unless you changed âkey=Lâ in the pinemhi.ini file). This is a nice indicator that the Rom Monitor is running and that your Personal Top Score will be saved. PINemHi Leaderboard Along with Personal Top Scores, PINemHi Leaderboard has some other cool features not directly accessible through this plugin like daily, weekly and 5-minute challenges. (These are accessible using the shortcut keys mentioned above.) It tracks Player 1 scores [aka Personal Top 10 Scores] as well as Special Scores (i.e. 20 loops [Back To the Future] or 50 martians killed [Attack From Mars]). You can add up to 9 friends and view each otherâs top scores. There are also a number of Badges that can be earned on various tables. Main Site: http://www.pinemhi.com/ Leaderboard: http://pinemhi.com/hiscores.php VPForums discussion: https://www.vpforums.org/index.php?showtopic=44580 Special thanks to DNA Disturber for creating PINemHi for the Visual Pinball community and allowing permission to use it here, making this plugin possible!! Submitter JoeViking245 Submitted 09/27/2021 Category Third-party Apps and Plugins
-
Version 1.2.0
52 downloads
View the Top Scores for your Visual Pinball X Tables (LaunchBox only) This plugin uses DNA Disturberâs PINemHi app to read a tables top scores that are stored in the nvram files created by VPinMAME. PINemHi currently it supports 425 roms. (Oct. 8, 2021 Updated to v1.1. See change log for details) Instead of scrolling through these (in game) See this (in LaunchBox) If youâve signed up on the PINemHi Leaderboard site, this plugin will also let you view your Personal Top 10 Scores (these scores are tracked separately from the Tablesâ top scores) as well as the Best Top 10 Scores on the Leaderboard. Signing up is free and you only need to provide a username. No email address, proof of citizenship nor vaccinations required. (See Top 10 Scores below) Requirements This plugin downloaded and setup (see Setting up the plugin below). PINemHi v3.3.1 (included with the plugin download) The emulator the table uses needs to point to âVPinballX.exeâ. This is needed to get the rom info for the table(s). Optional Requirements Sign up for PINemHi Leaderboards. (see Top 10 Scores below) Setting up the plugin Download and unblock the zip file. (right click the file, select properties and check the Unblock check box and click OK) Copy the VPXHiScores folder (from inside the zip) into your \LaunchBox\Plugins\ folder Edit the pinemhi.ini file (\LaunchBox\Plugins\VPXhiScores\PINemHi\pinemhi.ini) Under [paths] (10th line down), edit the path to the Visual Pinball (VP) ânvramâ folder located inside your Visual Pinball installation. (example) VP=D:\Emulators\Visual Pinball\VPinMAME\nvram\ The path MUST end with a slash!! (optional) Under [user] (line 25), type in your PINemHi Leaderboard name and code. (see Top 10 Scores below) Save and Close pinemhi.ini Using the plugin Start LaunchBox. Right click on one of your VPX tables and select View VPX Table HiScores. (see What to expect below) Click anywhere on the popup window and drag to move it. Click a button at the top of the window to view the different Top Scores. (see Top 10 Scores below) Click the red âXâ to close. How it works To get the top scores for a table, we 1st need to know which VPinMAME rom itâs using. To get this, the plugin uses VPinballX.exe to extract the tableâs script. It then searches the script for the name of the rom that table uses. The rom name is then passed to pinemhi.exe which extracts the top scores from the nvram file associated with the rom. What to expect The 1st time you run the plugin for a given table, you will see the Visual Pinball editor window appear, then close. This is where it extracts the tablesâ script. The script gets saved to the same folder as the VPX table, using the exact same name as the table but with a .vbs file extension. Depending on the table, the .vbs file will be somewhere between 20 KB and 150 KB in size. The next time you go to view that tablesâ top scores, the plugin will see the .vbs file and not extract it [again]. So you wonât see the VPX editor window unless you delete/move the tablesâ .vbs file. Top 10 Scores To be able to view your Personal Top 10 and Best Top 10 scores, you need to sign up at http://pinemhi.com/hiscores.php. This is where youâll get your name and code to add to âpinemhi.ini â. (See note #4 under Setting up the plugin [above]) You will also need to have PINemHiâs Rom Monitor (âpinemhi_rom_monitor.exeâ) running. This is a tiny executable that runs in the background and detects when a VPX table is loaded and then keeps track of your Personal top scores as well as downloads the Best Top 10 scores for that table. Please read through âPINemHi LeaderBoard installation and config.txtâ located in the plugin folder. (\LaunchBox\Plugins\VPXhiScores\PINemHi\ PINemHi LeaderBoard installation and config.txt) Some main points in the documentation (for use with this plugin): Setup your Visual Pinball (VP) path and user (name) and code. **Keys** Make note of which shortcut keys do which action. There are 5 different hotkeys. Change them as necessary. Controller buttons are also supported. Run âpinemhi_rom_monitor.exeâ. Other IMPORTANT notes: **** ââŠset the pinemhi_rom_monitor file to always execute with administrator rights.â âThe pinemhi_rom_monitor.exe was made with AHK (AutoHotkey). Microsoft Defender will frequently call AHK executables to be a virus/trojan This is a false positive. Feel free to test it with other anti-virus programs There is an option in Microsoft Defender to allow the program to still be used (make an exception for that file)â ****For me, setting the Rom Monitor to run as Admin created issues. As in it would not start. I get the message âThe requested operation requires elevationâ. The fix (what worked for me): Follow step #1 in Setting up the plugin. Specifically, unblock the zip file before extracting. Do not set pinemhi_rom_monitor.exe to âRun this program as an Administratorâ. With this, I would still get the UAC prompt when trying to run it from Windows Explorer. However, when starting it from within LaunchBox. (See Starting/Stopping pinemhi_rom_monitor.exe below) it ran just fine. Results may vary. This is what happened on both my main PC and on my cab. Thereâs a good chance both computers are slightly wonky, and that indeed you DO need to run the Rom Manager with admin rights. So if one way doesnât work, try the other. Starting/Stopping pinemhi_rom_monitor.exe You can toggle the Rom Monitor On/Off from the Tools menu. Depending on its state, youâll see this: Or this: When you launch a Table with PINemHi Rom Monitor running, youâll get a popup after the table loads showing your Top 10 Scores. Press âLâ on your keyboard to have it go away (unless you changed âkey=Lâ in the pinemhi.ini file). This is a nice indicator that the Rom Monitor is running and that your Personal Top Score will be saved. PINemHi Leaderboard Along with Personal Top Scores, PINemHi Leaderboard has some other cool features not directly accessible through this plugin like daily, weekly and 5-minute challenges. (These are accessible using the shortcut keys mentioned above.) It tracks Player 1 scores [aka Personal Top 10 Scores] as well as Special Scores (i.e. 20 loops [Back To the Future] or 50 martians killed [Attack From Mars]). You can add up to 9 friends and view each otherâs top scores. There are also a number of Badges that can be earned on various tables. Main Site: http://www.pinemhi.com/ Leaderboard: http://pinemhi.com/hiscores.php VPForums discussion: https://www.vpforums.org/index.php?showtopic=44580 Special thanks to DNA Disturber for creating PINemHi for the Visual Pinball community and allowing permission to use it here, making this plugin possible!! -
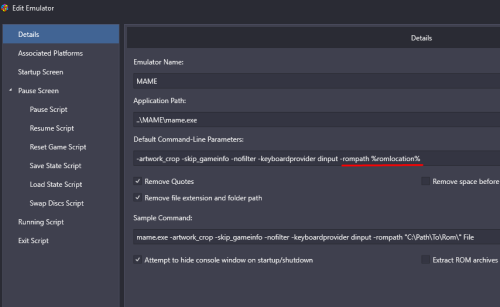
Did some testing... how you show you have it setup will work except the last slash in the rompath after "Games". It needs to be removed. electron -rompath "G:\Emulators\Acorn\Electron\Games" -cass ...assuming all your cassette .zip files are in this folder, as-well-as "electron.zip".
-
It would probably be easiest to add "G:\Emulators\Acorn\Electron\Games" to the rompath in your mame.ini file. [don't forget the quotes (") and semicolon (;)] Then for your command line ("2nd page") just use electron -cass Then check these 2 boxes