

Retrofrogg
-
Posts
1,383 -
Joined
-
Last visited
-
Days Won
8
Content Type
Profiles
Forums
Articles
Downloads
Gallery
Blogs
Everything posted by Retrofrogg
-
Yeah same, usually when it’s the first game. Any thoughts on this @C-Beats?
-
Not sure if it's specific to the current betas but just noticed this recently - sometimes videos don't play (though I can hear the sound from the video). The video itself just shows a black box. At other times the video will shrink to a corner of the video area (see screenshot).

-
Anyone got any thoughts on why this is happening?
-

Super Nintendo 3D Box
Retrofrogg commented on juniorunderground's file in Super Nintendo Entertainment System
.thumb.png.eb7d816ecad45572a03d6993ae94ee40.png) Nice. How are these different to existing sets?
Nice. How are these different to existing sets? -
Looks great. Any chance of fixing the box rotation stutter problem that has been mentioned by a few users in the other thread?
-
Seems to be a bug with the current beta - when I pop the game details screen out, and maximise it on my second monitor, the Retroachievements icons go large and blurry when my mouse pointer moves over them: When I select another game they return to normal, but the behaviour then repeats itself. When I move the pane back to the same monitor as the main Launchbox window, this problem disappears. The two monitors are running at different resolutions; could the problem be to do with that? Monitor 1 (with main Launchbox window) is running at 3840x2160, and monitor 2 at 2560x1440. Same problem if I have the main Launchbox windows on monitor 2, and move the game details pane to monitor 1.
-
Yeah I have an account; I've submitted a number of issues myself. Weird. I'll see what I can do!
-
Weird, I can't see the issue and get the message "This issue is submitted and being reviewed."
-
@SymmeTrey - could you list your hardware config please? And OS? @Mock - could you also list the rest of your hardware config and OS? Are you talking about the rotation in BigBox or Launchbox? Perhaps we can find something in common.
-
Wow, game details pane pop out - thanks so much! I've long wanted a dual-screen Launchbox setup, and this now makes it possible! Very very cool! Now to work on a game details theme that maximises the screen real estate that a second monitor affords.....
-
.thumb.png.fd17bee7a0d2aa701bd9a694701d9f02.png) 2.5D boxes, nice.
2.5D boxes, nice. -
OK, so I checked the mouse DPI settings, like this: And it made no difference. The rotation still has micro-stutters at the same frequency. @Jason Carr any further thoughts appreciated!
-
I've just significantly reformatted the database. A few items have been added, a few removed, and the scoring section has been improved. The only issue is that when I publish it (i.e. via the link above), the header text that was vertical has returned to horizontal - this looks a bit odd; I'll see if I can find a way round it. See image above for what it should look like! If anyone is keen to contribute to this project, please let me know!
-
What are your inclusion criteria for a platform @Mcfly.?
-
Archive.org Collection Sync
Retrofrogg replied to Jason Carr's topic in Third-Party Applications and Plugins (Released)
Appreciate any advice on this one @Jason Carr Also, apologies for including links to the archive. Seeing as this is an app that scrapes the Archive, I thought it would be OK to add links, but apparently not! I don't know how easy it will be for you to diagnose the problem if you don't have those links. Let me know if you want me to PM them to you or anything else. -
Nice setup. I have the same CPU with a 3090 and Launchbox running on an SSD. Main screen runs at 165Hz. Interesting relating to mouse DPI. I hadn't really investigated that but will take a look. I haven't had any problem with mouse focus when making wide movements, and don't really use BigBox. I do have a problem that it's very hard to rotate the box with the mouse smoothly horizontally, without it flipping about on the vertical plane - though I've mentioned that problem elsewhere. Maybe this further information about the stuttering will help narrow down the differential diagnoses.
-
Archive.org Collection Sync
Retrofrogg replied to Jason Carr's topic in Third-Party Applications and Plugins (Released)
I can't seem to get this to work; when I paste the Archive URL, I get this: The address of the collection looks like this: <Removed Link> It does work when I use this link: <Removed Link> But that seems to be an out-of-date set.
-
Archive.org Collection Sync
Retrofrogg commented on Jason Carr's file in Third-party Apps and Plugins
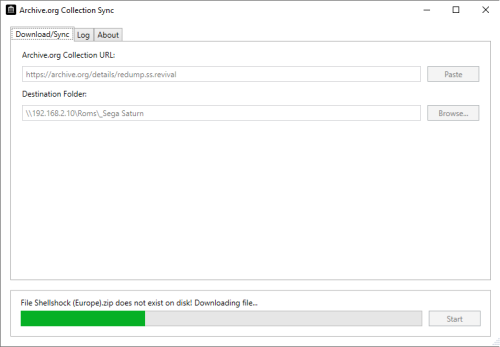 @Jason Carr The desciption of this plugin suggests that you can "sync" the archive collection with the files in a local folder - i.e. it would only download the ones you don't have. In your comment above however you said "The point of this tool is simply to download entire collections from archive.org (and deal with connection issues, etc.), while being able to confirm completely accurate downloads; that's it really.". So which is it - does it download entire collections only, or can it sync? I'm trying it out just now but haven't yet worked out how to enter the Archive collection URL.
 -
Archive.org Collection Sync
Retrofrogg replied to Jason Carr's topic in Third-Party Applications and Plugins (Released)
Would be nice to have an equivalent for Myrient, which seems to have more up-to-date rom sets, for the retro consoles at least. Edit: actually, seems like the Internet Archive set I was looking at was not the latest (though it seemed to be, from the link). -
Hi @kobaturtle! Not yet found a fix unfortunately. But I'm glad to have found someone else with the problem, so I know that at least it's not just me! What's your hardware config?
-
Great update! Now just need support for all 4 (or at least the left and right) spines in the 3D box model
-
 How many of these are you planning to make?
 -
Game Database Comparison Project - auditing online game media databases & resources Situation The Launchbox Games Database is very good when it comes to finding game metadata and media (box art, cart art, manuals, videos etc), though it is not complete and lacking various organisational features. There are a number of alternative online sources of similar information, though it can be difficult to know which ones to use or what kind of search strategy to employ. Having all these disparate, competing and overlapping sources of similar information seems inefficient, confusing and lacking in joined-up working. When directing time and energy into improving this, it is unclear whether this is best done by contributing to the Launchbox Games Database or pursuing other options. Ideally there would be some form of unified master database where gold standards can be set and where the various communities can contribute more collaboratively. Background Various online games databases exist, as do other sources of similar information including forums hosting media packs, media repositories and more general gaming related websites. The aim of this project is to review what is out there, catalogue these and then audit them, examining their remit, scope, quantity of material, quality, general organisation and ease of use. They will be scored based on various criteria including their performance against a random list of 30 games. This will allow clear comparison of these resources, help clarify search strategies and identify scope for improvement. It is worth noting also that various improvements are planned for the Launchbox Games Database this year. Assessment I initially had a small table posted below, though as this project has increased in scope, I've moved to Google Sheets (see link below). The main sheet is the main comparison of resources, though every resource then has its own sheet where it is given a "score" out of a maximum of 261, based on its cover for a random selection of 29 games (only Launchbox scored so far). The header rows and columns don't seem to lock in this published version, sorry. https://docs.google.com/spreadsheets/d/e/2PACX-1vR2Ec1EqS3igbaAaawu9EUmb7DoNHhZEkKoB6goPshSfcuS8zz-8jCM_5sFHePF2yt9w7hpRBgas8uF/pubhtml Keep an eye on this as I'll continue working on it. I would hope that other users can contribute by posting any good links below that they know of. I will keep it all updated in the above spreadsheet. If this gains traction then perhaps the thread could be pinned for the benefit of others. @hydef I lost your comment due to creating a new thread, but I've added your suggestions to the spreadsheet, thanks!
-
This sounds interesting. It will be good when Launchbox has 3D cassette box models so we can use these properly. By the way, I do a lot of CPC box art stuff so we should maybe link up on this at some point.


.thumb.png.eb7d816ecad45572a03d6993ae94ee40.png)

.thumb.png.fd17bee7a0d2aa701bd9a694701d9f02.png)


