-
Posts
1,383 -
Joined
-
Last visited
-
Days Won
8
Content Type
Profiles
Forums
Articles
Downloads
Gallery
Blogs
Everything posted by Retrofrogg
-
Lol @Freestate, thanks for your opinion, albeit a rather polarised one. Suffice to say we disagree in a few areas, including how "quality" applies here. A dime-a-dozen perfectly reconstructed and Photoshopped image of the original box takes away any of the box-aspect and leaves you with simply the image that went on the box. I want to see the box, not just the image on it (in particular now that we have 3D rotatable models). Though, different strokes for different folks and all that. I'm not sure what you're getting at with your second paragraph, in particular the unjustified vitriol. Wouldn't that be....a scan? Talking about retro systems I mean. How do you get closer to the actual box than a high quality scan of the actual box? I agree that as close to an authentic image that we can get when the box was new is what we're looking for. Though to take forward the idea of authentic...to me this would imply that any creases, marks or even just the uneven edges of the original box should be captured. If you edit these away, you lose some authenticity IMHO.
-
Thanks Rob. Perhaps it could be an option? I can’t imagine many requirement for the rotatable box showing on more than one screen! When a game is being played, could the user rotation be disabled? In Launchbox the mouse cursor has to be over the box itself to rotate it anyway, so even games using a mouse should be ok no?
- 214 comments
-
- third screen
- platform marquee videos
- (and 3 more)
-
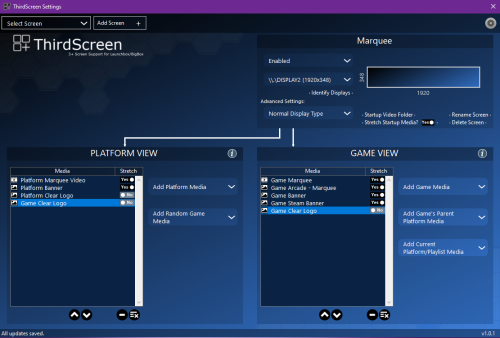
A similar plugin called "Thirdscreen" can show rotating 3D boxes on the second screen. Don't think it can do platform-specific settings though.
- 45 replies
-
What's the setting in the code for the rounded corners?
-
Looking to increase clarity on the different variations on a particular image type, and what people feel is best. The Launchbox Games Database has no guidance on what the various image types actually mean - and neither does Launchbox itself. Currently, taking the "Box - Front" image type as an example, we have: Box - Front Box - Front Reconstructed Fanart - Box - Front As well as a few other more specific items. Having spoken to @C-Beats about this, my understanding of what these mean is as below: Box - Front : the front box as it originally was - an actual scan Box - Front Reconstructed : an approximation of how the actual front box was, either put together from various elements, or a photoshopped tidy-up of the actual scan Fanart - Box - Front : not the official original front box image, but a new unoffical image, created by users My first query is whether the above is the general consensus. And if so - where do we draw the line between Box - Front and Box - Front Reconstructed when the latter is a photoshopped tidy-up of the actual scan? In my opinion, if the image has no discernible marks -i.e. it looks like a clean computer-generated image, rather than a scan of the actual box, then it should be labelled as Box - Front Reconstructed. You can easily tell the difference between these two by looking at the image; most images that are automatically scraped from the database look very clean. These tend to be labelled as Box - Front, but should really, as per the above, be labelled as Box - Front Reconstructed. The reason for most of them being clean images is that these are readily available online and much easier to get hold of - actual authentic scans are harder to come by. So my proposal is that Box - Front images should be and look like the actual scans - scuffs and all. Clean images should be labelled Box - Front Reconstructed. Proper scans should trump the clean images for the Box - Front category. Clean images should trump messy ones for the Box - Front Reconstructed category. Users can therefore choose what they prefer.
-
Great story. We watched the first 3/4 of it last week. Going to watch the last bit tomorrow
-
Thanks @garrett521 @JoeViking245 - a feature request; could we set which images display on the monitors per platform? For example, for MAME I might want the arcade controls to appear, but for NES I might want the box art.
- 45 replies
-
Book scraping plugin
Retrofrogg replied to xevidroid's topic in Third-Party Applications and Plugins (Released)
Have you seen @C-Beats's comics app? -
@garrett521 - which marquee monitor is that you're using?
- 45 replies
-
Magazines (Category/Platform) video: 16:9
Retrofrogg commented on CTRL-ALT-DEFEAT's file in Platform Theme Videos

-
I can edit a game and download screenshots no problem. When I select a bunch of games and go to tools/download/update metadata for selected games, and check the boxes for screenshot-game title and screenshot-gameplay, then select "yes, but do not replace any existing media", Launchbox seems to scan the games and then a windows comes up that says downloading media for selected games - but no download occurs, and no screenshots appear. Any help appreciated!
-
- 45 replies
-
- 1
-
-
C-Beats' New Digital Comic Book App - CHAOS!
Retrofrogg replied to C-Beats's topic in News and Updates
Would be great if Launchbox did at least this. -
- 45 replies
-
Thanks @JoeViking245 - but I don't see the reconstructed one in the list?
- 45 replies
-
Thanks @JoeViking245 . But that’s not really a workaround - then all the box-front-reconstructed images will show in the main games list, when it should show box-front.
- 45 replies
-
Also....could you add box - front - recontruction to the options list please?
- 45 replies
-
C-Beats' New Digital Comic Book App - CHAOS!
Retrofrogg replied to C-Beats's topic in News and Updates
Fair enough! I tried adding magazines to Launchbox before; I think the main problem was that LB doesn't create thumbnails for the magazines, so I had to create "box - front" images for them all manually, leading me to abandon the idea. -
C-Beats' New Digital Comic Book App - CHAOS!
Retrofrogg replied to C-Beats's topic in News and Updates
Nice! Would be great if this was integrated into Launchbox somehow, so we could see our games magazines along with the relevant platforms. -
Edit 06.10.24: This guide has been updated and revised; the new one can be found here: Updates April 2023 Reformatted the guide Removed "homebrew", as this has been removed from No-Intro sets and Dat-O-Matic at the request of multiple developers Expanded "Step 12 - updating the ROM set" to include instructions on how to manage this with Windows explorer Changed "Step 5 - determine which regions exist within a particular rom set" Introduction Having spent a fair amount of time finding the best way to import and manage full (not just licensed games) ROM sets, I'm sharing my method of importing and organising ROMs to help others (and in case anyone has any ideas for improvement). The focus here is on Launchbox, though if you also use BigBox then you'll see the changes reflected there. This guide is not for everyone; 1G1R afficionados who prefer the simplicity of having a single version of a game would use a different method. Some prefer a smaller curated game collection, others full sets for platforms. Both have their advantages. The method described here has in my opinion the best of both worlds. The aims are, for each desired platform: To have a full ROM set for the platform with all ROMs present and correctly named To have each region properly separated out in Launchbox That each region has the correct metadata, artwork, manuals etc To have the commercially released games in their own playlist, though to have alternate versions, unreleased, etc available also To be able to update the ROM set when changes are made, with these changes reflected in Launchbox That the above is easy and consumes minimal time STEP 1 - obtain the up-to-date DAT file for the platform being added, and load it into a ROM manager Rationale: Using a ROM manager allows you to compare your ROM collection for a platform against a definitive list. The list will probably be as complete a list as you're going to get. Keep your ROM set tidy and organised and confirm the validity of your ROMs. You can check that you have all the games/ROMs, that they are correctly named, and can add any missing ones or fix any errors. You can also check that your ROM set is up-to-date, with the latest versions of roms and the most recent changes added. These lists come in the form of DAT files, which contain lists of all dumped roms for a platform as well as the correct names and checksums. If you're not familiar with the datting world (quite different to the dating world) then it's worth doing some reading around this. The main datting groups are No-Intro (for consoles), Redump (for discs), MAME (for arcade) and Tosec (for everything else), though there are many others. Method: Various ROM managers are available; I've found RomVault the best. It has a component called DatVault, which can automatically add DAT files and keep them up to date. The DAT files are available from all the datting groups mentioned above and are regularly updated. Note - you can skip these steps relating to a ROM manager, though it will be more difficult to keep track of any future updates or changes to the ROM set. STEP 2 - obtain the full rom set for the platform being added Rationale: If you're going to do something, you may as well do it right. Obtaining the full ROM set ensures that you have all of the games for that platform (unless any are MIA) - generally including released games, unlicensed games, prototype and many other kinds of ROMs. If you're the collector type then this is the way to go. Note that hacks are not included; if you want to add these, you can do so separately at the end. Method: I won't list ROM sources here, but ensure that you obtain the most up-to-date full ROM set for the platform. Once you have the ROM set and have placed it in the folder where it is going to live, leave it there rather than moving ROMs into any sub-folders. This means that future scans of the folder with the ROM manager will work. Separating out any roms into subfolders in Windows Explorer will break the link with the ROM manager. STEP 3 - scan the ROM directory in the ROM manager using the DAT Rationale: This will help ensure that all ROMs are present and correct. In RomVault, if all ROMs are present in the folder and correct, then the icon for that platform will be green. Method: This involves telling the ROM manager where the roms are stored for that platform, and then running a scan. Below you can see my entry for the NES in the RomVault DAT tree, showing that I have all 4452 of the correct roms: This uses the No-Intro DAT file, which is regularly updated and contains all licensed games as well as beta versions, unlicensed games, demos, prototypes and samples. Sometimes ROMs will be missing from your set and will need to be added, or sometimes roms will need "fixed" within the app. STEP 4 - decide on how you want to separate the regions for the platform Rationale: We are going to import ROMs by separate regions, as this has various advantages over importing the full set and then letting Launchbox create region playlists. Doing each region separately means: You will have all released games for the platform - as some games were released in specific regions only You can browse games for each region separately in Launchbox All ROMs will have the correct regional artwork and metadata ROMs with more than 1 region (e.g. "Excitebike (Japan, USA)") will be correctly handled, and will appear under both regions and with the correct artwork Any regional variations in the platform/console itself will be correct - e.g. the Nintendo Famicom and Nintendo Entertainment System will appear separately with the correct names, platform videos, images, metadata etc. In terms of how to separate the regions - the 3 main regions are North America, Europe and Japan. These would tend to be the default 3 regions for a platform, though there will be some variation between platforms and so you can choose this on a per-platform basis. There is also a "World" region, which is for games that were released worldwide (we are going to add the "world" region roms to each of the 3 main regions). As regards the other remaining regions, you could have a 4th region group for "other", though I think it makes more sense to group these remaining regions under either North America (if it is an NTSC region) or Europe (if it is a PAL region). This page is quite useful in listing regions: https://nintendo.fandom.com/wiki/Regions Method: For the above to all work correctly, we are going to import each of the 3 regions as it's own platform in Launchbox - we will then group these platforms under a platform category. The hierarchy will end up looking something like this: Consoles (platform category) --Nintendo (platform category) ----Nintendo Entertainment System (platform category) ------Nintendo Entertainment System (North America) (platform) ------Nintendo Entertainment System (Europe) (platform) ------Nintendo Famicom (platform) Each of the above platforms will contain the relevant playlists (which we'll get to later). In Launchbox it will look something like this (ignore the other platforms for now): STEP 5 - determine which regions existing within a particular ROM set Rationale: If we are going to import the ROM regions separately, we need to know which regions exist within the ROM set so that we can make sure that all are imported. Method: A relatively easy way to do this is to do the following: Import the full ROM set into Launchbox. Don't scrape for any game information, images, videos, bezels or anything else. When doing the import, set the platform name as the first region that you are going to import (e.g. Nintendo Entertainment System (North America) Right-click the platform in Launchbox and select "auto-generate child playlists" Make sure only "Regions" is selected and click "OK" Make a note of all the regions that appear as playlists; these are all the regions that exist within that ROM set With the platform selected, select all games, right-click and "delete"; the platform, playlists and games should all be gone from Launchbox However, potentially a better way is to use the following Python script I made, which will parse any directory and return a list of the regions contained therein (it works with No-Intro files; I haven't looked at other datting groups yet): list_regions.py To run the script, open a command prompt, navigate to the folder where the script is stored, then type (without the quotes): "python list_regions.py". STEP 6 - import the first region into Launchbox We are now going to properly import the first region. We will start with the North America region, which is generally the main and preferred region for a platform. Again, using the No-Intro Nintendo Entertainment System set as an example, all the North America ROMs contain "USA" in the filename. We could just run a search in the ROM folder in Windows File Explorer for "USA", though that would also return games which have "USA" in the title. You could import all those, but you would then have to delete the games which are non-North America but have USA in the title. An easier way is to search specifically for the USA region by searching for "(USA" and importing those, and then searching for "USA)" and importing those. The No-Intro NES ROM set doesn't seem to have aeny triple-region ROMs, though if a ROM set had these then I would go for the alternative option mentioned above. Note that Windows File Explorer is funny about including a bracket in the search string. You have to enter it a certain way. See the last post in this link for how to do it properly: https://answers.microsoft.com/en-us/windows/forum/all/how-do-i-search-for-parenthesis/ff8982f2-7a65-4569-a3f1-0373d0763ad8 Basically you have to search for (without the first and last quotation marks): "name:~"*(USA*"" and then "name:~"*USA)*"" - for example" So, do the first search, and then import all those into Launchbox. Again, at this stage don't scrape for game information, images, videos, or anything else. In the importing ROMs dialogue I tend to ask Launchbox to leave the ROMs where they are. I would set the platform as "Nintendo Entertainment System (North America) (using this example), and set the "scrape as" to "Nintendo Entertainment System" (which should be selected by default). Make sure to check the box for "Force importing duplicate games". Although it is tempting, make sure that "Combine ROMs with matching titles into a single game" is unchecked. If you like, you can combine some of the ROMs later - I recommend doing this only for "released" games, as these are less likely to change or be updated. If you have "Combine ROMs with matching titles into a single game" checked, then only one of the ROMs is counted as a game, with the others being added as "additional applications". This is a flaw of the app as is stands, and means that any auto-populated playlists that you make will not recruit ROMs that are listed as "additional applications". Also, note that if you later decide to expand the combined games, the additional apps will have lost the associated images and you will have to re-scrape those. Once all the ROMs have been imported, do the same for the second search term. You should now have all North America (USA) ROMs for that platform imported. Finally, repeat the above steps for the "World" region (adding them to the North America platform). All "World" region ROMs were released in North America, and so should be a part of that set. You should now have all ROMs for the North America platform imported. STEP 7 - create the Nintendo Entertainment System platform category If you have not already done so, now is a good time to create the platform category for the NES platforms. I organise my platforms first by manufacturer, and so have a "Nintendo" platform category under the "Consoles" category. Make sure you're viewing the platform tree in "Platform Category" mode by the way. You can then create a "Nintendo Entertainment System" plaform category and put it under the "Nintendo" category. You can now move the "Nintendo Entertainment System (North America)" platform to the "Nintendo Entertainment System" category. STEP 8 - import the other regions into Launchbox Now repeat step 6 for the "Europe" region, and then for the "Japan" region. Make sure every step is followed, including adding the "World" region ROMs to each. Finally, look at the region list for that platform that you made earlier, and see if there are any regions that you have not yet imported. You can run searches in Windows Explorer for these remaining regions. There won't be many games that have been specifically released in these other regions. For example, if a ROM has the region "Australia", it will not have been imported yet using the above method - go ahead and import it, adding it to the "Europe" region platform as Australia is a PAL region (if you want to use the method mentioned above - you can create a 4th platform for "other" regions if you want). STEP 9 - organise the ROMs for each of these region platforms into release type playlists Now that we have all the roms correctly imported into Launchbox and under the 3 main region categories, we are going to organise them within Launchbox. Start with the North America region. At this stage you won't have any playlists. All ROMs will be grouped together under the platform heading. These ROMs will include released games but also unlicensed, demo, etc etc. The first step is therefore to separate these ROMs out by release type. Launchbox has a metadata field for "Release type" which is automatically populated from the ROM filename. I find that this works for most, but not all, ROMs. Why it works for some but not others, I'm not sure. Whilst Launchbox can create a number of auto-playlists (e.g. for regions, play modes and genres), unfortunately it cannot currently do this for release type. So we are going to create these manually. First, create a platform category under the main region platform ("Nintendo Entertainment System - North America" using our example) called "Release Type". Next, create a playlist called "All Licensed Games". Under the "Auto-Populate" tab of this playlist, you need 2 rules; Platform / is equal to / Nintendo Entertainment System (North America), and Release Type / Is Equal To / Released. In the parents tab, make sure that the playlist is set to appear under the "Release Type" category only. Click OK. You should now see something like this (don't worry about the numbers): Next, make similar auto-playlists for Unlicensed, Beta, Demo, Prototype, Sample, Program and Pirate. You could also do Aftermarket, but see the paragraph below. You should see some games appearing under these playlists when you refresh. Note that the No-Intro sets also contain "Aftermarket" releases; there is ongoing debate on the best tagging method within No-Intro. Currently, "unlicensed" is a kind of umbrella tag which coincides with "aftermarket" for the majority of ROMs, though not all; see here for some further information about the tagging, though note the error in that not all "aftermarket" games are "unlicensed": https://wiki.no-intro.org/index.php?title=Aftermarket_Guide I think that these release types should be fairly universal amongst No-Intro ROM sets, but if you're doing this with other No-Intro ROM sets then it would be worth checking that there are no other release types mentioned. Now to address the ROMs which don't have a release type assigned. Create a playlist called "No release type" with auto-populate rules: platform / is equal to / Nintendo Entertainment System (North America), and Release Type / is empty. This will then list all games without a release type. View the games in this playlist in "list view" and then arrange by "Version". You can now go through the list, selecting groups of games with the same release type, and then adding in the correct release type via right click - open bulk edit wizard. Go through the list until all ROMs have a release type assigned, and there are none left in this playlist. Now repeat this step for the other region platforms. STEP 10 - create the other playlists Now you can go ahead and "auto-generate child playlists" for the other playlists that you want - I tend to add in "genre" and "play mode". You may want to create other auto-populated playlists - for example in the NES No-Intro set you could create a playlist for "virtual console" ROMs, "Namcot Collection" ROMs and others. You can create manual playlists, but bear in mind these will not be auto-updated when you update the ROM set. For this reason, I prefer to have mainly auto-populated playlists. STEP 11 - scrape the game information, metadata, artwork and videos Now that the ROMs are properly organised, you can scrape the game information, metadata, artwork and videos - whichever items you prefer to have. Before starting, go to tools/options/region priorities, and make sure that the region for the ROMs that you are going to scrape is selected and at the top. Select any other regions that you have ROMs for. Then select all the games that you want to scrape for, and to go tools/download/update metadata and media for selected games. Then do the same for the other region platforms, selecting the appropriate region priority before scraping. Once all the above has downloaded, you can manually check through the collection and fix any errors in terms of box art region. I found that there were a small number that needed changed. You can replace the standard scraped images with art packs if you want. STEP 12 - updating the ROM set That's it! You should now have a ROM set in Launchbox that is properly set up. A good thing about doing it this way is that you can update the ROM set (relatively) easily, and so keep up to date with any additions or changes. When a ROM set is updated, if you have the latest DAT then on scanning in your ROM manager it will show the missing ROMs. You can then add these to your ROM folder, re-scan to make sure everything is OK, then import these ROMs into the relevant region platforms in Launchbox. If the update process has removed some old or defunct ROMs, then in Launchbox you can go to Tools / Scan / For Removed Roms in Currently Selected Platform". Do not use the Scan / For Added Roms feature, as it will look in your ROM directory and add all the ROMs that are for the other regions. In terms of how to update the ROM set, there are various methods. Currently the way I do it is to: Download the latest ROM set for the platform In your existing ROM folder in Windows Explorer, add a "date created" column (in "detail" view) Copy all the ROMs from the new set to the existing set; when it asks if you wish to over-write, select "no" Only the missing ROMs will be copied across Now sort the ROM folder by the "date created" column - the newly copied across ROMs should have that date & time set to when they were copied across You can now filter that folder by that date/time, to show only the new roms, click the down arrow at the edge of the "date created" column and choose the corresponding date You can now search within just the new roms for your regions, and import those into Launchbox; I start by searching for the "world" region, then after importing those I change the search to "-world" to remove those; then wrinse and repeat for the remaining regions; if there are any ROMs with dual regions then those would have to be added manually I hope this is helpful. The method is still too cumbersome for my liking and I'll keep working on streamlining things. Ideally Jason and Gordon would get together to combine their powers and integrate rom management functionality into Launchbox. Update: I hear a plugin from Gordon is in the works! Let me know of any suggestions for improvement!