-
Posts
1,442 -
Joined
-
Last visited
-
Days Won
8
Content Type
Profiles
Forums
Articles
Downloads
Gallery
Blogs
Everything posted by sundogak
-

Why are the MAME Software Lists different to other sources?
sundogak replied to strich's topic in Troubleshooting
MAME ROM Software sets do not have cartridge headers that indicate to the emulator the type of cartridge, size, and mapper information. They are the game ROM data only. The MAME emulator doesn't need this header on the ROM file as it deals with this by including this data in the HASH file XML for each cart system (if applicable). For example, if you look at "NES.XML" in your MAME Hash directory you will see information on the header data. MAME matches the ROM checksum looks to the XML for mapper data and the emulator knows how to run the cartridge. For archive purposes the non-headered are preferred or if you are going to do patches for hacks as you need to match specific checksums or the patch will fail (or make corrupted ROM). Some non-MAME emulators get around all this with built in databases within the emulator so will work with either type ROM. Other emulators need the header in the ROM file or will just not run (as you experienced). Others yet, may stop and ask for the header information which is annoying if on a Big Box type view (some Atari 800/5200 emulators). There are various utilities to add headers to things to non-headered roms like here for NES https://www.romhacking.net/utilities/1352/ But for emulation, best to pick a ROM set that works with your emulator so don't have to get into that gory level of detail. -
- 79 comments
-

Do all these posts with images go into a DB somewhere?
sundogak replied to strich's topic in Game Media
LB DB is one image at time for users. There was an old plugin that had some bulk ability on per game basis to upload to DB but hasn't worked in awhile. It was fiddly even when it did work. Plus it created other issues in that the approval queue would get large as people uploaded all kinds of files (many times not always better) that reviewer had to wade through. Then there is the problem of no way to know a better version was uploaded (other than manually looking). I am always a bit hesitant to mindlessly have LB blind overwrite media in mass. -

Do all these posts with images go into a DB somewhere?
sundogak replied to strich's topic in Game Media
Seaview who does many of them in that thread actually says "uploaded to DB" for his. For others is hit or miss. There is no "auto" upload though so a user has to do the work. -
Individually here. Or packs here. You need the alt packs for GNW.
-
It is evolving particularly for non-Arcade. Many of the GNW and Tiger handhelds were not added to running MAME set until about 4 years ago ("new" when you figure arcade games have been working for decade plus). Media lags after added to working set. The full MAME set has ~46,000 emulated systems vs about 3K for arcade. Most of those emulated systems many people don't care about as they are not games (e.g., the 10R calculator above is good example). The media in the LB DB is user uploaded (plus people have to make it). Gameboy, PSP type systems have good LB support and media in DB because they are popular systems. The polls that come out for LB every year or so never get many votes for anything like MAME Software List sets or handling of non-arcade MAME stuff (I would also like better pinball support media wise). But LB goes where the user base wants/votes. Anything else you got to put time in and there are tools like at arcadeitalia.net and plugins at this site that can speed it up. Or you do the manual sort way which is a few hours of time. Either way you will come back to a large chunk of handheld games will not have complete media (or any) available in LB DB or otherwise. I keep my Handhelds section hidden from Big Box for that reason. As with all hobbies you have to decide if it is worth the bother.
-
Should be more than plenty. LB installed on SSD will help with image cache speed (i.e., scrolling, media views). For the actual emulators plenty fast for what you listed. Most depend on the CPU vs graphics cards so good there as well. The RAM upgrade from 4GB will be helpful overall for general OS speed (at least 8 GB).
-
LB will work with pretty much any emulator; thus any version of MAME if that is EXE you have and ROM set.
-
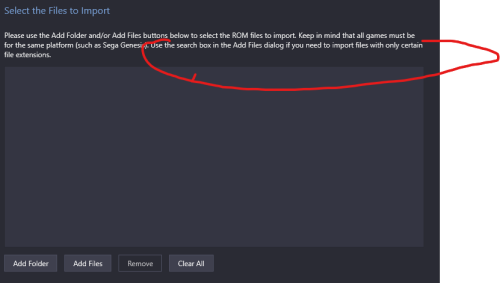
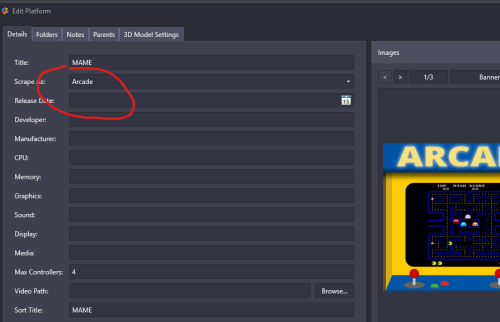
@strichThe importer is doing what it is supposed to it is just the LB DB does not deal well with non-Arcade items that are part of full MAME set (similarly Software Lists in MAME have same issue). Reimporting won't fix the issue as it relates to the scraper and the platform used. Thus, it is a manual affair to address it. For example, create a Nintendo Game & Watch platform manually. Right click in left pane and select new platform option. Set that platform to scrape for Nintendo G&W. I recall LB will complain you shouldn't add manually, ignore that. Then go back to your MAME arcade list and select the games you want to move to that platform. Right-click and can use bulk edit to change the platform in one go. LB will still point to the roms in the MAME directory and MAME will still be your emulator, but for LB viewing purposes it will move them to that separate platform from Arcade. Then you can rescrape the games and should bring up the media correctly (at least for proper Nintendo GNW games). There are about 50 or so Nintendo GNW games. For the all the other MAME handhelds it has been awhile since messed with it. I think I used the filter ability here to select handhelds via Additional Filters and Categories, and then you can export out an XML file and import that list into LB via a plugin that imports XML files. The difference is I hadn't imported handhelds initially. Or, if already imported, you can do the manual brute force way similar to the Nintendo GNW and look for the games, bulk select and move to a new platform. For example if you go into list view in LB and look at "source" column anything with "hh_" will be a handheld (sadly they don't all show source data). Developers like Tiger, Tomy are also good indicators for handhelds. Like mentioned though, once you get into non-Nintendo G&W handhelds the media starts to get sparse. Tiger games tend to have some (or packs you can find in LB download site) but quality is not as high as what you may be used to for other systems. It really depends on how much you want to fiddle with it all for games that tend to be low "replay" vs arcade type games.
-

mame-handheld electronic games - artwork / layfiles
sundogak replied to d8thstar's topic in Game Media
That pack only has artwork for the "official" art which just so happens to only have one GNW for whatever reason. Most of them are "alternate" which are listed individually here. Or you can download the packs listed under progettosnaps.net artwork packs "alternate". The https://www.progettosnaps.net/artworks/ 258 update pack has majority of them (~42). The rest suspect are scattered in the packs but here is zip with rest GNW artwork.zip Also some good media packs here at LB download site. -
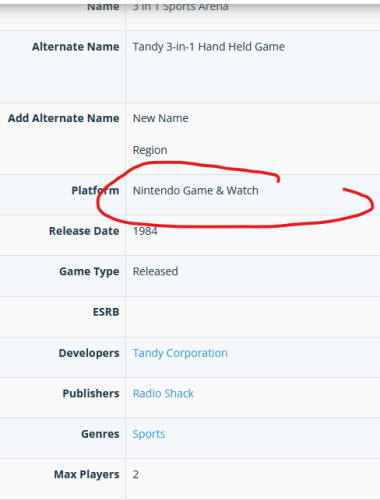
A few things to check. First you should make sure your game is linked to LB DB. Otherwise media won't download since LB doesn't know which game it is. Thus, make sure any games not showing a LB ID (top right circle) you manually connect and media should then download. Second, is LB can get confused as to which platform to look for in DB (particularly for MAME as it has lots of different things beyond Arcade). Looking at a few in your screenshot you imported "handheld" and "other" games for MAME. For example, the game "3 in 1 Sports Arena" is a handheld game and the entry for media is listed (confusingly within LB DB) under the "Nintendo Game & Watch" platform, not arcade. People have tended to put handheld stuff beyond Nintendo Game and Watch there. Sometimes it is in Arcade as well. Anything under Arcade (MAME) will typically default to Arcade platform to scrape from LB DB. The issue is this game is under the Nintendo Game and Watch platform, not Arcade For this reason I separate handhelds under their own platform (MAME Handhelds, and Nintendo Game and Watch). For handhelds and some non-Arcade MAME systems there tends to not always be an entry in the LB DB and if present, not as much media as you would see for Arcade systems. Actual Nintendo Game and Watch games are relatively complete for media but other non-Nintendo handhelds in MAME set are more hit and miss. Another example is that "10R" entry is a pocket calculator which has no LB DB entry and no media. You can either hide the entry, delete it, move to another platform or leave as is with no DB data or images. But from a MAME developer view it is considered a "handheld" and gets pulled in when imported.
-
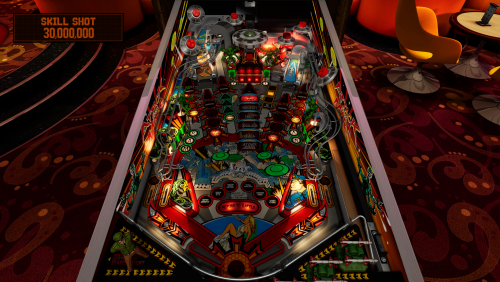
I see what your are saying as you could go the additional apps route. As each app entry you could select a specific emulator (e.g., VPX, FP) with one master entry for say "Attack from Mars". In essence, that is how the LB DB is setup with all things jammed into the Pinball category and not broken up by emulator type. However, not sure how useful that would be though for a Big Box view and/or cab setup if all additional apps vs separate entries under platform. In LB can right click easily enough to select. Basically a preference/org thing. But if doing anything with lots of tables I think not separating by platform (i.e., VPX, FP) would get cumbersome to manage as well as you cannot do media specific to that table/platform (the limitation with the LB DB for Pinball). Here are screen shots of Attack from Mars as example: Pinball FX Future Pinball (francisco666 version) with backglass (FP has built in backglass media): Visual Pinball (jpsalas version) with B2S backglass:
-
They are separate platforms. For FP you import the *.FPT tables from the Future Pinball\Tables directory. For VPX you import *.vpx tables from the Visual Pinball\Tables directory. You can import in bulk via Tools, Import, ROMs, and selecting files. Then go to tables directory via Add Files button. It will bring up normal Windows Explorer box with a Search window and then type in *.vpx and will search for all inclusive of those in sub folders. Then select and LB will import those. Similar with FPT tables and FP. Edit: and for one offs you can simply drag the VPX or FPT table into the platform in LB and it will start the auto import process.
-
FP and VPX are setup as completely separate emulators within LB. You also don't mix files with FP and VPX so tables will be in their respective folders along with the VPX and FP executable.
-
Are you using Windows 8 or 7? If so then see here.
-
It will boot but screen placement, backglass and DMDs will all have to be adjusted going from 1 to 3 screens. Plus, if you don't download and setup B2S files for 2nd screen back glass you will have to do that as well. In the end it will take time to move to new setup and no real way around that going from 1 to 3 screens. If keeping to small set of tables then won't be big issue. I also wouldn't bother renaming anything specific to make LB DB happy unless going to stick with less than 100 or so tables. The DB is of limited value as it is currently setup for pinball media and primarily for recreations. But beyond that you will run into LB DB limitations. Plus there are many media packs outside the LB DB both here in LB download section and at the pinball sites with clear logos, table snaps, videos, flyers, docklets, and other media. Predominantly they will be in format of table name, developer and year. LB will match any media that matches the "rom" name (or table name in this case).
-
I have a Intel NUC in TV location with wireless bluetooth keyboard and XBOX One wireless controller dongle (I had older non-bluetooth controllers). It is just used for older games (MAME, SNES, NES). Never seen any issues with lag at least noticeable by my casual play.
- 1 reply
-
- 1
-

-
Pinball for most part is not fully portable whether you are talking Future Pinball, VPX, or Zen Pinball FX. You can make them "kinda" portable at least for FP and VPX. VPX and VPinMAME all install things in Windows Registry. VPX is getting better about saving things outside registry but still need to re-run installer (or Baller installer) on any new setup and you may need merge registry settings depending on how setup initially. For example this key: Computer\HKEY_CURRENT_USER\Software\Freeware\Visual PinMame has DMD positioning information that VPX uses by default unless you setup a DMDDevice.ini file in your Visual Pinball\VPinMAME directory. At that point uses the file vs registry. Make sure you setup things so consistent drive mapping for both tables and the executables. I personally would never put anything in the Launchbox directory, especially pinball stuff. I map a "G" drive. That has LB, emulators, and all ROMs/Tables to run things. Moving to new computer is easier and keeps things organized. My "emulators" directory contains my pinball executable and setup files. For Tables I install each in their own folder. If you look at guides particularly at the pinball sites and even some very long term VPX folks, they will swear the world will stop revolving if you put tables in folders. I have +1K tables in folders and all work fine both for FP and VPX. Plus it is massively messy to do it the "right" way as all files such as back glass (B2S) and VPX tables get thrown in the root of the tables directly, it is insane to manage. VPX looks first there for anything it needs in the folder where the table is located and if not three looks to where it normally expects the file as fallback There are two exceptions to this: Music and Scripts. Music has to go in the Music folder and not in sub table folder. Music is still hard coded in the table code so unless you want to edit table code, placing where expected is quickest/easiest. Scripts are the other (vbs extension). I have found MOST times any scripts specific to the table can go in the same folder as the table. However, if a table author hard coded a path in their table then I have had a few tables gag if not in proper Scripts folder (usually ones I didn't keep anyway). My setup looks like this (and is one of myriad of ways to do it): If you have back glasses then if you name a "res" file the same as the table VPX will look there first and use those settings before it uses the general settings.txt file. Similarly for the B2STableSettings.xml. The "directb2s" file is the back glass and typically should be the name of the VPX table. It also helps immensely to put a note in directory (or in the file name for VPX table) as to the version of table. Your future self will thank you. I also put notes to indicate if using a color DMD or PUP Pack. Don't need that if have a few tables but it makes life easier for upkeep/version control. Overall I would would go and install the baller installer if not up to speed on all this. Make sure to use the beta Nov 2023 version as there have been lots of updates to VPX, B2S, and DMD code. Don't be thrown off on the "beta" term. ballerinsallv2311 [PinUP Virtual Pinball System] (nailbuster.com). Follow the guide here. baller_installer [PinUP Virtual Pinball System] (nailbuster.com) That will get you the key pieces of software all installed so things will work even for things you think you may not want right now (say PinupPopper, PinupPlayer, DOF). Then suggest you setup 5 or 6 tables in folder format you want to use and see how things go both outside LB and then getting things imported. Then it is wash and repeat after that. When you get cab you will have to revisit the res and DMD positioning aspects, as well as alter your VPX windows (to 3 screens) and controller mappings but you will have the base tables setup.
-
No, nothing that you will be able to slot directly in from a TV setup to a cab. Monitor resolutions, DMD placement, back glass setup and positioning for cab will be different than one screen TV setup. If you did a pre-cab setup with two screens so you have the back glass working you can adjust the resolutions specific to cab. But either way you will have work to do to manage.
-
No, you cannot leave them zipped. Those zip files contain B2S files (back glass) and music in many cases along with media. They also tend to have multiple versions in same zip (i.e. v1.01, 1.2). VPX will not know what to do with files inside the zip. VPX expects files to be in specific locations, particularly music. Stick with the folders that have "VPX" in title. Skip the others such as VP1 through VP9 and ignore VPX lower version number tables by same author. Most of the tables from VP9 and earlier have been redone in VPX at this point. There is also no reason to have 5 different versions and it will just result in a lot of extra stuff to manage. Future Pinball has advantages in some cases. Particularly now with BAM which patches some of the limitations of Future Pinball's ancient version (last updated in 2009). I have both installed, but as for tables for most part they will all be in VPX if they are recreations. Some original FP tables are not available in VPX (i.e., SlamT1LT's FP tables). I would initially stick with VPX if starting off down the pinball path.
-
Baller installer just gets VPX up an running with various all in one install sub components (e.g., DMDext, FlexDMD, VPinMAME). VPinMAME is key item that needs to be installed whether you use all in one or do separately. Pinup Popper is a component in the baller pack but you don't have to use it. As to LB, that is completely separate and has nothing to do with the baller installer. Outside of LB you should make sure you have a working install of VPX whether you use the all in one or otherwise. Once that is done then for LB you have to do two things: setup VPX as an "emulator" import VPX extension tables into LB. There a variety of threads on #1 but briefly this is what looks like: Key is under the "Default Command Line Parameters you enter this (note: the primary key tells VPX to play table on main monitor, not needed for one screen but doesn't hurt either): -primary -minimized -play You will see some older threads using AHK and plugins to launch, that is no longer needed with the above. For #2: you import games into LB having LB only look/import VPX extension files (the VPX tables). An example for The Addams Family looks like below: Lastly, media for Future Pinball and Visual Pinball is not simple and requires a lot of manual care and feeding. The LB database has some of the "real" pinball tables such as The Addams Family but overall you won't see a simple import into LB and search DB for media and all comes in with complete sets process. Look in the download section for various sets. Also the more your tables stick to the "Back to the Future (Data East 1990).vpx" naming convention the more likely packs done by others will match more readily. But overall there is no "standard" for pinball media (which Pinup Popper does help with).
-
-

Some games run fine in Daphneloader, but won't from Launchbox
sundogak replied to stevaside's topic in Troubleshooting
Your Daphne log file almost always will give clue as to what is going on. It should be in same folder as your exe. You should double check you have complete VLDP set (video and audio files in VLDP folder). The OGG file (typically this format) is the sound and needs to be exactly the same name as the M2v file (video). If missing, not named the same, or an OGG file from different version of the m2V file then will get no sound. -

Save images as rom name rather than game name?
sundogak replied to stigzler's topic in Troubleshooting
You can use this plugin here which I have used quite a bit particularly to keep my pinball media standardized format. It won't force LB to do by default but you can rename things after the fact. -
1) the MAME setup within LB was relatively new feature so likely not the case. The auto install used a command line within LB that bypassed the ini files; but if you made changes to the INI and it worked then can ignore comment. 2) Not really sure why that is working but if gets you what want then all good. Windows display numbers can be wonky and had in the past the "primary" monitor show up as #2 for listing. I use a utility called UltraMon to help with things but not needed if you got it working. 3) Open a DOS command window and go to your directory where you MAME.exe is located. Then type the command referenced. Basically launching MAME via command window and outside of LB.



-fp.thumb.png.93ce623e9eb1a78807f966e16427afe6.png)
-fp.thumb.png.c71d7e32a1c224fadc5be344d6491753.png)
b.thumb.png.9a8f0be4e3410124038f335eccf9b35e.png)
.thumb.png.83c47b44bdfb7d313804e8566629c739.png)
