Leaderboard


Popular Content
Showing content with the highest reputation since 03/09/2025 in all areas
-
Version 1.0.0
478 downloads
Here's my first Teknoparrot full pack A-C, had trouble uploading this yesterday but here it is finally. ALl the usual Goodies Videos, Video Themes, Box Art 2d and 3d Fanart/Backgrounds, Clear logos etc. Hope you enjoy this as much as i did making it PArt 2 coming soon Enjoy 😀 Try This link if your having trouble extracting https://mega.nz/file/qCBXDKwA#v9C4JjAEvVa_MOXa4nwcwyJmh2ZWtuVgGztxKAxHAJw20 points -
Just posting a separate thread for the update to this theme. Sharing a few screenshots of the progress....which is about 75% done overall I have spent the last 4 months upscaling and cleaning every single piece of art used in Refried 2.0...as well as making tons of new art for the update. It will cover about 70 more systems than 2.0...and utilize every single view type that big box has. I have not slept normally since I can remember...but,I am happy with how it's turning out...lemme know what you guys think of it so far!
 18 points
 -
Version 0.286
23,406 downloads
**This removes the nag screen that informs you if a rom doesn't work correctly, or if at all, if you use this no nag, then please do NOT go to the mame support site with issues with games, please only use if you understand that there will be no help from anyone at mamedev as you are using a modified version of mame. Contents: mame.exe - Normal Mame with Nags removed. (Note mame no longer carries the 64 in its exe name changed by Devs in 0.229) This version also allows the games Akai Katana and Dodonpachi Saidaioujou to be played. It's advisable to download the full mame official pack and install it, then just overwrite the exe with the replacement, this covers any changes the mame devs may have made to the support files. After you have done this, make sure you copy the folders artwork, ctrlr, cheat, hlsl, ini, folders and the ini files from the root of your original mame folder, and move/copy them to the new install. If you are using your own installed/setup of mame then make sure you also set in the mame.ini 'Skip_gameinfo 1' If you got Launchbox to setup mame for you when asked, you only need to replace the exe and play. As some are not sure about False Positives, and report a virus was detected, As goes for all versions i upload, they are all ran through virustotal before i upload, and if by any chance something did end up with an issue it would be noticed very quickly after upload and would be removed/restricted. 0.285 - VirusTotal - File - 4bcfb12b87f63afa1f0241915d7e812ecbf14e83faa6ed62af1b49582d70930d All NEW versions of the No-Nag will be posted in this download thread only, if you wish to get the new releases every month, either follow myself or the thread, As the download section will not show any new releases.15 points -
Version 2.0.0
371 downloads
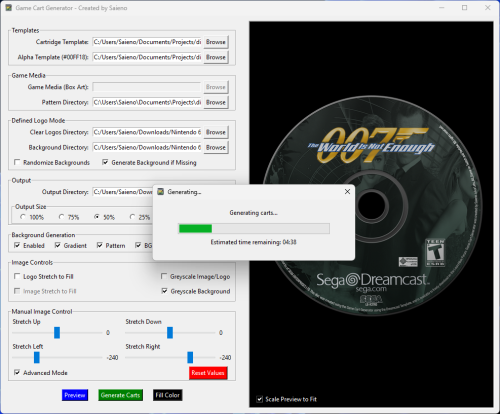
Game Cart Generator - Game Art Compositing Tool Created by Saieno - @Lets_All_Game on Twitch and LetsAllGame on YouTube Overview Game Cart Generator is a standalone desktop application for generating stylized cartridge or disc-based artwork. It's primarily for user-supplied template layers, clear logos or box art, and optionally background images or procedural backgrounds to compose polished output images. The app supports both standard label and defined logo area templates for advanced layouts, with options for pattern overlays, gradient fills, padding, scaling, compositing, and live color selection. This app is designed for batch generation and includes a threaded progress bar, preview support, auto-saving of settings per template, and example templates which you can use if you'd like. Template Requirements Cartridge Template (PNG): A top-layer graphic to overlay the final composition. Should contain transparency for visible underlying layers. Alpha Template (PNG): Must contain the color #00FF18 to define the artwork or logo area for the label. May contain the color #FF00FF to define a specific logo area which enables "Defined Logo Mode". These colors are used as masking keys and will be auto-detected and replaced during rendering. Key Features Support for both Standard and Defined Logo Area modes. Auto-detects and enables Defined Logo Mode based on Alpha Template contents. Background generation with: Solid color fill Vertical gradient Gradient with pattern overlay Optional greyscale conversion for logos and/or background layers. Background fallback logic when no matching background is found. Pattern overlays with optional grayscale masking. "BG Burn" effect for high-contrast multiply effect backgrounds. "Logo Burn" for blending greyscale logo and background together as a single burn layer. Fill Color: fills transparent areas inside the defined logo mask with a selectable color. Color Picker: choose fill color directly from anywhere on screen. Logo Stretch to Fill: stretches logos to fill the defined area, ignoring aspect ratio. Manual Image Stretching (up, down, left, right), with Advanced Mode extended range option. Scaled preview window with real-time updates and optional fit-to-window toggle. Threaded batch generation with estimated time remaining. Per-template configuration saved to settings.conf. Recursive input directory support for all asset folders. Defined Logo Mode Behavior When a template contains #FF00FF (magenta), the tool enables Defined Logo Mode: Clear logos are used in place of full box art. Backgrounds are matched by filename (e.g., Sonic.png). If no match is found: If "Generate Background if Missing" is disabled, a random background from the folder is used. If "Generate Background if Missing" is enabled, a generated gradient/pattern background is used automatically—even if background generation is off—to prevent transparency gaps. Greyscale Background option converts matched backgrounds to black & white. BG Burn applies a high-contrast multiply effect to background generation. Logo Burn composites the greyscale logo and background together, then blends that composite with the stylized background. If Fill Color is defined, it replaces any transparent pixels inside the logo mask area with the selected solid color. Logo Stretch to Fill forces the logo to completely fill the masked region, ignoring original aspect ratio. Output Final images are saved as .png to the selected output folder. Filenames are based on input image names for easy frontend installation. Composite includes background + logo/art + cartridge template overlay. Requirements No installation or required. Windows 10/11 Operating System Credits Created by @Saieno Twitch: https://www.twitch.tv/retr0sai YouTube: https://www.youtube.com/@LetsAllGame @Raindupon - Xbox, Xbox 360, PlayStation 2, PlayStation 3, and Sega Dreamcast disc template bases. @ABeezy13 - Hucard, Gameboy, Gameboy Color, Gameboy Advance, Nintendo 64, Super Nintendo template bases. @WallyWonka - Sega Genesis template base. @RetroNi - Sony PlayStation Portable and Super Famicom template bases. MarkusMcNugen on DeviantArt - Nintendo Switch template base. Bar0011 on DeviantArt - Nintendo 3DS template base. Omar Sacca (a.k.a. ortho*) - Famicom template base.15 points -
Version 1.0.0
831 downloads
9 Years of Shadows ARCADE GAME SERIES PAC-MAN Asterix & Obelix Slap Them All! 2 Asterix & Obelix XXL 2 Asterix & Obelix XXL 3 The Crystal Menhir Asterix & Obelix XXL Romastered Bubble Bobble Sugar Dungeons Absolum Blazing Strike DNF Duel Nen Master drainus Fatal Fury City of the Wolves Neon Inferno Marvel Cosmic Invasion Pocky & Rocky Cyber Shadow Gravity Circuit Reshrined Mighty Goose,Vengeance Hunters Guns, Gore and Cannoli 1,2 Asterix & Obelix Babylon mission Asterix & Obelix Slap them All! TMNT Arcade. Wrath of the Mutants Rayman Origins Fight'N Rage Rad Rodgers World One13 points -
Version 2.0.0
236 downloads
See What You're Missing™ Game/Platform comparer Compare games in your platforms against what's listed in the LaunchBox Games Database See which platforms are in the Games Database that are not in your collection Filter out games by Release Type, Genre and Co-op. Import placeholders (see Game Placeholders below) into to a new platform, those platforms or games not found. (optionally, import missing game placeholders into your existing platform) Output the results to a tab-delimited text file. Custom Metadata Updater (New v2.0.0) Update an individual games metadata or do it in bulk. Select only the fields you want to have updated. All others will be left untouched. Requires LaunchBox 13.19 or newer Installing; Copy the contents of the zip file into your /Plugins/ folder e.g. D:\LaunchBox\Plugins\LBDBcomparer\LBDBcomparer.dll Using: (click or scroll down for using the Custom Metadata Updater) Game/Platform comparer In the Tools menu, select LaunchBox Games Database - Game Comparer Select a platform to compare. (the list excludes platforms you've imported using Add Missing Games to NEW platform [see below]) This will show games listed in the database for this platform that are not found in the selected platform. (this searches and compares by database ID) Click the games ID # to open the LaunchBox Games Database to that game. Other things: Toggle Local games NOT in Database This shows your games that either don't have an associated LaunchBox database ID # or their ID # is not in the database for the selected platform. Toggle Missing Platforms This show database platforms not found in your collection. Search is done by Name Only. Exact match (but Ignore Case). Does not cross-check the platforms Scrape-As value. Does not exclude platforms you've imported using Add Missing Games to NEW platform (see below). Settings: (click the gear icon) Show only games that match the criteria (boxes that are checked). Filter by Release Type, Genre and/or Co-op. Click Save and Close to save the selected filters and close the settings window. Click Reset All, Save and Close to reset all filters to the defaults, save and close the settings window. Click the Close icon to close the window without saving and changes. The column headers will be highlighted Orange if any filters are set for that column. Add/Import options: Add Missing Games to NEW platform This will create a new platform named platform_name (M) e.g. Atari 2600 (M) Add game placeholders of games listed in the datagrid (filtered or otherwise) to the new platform. Re-running it will essentially recreate the platform based on the items in the datagrid. Add missing games to selected platform (not recommended) This will import game placeholders into your existing platform for games listed in the datagrid (filtered or otherwise). Game Placeholders: The imported game placeholders will have set their Title LBDB-ID Broken=True Installed=False With Installed=False, you can set Arrange By and choose Installed. But you can't Filter by it (nor Broken) You can also, on the left panel select View Installed [vs. e.g. Platform Categoy] and then select the No option. This can be helpful if you decide to add them to your existing platform. "Broken" can be used to hide the placeholders. Output Results to A Text File: This will output the results to a tab-delimited text file. The file will be named platform_name (missingGames_count).txt and gets created in /Output/ under this plugins folder. If it's a platform missing from your collection, the filename will be platform_name (M) (missingGames_count).txt e.g. D:\LaunchBox\Plugins\LBDBcomparer\Output\Atari 2600 (137).txt D:\LaunchBox\Plugins\LBDBcomparer\Output\Atari 2600 (M) (137).txt Click the view file icon to view the created file. Click the open folder icon to open you Windows Explorer to the /Output/ folder Notes: This will not check your games that are Additional Versions (Additional Apps). Additional Versions don't contain a LaunchBox database ID # to compare against. It "the numbers don't add up", check your platform for duplicates. Custom Metadata Updater From the LaunchBox main window... Select one or more games. Right-click one of them and select Custom Metadata Updater. If the games' field matches what's in the database, the Database column will show "identical". If they are different, double-click the value in the Database column to update that field in your game. Click the fields name in the left column to see both values in a larger window. (useful for the Notes field) If you selected more than one game, click the arrows to move to the next/previous game. Optionally, you can click Bulk Update, and update only the selected fields for all selected games. (click to go back up to using Game/Platform Comparer) If a plugin update is available, the Info icon will flash red. Click it to find a link to the downloads page.12 points -
Hi everyone, A new beta round has commenced! Thanks to everyone helping us test the latest beta builds! Your feedback is super valuable — please include the following info when reporting any issues: 📝 When submitting feedback, include: Your Windows version A clear description of the issue Whether the issue can be consistently reproduced The steps to reproduce it 🎮 How to Join the Beta To opt into the beta: In LaunchBox, go to Tools > Options > General > Updates Enable Update to Beta Releases When a beta is available, you'll be prompted at startup or can check manually via Menu > Help > Check for Updates 🔌 A Quick Note on Plugins Some beta builds include early versions of official plugins that aren’t yet live in the Plugin Manager. Because of this: You may see update prompts for plugins that are actually newer in the beta. Please avoid updating plugins while using a beta if you're planning to provide feedback — this helps us get accurate data and avoids breaking improvements. Beta 1: New Feature: LaunchBox can now auto-login to RetroAchievements for supported emulators like RetroArch, Dolphin, and PCSX2 New Feature: Added a quick-access RetroAchievements login and status option under Tools > Achievements New Feature: Supported emulators now have a RetroAchievements section with login options, hardcore toggle, and manual credential injection New Feature: Big Box now supports a Random Game action for keyboard and controller inputs to quickly jump to a random game New Feature: Added a new hybrid view in Big Box that combines platform and game views for smoother transitions and theming potential Improvement: Completed checkmark has been replaced with a customizable Progress field (e.g., In Progress, Beaten, Completed) Improvement: RetroAchievements now display detailed achievement types-Progress, Win Condition, and Missable-directly in both LaunchBox and Big Box default themes Improvement: RetroAchievements beaten status is now tracked and automatically updates the new Progress field Improvement: Videos are now properly centered again when using the WMP engine in Big Box Fixed: Improved WHDLoad parsing for Commodore Amiga game imports, fixing multi-version naming issues Fixed: Big Box transitions in platform views now animate in the correct direction consistently Fixed: Video transition animations in some Big Box default theme platform views were not triggering properly Fixed: Bulk editing date fields was not showing the correct value on the confirmation page Fixed: ScummVM Integration plugin updated to handle upstream changes that broke download functionality Fixed: Dolphin Integration plugin now correctly detects the latest version after changes to Dolphin's versioning system Fixed: MAME Import filtering logic no longer incorrectly marks some Music games as Non-Arcade, ensuring they're properly included during import Fixed: Game Details view text binding issue resolved, so "no achievements available" no longer shows incorrectly 🛠️ Beta 1: Features Still in Progress Beta 1 lays a lot of groundwork — but a few things are still evolving. When giving feedback, we’d love your take on how things work today, even if they’re not fully complete. Current WIP Areas: RetroAchievements: More features and polish are coming in future betas Hybrid View: Only one view is available now in the Default theme; expect more layouts, tweaks, and performance updates Progress Field: Early version — more statuses and integrations are on the way Beta 2: Improvement: The RetroAchievements options page will now prompt you if your credentials are incomplete or invalid when attempting to leave the page Improvement: Added support for importing VR compatibility data from Steam; Steam VR-supported games are now auto-tagged with a PC-VR controller in the VR Support category Fixed: Hybrid Views now load game items more efficiently than in Beta 1 Fixed: Custom Themes no longer falsely indicate that Hybrid Views are available Fixed: Horizontal wheels in Hybrid View now properly support the alpha-numeric index Fixed: Search and filter buttons on the alpha-numeric index now function correctly in Hybrid Views Fixed: Resolved a crash that could occur in Hybrid View when navigating with a controller Fixed: Game Completion data now migrates more reliably into the new Progress field Fixed: Opening List View no longer causes a crash Fixed: "no achievements available" no longer incorrectly shows on some LaunchBox theme's Game Details pane (for real this time) Fixed: Release Date field no longer stores time zone data, which could cause the date to shift based on user location Fixed: Rare crash that could occur when rapidly clicking the Favorite or Completed buttons under certain conditions Fixed: Game description could occasionally get stuck on a previous game instead of updating properly Things to keep in mind: For anyone that experienced the issue in beta 1 where your completed status didn't migrate properly to the new Progress field, you will need to close LB and open the settings file and change the HasMigratedToProgress setting to false. Then open LaunchBox back up and report back to us on how it went. The List View should be fixed, but if you are using a custom theme, an update to the theme will be required to see the new field as a column. The Big Box default theme only has Hybrid View 1 currently available. Expect more updates to the Hybrid View, including theming changes, extra views, and performance passes The new game Progress field will be undergoing a major revision that is slated to come in beta 3 Beta 3: New Feature: Game Progress now supports customizable Categories and Values (e.g., "Active / In Progress"). Default options are included, with the ability for users to create their own New Feature: A new Progress badge is available under Badges > Game Attributes > Progress, visually changing based on a game’s progress value (e.g., a "Done / Beaten" game shows a flag). These badges are included in the Nostalgic, White - Filled, and White - Outline sets (update white badges under Tools > Manage > LaunchBox Themes & Media...) New Feature: A new Game Progress Priorities page is now available under Tools > Options > Data > Game Progress Priorities. This page lets users sort progress categories and values, and add or remove unused ones. It’s also accessible via a gear icon next to the Progress field in the Add/Edit Game page New Feature: A new Game Progress options page has been added under Tools > Options > Data > Game Progress, introducing optional automated progress. Users can define rules (e.g., "Over 'x' minutes played" sets status to "Active / In Progress"), toggle the system on/off, and customize their values Improvement: The Progress On-the-fly Filter button options are now grouped by category, with values listed underneath. Clicking a category filters by all its values. Sort order reflects the settings from the Priorities page Improvement: The Progress dropdown in the Add/Edit Game interface now follows the custom sort order from the Priorities page Improvement: Auto-populate filters can now be created using the new Progress field. A new "Starts With" comparison type has been added for filter creation Improvement: The Progress sidebar filter section now displays Categories and Values in a tree structure, sorted according to the Priorities page Improvement: The following mappings are now fully functional in Hybrid View: Set Star Rating, Page Up/Down, Show Achievements, Show High Scores, Show Game Details, View Images, View Model, Play Music, and Random Game Improvement: Videos using the WMP Video Playback engine are now properly centered in Hybrid View, matching other views Fixed: Playing a game directly from the thumbnail lists in Hybrid View now correctly launches the intended game Fixed: Resolved an issue in Hybrid View where background platform videos and foreground game videos could play simultaneously, causing playback conflicts Fixed: You can no longer enter a Game's section in Hybrid View before bindings are loaded. Previously, this resulted in an empty section that stayed blank until exited 💡For people wanting to help test more Hybrid Views, there's a new theme for users on the beta called Aetherial, and should be available for download from the Theme Manager inside of Big Box. With Beta 3, the new Game Progress system is now considered feature complete, and there are a few things existing Beta 1 and 2 users will need to do to make sure everything migrates properly. Open LaunchBox, go to your All Games section. Select all games, open the Bulk Editor, and set Progress to blank (ie. empty). Close LaunchBox and wait for the background save process to finish completely. Navigate to: LaunchBox\Data\Settings.xml Open the file in a text editor and delete any of the following lines if they exist: <HasMigratedToProgress> <HasSetAutoProgressDefaultValues> Now reopen LaunchBox. It should migrate your data again with the new default structure correctly in place. If you're signed into RetroAchievements but your games aren’t showing a "Done / Beaten" progress status, you’ll need to: Go to Tools > RetroAchievements > Scan for Achievements Scan all your games Why? This triggers a rescan to pull in the new "Beaten" status, which the Progress system now uses. Not Seeing Any Progress Badges? This likely means you’re using a badge set that doesn’t include the new Progress badge designs. The Nostalgic pack (included with the update) contains all the new badges. The White - Filled and White - Outline packs need to be updated or downloaded to include the new Progress badges. To update or install badge sets, go to: Tools > Manage > LaunchBox Themes and Media... Beta 4 will address this by falling back to the Nostalgic pack when no badge exist in your current pack Beta 4: Improved: The Big Box Default theme now displays Game Progress, and you can toggle its visibility via Options > Game Details Improved: Game Progress Option pages in LaunchBox received minor wording updates for improved clarity Fixed: The Automatic Game Progress feature will no longer auto-set games to Active / In Progress after just 30 seconds of gameplay—it now correctly uses 30 minutes (or the time you adjust it to) Fixed: Background music now behaves better in Big Box’s Hybrid Views Fixed: Game Progress status (Beaten and Mastered) now update more smoothly when earned Fixed: Badges now fall back to the Nostalgic pack if your current pack is missing a specific badge Fixed: Clearing play time in LaunchBox will now reset Game Progress to Unplayed in applicable scenarios Fixed: Controller badges now show the correct tooltip when mousing over non-selected items—no more mystery tooltips Fixed: Removed the old Unplayed/Completed badges, since the new Progress Badge handles all that and then some For people on previous betas, if you had the issue of games moving to the "Active / In Progress" state if a game had over 30 seconds of play time (instead of 30 minutes), you can either manually bulk edit those games to a different value, or follow the same steps to refresh your game's progress. Same steps below as beta 3. This should be the last time you'll need to do this 🤞 Open LaunchBox, go to your All Games section. Select all games, open the Bulk Editor, and set Progress to blank (ie. empty). Close LaunchBox and wait for the background save process to finish completely. Navigate to: LaunchBox\Data\Settings.xml Open the file in a text editor and delete any of the following lines if they exist: <HasMigratedToProgress> <HasSetAutoProgressDefaultValues> Now reopen LaunchBox. It should migrate your data again with the new default structure correctly in place. Known Issues: Unable to change the minutes for the rule that moves games to Active / In Progress Beta 5: Improvement: Added two new Hybrid View options to the default theme, bringing the total to three Improvement: The default theme in Big Box now displays your Game Progress status Fixed: Adjusting the time on automated Game Progress rules now properly saves (no longer stuck at the default 30 minutes) Fixed: Storefront imports from the EA app now work correctly after adapting to the takedown of EA's deprecated Origin API Fixed: In Big Box, all available options in pop-up menus can now be selected as expected Fixed: Non-English characters in the installer should now display correctly again Fixed: The media installer header now properly reflects the correct version of LaunchBox Known Issues: Default Big Box theme - Platform Hybrid 3 - Alphanumeric Index navigates incorrectly Big Box - FlowBadge element - the correct badge pack is not always being used The EA "fix" ended up being an entire rewrite due to EA taking down their old Origin API. For users that do have EA games, testing would be much appreciated. At this point we have all the default hybrid views we are looking to add to this release, including the 3 default views and the custom theme (called Aetherial) that can be downloaded from the Manage Themes section. Appreciate the help in testing the 4 views. We are approaching the end of this cycle, but we are not quite there yet. Everyone has at least one more week to test the changes of this release out. Beta 6: Improvement: Game Progress value is now included in the Cloud Game Statistic Syncing service (Tools > Cloud > Enable Game Statistic Syncing) Improvement: A new Game Progress button has been added to the default LaunchBox theme for quickly changing a game's progress manually Improvement: Auto-import now supports non-emulated platforms (such as Windows) Improvement: Pause screen's Achievement window now displays the new RetroAchievement types Improvement: Game Progress changes made during gameplay are now better reflected when returning to Big Box Fixed: Automated Progress is now correctly triggered by more import methods, including startup and manual import scans Fixed: Disabling automatic game progress now correctly takes effect in all scenarios Fixed: Xbox storefront logout now properly respects your choice to log out Fixed: Big Box's Hybrid View 3 alphanumeric index now scrolls in the correct direction Fixed: Big Box now better respects your selected badge pack If you would like to learn more about the new Game Progress feature, you can find details here: https://feedback.launchbox.gg/help/articles/6612691 If you would like to learn about theming the new Hybrid views: https://feedback.launchbox.gg/help/articles/352426812 points
-
Neither I nor the project are dead. Anyone who says otherwise has no idea what they're talking about and does not speak for me. Work has not stopped since the last version. It has slowed at points because of significant IRL issues which I've neither the obligation nor the inclination to share because they're frankly no one's business but my own. What I can say is that, despite that, I've continued to work on it. The reason that the next version hasn't been released yet is a combination of those issues and, more significantly, that there are major changes/improvements that will be coming in the next version that require massive amounts of time to complete. There have been significant feature additions in the past like manual swapping that caused delays and the changes in this version require multiple times more work than that. It's a process, a tedious and time consuming one, but it's a process that needs to be done. Again and again and again and again and again and again... and eventually I'll come out of the hole, blink at the sun, and be done. But I'm not there yet. And I won't compromise the quality or standards of the project for anyone, just because they want it sooner. If that's too much to ask, that's unfortunately, as they say, tough shit. I don't report to or work for anyone. I have a vision that will be maintained. I have not dedicated years of my life to this project to either throw it away or let anyone else dictate how I should use my own skills and my own efforts and my own time. Gamebase64 has been around for 20+ years. CSDb.dk has been around for 30+ years. The library itself spans 40+ years because they're still being made and released to this day. I have to take all of that, gather it all in my arms, dump it in a pile, and turn it into something manageable, into something presentable, and into something usable, while maintaining the high standards that I hold myself to. And I have to do that, essentially, by myself. There are a number of very significant contributors in this space that this project would not be what it is were it not for their efforts - that cannot be overstated - and I am immensely grateful to those people. I try to name them by name - people like StatMat, sonninnos, the Ultimate Tape Archive team, everyone at GB64 and CSDb and more - and thank them as often as I can because I know firsthand the tedium and the effort that is required for these sorts of projects. But C64 Dreams, itself, is largely a one-man show. That can of course be a disadvantage at times because it means that it takes longer because 99.7% of the work is on my shoulders, but it also means that the end result is exactly what I want it to be. And people are, thankfully, generally pretty positive about that. Even people that have no idea what all work it actually entails (which is to say, essentially everyone), often one of the first things they say is "Wow... this must have been a lot of work." That would be an accurate assessment. I've worked on a number of emulation-related projects over the years that I've released to the public (C64 Dreams of course being the most significant of these) and, in every single case, they were endeavors that I undertook, ultimately, for myself - because I wanted things to be a certain way, because I wanted the experience to be better. But I decided hey, you know what, I'm putting in all this work for things that others might also appreciate, I might as well put this out into the wild. But the other part of that statement is the fact that I've also not released things publicly numerous times over the years for no other reason than just not wanting to deal with everything that entails. When I read comments like this, I feel completely justified in that decision. Not only is it not helpful in any way, not only does it actively undermine your own stated intent of seeing faster progress given the fact that it aggravates the one person that's actually putting in that work, but it also discourages anyone else that might consider for a moment whether or not they should publicly release projects like this. Why would anyone want to deal with that? Why would anyone see this kind of entitled attitude and say to themselves "Yeah, I want to use my time, my money, my mental energy, my sleep, my skills, and the cost of not using those things over the course of years of my life for myself, my family, and my friends... for this guy." When it's done, it'll be released. Until it is, it won't be. Period.12 points
-
Version 1.0.5
438 downloads
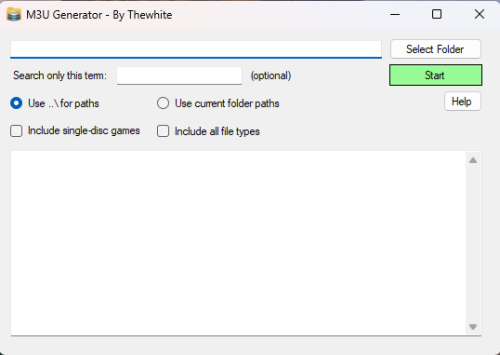
Hi everyone, I’d like to share a small utility I created called M3U Generator. It’s designed to automatically generate .m3u files for multi-disc games, commonly used with emulators like RetroArch and others that support playlist-style disc switching. 💡 What it does: Scans a selected folder for game files (.cue, .iso, .img, .bin). Groups discs belonging to the same game (based on filenames). Creates .m3u playlist files in a subfolder named m3u. Optionally includes single-disc games as well. 📦 Features: ✅ Supports subfolder-style or flat playlist paths (..\\ or current folder). 🔍 Filter results based on a keyword (e.g., "Disc" or "CD") to process only relevant files. 📝 Displays a log of the generated .m3u content directly in the software. 🧠 Automatically names playlists based on the first disc. 🕹 Example use case: Let’s say you have these files: Game Title (Disc 1).cue Game Title (Disc 2).cue The software will create: m3u/Game Title (Disc 1).m3u With content: ..\Game Title (Disc 1).cue ..\Game Title (Disc 2).cue 📥 How to use it: Launch the application. Click "Select Folder" and choose the directory where your ROMs are located. Optionally enter a filter term like Disc to process only multi-disc games. Choose path mode (relative or current folder). Check the "Include single-disc games" option if needed. Click "Start" – the .m3u files will be generated in a m3u subfolder. The output will be shown in the result textbox and also saved to 1-m3u_results.txt.11 points -
Version 1.0.1
240 downloads
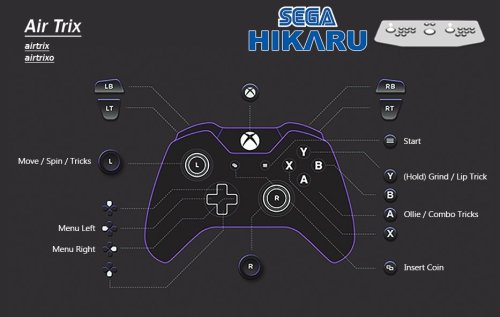
UPDATE: 2 11/01/26 -All missed inputs added to the images, inis and documentation updated -Better instructions -Additional help for the padDemul popup error END OF UPDATE UPDATE: 1 Using Demul with LaunchBox needs a specific setup. I've added some clear instructions on how to do so. Furthermore, using the bat files provided in LaunchBox requires you to uncheck 'use an emulator'. Which is an easy job. However, doing that will restrict you from using the 'Running Script' which allows you to Exit the Emulator with Esc. Booo. I want to be able to have per game controls AAAND Esc as exit when using LaunchBox. So, again I have done just that. There are now some LB specific bat files that need be integrated into the 'Additional Apps' part for all 6 games. It's a quick job I promise. This allows the per game configs to be used while retaining the 'Esc to exit' functionality in the 'Running Script' of the emulator. I have also added the control inputs to the documentation. This makes it easy if you for some reason need to set it yourself. The LaunchBox side of this requires a bit of setup, so the whole procedure will be below. ENF OF UPDATE Get the Emulator here. Link may become out of date over time but you'll be in the right place for the new versions. https://www.emu-france.com/?wpfb_dl=7038 With the release of the new Demul emulator specifically for Hikaru, a pre config is deserved. No messing with this one. It was complicated for me, but for you it's stupid easy. Demul doesn't support per game control configs, which is a pain as these Arcade games require bespoke configs. Meaning you'll have to constantly change the defaults each time you change game. Boooo. So, I have made some per game ini files with the correct controls set. Just figuring out the controls was a nightmare. Anyway, along with these per game ini files, I have made some .bat files to launch said games with their respective per game control ini file. Forcing per game controls into Demul. There are 2 versions. The bat files you can use standalone or anywhere else, and the ones that are LB specific. LB needs different ones as the Running Script needs to be active for Esc to be exit, and this can't be used if 'Use emulator' is checked, which is required for the normal bats to work and apply per game setting. Booo! Anyway, here are the bat examples, they are super simple. Normal, general bat launcher that you can use standalone or anywhere else. @echo off cd /d "%~dp0.." copy /Y "controls\padDemul_airtrix.ini" "padDemul.ini" start "" demul.exe -run=hikaru -rom=airtrix exit LaunchBox Specific Bat @echo off cd /d "%~dp0.." copy /Y "controls\padDemul_airtrix.ini" "padDemul.ini" exit INSTRUSCTIONS: SETUP DEMUL WITH LAUNCHBOX -Add emulator as normal, add application path to demul.exe as normal -Check (turn on) 'Remove quotes' & 'Remove file extension and folder path' & 'Remove space before rom' -Go to Associated Platforms and add Sega Hikaru as a platform (if not already there) -In Default Command Line Perimeters IN THE ASSOCIATED PLATFORM you MUST ADD: -run=hikaru -rom= -Go to Running Scripts and replace the one that's already there with this more reliable one: SetKeyDelay, 0, 50 $Esc::Send !{F4} That's the emulator done! PER GAME CONTROLS AND LB BAT FILES INSTALL: -Download and unzip the pre config files. -Place 'lb bat launchers', 'bat launchers' and 'controls' folders into the root of your Demul folder. -Right click on a Hikaru game, Edit, Metadata and Media -Go to Additional Apps on the left and hit Add Application -Name it whatever but I go with "Romname Per Game Controls" -Hit browse next to Application Path -Then select the .bat file for the game you are configuring FROM THE 'LB BAT LAUNCHERS' FOLDER PROVIDED that should be in the root of Demul, after you put it there. -Leave Command line blank. -Check (turn on) 'Auto Run Before Application' and 'Wait for Exit' -Hit ok to save -Repeat from step 3 for the other 5 games. You'll then have per game controls aaand esc as exit. Yaaaay! If you aren't using LB, use the non LB bat launchers. These work standalone or with other front ends. But, Alt+F4 will be exit unless a solution is deployed. Additional HELP: Some users, particularly Steering Wheel users, have been reporting this error message. Despite getting this message, users have been reporting everything still works when they close the popup. This may or may not be the case for you. padDemul Error! (HRESULT = 80070057) |DirectInputDevice8 Create Effect FAILED IF everything still works after closing this, you'll have to close it every time it pops up with whatever controller is causing the issue. To get around this, you can use a basic AHK to close the popup automatically. Simply add it to the Running Script of the emulator, under the one already there. WinWait, padDemul WinClose Keep in mind this will auto close ANY padDemul error popups. Be mindful if you are troubleshooting. My Patreon Link if you wanna help out and for more goodies https://patreon.com/warpedpolygon As is tradition, here is the documentation. There was some really tricky stuff despite being only 6 games. Air Trix airtrix airtrixo -The 'Roll' input is surplus to requirements when using a controller. It was barely functional on the OG cab, just looked cool. -Digital Up & Down is Ollie and Nollie (Grind). This confused the crap outa me until I looked at the owner's manual. -Configured in the Alternate Settings due to the regular one splitting the analog axis for some reason. Rather than just binding some inputs to the alt ones, all have been bound to alt settings to save confusion. -Calibrate in the test menu for the best analog coverage. HOW TO PLAY: This game has been setup to play like Tony Hawks. X/A is Ollie/Tricks, Grinds are Triangle/Y. There is no "nollie" despite the board making that motion on the OG cab. Standing on the nose is just Grind/Lip Trick. -Left Stick to move and spin -X/A is Ollie. Press this again multiple times while in the air to do combos. -Triangle/Y is Grind. You MUST be turning at the same time to do a grind. -Spinning you have 2 options: 1-Simply hold left or right when hit the lip and you'll automatically do a basic spin trick. 2-Ollie at the lip while holding left or right, to do a "better" spin trick than if you hadn't ollied at all. Doing Different Tricks: -When doing an "combo air" (no spinning) you can use left and right on the left stick, as well as ollie, to do tricks while in the air. Key To Getting Good -If you are still holding a spin direction on re-entry you'll slow down. Remember to let go of the stick before you go back in the ramp. -Combos can only be performed when not spinning. As long as you aren't holding a direction at the same time as doing an ollie, you'll be doing a 'combo air'. -However, you can still spin AND combo in the same air. As long as you let go of the direction, you can combo at any time. So, you can spin at the start of an air, let go of the stick and spam X/A to combo for the rest of the air. DEMUL CONTROL CONFIG. ONLY WHAT THE GAME USES WILL BE LISTED. THIS IS TO HELP IF YOU NEED TO MAP CONTROLS YOURSELF. JOY 1, Use "Alternative Settings": -Digital UP = Nollie / Stand on Nose (Grind) -Digital DOWN = Ollie / Tricks -Digital LEFT & RIGHT = Character Select / Menu Left & Right Analog 1 LEFT & RIGHT = Turn / Spin / Swing Boad Analog 2 LEFT & RIGHT = Roll (This input is not required for controller use. No need to map it) Planet Harriers pharrier -Nice and easy controls to configure. Nothing bizzare of annoying here. -Calibrate in the test menu for the best analog coverage. DEMUL CONTROL CONFIG. ONLY WHAT THE GAME USES WILL BE LISTED. THIS IS TO HELP IF YOU NEED TO MAP CONTROLS YOURSELF. JOY 1 -Analog 1 UP, DOWN, LEFT, RIGHT = Move (If you want inverted controls set up to down, down to up) -Digital LEFT = View 1 -Digital RIGHT = View 2 -PUSH 1 = Shoot -PUSH 2 = Lock-On -PUSH 3 = Bomb NASCAR Arcade sgnascar sgnascaro -So, most controls were easy to figure out...except gears. This ended up being looooong.... -Gears are bound to the JOY 2 slot of the configuration, despite being a 1 Player instance. Confusing to say the least. -Now more confusion. It's a 4 way H Gear system with a Neutral position, 5 inputs technically. This is set to the Up/Down/Left/Right digital inputs of the JOY 2 config. -Strange thing is Up is 3rd gear and Down is 4th gear, with Left and Right being inputs, just not on their own. 1st & 2nd gear are combination inputs.... FOR SOME GOD FORSAKEN REASON. 1st Gear = Digital Up/3rd Gear with DIGITAL LEFT at the same time. 2nd Gear = Digital Down/4th Gear with DIGITAL LEFT at the same time. What digital left actually is, is a mystery. It doesn't register as a gear on its own, only in combination with 3rd and 4th gear. It's a miracle I even caught this to be honest. Maybe on the OG cab the physical gear lever would pressed have multiple inputs when in 1st and 2nd. It's the only explanation I can think of. Aaanyway, I have macro these inputs to actually work thanks to the 'Alternative Settings'. These allow multiple inputs to be bound, helping me to get the gears in sequence on the face buttons. DEMUL CONTROL CONFIG. ONLY WHAT THE GAME USES WILL BE LISTED. THIS IS TO HELP IF YOU NEED TO MAP CONTROLS YOURSELF. Demul Gear Settings to Macro/Combine Stupid Shit Gear Inputs (xbox buttons, just for reference): MUST BE DONE IN JOY 2 CONFIGURATION -In 'normal config' (not Alternative) Digital UP = X Digital DOWN = B Digital LEFT = Y -In Alternative Settings Digital UP = A Digital DOWN = Y Digital LEFT = X This means the gear controls are as below. Just like a H transmission. X = 1st Y = 2nd A = 3rd B = 4th The rest of the controls you want to set in normal settings (not alt) IN JOY 1 -Analog 1 LEFT & RIGHT = Steering -Analog 1 UP = Accelerate -Analog 1 DOWN = Brake -Digital UP = View Change Despite this effort, the gears still aren't usable, unless you constantly hold the button for that gear. The age old issue of 'gears not sticking' has been around forever. This needs to be tackled at the emulation development level, or with something like joytokey. Now that I have identified them, perhaps someone can do something about it so we can have gears that stay in position. Star Wars: Racer Arcade swracer -Nice and easy to configure. -Nice and easy to play, this game AUTO ACCELERATES. Kid friendly. Braking is still manual. No option for manual acceleration at all. -Test Menu is fine at default. Calibration is correct out of the box! DEMUL CONTROL CONFIG. ONLY WHAT THE GAME USES WILL BE LISTED. THIS IS TO HELP IF YOU NEED TO MAP CONTROLS YOURSELF. JOY 1 -Analog 1 LEFT & RIGHT = Steering -Digital LEFT & RIGHT = Character Select / Menu Left & Right -PUSH 1 = Boost -PUSH 2 = Brake Cyber Troopers Virtual-On 4: Force von4 -Another one that is a 1 player game but has inputs bound to JOY 2 config slot. Yay! -All of the Right Stick controls are the same as the left in JOY 1, just in JOY 2. Because of course they are! -Mapped exactly the same as the original. Watch the tutorial as it takes some getting used to. DEMUL CONTROL CONFIG. ONLY WHAT THE GAME USES WILL BE LISTED. THIS IS TO HELP IF YOU NEED TO MAP CONTROLS YOURSELF. JOY 1 (Left in game stick, shoot, boost, P.I.B) -Digital UP, DOWN, LEFT, RIGHT = Move -PUSH 1 = Left Shoot -PUSH 2 = Left Boost -PUSH 3 = P.I.B / Command JOY 2 (Right in game stick, shoot and boost) -Digital UP, DOWN, LEFT, RIGHT = Move -PUSH 1 = Right Shoot -PUSH 2 = Right Boost Brave Firefighters braveff -This "light gun game" only supports mouse control with Demul. As far as I know. -Mouse controls are kinda hard coded to the emulator. So there's nothing really for me to provide. All the .bat does is launch the game with default controls. This is just fine for 1 player. -2 Players requires RAW input. This is done in various ways with demul, mainly DemulShooter, which at this time doesn't support this build of Demul. -Normally I provide some kind of RAW input support for 2 players, but, everyone has their preferred way with Demul. So, it's up to you -If you have a suggestion to provide something for 2 player Raw input, let me know!11 points -
Windows is starting to decline, and I truly hope LaunchBox has a long future ahead. Windows no longer makes sense as a platform, and the only thing keeping people like me tied to it is LaunchBox. As days and months go by, more users will move away from Windows, and that could seriously harm LaunchBox in the long run. If I were part of the team, I would start thinking very seriously about bringing LaunchBox and BigBox to Linux.11 points
-
.thumb.png.1885847bc1a3ae6d7e0d03bce5fd363f.png)
Version 1.0.0
77 downloads
Nintendo DS is a neglected artwork system I decided to make boxes for. So many games, many of which are total junk. 1700 games total. I believe all USA releases are included, but some may be missing I am not sure. There are a few Euro exclusives included and 1 Japanese exclusive. Fronts and spines included and YES most were upscaled so don't complain about it. Most of them look acceptable. Some spines may look junky or not completely accurate, but I remained as authentic as possible. Finding original source artwork was a challenge to say the least. Included is a PSD template if you want to make your own covers or improve existing ones. Enjoy this much needed set. Feel free to let me know if any USA games are missing.11 points -
Version 2.1.0
20,026 downloads
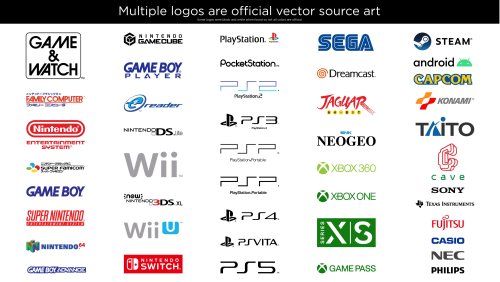
This is a giant collection of platform logos drawn digitally by hand. This took well over 500 hours of work over 15 months. While console logos exist all over the internet, this collection aims to bring them to a higher level of polish and accuracy. The default logos in BigBox will now come from this set. It was extremely tedious to ensure a very high level of accuracy across thousands of files. So Many Versions! Each included platform has multiple logo variants. Basically, many consoles had different logos for different regions and time periods. There are also smaller variations such as with or without a trademark (tm). There are black and white versions for each of these. With all of these it can add up to over 50 small variations for one platform! This would be impossible to navigate so I’ve split them up into smaller categories. For each format (Normal, Large and SVG) there are Light and Dark folders. For either of those there are: “Color”, “Black & White” and “Just White” (or Just Black respectively). If you wanted to use a minimalistic dark theme, you could use the “Just White” versions for a contemporary look. If you wanted logos for a standard dark theme then you could use “Light - Color”. Official Versions Included Besides the many hand drawn logos, I’ve also curated multiple logos that are the OFFICIAL renderings. Meaning, vector art ripped from official sources such as websites and pdf manuals. Finding official source art in the wild is pretty uncommon and required many hours of digging. Most of the source art was not in color so most of these colors are still generated by me. Some of the platforms with official logos include: Sadly, some of these wasted a lot of my time because I drew them and later found the official versions. The Drawing Process: My process for drawing a logo required many steps. I first did research on each logo. Then I would dig deep for the best references I could find. One rule I had was to never trust any image. I would compare multiple sources and make sure the source I chose was not fan made or some modern re-release that changed the logo. If a better source was found that showed differences from what I drew I would redraw it again (it sucked). I redrew the NEO GEO logo about 5 times before I was finally happy with it. Generally, source art would include box art images, adverts, brochures, and manual scans. Archive.org and Manualslib.com were a huge help for a lot of these scans. I would then use the pen tool in Adobe Illustrator and go to town! Sometimes if my source was really amazing, I could finish the whole logo in an hour and a half or so. Other times it would take much, much longer. Getting the correct color was always challenging and required intelligent guesswork. For example, with the classic Konami logo, I brought in 20 images. Gathered the color from all of those and found the average color for the red and orange. Then I’d tweak it slightly more, usually to improve saturation. When it came to fonts, I would always search for it but rarely found exact matches. If the font was found I’d obviously use it, but If not I’d have to hand draw it. However, a couple of the smaller taglines/subtitles do use a very close match. Hand drawing those fonts would do more harm than good. While drawing a logo I took great care to make things as visually pleasing as possible. Every little section of each letter of each logo was considered. Curves were carefully made to be smooth with as few anchor points as possible. Letters align with each other and angled letters all share the same angle. Hand drawing fonts is very tricky. Many logos were substantially harder than I’d anticipated. The Sega Saturn US logo for instance, drove me insane. It took over 40 hours to draw (not to mention wasted time from failed attempts months earlier). I used Adobe Illustrator to mimic every highlight, tiny color shift, shading and glow. When I was working on this logo, I’d come home from my graphic design day job and then spend 4 hours on it, which would only finish part of one letter. As I worked, I’d have a couple copies of the logo in the same file and a couple times it bottomed out 32GB of ram! Unique Versions This collection brings a few unique logos to the table. I’m just going to list a few. I created multiple new arcade and pinball logos, although previous arcade logos are here too. I highly polished the Daphne logo as it needed some love. I drew a detailed version of the TeknoParrot logo which seems to be uncommon in high resolution. I also created Sega system 16 and 32 arcade logos based on the exact font used in the Sega 32X and Sega CD (Copperplate Gothic Std 31AB stretched horizontally to 130%). The Capcom logos have stylized alternate versions based on a gradated version Capcom rarely uses. There are several other unique logos I could list here. White Outline - Default Versions Since these logos are replacing the default logos in BigBox, Faeran smartly requested that I create versions with white outlines around the outside. That way logos could be seen against any background color. I only made the outline versions for the options I gave to Faeran. I don’t plan on making outline versions for the rest of the variations. That said, the versions I did make are included here. The outline versions don’t look quite as nice in my opinion but they serve a very functional and important purpose. Solid black logos for some systems, like the PSP, would not be visible in certain themes without a white outline. However, theme creators or those wanting to add logos to a single theme, I would still recommend the non-outline versions for the cleanest look. Conclusion I included every platform and version that I wanted to. There are some more obscure ones I could draw but I didn’t see the need to seeing as how I've created 22,000 files as is. If I knew how much work this was going to take, I would've never gotten myself into this (lol). I hope that you guys get a lot of enjoyment out of these. I’m glad I made them and it feels really good to finally be able to upload them. I made these originally for LaunchBox but they can be used elsewhere. I will always appreciate credit if you use them. Needless to say, I don’t own the rights to the logos and these are NEVER to be sold in any way. Thanks Special thanks to Juketstu and Faeran for their valuable feedback. Also, huge thanks again to Faeran and the LaunchBox team for using these as the new defaults for BigBox! If you like what you see here, please also check out my LaunchBox / BigBox logo collection & Pineapple Graphics' Photoreal Controller Vectors:11 points -
Version 1.0.0
223 downloads
These are the one's i didn't do first time to go with the previous pack, all the usual goodies enjoy now back to letter D, i'll be doing a letter at a time gives me a bit of a break and there's probably too much for a single upload in multiple letters. Part 1 here incase you missed it10 points -
Version Updated at 0.283
10,115 downloads
UPDATE 09/01/2026 All of Namco System 12 had it's controls updated at some point. This caused the map files to be incorrect. This has now been sorted. Only the .cfg have been updated, so just grab those if updating! Also, War: Final Assault has had digital analog applied so the crosshair doesn't snap back to centre. It plays like a proper FPS now. UPDATE: Its been 2 years since I "finished" this, and its taken until now for the MAME burnout to lift. But it's back to add some more games and overall improvements. Thanks to past me futureproofing the project, now me only needed to add 35 games. Stuff I missed first time around and stuff that's been added to MAME over the past 2 years. However, about 100 games need fixing. Thanks to help from the community I was able to easily identify which ones I messed up with double inputs or left the test menu on like a dumbass! MAME of course have changed some stuff and hopefully I've caught everything that pertains to this project. Improved platform xml, with almost all games now having a DB entry. I've also made a bunch of Hardware Playlists! Most of the popular ones beyond what LB creates. Stuff like Capcom ZN, Cave 68000, Seta 1st Generation and a bunch of Sega stuff just to name a few. Open to suggestions to add more! This is the bit you really want to pay attention to with the update! CHDs and the size of this build when culled. So, just to break this down: 3571 Non-Merged Roms (No CHD's) = 15.5GB 3571 Games in Merged Roms (No CHD's) = 16.7GB A culled Non-Merged set is actually smaller in size than a culled merged set. Due to merged including "all versions in one zip", independently, they are overall larger in size. Despite non-merged roms including bios files per rom, making it larger for a full set, a non-merged set ends up being overall smaller when culled like this. Not by much! But, I still fully recommend non-merged as they "just work", being overall smaller in size is an unexpected but added bonus. Now, CHD's. Exactly what is needed is in the documentation. For a full set, for this list of games, it's 110GB! However, 65GB (OVER HALF) of this is Rhythm games. Only 48 of them, Beatmania being the main offender. Another 12GB is occupied by ONE GAME....Fire Fox. A LaserDisc game that probably isn't wort the 12GB. These have been configured and added to the project for completeness. But, I have added these to a playlist (also in documentation) so you can easily delete/not use/exclude these Rhythm games from your build. They don't translate well to a controller anyway, so ya really not missing out on much, but saving 65GB across 48 games. Fire Fox is in that playlist also, do what you want. However.... A Non-Merged Culled set with all CHD's for this list (excluding Rhythm + Fire Fox) = 49 GB I had to double take the first time I calculated this. Almost all of MAME Arcade, 1G1R "ish", excluding games better emulated outside of MAME and oversized CHDs, fits into just under 50GB. Amazing! These figures will of course increase as time goes on, this is just a snapshot of now! Namco System 23 and Model 2 will be added once they are in a better state. They are really, really close to running well enough to add. --END OF UPDATE-- If you want show your appreciation and support the project and myself please check put my Patreon https://www.patreon.com/warpedpolygon No need to use the importer with the provided custom platform xml. I fully recommend using this to get the most out of what's been done. If you have been following along you know what the score is. If you are new here, let me explain what all this is. MAME is awesome, however like many other emulators it doesn't know what your use case is, how can it. So, it's defaults are more of a 'one size fits all... but not perfectly' kind of deal. As a result getting things setup can be a mine field. This isn't just down to MAME defaults, plenty of games present you with a bunch of hoops to jump through just to play the damn thing. This, on top of figuring out controls, (which is the main point here) can be a very frustrating experience. Even google can come up short sometimes leaving you to fumble around in the dark. Removing this frustration is the whole point of the project. I see lots of github requests for MAME that aren't emulation issues, they're configuration and setup issues. This project should alleviate the rage of most users. FOR CONTROL PAD USERS. So, let's just get into the stuff you wanna hear. To keep it simple I'm gonna list what IS here and what ISN'T here: WHAT IS HERE Every working Parent ROM has been configured. Although, some games listed as NOT WORKING do indeed work to some degree. These have also been configured to future proof the project. Clones and/or preferred versions have been identified, configured and added in ADDITION to their parent counterparts. This could be an uncensored Japanese version, control hack, translation or even a sequel. In some instances an entirely different game can be a clone version. This is such an important part of the project. All English region Names/Versions have been configured. You may know a game by a completely different name depending on your region. All English versions with different names have been configured. So, if it's Buck Rogers: Planet of Zoom, or just Zoom 909 to you, you'll be able to find it. It'll have that title in game also. I haven't just duplicated the parent version and changed the name in LB. All games have been tested and controls configured for XINPUT Controllers. This has been done per game. Some games needed ages spent on them to figure what the hell was going on. Robocop 2 has diagonals that need mapping to the second player joystick, despite being a one player game. So, you can imagine the time and testing that went in. Multiplayer games set to work with maximum players. Pretty much 70% of 4 player games were setup for 2 players by default. Games that remove the character selection for 4 players have had their 2 player versions also added so you have the choice. Multi screen games set for both one and two screen use. You will have the choice to launch the 1 screen or 2 screen version without having to set everything up. These maybe listed a 1 and 2 player variants. All analog games have had their sensitivity checked and changed if needed. Yes, the trackball Sonic game works just fine despite what people say. Every configured game has a control layout image. Working Prototypes are here. English set for Japanese only games wherever possible. There's more than you think. Unlockable/hidden content pre unlocked. Keep in mind some cheats for hidden content are a one time use and don't save to NVRAM. Fighting game button layouts are setup to all be the same. Exactly the same as Street Fighter 2 on SNES for 6 button fighters. Light gun games set for controller AND mouse usage. Inaccurate games have been calibrated. Widescreen games set to pixel aspect. Technical hoops already jumped through. Much, much, much more. WHAT ISN'T HERE Mah-jong games that use a Mah-jong panel. These simply have too many inputs to map to a controller. Mah-jong games that use a joystick are here. Japanese quiz games. Gambling and video poker games. Basically anything with a BET, HOLD input system. Japanese clone versions, UNLESS they are preferred or have additional content. Truly non working games that simply black screen. Any arcade platforms better emulated outside of MAME for e.g. Sega Model 2 & 3. ABOUT THE PLATFORM XML A lot of work has gone into making sure these games are all accounted for in the xml. There were a bunch of roms that weren't recognised by the importer or games that simply haven't yet been added to the Database. I have made sure that these have been added and named correctly before I start changing/updating the database. Also, I have gone the extra mile and added version info in the title of the game if there are multiples of the same game. So, you will see The Simpsons (2 Player) and The Simpsons (4 Players) as separate versions for extra convenience. PlayChoice-10 games and mega play games have also had this info added to the title so you know exactly what version is being selected, despite sharing the same name as other versions/games. MAME SET ADVICE AND MERGED ROMS Despite my previous statements, Non-Merged is the best for sooo many reasons. I plead with you, just go non merged and you'll have a better time. However, merged will work just fine as long as you have your bios setup correctly. INSTRUCTIONS Download CFG, NVRAM and Control Layout Images Put CFG and NVRAM files in the cfg and nvram folders of MAME Use Images however you want. I like to put these in the Screenshot - Gameplay images folder so they display in the side bar. If you don't use a gameplay screenshots this is a nice solution outside of BigBox. This has been made for use with XINPUT controllers. If you aren't using an XINPUT controller you can use DS4windows or it's alternative. USING THE ARCADE PLATFORM XML Download the Arcade.xml Backup your old xml just in case if you have one. Make sure LaunchBox is not running Place Arcade.xml into Data->Platforms folder in LaunchBox Start LaunchBox. The Arcade platform should be showing now. Select all games in the Arcade platform (Ctrl+A), then go to Tools->File Management->Change ROMs Folder Path for Selected Games (Merged Only) It will say some roms are missing, they're not, just in other zips. Make sure to change paths for these also, when asked. Find your ROMs folder and select it. Don't forget to set your emulator path and set it as the default for Arcade platform. PLAY!!! This project will be kept up to date moving forward. If you have any info, suggestions or whatever just holler in the comments.10 points -
Version 1.1.0
285 downloads
Original COLORFUL theme here! Two additional views when selecting games to go along with the Colorful theme. The preview video/screenshot for the game will appear on the console screen underneath reflective light/dirt on the console. Vertical Wheel 4 will also show the game cartridge/disc when applicable, Vertical Wheel 3 doesn't show the cartridge and simply displays the respective game media. This view is not comprehensive, and currently only handles the following game systems: N64 Nintendo 3DS NES Gameboy Advance Gameboy Color Gamecube Switch Wiii Wii U Dreamcast Sega Genesis Sega Saturn Playstation Playstation 2 PSP SNES Windows I may add more as I come across them/expand my own game collection or if there's a high demand for it. There's also the PlatformWheel2 view from the original Colorful theme included but with a correction - the original version seemed to have a color mismatch for the Sega Genesis platform. A corrected version is included in this as well. Enjoy and let me know if you have any issues with it! Shoutouts to @viking and @faeran for making such a clean and wonderful theme! Made with the Community Theme Creator, so thanks also to @y2guru!10 points -
Version 1.0.0
266 downloads
This is Alekfull-XN The theme is originally from Retrobat and Batocera and i really like it. I remember autumn 2024 i took the images and start make it for Launchbox Bigbox and then my laptop got broken luckly i got the files for the theme in (ctc) Community Theme Creator and with a new pc i finally complete this theme and i hope you like this feel free and downlad. cheers Ninjaman10 points -
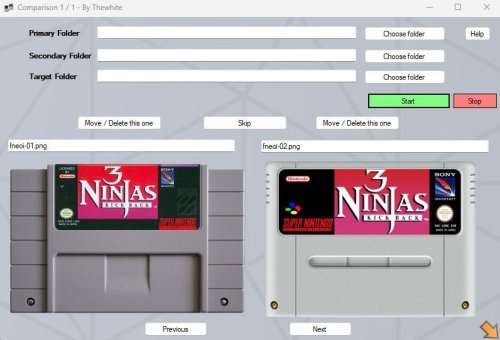
Version 1.2
113 downloads
Hi, LaunchBox often downloads multiple images for the same category (e.g., multiple front covers for a single game). However, not all images are equal — sometimes you want to keep the higher quality version, or prefer the American cover over the European one. My tool helps you quickly compare and clean up duplicate images by relying on filenames to group related images (like multiple covers for the same game). Instead of going through the LaunchBox interface, selecting a game, navigating to the images tab, and manually sorting through them, this tool shows image pairs side by side so you can instantly decide which one to keep or remove. ⚡ This will save you countless minutes when cleaning up large collections. 🔧 Features: Compare images from two folders based on filename similarity (e.g., Zoop-01.jpg vs Zoop-02.jpg) Detect and display duplicates within the same folder Preview matching images side-by-side Move or delete images with one click Optional: Move unselected images to a target folder while recreating the original folder structure Automatically sends deleted files to the Recycle Bin if no target folder is set 🚀 How to Use: Select Primary Folder and Secondary Folder — These are your two image collections (e.g., cart and fan art cart). (Optional) Choose a Target Folder — This is where non-selected (duplicate) images will be moved. If left empty, files will be sent to the Recycle Bin. Click Start to begin the comparison. If matches are found: Images are shown side-by-side. Use Move/Delete buttons to act on one of the files. Use Skip to move to the next pair. After inter-folder comparison, the tool will automatically check for duplicates within Primary Folder, then within Secondary Folder. 🗂️ If a file is moved to the target folder, the tool preserves its original structure. Example: If the file is located at V:\Launchbox\images\snes\Cart\Zoop-01.png, and the target folder is V:\Duplicates, the moved file will be placed at: V:\Duplicates\Cart\Zoop-01.png10 points -
Version 0.16
36,139 downloads
LIGHTS OUT! BEZELS UPDATED TO THE NEWEST MAME CODE Mr. RetroLust created a series of bezels which is a masterpiece : Yet as he uses a rather old version of MAME, some of those bezels are not compatible with the latest releases which use a redesigned artwork system (MAME 0.226 onwards). As I intend to continue to enjoy his creations in optimal conditions, I have undertaken to update all the lay files and to correct recent incompatibilities. The original project uses a reflection and scratch layer to add a realistic effect which defines its style. You will find here the complete arcade 4K widescreen collection updated to the most recent lay code and expanded in various ways. Mainly based on the version 17.0 of the original collection : I’ve updated/edited all the lay files. Renamed files in sync with latest MAME release (0.281 at the time of this writing). Merged some archives to avoid any conflict with the classic artworks of Mr. Do and progetto-SNAPS. Converted and integrated some of Mr. RetroLust's non-MAME specific arworks*. Added Xeno Crisis bezel by Layer0730. Added blue MAME cab bezel by d66dle. Added some new artworks in the same style (Ex: Darius II Dual-Screen). Replaced most of the screen overlays based on pics with lay-coded ones according to the latest MAME sources (ex : Circus). Corrected some MAME artwork display known bugs (ex : Dead Eye). Added switchable gear shift for racing games when possible (ex : Pole Position). Added optional custom enhancements (ex : Galaga). Added color variations (ex : Barricade). Added BIOS specific bezels (ex : Deco Cassette System). Added generic horizontal and vertical bezels to use as fallback art files for every game missing individual artwork. Included a folder INI file to display a list of all games of the collection. If you spot a bug, or a game I forgot to add a gear shift, please indicate it in the comments, I will try to rectify it ASAP. * : Converted for MAME and upscaled to 4K some artworks from HD Lights Out! Retroarch Bezels 8.5. Converted for MAME the Sammy Atomiswave 4K Lights Out! Realistic Bezels 1.0.0. Converted for MAME the Sega Naomi 4K Lights Out! Realistic Retroarch Bezels 1.3. INSTALLATION Easy 'n' dirty way (not recommended) : Unzip all LightsOutRevisited0-Z archives in MAME/ARTWORK/ Install updates one after the other, just unzip and replace all files when asked. Put horizontal and vertical INIs in the root folder of your MAME installation or in MAME/INI/PRESETS/ Advanced 'n' clean way : Use the provided DAT to rebuild the collection with Clrmamepro, Romcenter or your favorite ROMs manager. Place the resulting ZIP files in MAME/ARTWORK/ Put horizontal and vertical INIs in the root folder of your MAME installation or in MAME/INI/PRESETS/ It is ESSENTIAL to use the included horizontal and vertical INIs to make the generic fallback bezels work. Optional : Put vector, vector-mono and raster INIs in the root folder of your MAME installation or in MAME/INI/PRESETS/ Put Lights Out Bezels Revisited INI in MAME/FOLDERS/ The FOLDERS INI file is entirely optional. The vector and the vector-mono INIs are highly recommended but not essential. The raster INI is ONLY to be used if you use the D3D HLSL graphics mode. I personally use the BGFX graphics mode for the rasters and the fantastic ArcCabView shader from Ducon2016 and Houb (included in UPDATE TO LIGHTS OUT 10.0 - MAME 0.276). Let's play ! All hails to Mr. RetroLust for the incredible work that he made with his original bezels. Special thanks to the following people who directly or indirectly inspired and/or helped me with this project : AntoPISA, d66dle, Ducon2016, Houb, Layer0730, Mr. Do, numerous members from MAMEWorld, Starman99x, Vaughan and Widge-5. After downloading and testing the release, if you enjoyed it, please come back and react by reviewing or liking the page. It will take you just a few seconds and help me give visibility to this project.9 points -
Version 1.1.0
140 downloads
This is the AI-HyperTbox theme. It has been forked from the awesome "AI-HyperTocera" theme done by the The Mini Cake TV folks and they deserve most all the credit for the biggest part of the artwork. Using nice animated AI generated backgrounds. Added over 330 platform and playlist audio clips in SE version (not shown in video) The latest AI-HyperTbox (SE) version has: 5-Platform Views 3-Horizonal Game Wheel Views 4-Vertical Game Wheel Views 2-Game Wall Views Fullscreen Coverflow View Text Games View Platform Marquee View Game Marquee View Settings View Assets Used: AI-HyperTbox (SE) Sound Pack AI-HyperTbox (SE) Start/Exit theme AI-HyperTbox (SE) Pause theme Jarvis Startup Video The AI-HyperTbox theme has two flavors. The SE version (used in the video), available to my BMAC members and the free basic version posted here on the forums Comments, questions and suggestions are always welcome down below. Make sure to like and subscribe to the YouTube video if ya watch it to help out the channel, and do the bell thing to be notified of new videos. Please consider supporting these projects with a "cup of coffee" or by becoming a member @ my BMAC page OR A donation of any size via PayPal - ENJOY!!! • The Papaw 🙏❤️🙏9 points -
Lemmings
9 points
-
@Albatross
9 points
-
Version v2.23.1 - Early Access
5,146 downloads
DESCRIPTION: I am quite possibly the biggest Coverbox fan in these forums, I've loved it since the first day I used it. It was my go to for over a year of retro gaming. After using it for a while I started to notice areas that could be improved upon, eventually leading to me wanting to do something about it. After getting permission from Faeran I started adding in all the stuff I wished Coverbox had. Its got all the flashy stuff of a modern theme but still retains that sweet warm glow of Coverbox. After a couple of years I started to feel the same way about my old fragments, all the new stuff Dave was adding to the CTC was missing from those old fragments. Now, here I am again doing that same thing. Redoing the coverbox views, its become my 2nd hobby. I also have an obsession with adding more and more to my gaming library, sometimes I just sit and look through it for hours and never play anything. I like to tinker endlessly with the games, this entire theme from the beginning was designed around my obsessive compulsive habits. You might notice that I take it way too far with the small details, this is because of my ocd, and will likely never change as it's part of who I am. I spent many months listening to what you guys wanted from the previous themes, I took all that information and mashed it together into what you see here. Something for everybody. It's been a long road, I've learned alot over the years and finally feel like I can bring my vision to life. Please keep in mind this is still a very early version of the theme, stick with me while I polish up and add more game list views. To any newcomers, do not be scared off by the massive overload of information in this thread! It works out of the box with no extra work required. It works without installing any of the addons, or adding any custom options. It adapts to what you have installed and it adapts to what media you have. This will only improve as time goes by and people help me test the logic, eventually it will adapt to anything you throw at it. If you want to use all the custom options it can "seem" complex when in fact it's very simple. Making it was not, but using it should be. The custom options are for advanced users that want more out of their game lists. Give it a try, it might be your new go-to theme. Be sure to read the guides I wrote below to get the most out of this theme. Especially the one about how to change global settings! FILE DESCRIPTION: Coverbox Remastered v2.XX.zip - This is the most current version of Coverbox Remastered. Coverbox Remastered - BGM Addon.zip - This is a addon for Coverbox Remastered v2.XX. It adds background music support. It will not work with the old fragments version! Coverbox Remastered - BG Videos Addon.zip - This is a addon for Coverbox Remastered v2.XX. It adds background video support to most of the game list views. It will not work with the old fragments version! Coverbox Remastered Holiday Event Addon.zip - This is a addon for Coverbox Remastered v2.XX. It adds support for a few holiday events. It will not work with the old fragments version! _CUSTOM FIELDS (vX.XX).zip - This a copy of the _CUSTOM FIELDS.txt file that is included in the theme. It contains all the custom options for the game list views Coverbox Fragments (v1.XX) OLD.zip - This is the old Coverbox Fragments project I did a few years ago. This might get removed after I'm finished remastering all of them. FEATURES: Totally Re-Remastered Coverbox views Even more details Insane amount of logic added View box back when in game details in 2D or 3D mode! On-the-fly region changes to UI, cases, logos, buttons, icons, even the background! Many many custom options, so many options. Now with a ton of new customization options! Most of the game views allow you to easily customize them Tons of bonus media is now supported. You can add avatars, official icons, banners, xmb waves, change the color of handhelds, ui themes, the list goes on and on. Make it yours. Cart & disc animations! You can turn them on/off now with the global settings! Working battery levels for portable bigbox users, for all views. Handheld's in game list view even reflect real charge levels! Now with a set of Global Settings so you can get your Coverbox just right Seamless game details menu (just like CoverBox!) Absolutely ridiculous amount of ways to customize this theme. Like seriously man, you won't find anything with more options. Extend your gaming library even further with detailed information on the cover and icon dock, via metadata and custom fields. The tinkering continues well after your setup is complete. Easy to modify! Almost all assets are layered for added flexibility! Don't like a logo I added? root around in the media folder and delete it, edit it, change the color, modify anything you want! EXTREMELY detailed box art options More than just a cover! Under the hood each cover is a fully constructed box. Complete with inlay, disc, cart, wrapper, everything. When missing media happens, what you see underneath feels authentic. Custom startup & pause themes (still working on them for v2) Tremendous amount of hidden detail, some of which you won't even notice until you use it for a while, or add certain games to your collection. Now with Addon Support! Adapts immediately to what you have installed, and what you don't. Background Videos are now installed as a addon! For those who prefer them off, the theme will adapt and switch to static bg. Holiday Events Addon! New Holiday stuff added for those who enjoy a decent jump scare and good ol saint nick. (4th of July, Christmas, Halloween) Now with proper Retroachievements Support! Get them cheevs (Thanks Dave!) Background Music Addon! Listen to some sweet synth beats when you browse the platform list (can be turned off in global settings) Now with Game Save/State Support! IDK what it even is, or how to even activate it, but it's in there. VIDEOS: 2025-09-26 19-14-09.mp4 I'LL MAKE BETTER VIDEOS LATER VIEWS: Platform View 1 - Blades (WIP) Settings View 25 Remastered Coverbox Views Default View (for platforms with no theme yet) More platform/game list views on the way REQUIREMENTS: This theme no longer has many requirements! If the theme is running slow just disable some of the features using the global settings guide BigBox Version: 13 or later Region Metadata Filled Out Gameplay Videos (Its Coverbox after all) Platforms MUST be named using official Launchbox names, listed below. This theme almost requires the use of a dedicated GPU. It will not run very well with onboard GPU. SUPPORTED PLATFORM/PLAYLIST NAMES: Microsoft XBox Microsoft XBox 360 Nintendo Entertainment System Nintendo Famicom Nintendo Famicom Disk System Super Nintendo Entertainment System Nintendo Super Famicom Super Famicom Nintendo Sufami Turbo Nintendo Satellaview Nintendo Super Disc Nintendo Game Boy Nintendo Game Boy Color Nintendo Game Boy Advance Nintendo Super Game Boy Nintendo DS Nintendo DSi Nintendo 3DS Sega Game Gear Sony Net Yaroze Sony Playstation Sony Playstation 2 Sony Playstation 3 Sony Pocketstation Sony PSP If you do not wish to change your platform names you can rename the view files to match your platform/playlist names. EXTRAS: (OLD STARTUP/PAUSE STUFF) NEW ONES NOT READY YET These are the OLD startup/pause themes from Coverbox Fragments, they work but won't match the new Coverbox Remastered version. I'm still working on them and I'm way behind on it, I only have maybe 2 finished. I'll get to these at some point they are a big part of the theme, and wont be forgotten. Coverbox - Fragments Startup Themes Coverbox - Fragments Pause Themes *Installing these old versions will NOT reflect the install status on the Settings View like the new versions. REMASTERED PLATFORMS: 25 Nintendo Entertainment System (Remastered) Nintendo Famicom Nintendo Famicom Disk System Super Nintendo Entertainment System (Remastered) Nintendo Super Famicom (Remastered) EUROPE Super Famicom (Remastered) JAPAN Nintendo Sufami Turbo Nintendo Satellaview Nintendo Super Disc MSU-1 Nintendo 64 Nintendo 64DD Nintendo Gamecube Nintendo Wii Nintendo WiiU Nintendo Switch Nintendo Gameboy (Remastered) Nintendo Gameboy Color (Remastered) Nintendo Gameboy Advance (Remastered) Nintendo Super Gameboy Nintendo DS (Remastered) Nintendo DSi Nintendo 3DS (Remastered) Sony Playstation (Remastered) Sony PocketStation Sony Net Yaroze Sony Playstation 2 (Remastered) Sony Playstation 3 (Remastered) Sony PSP (Remastered) Sega Game Gear Sega Master System Sega Genesis Sega Saturn Sega Dreamcast MS-DOS Microsoft XBox (Remastered) Microsoft Xbox 360 (Remastered) and more...once I get all caught up. Any platform in red has not been ported to the new system yet, trying to enter the game list for any platform in red will fallback to the default theme. ICON DOCK LEGEND: I added new icon docks to all of the remastered game list themes. These usually are consistent between platforms (with a few exceptions). They are all usually the same unless the platform has icons for that type of thing already, then i use those instead. Ill list what the icons mean below: - game has additional applications - game is favorited - game is completed - game has achievements - game is broken - game has manual - game has game save - game has lightgun support (only if platform supports it) - game has mouse support (only if platform supports it) - game has keyboard support (only if platform supports it) *other values exist and are usually tied to the Custom Fields stuff. DLC, adhoc, wifi, etc sometimes have dock icons. EARLY ACCESS PROGRESS: Remaster all the fragment game list views (21/30) Remaster the Start/Shutdown themes for all platforms (2/30) Remaster Pause Themes (2/30) Finish Platform view 1 and make 3 new platform views (1/4) Finish game/platform Marquee views (0) Polish all the game list views and try to remove any lag (0) Possibly remove things to speed up some of the troublesome game lists? (0) GUIDES: READ THEM!!!! INSTALL GUIDE: SUGGESTED BIGBOX SETTINGS: CUSTOM OPTIONS GUIDE: GLOBAL SETTINGS GUIDE: READ THIS! ON-THE-FLY REGION CHANGES GUIDE: BONUS MEDIA GUIDES: NEW INFO ADDED! (9/16/25) EDITING THE THEME: WANT TO HELP? PATREON: Become a member of my Patreon, a place where you can help keep me up late by buying me Starbucks. It's no longer a place of paywall, I don't even spend alot of time there it's just a place for people to donate to my long nights of theming. I spend alot of time in my gaming room making these themes, if you feel that using these themes has brought you $3 worth of joy, please consider donating to my coffee pot. Any person that donates (even just once) will get their name permanently listed in the "Supporter" section on the settings page of this theme. You can subscribe then immediately unsubscribe, it doesn't hurt my feelings. As a added bonus you can make requests and let me know how you feel about anything really. I try to post every few days and show what I've been working on, stop by and check it out! It's free. If you decide to become a member of my super secret club, I will listen to your stories, requests, and criticism. I will use your donation money to buy large stockpiles of Bustelo, and Giovani's pizza. Your voices will be heard, your money will be spent on snacks, and I will do my best to make the magic happen. I will say...I don't do this for money. I am grateful for every dollar, but....I really WILL spend your money on fast food and coffee. If you don't buy it for me, I buy it myself lol. I stay up late regardless, and I will make these whether people pay me or not. I think it's fun, making these. It's another way for me to re-live these platforms aside from browsing the game lists (which also bring me joy). I spend a ton of time reading about the platforms, watching videos, all kinds of fun stuff. I don't think of it as a job, I WANT to make them, for free even. I jump at the chance to squash bugs because I truly want this to be the best I can possibly make it, to pay proper homage to the original Coverbox and also for anybody that enjoys Coverbox as much as I do. I may not make alot of money, but, I don't need it to be happy. I have everything I need, God has blessed me with such. I prefer that you donate your money to Dave, he deserves it more so than I. Without his CTC we would have WAAAAY less themes here to choose from, this one included. It's made ENTIRELY with his CTC app, I used nothing else. I will list his Patreon page below with mine. Again, I'm grateful for all of you that choose to share your snack money with me, and also with Dave. Dave's Patreon KingSlayer420 Patreon CREDITS: ASSETS: Coverbox - By Faeran Photoreal Controller Vectors - By Pineapple Graphics Platform Backgrounds from Unified - By CriticalCid COLORFUL Hardware PNG media - By viking COLORFUL platform video set - By viking LaunchBox Logos - By Dan Patrick Default assets - By dragon57 Color Logos Wallpaper - By dragon57 Blank Box art - By Pyrometheous Console Platform Box Pack - By Rlad SNES Console Front Face - By BMovieBen Super Gameboy Cartridges - By Duimon HD PS1 BIOS Theme - By mrgonaka Retroarch PSX Bios Theme - By Sir5ur Super Gameboy Borders - By ruckage Platform Fanart - By BlazingRyuu Cart-Case Borders - By ABeezy1388 Case Borders - By Robin55 Gameboy Kiosk Overlay - By p3st HyperSpin Platform Pointers - By thatman84 Unified Pointers - By CriticalCid PS2 5K Wallpaper - By adamlbiscuit Sega Game Gear Sound Pack - By drmalouf PS2 Soundpack - By Jodanzuki Classic DS Menu - By Gemdation DSi Sprites - By Citra Nintendo 3DS - By reon 3DS Theme - By Malixx Famicom Disk Case - By Dedaloso TendoMode - By ryback2501 OEM Unleashed - By FrontlineMist57 Xbox 360 NXE - By Riquenunes NXE Ultimate Pack - By TheBusterZX Playstation X - By pajarorrojo Assets from CTC Examples - By Dave Paterson PSP 1G1R No-Case - By Signum Platform System Boxes - By Styphelus SNES MSU-1 Media Set - By CTRL-ALT-DEFEAT MUSIC: RetroSynth - By Bastien Agussol This is Halloween - By Universfield Tetris Theme - By SpookyDave Flower Garden Remix - By Qumu Super Mario Land Remix - By Qumu Holly Jolly Christmas - By Don Salmon Music Star Spangled Banner - By Music Unlimited Underground Remastered 80s Style - By Aqua MIDI Focused - By 8-BrickDMG Pokemon Synthwave - By Chillboy Beats Somebody's Watching Me - By Rockwell Emerald Hill Zone Remix - By Player2 Astro Advancement - By Sponzi Castle Theme Remix - By PIXELIZER GTA Retrowave Remix - By RetroCiri Yoshi's Island - Underground - By JuunJuubei Rainbow Road 80's Synthwave - By Chillboy Beats DSi Shop Theme Remix - By mfgecko 3DS Theme Shop Remix - By Player2 Chemical Plant Zone Remix - By Xennon Perfect Dark Remix - By Ryuquency Yoshi Story Remix - By Synoxsis Halo 2 Synthwave - By MS Synthwave GTA V Pause Remix - By EurocorpFx Halo 3 Rain - By MS Synthwave FFVII Battle Remix - By DI Steven Papo Satellaview BSX - By New Nova UNATCO Remix - By CVDash Final Fantasy Prelude - By Chillboy Beats Super Mario Bros 1-2 Synth - By RetroShred Super Mario Bros Synth - By Lucid Memory Dreams of the Shore - By Leon Night Dark Lavender Town - By Turbo Sinner Aquatic Ambience Remix - By HEPHESTOS Donkey Kong Intro Remix - By JGS Music VIDEO: Rainbow Neon Stairs - By Anton Nikolaienko PS2 Game List Video - By DonellHD Futuristic Pixel Neon - By Siam Ahmad Halloween Festival - By Potjanun Surirug Christmas Scene - By Cahya Sunandar Digital LCD Pattern - By Ponravin Phom-in Merry Christmas - By Black Spade Design Happy Independence Day - By Saad Ur Rehman American Flag Wave - By Dwi Rustiyanto 3D Grid Tunnel - By Paduret Dan Cristian Abstract Radiating Lightburst - By Ibna Foysal Abstract Geometric Shapes - By Pipat Sungwises Elegant Moving Shapes - By Chandresh Uike White Color Grid - By Digital Background Gray Grid - By Syahrul Iman Colorful Lines - By Herlangga Perkasa Abstract Lighting - By Shajahan Ali Lens Flare - By Herlangga Perkasa Pink Curved Lines - By Happy Dwi Sulaspriyono Abstract Brick Wall - By Okan Akdeniz Endless Sci-Fi Corridor - By Iryna Nikolaienko White Squares - By Chandresh Uike Elegant White - By Chandresh Uike NES Mini Screensaver - By GraphicsGod Playstation 3 XMB Waves - By VoltPlayz PSP Wave Videos - By AYZAK 94 SPECIAL THANKS TO: Faeran - For making Coverbox, letting me use your assets, helping me when I get stuck, making all the CTC videos, your like a mentor to me. y2guru - For making Community Theme Creator, none of this would be possible without it! Also thank you for all the help, examples, assets, and instructional videos! Cnells2000 - For helping me make some videos, making some assets and helping me test Vahn65 - For helping me test updates Zyute - For helping me test updates Patreon Supporters - For keeping the coffee comin' and helping me with the themes. REPORT BUGS IN THE COMMENTS (OR DM ME) I'LL GET THEM FIXED ASAP *_CUSTOM FIELDS.txt is included in the theme, and also available for download in a separate zip above. If you like this theme, please leave a review and tell me about it! It keeps me motivated! FEED ME TASTY MUSHROOM!9 points -
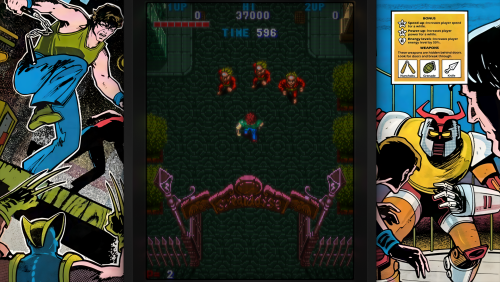
Version 1.1
8,477 downloads
I'm redoing all of the bezels of my favorites collection in Launchbox using artwork I've found everywhere while also using various techniques to upscale to 4k. Most of the artwork I've found is from Mr Do's site and arcadeartwork.org. Shout out to AlexDC22 for the Neo Geo bezels. These are to be used with Duimon's Bezel Project MegaBezel integration using his instructions here: https://github.com/Duimon/Duimon-Bezel-Project Additional Screenshot Album https://imgur.com/a/q35NtSo New bezels will be updated periodically. Once enough are accumulated, I'll combine them into the master zip file.9 points -
@goofers : One Higher quality Rampart clear logo
9 points
-
I built a simple old school plugin to help in the matter. If you download the attached file and then extract it to your \\LaunchBox\Plugins folder (not in any subfolder) when LaunchBox is CLOSED and then open LaunchBox. You'll have a new menu option at the bottom of the Tools menu that says Correct Completed => Progress Migration. Click that and you should be good to go. This plugin is SUPER rudimentary and just looks for the old completed flag and if the game has it sets Progress to "Done / Mastered" (without quotes). It WILL overwrite anything that's currently in there and there is no undo. Should get those that lost their data into a better state though and allow them to start enjoying the new Progress field. CompletedCorrection.zip9 points
-
There was this one on SteamGridDB:9 points
-
Version 1.0.0
182 downloads
Here are 9 platform video marquees that I've created. I was originally posting these on the forum, but I'm a dummy and never posted them here. Hopefully more people will see them. I plan to make more, but these do take a decent amount of time to produce. Video files are 2880x1080. This is what my personal ultrawide monitor marquee at home is built for, so I hope that converts over to what other people have. Also, if I'm uploading this in the wrong section, or if there aren't enough videos in this package, then I'm terribly sorry!9 points -
Current new themes are sitting at 7 Handhelds 14 Consoles 12 Arcade 34 Computers = 67 total new themes I have to look through the Launchbox database list and see what's missing still...aiming to cover every single system in the database As far as custom platforms,I am not dealing with those until the database is covered I also plan on Video themes and animated marquees to match every current and future theme in refried Edit: Looked over the DB and I need to do 6 more that are missing,then the entire DB so far will be covered PICO-8 Oric Atmos Nintendo Switch 2 Bandai SuperVision 8000 Fujitsu FM Towns Marty Microsoft Xbox Series X/S9 points
-
Version 1.0.0
230 downloads
Hello everyone, how are you? I'm Leto and I'm here to post for the first time exclusively my Sega Mega Drive covers that I customized in Photoshop. It was a professional job, valuing the platform that had such an impact on my life. I'm sure that from now on, with this hard work done for Mega Drive fans, everyone will remember their games again. There are 804 covers following the same pattern, with 600x840 resolution for the main Mega Drive games, which in my opinion is more than necessary for all fans of the platform. Note: If anyone uses it, don't forget to give credit to the author, thank you very much. A hug to everyone and have fun.9 points -
.thumb.png.650e3cddf2300b54510b135a0b410135.png)
Version 1.0.0
94 downloads
This 2D boxart pack is made up of the missing ones from the excellent WallyWonka's pack. I tried my best to keep them uniform, they're far from perfect, most of them have been AI upscaled and manually adjusted, but most of them are decent enough.9 points -
Here you go
9 points
-
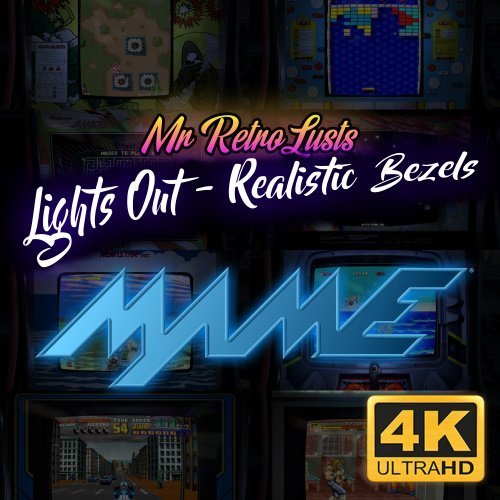
Version 22.0
69,587 downloads
Note: This thread will not be pushed to the front in the "whats new" section, if you want notifications for future updates to this file be sure to follow this page by using the follow button in the upper right corner Part of the "Lights Out - Realistic Bezels" series, for RetroArch bezels in this series see: https://forums.launchbox-app.com/files/file/1950-mr-retrolusts-lights-off-retroarch-bezels/ About: NOTE: This original project uses a reflection and scratch layer to add a realistic effect, it defines the style of the project, this is not for everyone. But please don't request "a clean verion" as I haven't kept the layer formats for all these 2000 games, this project is what it is. Realistic bezels in 3840x2160 resolution for MAME. My goal was to make bezels for around 1300 MAME games I had in my collection but I ended up making many bezels more. I started this project in 2019 and finished it in 2026. I used existing high quality artwork but also cleaned a lot of previously unavailable artwork which @Mr. Do had in his amazing collection. I searched high and low with google images to find existing artwork, which took me to Japanese websites often using google translate and research to get to those obscure images. The quality isn't always as high but I made sure I always used the highest quality I could find. Note: These artwork packs are made for older versions of Mame, if you use Mame 0.226 and upwards and find these files don't work right please see this post as you need to have them in a different lay structure: ============== Installation: Place the zip files inside the packs in mame/artwork/ Also be sure to curve the screen in Mame effects, you can use the preset files I've included in the downloads but they are for an older version of Mame (0.198) so they might not work on newer versions. To learn more about effects in Mame be sure to read this well: https://docs.mamedev.org/advanced/hlsl.html ============== Credits: Most of the artwork used are from the most excellent @Mr. Do & the many team members: http://mrdo.mameworld.info/index.php For NeoGeo artwork much artwork came from: http://www.neogeosoft.com/ For Flyer artwork the amazing: https://flyers.arcade-museum.com/ and https://www.flyerfever.com/ Some artwork used from: https://www.verticalarcade.com/ which has amazing vertical bezels, be sure to pay them a visit. Some artwork used from imbord3rlin3: https://www.arcade-projects.com/threads/high-resolution-scan-database-scans-as-a-free-service.24725/ Photos from Museum of the Game® & International Arcade Museum® https://forums.arcade-museum.com/ For research the great Arcade Database by: http://adb.arcadeitalia.net/ Special thanks to the following people, without them this project wouldn't be what it is: @ArsInvictus John Merrit, @Briball @cmgssilva @Orionsangel @Boz1978 @L4ZYD4NE @Manson976 UDb23 @IainSA TheGuru, Smitdogg, CAG, DrVectrex, tbombaci, italie, MAMEWorld, Ad_Enuff, UDb Raspbear, @destrowade @CKL @Thoggo @Antny @Dreamstate Andyaust @zugswang Spinnhacker, CCF Gameplay, jkburks, Comboman, Tim Lindquist, TrevEB, Aaron Giles, Jumpman1981, @kloug666, Tormod, yaggy, @NightVoice, Dillweed, @NeoKarnage, Vaughan, Zorg, Divemaster, Ad_Enuff, ranger lennier, Kiltron, @damageinc86, AntoPISA8 points -
8 points
-
8 points
-
@HADES81 Cyborg 009
8 points
-
@HADES81 Boogerman
8 points
-
@HADES81 Taz Mania
8 points
-
@HADES81 SWAT CATS USA
8 points
-
@HADES81 Earth Light
8 points
-
Version 1.0.0
95 downloads
As asked for by Faluki, all the usual stuff videos box art backgrounds etc. Big Pack coming Tomorrow first of my Teknoparrot Packs in the mean time enjoy this one 👍8 points -
8 points
-
8 points
-
8 points
-
@MJF
8 points
-
Hey All, We are back with another beta round! Thanks to everyone helping us test the latest beta builds. Your feedback is super valuable, so please include the following info when reporting any issues: 📝 When submitting feedback, include: Your Windows version A clear description of the issue Whether the issue can be consistently reproduced The steps to reproduce it 🎮 How to Join the Beta To opt into the beta: In LaunchBox, go to Tools > Options > General > Updates Enable Update to Beta Releases When a beta is available, you will be prompted at startup or can check manually via Menu > Help > Check for Updates 🔌 A Quick Note on Plugins Some beta builds include early versions of official plugins that are not yet live in the Plugin Manager. Because of this: You may see update prompts for plugins that are actually newer in the beta Please avoid updating plugins while using a beta if you are planning to provide feedback. This helps us get accurate data and avoids breaking improvements 🎞️ VLC is now considered legacy If you are reporting any issue in either LaunchBox or Big Box, you must first ensure your video engine is set to Windows Media Player. For Big Box: Go to Options > Video and set the Video Playback Engine to Windows Media Player For LaunchBox: Go to Tools > Options > General > Video Playback and do the same Note that these settings are separate. Changing the setting in one does not affect the other. Always re-evaluate the issue after changing this setting before submitting a report. Beta 1: New Premium Feature: Added a new Screensavers feature to Big Box, letting users discover games with fully themeable views and interact directly with the games shown Improvement: Platform detail views in both LaunchBox and Big Box now display numerical counts for games that are beaten, completed, or mastered, based on Game Progress Tracking stats Fixed: RetroAchievements were not loading in Game Details when using a List View, resulting in no achievement data being shown Fixed: Removed the outdated Change Badge Images option from the Badge menu in LaunchBox, which no longer applied after the media manager overhaul in version 13.21 Fixed: Legacy Big Box themes using Old Default theme code had a stray completed graphic that would always show, regardless of user data Fixed: Selecting a game too quickly in Big Box could prevent LEDBlinky from displaying the correct lighting behavior Fixed: A specific crash related to the MAME High Score system is now caught with error handling, and logging has been added to help identify the root cause The screensaver feature is a bit of a work in progress, but the core principles are there. The view itself is designed to be an alternative to Attract Mode. It cycles through games, giving you another avenue to discover games in your library. There's an action button that allows you to quickly navigate to the Game Details page of the game you are looking at. The default theme currently comes with 3 completed views, and 1 placeholder. By release, all 4 views should be filled in for the default theme. Each theme will have the ability to have up to 4 distinct screensaver views, and theme devs have the full breadth of game bindings at their disposal when building out these views. More detailed theming info for theme devs will be coming soon. Beta 2: New Feature: LaunchBox now opens with a brand new Welcome Wizard that helps users quickly set up their games, preferences, and media so they can jump straight into the fun New Feature: A new automation rule for Game Progress Tracking now allows games to be marked as paused if they have not been played in a user-defined number of days New Feature: A new Media Settings section under Tools > Options > Media > Automatic Imports lets users customize which media files are downloaded during automated imports Improvement: When arranging by Game Progress, sorting now follows your user-defined order for progress values and headers Improvement: Platform icons have been visually refreshed for Nintendo GameCube, Nintendo Game Boy Advance, and PICO-8 to better represent each system Improvement: Screensaver 4 for the Default view is now complete and available for testing Improvement: The “Attract Mode Master Volume” option in Big Box is now called “Idle Master Volume” and now controls both Screensaver and Attract Mode audio. Improvement: Marquee screens and LEDBlinky integration should now function properly with Screensavers Fixes: Games hidden by the user will no longer appear in the Game Discovery Center Fixes: The Beat em Up clear logo now displays correctly under all conditions Fixes: Resetting play time and play count now also resets these values for all additional apps attached to a game Fixes: Hybrid views now provide proper audio feedback when navigating with a controller or keyboard Fixes: Some custom LaunchBox themes were silently failing to poll the selected game, which could prevent item highlighting from working correctly Fixes: In some custom LaunchBox themes, multiple carousel controls in the Game Details panel were not always updating as expected Beta 3: New Premium Feature: LaunchBox and Big Box now include a brand new FFMPEG-based video playback option, delivering more reliable performance, with the old VLC engine now phased out8 points
-
8 points
-
Version 1.0.1
445 downloads
NOW WITH VIDEOS! For the longest time I've wanted to put together a definitive Super Famicom platform, but exclusively for games that are playable in English. There's a lot of translations out there, and going through each of those to compile a definitive list is no small feat. But now, thankfully and mercifully, there are a couple of different resources to track every Japanese SNES game with a translation. EDIT/UPDATE: This quickly spiralled into also figuring out which Japanese exclusives, with no translation, are ACTUALLY playable in English! @CriticalCid Provided a list of games "deemed" to be playable from the HyperSpin days. It seems they really went through every Japanese exclusive with no translation (at the time) and created a list. It's a good list, however, quite a few games aren't really playable in English. Some games with quiz elements slipped through and they were pretty liberal with adding to it. So, errrgh, I tested/watched a bunch of longplays for every game on the list, and culled it down to what it ACTUALLY playable in English. Some games you aren't even gonna notice the language barrier, others may have...like 1 menu in Japanese. The worst offenders are the Zero4 Champ games, a lot of menuing in Japanese, but the game is totally worth it. All other games I've been pretty strict with. Checked SNES Drunks lists, and had a general rummage around to make we got em'all (hopefully). The Project is now in 2 Parts/Platforms. Super Famicom is the T-En Platform, in other words, games guaranteed to play in English. Super Famicom English Friendly platform, is for Japanese Exclusives (with no translation) that are "playable" in English! You may still encounter Japanese text & voice, but it'll be minimal. These have been separated as not everyone may want the English Friendly games, and only opt for the "guaranteed to be in English" platform. If my assumption is wrong, lemme know and I'll combine them! "Rules" for the Translation Project Now, there aren't really any "rules" when it comes to translations and Japanese platforms. Especially with game titles. A Japanese game can have its original title, the English translation title... and it's western release title, which can be different to the Japanese to English translation. Confusing...yes. Also, artwork in general is a bit of a nightmare for Japanese games. Finding full unified 3D boxes that actually cover the full library is tough, and Box - Fronts can be different sizes depending on the source, causing my OCD to throw a fit. Another point is the rom association with the DB. A lot of time has gone into ensuring all games and their artwork are correctly associated under the proper DB ID. Some games when imported under the translated title will catch a RomHACK ID or something completely different due to the difference in title, not on my watch. Anyway, the rules I have applied for this platform are as follows. 1G1R. Only 1 game per entry ONLY Japanese unified artwork for Box Fronts, 3D boxes, 2D Carts and Clear Logos. Thanks to @firedropD12 for providing the updated/upscaled box fronts for the translation platform, among other things. Game titles set to the translated English title. This aligns the game name and title screen. Keep in mind not all translations have a translated title. A translation can be released with the Japanese title & the English title. In this scenario, the English title has been selected. Only the better translations with improvements (if any) listed/imported. (No FastROM hacks as I keep those in a separate platform) Artwork NOT named to Rom name. Instead I exported the images via the media pack maker, which names art to the DB entry, not the ROM name. This is best for 'ADD ROMS' situations. NO non Japanese translations. This includes French games translated to English, and Japanese games translated to anything other than English. Strictly Japanese to English here. NO USA Relocalisations for the above reason, also they really belong in the Improvements category. NO Satellaview exclusives. This is really it's own platform and doesn't belong here. Satellaview will be covered separately, in depth, as it has loads of "confusing crossover" with the normal Super Famicom library. "Rules" for the English Friendly Project No games with a translation Japanese exclusives only Games must be "enjoyable" in English. This is VERY transient, but to keep things realistic, if I found myself reaching for Google Translate, it got cut. However, there are like 5-10 games that are too good to not include, despite having move of a language barrier than I'd like. Your mileage may vary. The same rules for Artwork apply as above for the Translation Project. Now here comes the nasty part. ROM NAMING for TRANSLATIONS Despite there not really being any solid naming standard, mostly looking like this... Dragon Quest III (Japan) [T-En] ....one has emerged and it looks like this..... Dragon Quest III (Japan) [T-En by DQ Translations v1.1] [Add by Rod Mérida v1.0c] [SNES Mini] [i] [n] This is based on MaybeIntros work from many years ago https://maybeintro.wordpress.com/about/ that now seems to be in use again. Yes it's long, but information rich. Losing track of what you have applied to which rom is the WORST. Name them like this so you know exactly what's going on and be able to backtrack. This way, we know who done the original translation along with the version, who made the addendums (if any) and any other additional info such as 'SNES Mini' or 'improvement patch x' applied on top. [i] means Incomplete - [n] means the title screen has been changed to it's translated title Some people don't change the Rom title to it's translated name, opting to keep the original Japanese title. THAT IS NOT THE CASE HERE. If a game has a translated title, the general rule of thumb is to rename the rom to match, which is what has been done here. The fact this naming convention is the same as the best 'resource' out there is completely coincidental INSTRUCTIONS This applies to BOTH platforms! (Back up yo s*it if you need to) Download images and platform xmls from this page Make sure LB is NOT running Place Super Famicom/Super Famicom English Friendly platform xml into correct place... Data--> Platforms Start LB Super Famicom/Super Famicom English Friendly platform should then appear in LB, if not, restart LB. Place 3D Boxes, Boxes, Cart Front & Clear Logo folders into.... Images --> Super Famicom/Super Famicom English Friendly Change roms file path to where you Super Famicom roms are. Click on any Super Famicom game, press Ctrl+A to sellect all games, go to Tools top left, go to File Management and select 'Change Roms Folder Path For Selected Games', select your folder location for Super Famicom games, and hit OK. (T-En Platform Only) If you have the correct source, rom names should be the same. (T-En Platform Only) If not... you have your work cut out for you. You can rename your roms to match how they are imported, or you can change the file name LB is expecting by.... Right Clicking on a game, edit Metadata and then change the launching path and name to match yours. This will be painstaking work. Make sure your emulator is setup AND ASSOCIATED with the Super Famicom/Super Famicom English Friendly platforms. I wanna try to mitigate the main issue of rom names, and getting your specific roms associated to the correct games if you don't have the same naming convention. If people can let me know how they name their translation roms I'll put out an additional xml with those commonly used names instead. If anyone knows of a better way to..... like....reverse import!?...., please do let me know. You can do whatever you want with the English Friendly platform. You can absorb it into your Super Famicom platform, if you wanna combine it into one. LISTS IN ANY CASE. This is the FULL list of every game with a translation in this Project using the best translations (I hope). There are also some Japanese games already in English that don't need patching listed at the bottom, of course these are also in the build. I the list you will see the translated name if there is one, and MOST importantly the LB Database ID. The ID's are paramount to tracking these entries and their associated translated titles. You can use these IDs if building yourself, they come in handy to say the least. With the rom name descriptors, you should be able to find those translations/patches with google, if you need to use these. If you see anything incorrect or you see a "technically inferior" translation, drop a comment. This list will of course grow as new translations are released. Again, if you know of any new ones let us know. (June 20, 2025) Full list of ENGLISH TRANSLATED Super Famicom Games in the Project -268- Game Name LaunchBox DB ID Rom Name 3x3 Eyes: Juuma Houkan #33053 3x3 Eyes - Juuma Houkan (Japan) [T-En by Atomizer_Zero v1.01].zip The 4.6 Billion Year Saga: To Faraway Eden #1909 4.6 Billion Year Saga, The - To Faraway Eden (Japan) [T-En by NLeseul v0.9b] [n].zip Accele Brid #23247 Accele Brid (Japan) [T-En by Aeon Genesis v1.00].zip Actraiser #1046 Actraiser (Japan) [T-En by Aeon Genesis v1.00].zip The Adventures of Hourai High: Transfer Student Dramabomb #19112 Adventures of Hourai High, The - Transfer Student Drama Bomb (Japan) [T-En by Aeon Genesis v1.00] [Add by Advancedpillow v1.0] [n].zip Albert Odyssey #23757 Albert Odyssey (Japan) [T-En by Peter Lemon] [i].zip Alcahest #13938 Alcahest (Japan) [T-En by FH v1.0b] [Add by KingMike] [Splash screen removed].zip Amazing Hebereke #132552 Amazing Hebereke (Japan) [T-En by LucianoTheWindowsFan v0.1] [i] [n].zip The Amazing Spider-Man: Lethal Foes #21489 Amazing Spider-Man, The - Lethal Foes (Japan) [T-En by Gorgyrip v1.0].zip Ancient Magic: Bazoo! World Of Magic #23125 Ancient Magic - Bazoo! World of Magic (Japan) [T-En by Aeon Genesis v1.00] [n].zip Arabian Nights: Sabaku no Seirei Ou #14812 Arabian Nights - Sabaku no Seirei Ou (Japan) [T-En by LostTemplar v1.0].zip Aretha #23405 Aretha (Japan) [T-En by Dynamic Designs v1.00].zip Aretha II: Ariel's Wonderful Adventure #94116 Aretha II - Ariel's Wonderful Adventure (Japan) [T-En by Dynamic Designs v0.91] [n].zip Armored Police Metal Jack #33006 Armored Police Metal Jack (Japan) [T-En by MrRichard999 & FlashPV & Jink640 v2.0] [n].zip Assault Suits Valken #1557 Assault Suits Valken (Japan) [T-En by Aeon Genesis v1.00] [n].zip Bahamut Lagoon #9054 Bahamut Lagoon (Japan) [T-En by DeJap & Neill Corlett & Tomato v1.3].zip Ball Bullet Gun: Survival Game Simulation #24870 Ball Bullet Gun (Japan) [T-En by Aeon Genesis v1.00].zip Bastard!!: Dark God of Destruction #3479 Bastard!! - Dark God of Destruction (Japan) [T-En by DeJap v1.0] [Add by Docrow v1.0] [n].zip Battle Soccer: Field no Hasha #3481 Battle Soccer - Field no Hasha (Japan) [T-En by Hurkey Translations v1.0].zip Bing Bing! Bingo #33510 Bing Bing! Bingo (Japan) [T-En by MrRichard999 v1.0].zip The Blue Crystal Rod #34805 Blue Crystal Rod, The (Japan) [T-En by Stargood Translations v1.0] [Region lock removed].zip Brandish 2: The Planet Buster #1590 Brandish 2 - The Planet Buster (Japan) [T-En by Synchronicity v1.0].zip Burning Heroes #14813 Burning Heroes (Japan) [T-En by Dynamic Designs v1.00] [n].zip Captain Tsubasa III: Challenge of Kaiser #14775 Captain Tsubasa III - Challenge of Kaiser (Japan) [T-En by Pianohombre v1.0] [Add by Morhamms357 v0.9] [n].zip Captain Tsubasa IV: Professional Rivals #34811 Captain Tsubasa IV - Professional Rivals (Japan) [T-En by Joe Shway v0.9] [i] [n].zip Chaos Seed: Feng Shui Chronicles #24871 Chaos Seed - Feng Shui Chronicles (Japan) [T-En by Dynamic Designs v1.02] [n].zip Chatting Parodius Live! #14779 Chatting Parodius Live! (Japan) [T-En by Advancedpillow & Onereto & Reld v1.0] [n].zip Cho Aniki: Buff Battle Ballad #24807 Cho Aniki - Buff Battle Ballad (Japan) [T-En by Stardust Crusaders v1.01] [n].zip Clock Tower #34732 Clock Tower (Japan) [T-En by Aeon Genesis v1.01].zip ClockWerx #101931 Clockwerx (Japan) [T-En by MrRichard999 v0.75] [i].zip Cooly Skunk #174463 Cooly Skunk (Japan) [T-En by Psyklax v1.1] [Add by Denim v1.1] [n].zip Crystal Beans: From Dungeon Explorer #14814 Crystal Beans from Dungeon Explorer (Japan) [T-En by Hiei & Neige v1.1].zip Cu-On-Pa SFC #3544 Cu-On-Pa SFC (Japan) [T-En by Aeon Genesis v1.00].zip Cyber Knight #3545 Cyber Knight (Japan) [T-En by Aeon Genesis v1.01] [Add by MTeam v1.01].zip Cyber Knight II: Chikyuu Teikoku no Yabou #20006 Cyber Knight II - Chikyuu Teikoku no Yabou (Japan) [T-En by Aeon Genesis v1.00].zip Cyborg 009 #24831 Cyborg 009 (Japan) [T-En by Aeon Genesis & J2e Translations v1.00].zip Daisenryaku Expert WWII: War in Europe #108412 Daisenryaku Expert WWII - War in Europe (Japan) [T-En by Gc8tech v0.1] [i].zip Dark Half #3548 Dark Half (Japan) [T-En by Aeon Genesis v1.00].zip Dark Law: Meaning of Death #14815 Dark Law - Meaning of Death (Japan) [T-En by Aeon Genesis v1.00].zip Demon Child Zenki: Battle Raiden #14783 Demon Child Zenki - Battle Raiden (Japan) [T-En by Dynamic Designs v1.00] [n].zip Densetsu no Ogre Battle: The March of the Black Queen #3232 Densetsu no Ogre Battle - The March of the Black Queen (Japan) (NP) [T-En by FinS v1.2].zip Dezaemon SFC #3551 Dezaemon (Japan) [T-En by Aeon Genesis v1.00] [Add by Mwksoul v1.0] [n].zip Dinowars: A Great Dino Odyssey #25614 Dinowars - A Great Dino Odyssey (Japan) [T-En by Backlog Odyssey v2.0] [n].zip Do-Re-Mi Fantasy: Milon's Quest #3554 Do-Re-Mi Fantasy - Milon's Quest (Japan) [T-En by Gaijin Productions & RPGOne v1.3] [n].zip Dokapon 3-2-1: From Friendship to Mayhem #107663 Dokapon 3-2-1 - From Friendship to Mayhem (Japan) [T-En by Krokodyl v1.4] [n].zip Dokapon Gaiden: Fiery Audition #108413 Dokapon Gaiden - Fiery Audition (Japan) [T-En by Krokodyl v1.0] [n].zip Donald Duck and the Magical Hat #26524 Donald Duck and the Magical Hat (Japan) [T-En by Gorgyrip v1.0] [n].zip Doraemon 4: In the Moon Kingdom #3555 Doraemon 4 - In the Moon Kingdom (Japan) [T-En by Sgt. Bowhack v0.94b] [n].zip Dossun! Ganseki Battle #3556 Dossun! Ganseki Battle (Japan) [T-En by Aeon Genesis v1.00].zip Dragon Ball Z: Hyper Dimension #1800 Dragon Ball Z - Hyper Dimension (Japan) [T-En by Twilight Translations v1.00].zip Dragon Ball Z: Super Gokuu Den: Kakusei Hen #3557 Dragon Ball Z - Super Gokuu Den - Kakusei Hen (Japan) [T-En by Commando Ginew v1.0] [i].zip Dragon Ball Z: Super Gokuu Den: Totsugeki Hen #13915 Dragon Ball Z - Super Gokuu Den - Totsugeki Hen (Japan) [T-En by Kakkoii Translations v0.98] [Anime].zip Dragon Ball Z: Super Saiya Densetsu #13916 Dragon Ball Z - Super Saiya Densetsu (Japan) (Rev 1) [T-En by Klepto Software v1.02].zip Dragon Quest I & II #19047 Dragon Quest I & II (Japan) [T-En by RPGOne v2.0 DQ] [Add by Mziab v1.0].zip Dragon Quest III #14776 Dragon Quest III (Japan) [T-En by DQ Translations v1.1] [Add by Rod Mérida v1.0c] [SNES Mini] [n].zip Dragon Quest V: Hand of the Heavenly Bride #3559 Dragon Quest V - Hand of the Heavenly Bride (Japan) [T-En by Byuu & spSpiff v0.91] [n].zip Dragon Quest VI: Realms of Revelation #3560 Dragon Quest VI - Realms of Revelation (Japan) [T-En by NoPrgress v0.90b2] [n].zip Dragon Squadron Danzarb #23111 Dragon Squadron Danzarb (Japan) [T-En by Aeon Genesis v1.00] [n].zip Dream Maze: The Kigurumi Adventure #122603 Dream Maze - The Kigurumi Adventure (Japan) [T-En by KingMike's Translations v1.0b] [n].zip Dual Orb II #3561 Dual Orb II (Japan) [T-En by Translation Corporation v1.7] [Splash screen removed].zip Aim for the Ace!: Ace Tennis #22760 E:\LaunchBox\Games\Super Famicom\Aim for the Ace! - Ace Tennis (Japan) [T-En by RPGOne v1.3] [n].zip Earth Light #122545 Earth Light (Japan) [T-En by Nezz v1.0].zip Elnard #282 Elnard (Japan) [T-En by Slidelljohn v2d beta] [i].zip Emerald Dragon #19069 Emerald Dragon (Japan) [T-En by Translation Corporation v1.2] [Splash screen removed].zip Energy Breaker #14817 Energy Breaker (Japan) [T-En by Disnesquick & Satsu v1.02].zip Eternal Filena #23113 Eternal Filena (Japan) [T-En by Satsu v0.98] [i] [n].zip F-1 Grand Prix: Part II #26329 F-1 Grand Prix - Part II (Japan) [T-En by MrRichard999 v0.50] [i].zip F-1 Grand Prix: Part III #18643 F-1 Grand Prix - Part III (Japan) [T-En by MrRichard999 v0.50] [i].zip Famicom Detective Club Part II #32900 Famicom Detective Club Part II (Japan) (NP) [T-En by Demiforce v1.00] [n].zip Fantastic Parodius #14778 Fantastic Parodius (Japan) [T-En by Blizzz v1.1a] [n].zip FEDA: The Emblem of Justice #3606 Feda - The Emblem of Justice (Japan) [T-En by Dynamic Designs v1.02].zip Final Fantasy IV #9418 Final Fantasy IV (Japan) (Rev 1) [T-En by J2e Translations v3.21] [Add by Spooniest v1.0] [Add by Masaru v1.2].zip Final Fantasy V #1762 Final Fantasy V (Japan) [T-En by RPGe v1.10] [Add by Leet Sketcher v1.2].zip Final Fantasy VI #108333 Final Fantasy VI (Japan) [T-En by RPGOne v1.2] [All Bugs Fix] [Add by Spooniest v2.0].zip Fire Emblem: Genealogy of the Holy War #3615 Fire Emblem - Genealogy of the Holy War (Japan) [T-En by Fire Emblem 4 Translation Team v20160707 beta 7] [n].zip Fire Emblem: Mystery Of The Emblem #3614 Fire Emblem - Mystery of the Emblem (Japan) [T-En by RPGuy96 & VincentASM v0.98] [Add by Quirino v0.14] [Add by RobertTheSable v0.22] [n].zip Fire Emblem: Thracia 776 #3616 Fire Emblem - Thracia 776 (Japan) [T-En by Cirosan v1.04] [Add by Miacis v1.08].zip Flying Hero: Bugyuru's Adventure #29740 Flying Hero - Bugyuru's Adventure (Japan) [T-En by KingMike's Translations v1.0] [n].zip Front Mission #3623 Front Mission (Japan) [T-En by Frank Hughes v1.0b] [Add by MTeam v1.02] [Splash screen removed].zip Front Mission Series: Gun Hazard #3624 Front Mission Series - Gun Hazard (Japan) [T-En by Aeon Genesis v1.01].zip Funaki Masakatsu Hybrid Wrestler: Tougi Denshou #24832 Funaki Masakatsu Hybrid Wrestler - Tougi Denshou (Japan) [T-En by Phil v1.0].zip G.O.D: Growth or Devolution: Heed the Call to Awaken #34752 G.O.D - Growth or Devolution - Heed the Call to Awaken (Japan) [T-En by Dynamic Designs v1.00] [n].zip Galaxy Robo #107706 Galaxy Robo (Japan) [T-En by Dynamic Designs v1.10].zip Ganbare! Goemon: The Twinkling Journey: The Reason I Became a Dancer #18797 Ganbare! Goemon - The Twinkling Journey - The Reason I became a Dancer (Japan) [T-En by DDSTranslation v3.0] [Add by Djungelurban v1.0] [n].zip Ganbare! Goemon 2: The Strange General McGuinness #18795 Ganbare! Goemon 2 - The Strange General McGuinness (Japan) [T-En by DDSTranslation v3.0] [Add by Djungelurban v1.0] [n].zip Ganbare! Goemon 3: The Mecha Leg Hold of Jurokube Shishi #18796 Ganbare! Goemon 3 - The Mecha Leg Hold of Jurokube Shishi (Japan) [T-En by DDSTranslation v3.0] [Add by Djungelurban v1.0] [Proper translation] [n].zip Ganpuru: Gunman's Proof #90487 Ganpuru - Gunman's Proof (Japan) [T-En by Aeon Genesis v1.03].zip Gekitou Burning Pro Wres #3628 Gekitou Burning Pro Wres (Japan) [T-En by Phil v1.0].zip Genjuo Ryodan #131172 Genjuu Ryodan (Japan) (NP) [T-En by Gc8tech v82] [i].zip Get Going! Ebisumaru: The Mechanical Maze: Mystery of the Missing Goemon!! #33873 Get Going! Ebisumaru - The Mechanical Maze - Mystery of the Missing Goemon!! (Japan) [T-En by DDSTranslation v2.0] [n].zip Ghost Chaser Densei #24810 Ghost Chaser Densei (Japan) [T-En by MrRichard999 & AgentOrange & Rainponcho v1.0] [Color hack by Mister Man v1.0] [Splash screen removed].zip Glory of Heracles III: Silence of the Gods #29742 Glory of Heracles III, The - Silence of the Gods (Japan) [T-En by DQ Translations v1.1a] [n].zip Glory of Heracles IV: Gift from the Gods #34748 Glory of Heracles IV, The - Gift from the Gods (Japan) [T-En by Translation Corporation v1.1] [n] [Splash screen removed].zip Go for it! Goemon: The Rescue of Princess Yuki #3211 Go for it! Goemon - The Rescue of Princess Yuki (Japan) (Rev 2) [T-En by DDSTranslation v2.0] [SRAM Hack] [n].zip Go Go Ackman #3632 Go Go Ackman (Japan) [T-En by Ackman Translations v1.0].zip Go Go Ackman 2 #25501 Go Go Ackman 2 (Japan) [T-En by Anime_World & Bunkai & Retroman_X v1.1] [Splash screen removed].zip Go Go Ackman 3 #25502 Go Go Ackman 3 (Japan) [T-En by Reld v20200105] [Add by Reld v20191227].zip Gourmet Sentai Barayarou #3634 Gourmet Sentai Barayarou (Japan) [T-En by chillyfeez v1.0] [Posing heals].zip The Great Battle II: Last Fighter Twin #33275 Great Battle II, The - Last Fighter Twin (Japan) [T-En by Aeon Genesis v1.2] [n].zip Great Battle III, The #123909 Great Battle III, The (Japan) [T-En by Aeon Genesis v1.1] [n].zip Great Battle IV, The #33272 Great Battle IV, The (Japan) [T-En by Aeon Genesis v1.1] [n].zip The Great Battle V #33273 Great Battle V, The (Japan) [T-En by Aeon Genesis v1.2] [n].zip Gulliver Boy #23109 Gulliver Boy (Japan) [T-En by Stealth Translations v0.99a] [Add by Mziab v1.1] [n].zip Heartthrob Memorial: Under The Tree Of Legends #33291 Heartthrob Memorial - Under the Tree of Legends (Japan) (Rev 1) [T-En by Tom & FlashPV & DDS v3] [n].zip Hero Chronicle: Project Olympus #123606 Hero Chronicle - Project Olympus (Japan) [T-En by Aeon Genesis v1.00] [n].zip Hiouden: Legend of the Scarlet King: The Demonic Oath #14804 Hiouden - Legend of the Scarlet King - The Demonic Oath (Japan) [T-En by Aeon Genesis v1.00] [n].zip Holy Umbrella: Dondera no Mubou!! #14788 Holy Umbrella - Dondera no Mubou!! (Japan) [T-En by Aeon Genesis v1.00] [Splash screen removed].zip Hyper Iria #30732 Hyper Iria (Japan) [T-En by Dynamic Designs & Matt's Messy Room v1.03] [Splash screen removed].zip I Love Bikes! Street Racer Soul: Rider's Spirits #33004 I Love Bikes! Street Racer Soul - Rider's Spirits (Japan) [T-En by MrRichard999 v1.0] [n].zip Jerry Boy #5862 Jerry Boy (Japan) [T-En by Chris Covell v1.0] [Controls Hack by KingMike v1.0].zip Jikkyou Power Pro Wrestling '96: Max Voltage #28830 Jikkyou Power Pro Wrestling '96 - Max Voltage (Japan) [T-En by Phil v1.0] [i].zip Jojo's Bizarre Adventure #24833 Jojo's Bizarre Adventure (Japan) [T-En by Aeon Genesis v1.00] [Add by brkmnly v1.2] [n].zip Jutei Senki #24812 Jutei Senki (Japan) [T-En by Aeon Genesis v1.00].zip Kessen! Dokapon Kingdom IV: Legendary Heroes #124452 Kessen! Dokapon Kingdom IV - Legendary Heroes (Japan) [T-En by Krokodyl v1.0] [n].zip King of Demons #25503 King of Demons (Japan) [T-En by Aeon Genesis v1.01] [n].zip Kirby's Super Star Stacker #19031 Kirby's Super Star Stacker (Japan) [T-En by TheDanaAddams v1.1] [n].zip Kouryuu no Mimi #24834 Kouryuu no Mimi (Japan) [T-En by RPGOne v2.0].zip Kunio's Dodge Ball #26288 Kunio's Dodge Ball (Japan) [T-En by Azelistic v1.0] [n].zip La Wares #34649 La Wares (Japan) [T-En by Dynamic Designs v1.00].zip Langrisser, Der #3549 Langrisser, Der (Japan) (Rev 1) [T-En by Byuu & Derrick Sobodash v1.3.1].zip Laplace's Demon #33279 Laplace's Demon (Japan) [T-En by Aeon Genesis v2.0] [n].zip Last Bible III #23761 Last Bible III (Japan) [T-En by Tom v7.0].zip Lennus II: The Apostles of the Seals #14818 Lennus II - The Apostles of the Seals (Japan) [T-En by Dynamic Designs v1.04] [n].zip Light Fantasy #143073 Light Fantasy (Japan) [T-En by Zarby89 v1.0].zip Little Magic #14805 Little Magic (Japan) [T-En by Aeon Genesis v1.00b].zip Little Master III: Jewels of the Rainbow #25472 Little Master III - Jewels of the Rainbow (Japan) [T-En by DackR v2b] [i] [n].zip Live A Live #9954 Live A Live (Japan) [T-En by Aeon Genesis v2.00 Deluxe].zip Madou Monogatari: Big Kindergarten Kids #23377 Madou Monogatari - Big Kindergarten Kids (Japan) [T-En by Aeon Genesis v1.01] [n].zip Maerchen Adventure Cotton 100 Percent #18646 Maerchen Adventure Cotton 100% (Japan) [T-En by Ellen & Sven & Svambo v1.1].zip Magic Knight Rayearth #14819 Magic Knight Rayearth (Japan) [T-En by RPGe v1.01] [Add by MTeam v1.02].zip Magic Poipoi Poitto! #24882 Magic Poipoi Poitto! (Japan) [T-En by KingMike's Translations v1.0] [n].zip Magical Drop #5576 Magical Drop (Japan) [T-En by Aeon Genesis v0.95b].zip The Magical Land of Wozz #14822 Magical Land of Wozz, The (Japan) [T-En by Translation Corporation v1.1] [n].zip Magical Pop'n #14780 Magical Pop'n (Japan) [T-En by Aeon Genesis v1.01].zip Magna Braban: The Wandering Hero #14820 Magna Braban - The Wandering Hero (Japan) [T-En by KingMike's Translations v2.0] [n].zip Majin Tensei #31478 Majin Tensei (Japan) [T-En by DDSTranslation v4.0] [Add by Badnest v1.0].zip Majin Tensei II: Spiral Nemesis #33431 Majin Tensei II - Spiral Nemesis (Japan) [T-En by DDSTranslation v1.0].zip Mario's Super Picross #21356 Mario's Super Picross (Japan) [T-En by FCandChill & Kumori v1.5] [n].zip Marvelous: Another Treasure Island #24814 Marvelous - Another Treasure Island (Japan) [T-En by Tashi] [Add by DackR & LuigiBlood v1.08] [n].zip Mega Man & Bass #5813 Mega Man & Bass (Japan) [T-En by Aeon Genesis v1.00] [Add by Blade133bo v1.1] [n].zip Megami Tensei: The Old Testament #23760 Megami Tensei - The Old Testament (Japan) [T-En by DDSTranslation v1.1] [Add by Raindare v0.4] [n].zip Melfand Stories #26088 Melfand Stories (Japan) [T-En by Gan v1.1a].zip Metal Max Returns #14821 Metal Max Returns (Japan) [T-En by Aeon Genesis v1.00].zip Metal Slader Glory: Director's Cut #30790 Metal Slader Glory - Director's Cut (Japan) (NP) [T-En by FCandChill v1.0].zip Mickey & Donald: Magical Adventure 3 #5596 Mickey & Donald - Magical Adventure 3 (Japan) [T-En by RPGOne v1.5] [Nephew Colors hack by Jonny v1.0] [n].zip Mickey's Great Adventure in Tokyo Disneyland #24815 Mickey's Great Adventure in Tokyo Disneyland (Japan) [T-En by Svambo & Anonymousse v1.0] [n].zip Might and Magic: Book II #447665 Might and Magic - Book II (Japan) [T-En by MrRichard999 & D.D.S. & Dr. Floppy & AgentOrange v1.02].zip Miracle Girls #24835 Miracle Girls (Japan) [T-En by RPGOne v1.1].zip Mobile Fighter G Gundam #25474 Mobile Fighter G Gundam (Japan) [T-En by Aeon Genesis v1.00] [n].zip Mobile Suit Gundam: Cross Dimension 0079 #24836 Mobile Suit Gundam - Cross Dimension 0079 (Japan) [T-En by Aeon Genesis v1.00] [n].zip Mobile Suit Gundam F91: Formula Wars 0122 #24837 Mobile Suit Gundam F91 - Formula Wars 0122 (Japan) [T-En by Twilight Translations v1.00] [n].zip Mobile Suit Gundam Wing: Endless Duel #5839 Mobile Suit Gundam Wing - Endless Duel (Japan) [T-En by Aeon Genesis v1.00] [n].zip Mobile Suit V Gundam #26286 Mobile Suit V Gundam (Japan) [T-En by Twilight Translations v1.00] [n].zip Monstania #5615 Monstania (Japan) [T-En by Aeon Genesis v1.03].zip Mysterious Dungeon 2: Shiren the Wanderer #25891 Mysterious Dungeon 2 - Shiren the Wanderer (Japan) [T-En by Aeon Genesis v1.00] [n].zip Mystic Ark #5621 Mystic Ark (Japan) [T-En by Aeon Genesis v1.01].zip Nangoku Shounen Papuwa-Kun #14782 Nangoku Shounen Papuwa-kun (Japan) [T-En by FH v1.0b] [i].zip Neugier: The Journey Home #5704 Neugier - The Journey Home (Japan) [T-En by Haeleth & RPGOne v2.00] [n].zip Nice de Shot #132209 Nice de Shot (Japan) [T-En by MrRichard999 v0.99].zip Nishijin Pachinko 2 #137927 Nishijin Pachinko 2 (Japan) [T-En by MrRichard999 v1.0] [n].zip Nishijin Pachinko 3 #137925 Nishijin Pachinko 3 (Japan) [T-En by MrRichard999 v1.0].zip Okamoto Ayako to Match Play Golf: Ko Olina Golf Club in Hawaii #132313 Okamoto Ayako to Match Play Golf - Ko Olina Golf Club in Hawaii (Japan) [T-En by MrRichard999 v0.94].zip Olivia's Mystery #132316 Olivia's Mystery (Japan) [T-En by alasker1899 v1.0] [n].zip Otogirisou #132317 Otogirisou (Japan) [T-En by ButThouMust v1.1].zip Panel de Pon #455522 Panel de Pon (Japan) [T-En by Zuqkeo v1.0].zip Panic in Nakayoshi World #25235 Panic in Nakayoshi World (Japan) [T-En by Project Sailor Moon v1.00].zip Pikiinya! #131902 Pikiinya! (Japan) [T-En by LucianoTheWindowsFan v0.1] [i].zip Popeye: Tale of Teasing Witch Sea Hag #26531 Popeye - Tale of Teasing Witch Sea Hag (Japan) [T-En by KingMike's Translations v1.0] [n].zip Power of the Hired #131173 Power of the Hired (Japan) [T-En by Dynamic Designs v0.75].zip Power Sokoban #131269 Power Sokoban (Japan) [T-En by Saffith v1.0] [n].zip Pretty Soldier Sailor Moon: Another Story #18726 Pretty Soldier Sailor Moon - Another Story (Japan) [T-En by BST v2.08] [Grind-Be-Gone] [Swiss Manicure] [n].zip Pretty Soldier Sailor Moon #28784 Pretty Soldier Sailor Moon (Japan) [T-En by mteam v1.01] [n].zip Pretty Soldier Sailor Moon R #5822 Pretty Soldier Sailor Moon R (Japan) [T-En by FuSoYa v1.00] [n].zip Princess Minerva #34800 Princess Minerva (Japan) [T-En by Dynamic Designs v1.02].zip Psycho Dream #132532 Psycho Dream (Japan) [T-En by Stardust Crusaders v1.0].zip Raccoon Rascal #29256 Racoon Rascal (Japan) [T-En by Zarby89 v1.0] [n].zip Ranma 1-2: Hard Battle II Super Move Hustle #2201 Ranma 1-2 - Hard Battle II Super Move Hustle (Japan) [T-En by Dynamic Designs v1.10] [n].zip Ranma 1-2: Treasure of the Red Cat Gang #28832 Ranma 1-2 - Treasure of the Red Cat Gang (Japan) [T-En by Dynamic Designs v1.00] [Anime] [n].zip Record of Lodoss War #24838 Record of Lodoss War (Japan) [T-En by Dynamic Designs v1.0] [n].zip Rockman 7: Shukumei no Taiketsu! #292 Rockman 7 - Shukumei no Taiketsu! (Japan) [T-En by Zynk Oxhyde v1.0].zip Rockman X #143 Rockman X (Japan) (Rev 1) [T-En by Her-Saki v1.5].zip Rockman X2 #1015 Rockman X2 (Japan) [T-En by Her-Saki v1.1].zip Rockman X3 #1016 Rockman X3 (Japan) [T-En by Her-Saki v1.1].zip Romancing Sa-Ga #26338 Romancing Sa-Ga (Japan) (Rev 1) [T-En by DDSTranslation v1.2].zip Romancing Sa-Ga 2 #26087 Romancing Sa-Ga 2 (Japan) [T-En by Gilhide v0.05c] [i].zip Romancing Sa-Ga 3 #5817 Romancing Sa-Ga 3 (Japan) (Rev 1) [T-En by Mana Sword v0.30].zip RPG Tsukuru: Super Dante #107714 RPG Tsukuru - Super Dante (Japan) [T-Eng by Magecraft v0.90] [Add by KanjiHack] [i].zip RPG Tsukuru 2 #25479 RPG Tsukuru 2 (Japan) [T-En by KanjiHack v0.9] [i].zip Rushing Beat #5810 Rushing Beat (Japan) [T-En by FlashPV v1.0].zip Sailor Moon Super S: Floating Panic #28804 Sailor Moon Super S - Floating Panic (Japan) [T-En by Dynamic Designs v1.01] [n].zip Sanrio World Smash Ball! #5824 Sanrio World Smash Ball! (Japan) [T-En by Suicidal Translations v1.00].zip SD The Great Battle: A New Challenge #26346 SD The Great Battle - A New Challenge (Japan) [T-En by Aeon Genesis v1.0] [n].zip Seiken Densetsu 3 #5827 Seiken Densetsu 3 (Japan) [T-En by LNF & Neill Corlett & SoM2Freak v1.01].zip Sengoku #24840 Sengoku (Japan) [T-En by Vice Translations v1.00] [n].zip Shiji Hero Legend #34747 Shiji Hero Legend (Japan) [T-En by Dynamic Designs v0.90] [n].zip Shin Megami Tensei #14784 Shin Megami Tensei (Japan) [T-En by Aeon Genesis v1.00] [Add by Orden v1.0] [Add by Revenant v1.3].zip Shin Megami Tensei if... #21146 Shin Megami Tensei if... (Japan) [T-En by Aeon Genesis v1.0] [Add by A Friendly Irin v1.05].zip Shin Megami Tensei II #14785 Shin Megami Tensei II (Japan) [T-En by Aeon Genesis v1.00] [Add by A Friendly Irin v1.09] [Fiend tile hack by A Friendly Irin v1.1] [Original demon race names].zip Shin Nekketsu Kouha: Kunio-tachi no Banka #23216 Shin Nekketsu Kouha - Kunio-tachi no Banka (Japan) [T-En by Aeon Genesis v1.00].zip Shodai Nekketsu Kōha Kunio-kun #23217 Shodai Nekketsu Kouha Kunio-kun (Japan) [T-En by Aeon Genesis v1.00].zip Silva Saga II: The Legend of Light and Darkness #14777 Silva Saga II - The Legend of Light and Darkness (Japan) [T-En by Dynamic Designs v1.00].zip Slayers #5861 Slayers (Japan) [T-En by Dynamic Designs & Matt's Messy Room v1.01].zip Snoopy Concert #24841 Snoopy Concert (Japan) [T-En by Aeon Genesis v1.00].zip Song of The Angel #34645 Song of the Angel (Japan) [T-En by Translation Corporation v1.0] [n] [Splash screen removed].zip Star Fox 2 #128598 Star Fox 2 (Japan) (Beta) [T-En by Aeon Genesis v1.00] [Add by ManuLoewe v20100720].zip Star Ocean #6132 Star Ocean (Japan) [T-En by DeJap v1.0].zip The Stories Of Ihatovo #34750 Stories of Ihatovo, The (Japan) [T-En by Tom & FlashPV & DDSTranslation v2.0] [n].zip Super Aleste #3264 Super Aleste (Japan) [T-En by Asiwish v1.2].zip Super Back to the Future Part II #21137 Super Back to the Future Part II (Japan) [T-En by Mteam v1.00].zip Super Bomberman 4 #14786 Super Bomberman 4 (Japan) [T-En by Svambo v1.0].zip Super Bomberman 5 #14787 Super Bomberman 5 (Japan) [T-En by Psyklax Beta] [Add by Svambo v1.0] [i].zip Super Chinese Fighter #33285 Super Chinese Fighter (Japan) [T-En by DDSTranslation v1.0].zip Super Chinese World #2672 Super Chinese World (Japan) [T-En by DDSTranslation v1] [n].zip Super Chinese World 2: The Interstellar Battle Arena #123212 Super Chinese World 2 - The Interstellar Battle Arena (Japan) [T-En by DDSTranslation v2] [n].zip Super Chinese World 3 #34652 Super Chinese World 3 (Japan) [T-En by DDSTranslation v2] [n].zip Super F1 Circus 2 #132818 Super F1 Circus 2 (Japan) [T-En by MrRichard999 v0.95].zip Super F1 Circus 3 #133463 Super F1 Circus 3 (Japan) [T-En by MrRichard v0.995].zip Super Famicom Wars #26347 Super Famicom Wars (Japan) (NP) [T-En by Optiroc v1.1].zip Super Family Circuit #131300 Super Family Circuit (Japan) [T-En by MrRichard999 v1.0].zip Super Fire Pro Wrestling: Queen's Special #28839 Super Fire Pro Wrestling - Queen's Special (Japan) [T-En by Phil v1.0].zip Super Fire Pro Wrestling Special #28844 Super Fire Pro Wrestling Special (Japan) [T-En by BobSchneeder45 & Boogal & iccanobif v1.0].zip Super Fire Pro Wrestling X Premium #6156 Super Fire Pro Wrestling X Premium (Japan) [T-En by Sydra v7].zip Super Gachapon World: SD Gundam X #22399 Super Gachapon World - SD Gundam X (Japan) [T-En by MrRichard999 v0.98].zip Super Genjin 2 #18805 Super Genjin 2 (Japan) [T-En by Gaijin Productions v1.00] [i].zip Super Gussun Oyoyo 2 #14790 Super Gussun Oyoyo 2 (Japan) [T-En by RPGOne v1.0].zip Super Naxat Open: Spike McFang Golf #132369 Super Naxat Open - Spike McFang Golf (Japan) [T-En by MrRichard999 v0.99] [n].zip Super Nazo Puyo: Rulue's Roux #97230 Super Nazo Puyo - Rulue's Roux (Japan) [T-En by Momochi v1.1] [n].zip Super Ninja Kid #28773 Super Ninja Kid (Japan) [T-En by Diogo Ribeiro v1.0] [n].zip Super Puyo Puyo 2 #5798 Super Puyo Puyo 2 (Japan) [T-En by J2e Translations v1.1] [n].zip Super Robot Wars 3 #3546 Super Robot Wars 3 (Japan) [T-En by Aeon Genesis v2.00m2] [Music Persistance] [n].zip Super Robot Wars EX #31472 Super Robot Wars EX (Japan) [T-En by Aeon Genesis v1.00] [Music Persistence] [n].zip Super Robot Wars Gaiden: The Elemental Lords #31473 Super Robot Wars Gaiden - The Elemental Lords (Japan) [T-En by Aeon Genesis v1.05] [Music Persistence] [n].zip Super Shell Monsters Story #29689 Super Shell Monsters Story (Japan) [T-En by Dynamic Designs v1.00 hotfix 09] [n].zip Super Shell Monsters Story II #90615 Super Shell Monsters Story II (Japan) [T-En by Dynamic Designs v0.90] [n].zip Super Soukoban #27492 Super Soukoban (Japan) [T-En by MrRichard999 & Krom v0.5] [i].zip Super Ultra Baseball 2 #31469 Super Ultra Baseball 2 (Japan) [T-En by VX v1.00].zip Super UNO #131190 Super Uno (Japan) [T-En by Krokodyl v1.0] [n].zip Sutte Hakkun #24817 Sutte Hakkun (Japan) [T-En by Raccoon Sam v1.0] [n].zip Tactics Ogre: Let Us Cling Together #14806 Tactics Ogre - Let Us Cling Together (Japan) (Rev 2) [T-En by Aeon Genesis v1.00b].zip Tales of Phantasia #6232 Tales of Phantasia (Japan) [T-En by DeJap v1.2] [Add by Spinner 8 and friends v1.0].zip Tenchi Muyou!: The Game #6255 Tenchi Muyou! - The Game (Japan) [T-En by borderLine & LNF v1.1] [n].zip Tengai Makyou Zero #104353 Tengai Makyou Zero (Japan) [T-En by Tom v7.0].zip Tetris Battle Spin Off #17179 Tetris Battle Spin Off (Japan) [T-En by DDSTranslation v1.0] [Add by Docrow v1.1] [n].zip Tomorrow's Joe #24843 Tomorrow's Joe (Japan) [T-En by Vice Translations v0.99] [n].zip Torneco no Daibouken: Fushigi no Dungeon #6306 Torneco no Daibouken - Fushigi no Dungeon (Japan) [T-En by Dynamic Designs v0.99].zip Trans-America Ultra Quiz #94115 Trans-America Ultra Quiz (Japan) [T-En by Krokodyl v1.0] [n].zip Treasure Hunter G #6309 Treasure Hunter G (Japan) [T-En by Metalhawk & Obsolete Translations v1.0b2].zip Treasure of the Rudras #24040 Treasure of the Rudras (Japan) [T-En by Aeon Genesis v2.10] [Add by Kertra] [n].zip Tsuyoshi Shikkari Shinasai: Taisen Puzzle Dama #132650 Tsuyoshi Shikkari Shinasai - Taisen Puzzle Dama (Japan) [T-En by Bankbank v0.1] [i].zip TwinBee: Rainbow Bell Adventure #146636 TwinBee - Rainbow Bell Adventure (Japan) [T-En by Aeon Genesis v1.01].zip Uchū no Kishi: Tekkaman Blade #24842 Uchuu no Kishi - Tekkaman Blade (Japan) [T-En by Byuu & Derrick Sobodash v1.0].zip Ultima: The Savage Empire #28766 Ultima - The Savage Empire (Japan) [T-En by Nytegard v1.01] [i] [n].zip Ultra Baseball Jitsumei Ban #101833 Ultra Baseball Jitsumei Ban (Japan) [T-En by VX v1.04].zip Umihara Kawase #6319 Umihara Kawase (Japan) [T-En by Satsu v0.90] [Add by Green Jerry v1.0] [Add by Burning Loaf v1.0].zip Undercover Cops #24818 Undercover Cops (Japan) [T-En by RPGOne v1.0].zip Villgust #18806 Villgust (Japan) [T-En by Dynamic Designs v1.01] [n].zip The Violinist of Hameln #29039 Violinist of Hameln, The (Japan) [T-En by J2e Translations v1.00] [n].zip Warriors: Legend of the Blue Dragon: The Two Heroes #34803 Warriors - Legend of the Blue Dragon - The Two Heroes (Japan) [T-En by DDSTranslation v2.0] [n].zip Wedding Peach #6341 Wedding Peach (Japan) [T-En by Chaotic Translations v0.9] [i].zip Wizardry Gaiden IV: Taima no Kodou #33434 Wizardry Gaiden IV - Taima no Kodou (Japan) (Rev 1) [T-En by AgentOrange & DDS & Helly & MrRichard999 v1.02].zip Wizardry V: Heart of the Maelstrom #3290 Wizardry V - Heart of the Maelstrom (Japan) [T-En by Darkmoon2321 v1.1] [n].zip Wizardry VI: Bane of the Cosmic Forge #33433 Wizardry VI - Bane of the Cosmic Forge (Japan) [T-En by TiCo v0.99] [Add by MrRichard999] [n].zip Wonder Project J: Mechanical Boy Pino #6352 Wonder Project J - Mechanical Boy Pino (Japan) [T-En by WakdHacks v1.04] [n].zip Wrecking Crew '98 #22642 Wrecking Crew '98 (Japan) [T-En by ShadowOne333 v2.0].zip Xak: The Art of Visual Stage #34648 Xak - The Art of Visual Stage (Japan) [T-En by Dynamic Designs v1.10].zip Ys IV: Mask of the Sun #6370 Ys IV - Mask of the Sun (Japan) [T-En by Aeon Genesis v2.10].zip Ys V: Expert #33432 Ys V - Expert (Japan) [T-En by MrRichard999 v0.1b] [i].zip Ys V: Kefin, Lost Kingdom of Sand #21139 Ys V - Kefin, Lost Kingdom of Sand (Japan) [T-En by Aeon Genesis v1.00] [n].zip List of Japanese Exclusive Games Already in English - No need to patch. Identifiable with '(Japan) (En)' tags, together -21- As these are "guaranteed to play in English" they will be part of the Super Famicom platform. Acrobat Mission #18940 Acrobat Mission (Japan) (En) Caravan Shooting Collection #92220 Caravan Shooting Collection (Japan) (En) Choujikuu Yousai Macross: Scrambled Valkyrie #18827 Choujikuu Yousai Macross - Scrambled Valkyrie (Japan) (En) Dr. Mario #135274 Dr. Mario (Japan) (En) (NP) Galaxy Wars #26085 Galaxy Wars (Japan) (En) Gekitotsu Dangan Jidousha Kessen: Battle Mobile #123341 Gekitotsu Dangan Jidousha Kessen - Battle Mobile (Japan) (En) Gon #21359 Gon (Japan) (En) Human Grand Prix III: F1 Triple Battle #123646 Human Grand Prix III - F1 Triple Battle (Japan) (En) Human Grand Prix IV: F1 Dream Battle #102445 Human Grand Prix IV - F1 Dream Battle (Japan) (En) Inazuma Serve da! Super Beach Volley #123648 Inazuma Serve da! Super Beach Volley (Japan) (En) Jaleco Rally Big Run: The Supreme 4WD Challenge #106198 Jaleco Rally Big Run - The Supreme 4WD Challenge (Japan) (En) (Rev 1) Mario to Wario #24866 Mario to Wario (Japan) (En) Rendering Ranger R2 #17286 Rendering Ranger R2 (Japan) (En) Super Air Diver 2 #26301 Super Air Diver 2 (Japan) (En) Super Bombliss #132568 Super Bombliss (Japan) (En) Super Drift Out: World Rally Championships #18650 Super Drift Out - World Rally Championships (Japan) (En) Super Dunk Star #131554 Super Dunk Star (Japan) (En) Super Tetris 2 + Bombliss #28775 Super Tetris 2 + Bombliss (Japan) (En) (Rev 1) Super Tetris 2 + Bombliss Genteihan #132634 Super Tetris 2 + Bombliss Genteiban (Japan) (En) Super Tetris 3 #25772 Super Tetris 3 (Japan) (En) Uchuu Race: Astro Go! Go! #26315 Uchuu Race - Astro Go! Go! (Japan) (En) English Friendly Platform Game List (No-Intro) -155- Action Pachio (Japan).zip American Battle Dome (Japan).zip Appleseed - Prometheus no Shintaku (Japan).zip Bakukyuu Renpatsu!! Super B-Daman (Japan).zip Bakutou Dochers - Bumps-jima wa Oosawagi (Japan).zip Battle Dodge Ball II (Japan).zip Battle Dodge Ball (Japan).zip Battle Master - Kyuukyoku no Senshi-tachi (Japan).zip Battle Pinball (Japan).zip Battle Racers (Japan).zip Battle Soccer 2 (Japan).zip Battle Tycoon - Flash Hiders SFX (Japan) (Rev 1).zip Battle Zeque Den (Japan).zip Bishin Densetsu Zoku (Japan).zip Bishoujo Senshi Sailor Moon S - Jougai Rantou! Shuyaku Soudatsusen (Japan).zip Bishoujo Senshi Sailor Moon S - Kondo wa Puzzle de Oshioki yo! (Japan).zip Bishoujo Senshi Sailor Moon S - Kurukkurin (Japan).zip Bishoujo Senshi Sailor Moon SuperS - Zenin Sanka!! Shuyaku Soudatsusen (Japan).zip Block Kuzushi (Japan).zip Bomberman B-Daman (Japan).zip Columns (Japan) (NP).zip Coron Land (Japan).zip Cosmo Gang - The Puzzle (Japan).zip Cosmo Gang - The Video (Japan).zip Cosmo Police Galivan II - Arrow of Justice (Japan).zip Crayon Shin-chan 2 - Daimaou no Gyakushuu (Japan).zip Crayon Shin-chan - Arashi o Yobu Enji (Japan).zip Deae Tonosama Appare Ichiban (Japan).zip Death Brade (Japan).zip Dolucky no A.League Soccer (Japan).zip Dolucky no Puzzle Tour '94 (Japan).zip Dream Basketball - Dunk & Hoop (Japan).zip Drift King Shutokou Battle 2 - Tsuchiya Keiichi & Bandou Masaaki (Japan).zip Dynamaite - The Las Vegas (Japan).zip Dynamic Stadium (Japan).zip Edono Kiba (Japan).zip F-1 Grand Prix (Japan).zip Fighter's History - Mizoguchi Kikiippatsu!! (Japan).zip Finalset (Japan).zip Fire Pro Joshi - All Star Dream Slam (Japan).zip Fishing Koushien (Japan).zip Ganbare! Daiku no Gen-san (Japan).zip Gegege no Kitarou - Fukkatsu! Tenma Daiou (Japan).zip Genocide 2 (Japan).zip Gerry Anderson's Thunderbirds - Kokusai Kyuujotai Shutsudou Seyo!! (Japan).zip Gojira - Kaijuu Daikessen (Japan) (Rev 1).zip GS Mikami - Joreishi wa Nice Body (Japan).zip GT Racing (Japan).zip Hashire Hebereke (Japan).zip Hat Trick Hero 2 (Japan).zip Heisei Inu Monogatari Bow - Pop'n Smash!! (Japan).zip Hiryuu no Ken S - Golden Fighter (Japan).zip Hokuto no Ken 6 - Gekitou Denshouken Haou e no Michi (Japan).zip Hokuto no Ken 7 - Seiken Retsuden Denshousha e no Michi (Japan).zip Honoo no Toukyuuji - Dodge Danpei (Japan).zip Human Baseball (Japan).zip Zen-Nihon GT Senshuken (Japan).zip Jungle no Ouja Tar-chan - Sekaimanyuu Daikakutou no Maki (Japan).zip JWP Joshi Pro Wres - Pure Wrestle Queens (Japan).zip Kamen Rider (Japan) (Rev 1).zip Kamen Rider SD - Shutsugeki!! Rider Machine (Japan).zip Kat's Run - Zen-Nihon K-Car Senshuken (Japan).zip Keeper (Japan).zip King of Rally, The - Paris-Moscow-Beijing (Japan).zip Kinnikuman - Dirty Challenger (Japan).zip Libble Rabble (Japan).zip Lode Runner Twin - Justy to Liberty no Daibouken (Japan).zip Lupin Sansei - Densetsu no Hihou o Oe! (Japan).zip Makeruna! Makendou 2 - Kimero! Youkai Souridaijin (Japan).zip Matsumura Kunihiro Den - Saikyou no Rekishi o Nurikaero! (Japan).zip Mazinger Z (Japan).zip Multi Play Volleyball (Japan).zip Mystery Circle (Japan).zip Nakajima Satoru Kanshuu - Super F-1 Hero (Japan).zip Natsuki Crisis Battle (Japan).zip Naxat Super Pinball - Jaki Crush (Japan).zip New Yatterman - Nandai Kandai Yajirobee (Japan).zip Nichibutsu Arcade Classics (Japan).zip Nichibutsu Arcade Classics 2 - Heiankyou Alien (Japan).zip Nintama Rantarou (Japan).zip Nintama Rantarou 2 (Japan).zip Nintama Rantarou 3 (Japan).zip Nintama Rantarou Special (Japan).zip Nontan to Issho - Kurukuru Puzzle (Japan).zip Onizuka Katsuya Super Virtual Boxing - Shin Kentou Ou Densetsu (Japan).zip Oonita Atsushi FMW (Japan).zip Ossu!! Karate-bu (Japan).zip Otoboke Ninja Colosseum (Japan).zip Pipe Dream (Japan).zip Pokonyan! - Henpokorin Adventure (Japan).zip Ranma 1-2 - Ougi Jaanken (Japan).zip Ryuuko no Ken 2 (Japan).zip Saikyou - Takada Nobuhiko (Japan).zip Same Game (Japan).zip SD F-1 Grand Prix (Japan).zip SD Kidou Senshi Gundam 2 (Japan).zip SD Gundam - Power Formation Puzzle (Japan).zip SD Hiryuu no Ken (Japan).zip SD Kidou Senshi Gundam - V Sakusen Shidou (Japan).zip Seifuku Densetsu - Pretty Fighter (Japan).zip Shanghai - Banri no Choujou (Japan) (Rev 1).zip Shin Nihon Pro Wrestling Kounin - '94 Battlefield in Tokyo Dome (Japan).zip Shin Nihon Pro Wrestling Kounin - '95 Tokyo Dome Battle 7 (Japan).zip Shin Nihon Pro Wrestling - Chou Senshi in Tokyo Dome - Fantastic Story (Japan).zip Shounen Ashibe - Goma-chan no Yuuenchi Daibouken (Japan).zip Sougou Kakutougi Rings - Astral Bout 3 (Japan).zip Sougou Kakutougi - Astral Bout (Japan).zip Sougou Kakutougi - Astral Bout 2 - The Total Fighters (Japan).zip Soukou Kihei Votoms - The Battling Road (Japan).zip Spark World (Japan).zip Spriggan Powered (Japan).zip Stardust Suplex (Japan).zip Supapoon (Japan).zip Supapoon DX (Japan).zip Super Bikkuriman (Japan).zip Super Bomberman - Panic Bomber W (Japan).zip Super F1 Circus (Japan).zip Super F1 Circus Gaiden (Japan).zip Super Family Gelaende (Japan) (NP).zip Super Fire Pro Wrestling (Japan).zip Super Fire Pro Wrestling 2 (Japan).zip Super Fire Pro Wrestling III - Easy Type (Japan).zip Super Fire Pro Wrestling III - Final Bout (Japan) (Rev 1).zip Super Gussun Oyoyo (Japan).zip Super Indy Champ (Japan).zip Super Loopz (Japan).zip Super Mad Champ (Japan).zip Super Pinball II - The Amazing Odyssey (Japan).zip Super Puyo Puyo (Japan) (Rev 2).zip Super Puyo Puyo Tsuu Remix (Japan).zip Super Rugby (Japan).zip Super Tekkyuu Fight! (Japan).zip Super Variable Geo (Japan).zip Sutobasu Yarou Show (Japan).zip Taekwon-Do (Japan) (Ja,Ko).zip Tetsuwan Atom (Japan).zip Great Battle Gaiden 2, The - Matsuri da Wasshoi (Japan).zip Touge Densetsu - Saisoku Battle (Japan).zip Ultra Seven (Japan).zip Umizuri Meijin - Suzuki Hen (Japan).zip Undake 30 - Same Game Daisakusen - Mario Version (Japan).zip Ushio to Tora (Japan).zip Vs. Collection (Japan).zip Wakuwaku Ski Wonder Spur (Japan).zip Yoshi no Cookie - Kuruppon Oven de Cookie (Japan).zip Youkai Buster - Ruka no Daibouken (Japan).zip Yu Yu Hakusho (Japan).zip Yu Yu Hakusho 2 - Kakutou no Shou (Japan).zip Yu Yu Hakusho Final - Makai Saikyou Retsuden (Japan).zip Yu Yu Hakusho - Tokubetsu Hen (Japan).zip Zen-Nihon Pro Wres' - Sekai Saikyou Tag (Japan).zip Zen-Nihon Pro Wres (Japan).zip Zen-Nihon Pro Wres 2 - 3-4 Budoukan (Japan).zip Zero 4 Champ RR (Japan) (Rev 1).zip Zero 4 Champ RR-Z (Japan).zip8 points -
8 points
-
Hi all, below i am sharing the PNG files for the systems I created (some based on files from @Viking). hope someone finds them useful. Use and mention me 😉
8 points


.thumb.png.c9faf450e4d2b690a819048b18173f61.png)


3.jpg.742da72ac43a94705002c210c5b6f7fd.thumb.jpg.f8fc1cacc611a7156fb5cc60847b357f.jpg)


.thumb.png.9332e12cab6cec0213b9ffd456a9a968.png)


.thumb.png.1885847bc1a3ae6d7e0d03bce5fd363f.png)


.thumb.png.650e3cddf2300b54510b135a0b410135.png)


