-
Posts
1,442 -
Joined
-
Last visited
-
Days Won
8
Content Type
Profiles
Forums
Articles
Downloads
Gallery
Blogs
Everything posted by sundogak
-
In LB the Options, Media Priorities dictates what gets shown based on image type. As to where they go, typically these type images would go in Arcade Cabinets folder. You could then adjust the image priorities such that Arcade Cabinets shows up for a box front (or not). Somewhat depends on your theme and its default and/or what your preference is vs the theme designer.
- 26 comments
-
- 1
-

-
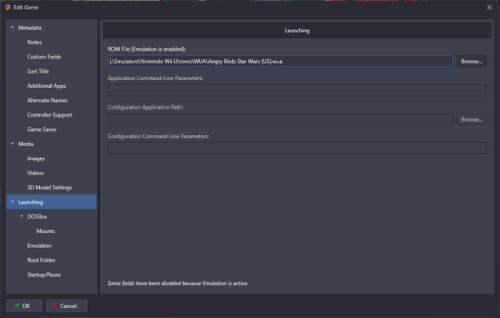
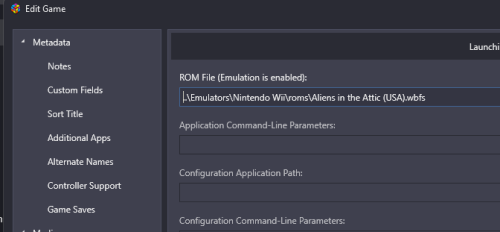
No both emulators can be used (have both). LB is agnostic to the type of emulator as long as it has some command line functionality. Can you screen snap example of what you have for the actual game "rom file" (examples below) for each as I don't see anything immediately obvious. Using that "+" or other special characters in path isn't usually a good idea as can cause odd things for some emulation but that wouldn't explain your issue with CEMU as that looks okay path wise. For at least CEMU my guess is pointing to wrong file within the directory or an unencrypted version. The link here has some details on the different file types for CEMU and some additional gory details. Similarly for Dolphin a screen snap of your setup game example and what pointing to will help as you said both work outside LB.
-
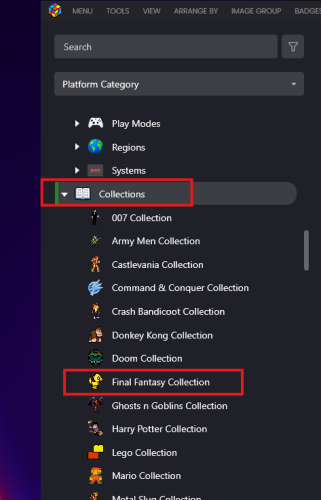
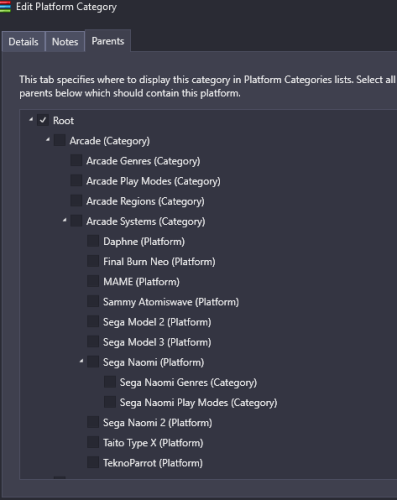
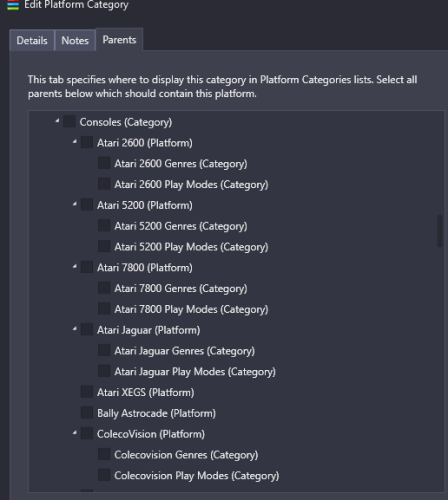
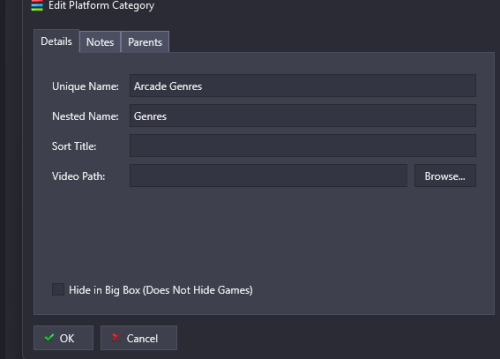
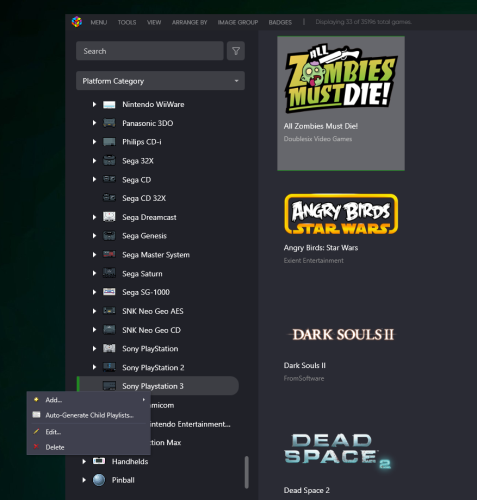
There are Categories, Playlists, and Platforms. Right Click in the left pane to bring up options for adding a new platform, playlist or category. Categories can have groups of playlists.In example below the "Collections" item is a category. Under that are all the playlists for each of the game type. To add games to playlist right click (or multiple select) and will give option to add to playlist. How you organize is done via the edit tab and you can check box where you want that playlist to show up. If you check "root" it will be in base list. For Categories and Playlists how you name this is completely up to you. Platforms you can also freely name but you will save yourself some headaches on themes and using other people's media if you stick to platforms with "normal" names. Lastly keep in mind that if you have multiple of same type of playlists or category (say Genre or Region) then you have to name them uniquely but you can also have a "nested name" which is what shows up in Bigbox and Launchbox.
-
I use Firefox and works fine showing all menu items. Not sure why DuckDuckGo would impact it.
-
-

MAME games won't return from BigBox pause screen
sundogak replied to SpiderPork's topic in Troubleshooting
-
Likely it is issue with the natural keyboard emulation within the driver for this system. Autoboot requires it to work properly. Fiddling with the command within MAME directly you can see that it doesn't matter what is after the first letter in quotes after issuing command as it won't type anything after (doesn't matter the character). Looking at the driver code at GitHub shows comments that keyboard emulation isn't complete. As this is prelim with many of the carts shown as not working and keyboard emulation needs to work fully for autoboot, there likely isn't much to do. I tried some crazy spacing /combos and it would type additional characters but not in way could control to type "load" (much less the 1 in quotes). The command line should type out whatever you put in after quote, so definitely some parsing issue with the driver. So I think you are out of luck on this one until more work done of the driver. One note for future is that anything requiring quotes needs three quotes on each side of character so would be """1""" (see below).
-
Below is my log on working version. Only real difference is your bank 0 dip switches and I have gamepad switch set. But nothing in your dip switch setting would prevent running as A3 and A7 are set on for normal operation. I do have note on my batch file for the Enhanced version that it doesn't work with OpenGL, but don't see you set that switch. The fact it is stopping at the view port generation makes me think some sort of video driver conflict but otherwise I don't see anything obviously wrong as it is loading and finding all the needed parts. So not much help.....🤔 2024-11-13 19:45:18.367 INFO [36872] [reset_logfile@348] Version v2.11.3 2024-11-13 19:45:18.367 INFO [36872] [reset_logfile@352] Command line: hypseus.exe dle11 vldp -framefile ..\vldp\dle11\dle11.txt -blank_searches -min_seek_delay 1000 -gamepad -seek_frames_per_ms 20 -homedir G:\Emulators\Hypseus -fastboot -bank 0 11011001 -bank 1 00100111 -nocrc -noissues -sound_buffer 2048 -fullscreen -useoverlaysb 1 2024-11-13 19:45:18.367 INFO [36872] [reset_logfile@353] CPU : AuthenticAMD || Mem : 16320 megs 2024-11-13 19:45:18.367 INFO [36872] [reset_logfile@354] OS : Windows 10/11 || Video : NVIDIA GeForce GTX 1080 2024-11-13 19:45:18.368 INFO [36872] [reset_logfile@355] RGB2YUV Function: C 2024-11-13 19:45:18.368 INFO [36872] [reset_logfile@361] Line Blending Function: C 2024-11-13 19:45:18.368 INFO [36872] [reset_logfile@368] Audio Mixing Function: C 2024-11-13 19:45:18.579 INFO [36872] [SDL_input_init@505] Loading Game Controller system with HAPTIC support 2024-11-13 19:45:18.892 INFO [36872] [SDL_input_init@513] Found G:\Emulators\Hypseus/gamecontrollerdb.txt 2024-11-13 19:45:18.930 INFO [36872] [SDL_input_init@516] Loaded 525 Game Controller mappings 2024-11-13 19:45:19.090 INFO [36872] [SDL_gamepad_init@608] Gamepad #0: T16000M connected 2024-11-13 19:45:19.145 INFO [36872] [SDL_gamepad_init@608] Gamepad #1: vJoy Device connected 2024-11-13 19:45:19.145 INFO [36872] [SDL_gamepad_init@617] Gamepad #1: Haptic Rumble support 2024-11-13 19:45:19.277 INFO [36872] [game::load_compressed_rom@941] Loading compressed ROM image dle11u1l.bin ... 8192 bytes read. 2024-11-13 19:45:19.277 INFO [36872] [game::load_compressed_rom@941] Loading compressed ROM image dle11u2l.bin ... 8192 bytes read. 2024-11-13 19:45:19.278 INFO [36872] [game::load_compressed_rom@941] Loading compressed ROM image dle11u3l.bin ... 8192 bytes read. 2024-11-13 19:45:19.278 INFO [36872] [game::load_compressed_rom@941] Loading compressed ROM image dle11u4l.bin ... 8192 bytes read. 2024-11-13 19:45:22.185 INFO [36872] [video::notify_stats@2220] Viewport Stats:|w:640x480|v:640x480|o:320x240[s]|l:2560x1080|o 2024-11-13 19:45:23.185 INFO [36872] [ldp_vldp::read_frame_conversions@1030] Framefile parse succeeded. Video/Audio directory is: G:/Emulators/Hypseus/framefile/../vldp/dle11/./ 2024-11-13 19:45:23.512 INFO [36872] [video::notify_stats@2220] Viewport Stats:|w:1440x1080|v:1440x1080|o:720x540[s]|l:2560x1080|o 2024-11-13 19:45:34.548 INFO [36872] [ldp::pre_search@178] ignoring seek because we're already on that frame
-
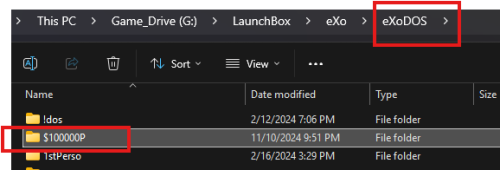
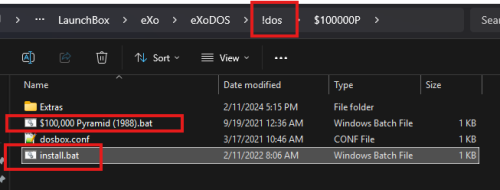
EXO doesn't need LB to run, it just makes it easier. See #5 below. You don't launch any of the batch files for EXO directly from DosBox. The batch files are designed to call the appropriate emulator in the Emulators folder (see #8) then spawn the program. The version of LB in the EXO package is pretty old. You should make sure you can even run LB in VM by just downloading most current free version and seeing if will run. LB does have various dependencies that on a Windows computer it will install automatically. In VM, not sure if that happens and without them LB won't run. I have run a Mac VM in Windows but not other way around. Don't set compatibility back to old versions. Also don't run LB in admin mode. Have no idea why OneDrive would be going and cloud storage, never seen that with Exo but not using lite version. If you want to run a program outside of LB that will be easiest to troubleshoot. Assuming you installed exo in paths it wants to see then you can go to the following directory (!dos), click on Install.bat and then after completed you can launch from the game batch file. No LB needed: The Install puts the files here: The exo auto installer can sometimes be wonky but on a new install it should be okay. Key is that EXO expects things in certain folders as batch files are used. Below is typical install folder setup for EXO. As long as the paths within the EXO folder are as it expects then the batch files will run. The key folders are the ExoDOS, emulators, and dosbox folders. Now whether this will all run inside a VM (or the EXO updater/downloader), I am somewhat doubtful but if you can run DosBox then potential. The key though is making sure your folders are correct and base install works. Running LB in the VM (assuming can get running) won't be very speedy. Space may also become an issue as you add media to LB. The full exodos package is about 800 GIGs. ExoDOS has a Discord so may ask there as pretty unique use case (and not really a LB issue if cannot run the base EXO package).
-

Rpcs3 Games Not Booting From Launchbox?
sundogak replied to launchbox43924i83954's topic in Emulation
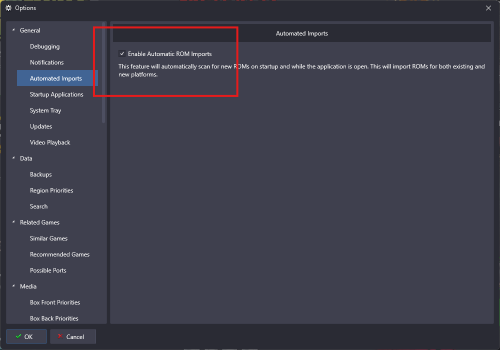
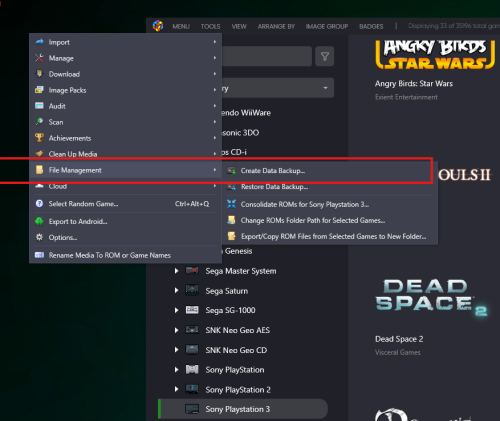
If you have auto import on (see snap below) then my suggestion is to delete the PS3 platform and re-add as there were changes in how PS3 and Vita games were imported a few versions back. LB now uses the emulator itself to tell what games are to be imported assuming auto import is on. If auto import is not on or you do not use it then I would delete only the game entry that is having issues and re-add manually. Assuming you have auto import on then do as follows: Create backup of your data just in case. Right click on platform and select delete. Most of the time, if you wait a few minutes, LB will reimport the platform and games. Note it takes the game names directly from RPCS3 so can get some titles you may have to fix to match to LB DB. If for some reason auto import doesn't re-add the platform then can add by going to Tools, Manage, Platforms, and selecting add For PS3 and Vita you need to make sure your roms folder for that platform is pointing to an empty directory (not where you eboot.bin files are) as LB uses the emulator entries. If point to your PS3 folder with files it will duplicate and add things again in addition to auto import. In my case below my "Games\Sony Playstation 3" folder has nothing in it (I use separate drive/folder) but auto import did its thing and added whatever was in RPCS3 outside LB. For the folks at beginning of thread who had the issue with the decryption error that is coming directly from RPCS3 and not LB. Likely that means LB is pointing to wrong eboot file that wasn't decrypted so double check via RPCS3 directly the path to the file that is working. This is especially the case if you had a PS3 setup prior to the auto import feature being added and then turned auto import on as it can create some odd errors with PS3 prior setups. Thus, the re-adding platform and letting LB auto import do its stuff may fix issues there. LB has nothing to do with decryption otherwise. -
As long as USB 3.0 or higher and speaking about a spinning HDD at 7,200 or 5,400 rpm then your internal and external HDD will be (roughly) the same speed. The HDD becomes the choke point for speed, not the USB 3.0 or SATA III interface. If go to SSD then which interface you use for full throughput matters. For USB connection just make sure using a good USB 3.0 cable that is certified as such.
-
Atom cassettes are not supported by MAME at this point. You can look at the HASH directory and look at the atom.xml and says "<software name="GAME NAME" supported="no">" in entries in the list. Also can use this site: http://adb.arcadeitalia.net/dettaglio_mess.php?software_name=backgamm&software_list=atom_cass&search_id=2 Also this thread is useful for cass usage (MAME standalone not RA):
-

retroarch Philips CDi needs me to insert a cartridge?
sundogak replied to BigBearPoet's topic in Noobs
@BigBearPoetThis is an issue across all emulation for CD-i as the digital video cartridge hardware has not been emulated. Not likely to be resolved anytime soon as specs for DVC are sparse. List of CD-i programs that need DVC to run. -
Glad figured issue. But also in the "Ugh nothing ever simple" ..........the use of %romfilename% will break RA's "Content Directory" overrides if using them. As RA doesn't seem to be "smart" enough to parse the MAME.ini it used to launch the program (odd). Will have to do a bit more playing around but if use Content level overrides you have to stick with the %romfile% variable. You can see how RA sees it if go to Information and once running will revert to Core Overrides.
-
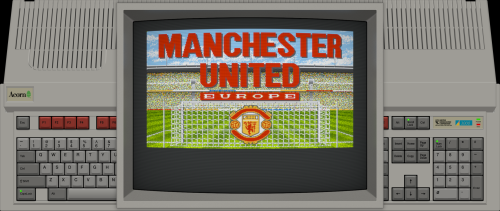
@coliver33 My guess at this point is that spacing in path is causing issues when LB parses command. Particularly because it is double space and likely some escaping issue and LB missing a "space" so from RA view doesn't know what to launch. Although I know you said it works outside of LB, we are now dealing with 4 levels of stuff to deal with 1) LB command, RA, MAME, and MAME Software List all of which have their oddities and make difficult to troubleshoot where things are going wrong. With SL, simple is best on paths. At any rate could try two things to check above with particular focus on that "(Merged)" path being double space. Under your MAME SL level directory make a simple directory name (say software) and copy the ..software\archimedes\3dtanks.zip, point LB to it and see if that works. If so then that double space is issue and likely good to know for future as may cause other glitches. Likely "better" solution. LB added new variables within last several months (which haven't bothered to try as don't mess with RA if works!). The %romfilename% strips out path and extension which for MAME SL is actually the preferred way even within MAME standalone as MAME only needs to know the game name not anything else (as takes from XML/INI data). You also get advantage of MAME using the XML data. If do it this way then SHOULD take care of any spacing issues as you are not sending anything from LB to RA other than file name (no extension or path). As you said RA works fine out side of LB then in theory the double space aspect should not come into play from LB view. "aa310 -bios 200 -flop \"%romfilename%\"" In example above with zip you used it would then look like this to RA incoming: aa310 -bios 200 -flop 3dtanks You keep the RA setup as before as far as check boxes as still need quotes stripped other than what we explicitly put in. I tried this and works as well on my setup with %romfilename% and launches 3dtanks. Note: edited slightly to delete the "-flop1" to "flop" as if using this method the XML will parse to correct drive.
-
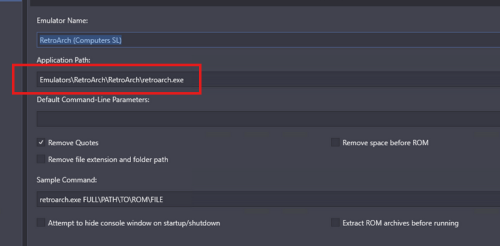
@coliver33A couple additional things. It looks like they deprecated that Mame.opt option of "boot from CLI" so wouldn't worry about that line (used to need that so not sure what they did there). One thing I noticed is you are pointing LB to Retroarch two folder layers deep. Was that intended to have Retroarch inside another RA folder? LB needs to point to same setup EXE as what you are using outside of LB. In your MAME RA INI above you show RA path one level down (as normal) so you should be pointing to that exe. Likely that is part of problem as the MAME system files in RA don't match.
-
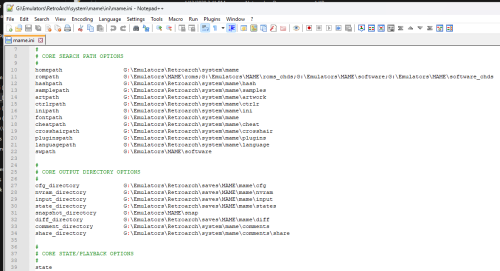
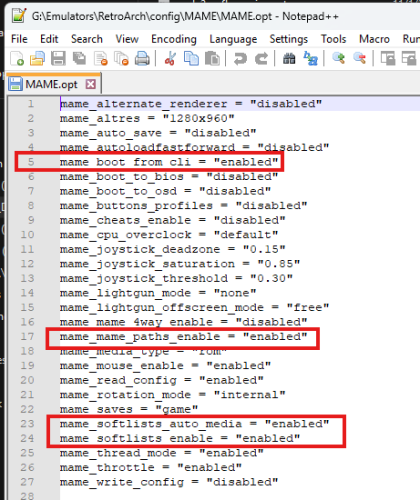
1) Yes, it works for me. RA with MAME standard core: 2) Using the base MAME core you don't need to move anything around from standard install of MAME arcade and MAME software lists. Bios files remain as for normal MAME. So you don't need to move the bios into System folder for RA. 3) MAME.ini for RA in system directory doesn't looks consistent. Should just point to standard MAME arcade ROMs folder and standard MAME software list set. If have CHDs separate then those as well. Example: 4) Then on your MAME options file for RA should have this which for SL the red boxes are key: Using above you can keep a normal MAME set and also use for RA. Because of the an issue/coding glitch you have to have updated copies of HASH XMLs and Samples within the MAME RA system folder (won't work pointing to MAME install) even though the intent of the RA "MAME_PATHS_ENABLE" was to be able to use all MAME normal paths. But at least for ROM MAME paths they can reside outside RA folder structure.
-

Game metadata differs from data in LB games DB
sundogak replied to Rinusch's topic in Troubleshooting
Shows in the database and shows in local LB DB as well. Make sure your local DB copy is current. Force an update via Tools, Download, Force Update Games DB. Note there is lag from time accepted and posted in online version and packaged up for local DB copies. -
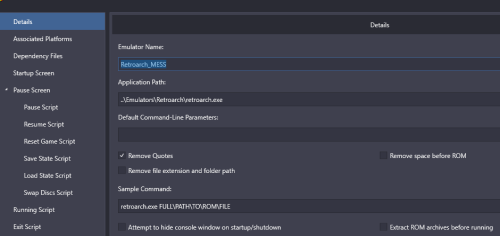
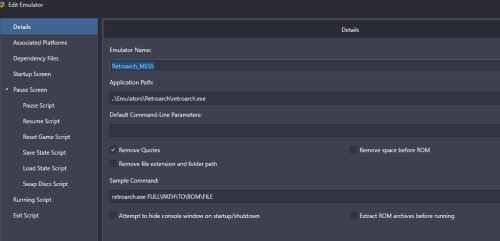
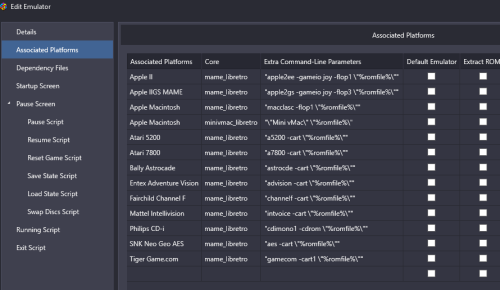
The main issue is doesn't appear you added the variable to append the rom file. For MAME and RA the following setup works. Note I make a separate RA core entry specifically for anything in the former MESS (or Software List ) category as they are treated differently than arcade and avoids messing up your arcade setup. This also assumes you have copied your MAME XML files and they correspond to the core version. Make sure entry has "remove quotes" checked. Append the %romfile% variable to your command which tells LB to take whatever was imported as the rom file and append to command line. It will also follow the check boxes above as to how parses command line. Note double quotes like this example for Atari 5200. "a5200 -cart \"%romfile%\""
-

New game not showing up when searching for it in db interface
sundogak replied to Nocta's topic in Troubleshooting
What does your Changes Status in Moderation panel show? If accepted then likely just lag on approval to packaging into DB. If denied (or still pending review) then that is your answer as to why not in DB. You don't say what platform but there is a "Universe" game in Windows platform. -
No, don't move anything around. Your MAME setup and Software List sets need to all be working before using the scripts. You can test your MAME setup outside LB which helps identify issues as can see the command window as shown below: Assumptions on using below test line: 1) you are launching command window in MAME root directory outside of LB 2) using Gold Mine as a test game 3) your LUA file is in directory ...\MAME\scripts\mtx_cass.lua mame mtx512 goldmine -autoboot_delay 1 -autoboot_script scripts/mtx_cass.lua If doesn't work in command line won't work in LB. The command errors will likely give you insight on issue. A few possible reasons to double check if errors in command above (see snaps below): If the command above works and launched game then likely means you had setup MAME within LB using auto setup so you will need to alter the path in LB to include your Software List directory rompath or there is some specific issue with naming in LB. Helpful then if you have screen shots of your LB setup to help troubleshoot (MAME emulator settings, example game entry settings). If command doesn't work then likely one of these: your MAME.ini isn't pointing to your directory where your Software List files are located and set in the "rompath" entry in the INI file. This should point to the root Software folder. It will be the folder that contains: ...\MAME\software\mtx_cass\goldmine.zip for purpose of test above. you don't have a complete MAME roms Arcade set and/or the MAME files are not named properly as they will have the bios and needed files to run the MTX emulation you do not have a correct/current set of XML files in your MAME Hash directory: ..\MAME\hash\mtx_cass.xml you haven't downloaded the Software List Mame set which is separate and an addon to the MAME rom arcade files set (need both sets).


