.png.d63b88dc3d5c6db8803dfbd996ce65fc.png)
JoeViking245
-
Posts
2,953 -
Joined
-
Last visited
-
Days Won
25
Content Type
Profiles
Forums
Articles
Downloads
Gallery
Blogs
Everything posted by JoeViking245
-
.thumb.png.c9faf450e4d2b690a819048b18173f61.png) Movie Scraper (Reboot 2023) View File This is a reboot of the Movie Scraper Plugin by @Slipstream. The intent of this plugin is to scrape metadata and media for movies you’ve imported into LaunchBox. Q & A: Why use LaunchBox as your digital movie library? Because you can. What metadata is imported? Title Notes (Movie Plot) Release Date Publisher (Production Studio i.e. “Marvel Studios”) Genre(s) Series (Collection i.e. “The Avengers Collection”) Video Url (YouTube movie trailer) What media is imported? Box – Front Banner Clear Logo Disc Fanart – Background Arcade – Marquee Can it import media I already have? Yes. When importing media, the plugin will 1st look in the same folder the movie file is located. Do I need to have my own personal API keys for both TMDB and FanArt.TV? Yes. However, when running Setup the first time, “temporary” API keys are automatically inserted. For now, they work. But for best, continued results, obtain and enter in your own keys. (See below) Are both API keys required to scape? Yes. If either of the keys are missing or invalid, the plugin will exit. Do the Movie Titles [in LaunchBox] need to be named a certain way before scraping? Yes. The Titles should be the name of the movie without any extras. The Avengers will work. The Avengers 2012 will not work.* The.Avengers.2012.1080p.BluRay.x264.DTS-FGT will not work.* *No. If you have a valid Information (NFO) file in the same folder as the movie, the plugin will parse the file to get the proper Title and movie ID#. The Avengers 2012 will work. The.Avengers.2012.1080p.BluRay.x264.DTS-FGT will also work. Can I scrape more than one movie at a time? Yes. Select multiple (or all) movies in the Platform, right-click and select Scrape Movie. You may want to test with just one movie or only a couple at first. Installation: Download the zip file Unblock it by right-clicking the file, select Properties, check “Unblock” and click OK. (Alternately, just use 7Zip to open the downloaded file) Copy the folder inside the zip into ../LaunchBox/Plugins/ i.e. D:\LaunchBox\Plugins\MovieScraper2023\MovieScraper.dll Setup: Start LaunchBox Click Tools and select “Movie Scraper Setup” Enter in your API keys Click Verify Keys to confirm they are working (Optional) Check “Automatically select 1st Movie when multiple results are found” Click Save Use: Select one or movies you have imported into LaunchBox, then right-click on one of them. Select Scrape Movie A “Please Stand By” window will appear indicating scraping is in progress. If a movie has more than one ‘close match’, a window will appear where you can select the correct movie. Unless during Setup, you checked “Automatically select 1st Movie when multiple results are found”. Scraping is complete when “Please Stand By” disappears. When completed, press F5 to refresh the Box-Front images for the selected movie(s). Click on a different movie and then back on one just scraped to refresh the images in the right side-bar. Getting your personal API keys: (both are free to get) TMDB A TMDB user account is required to get an API key. Once created, log in and go to Profile - Overview - Edit Profile. Go down to API to get your “api_key (v3 auth)”. http://www.themoviedb.org FanArt.TV Register an account at https://fanart.tv/. Once registered, go to https://fanart.tv/get-an-api-key/ to find your personal key The process when scraping: Get the API keys from APIfile.xml and verify the API keys are valid If either API key returns “Unauthorized”, the plugin will exit Check if the movie has an NFO file (in the same folder as the video file). If so… Get/store the movies ID#. (Can be either TMDB or IMDB) Set the ‘games’ Title Check for existing image files in the same folder as the video file. If any exist, copy them into LB Image files need to have the same name as the video file, plus -imageType.png (or .jpg depending on the image type) Search TMDB using ‘Title’. (If an NFO file exists, search by the movie ID# from step 2 above) If no matches, “The movie could not be found.” [popup message] will appear. When scraping in bulk, a popup will appear at the end of all scraping instead, listing the movies not found If there are multiple matches, a window will appear to have you select the correct movie. (Unless you chose to “Automatically select 1st Movie” during Setup) If there’s only 1 match (or when a movie was manually selected), set the movies: Title, Notes, Release Date, Publisher, Genre(s), Series and Video Url (link to movie trailer) Download images from TMDB and FanArt.TV. Download images only if the image type doesn’t already exist (i.e. local images weren’t found) Order of precedence for importing images: Local images: Box-Front Banner Clear Logo Disc Fanart-Background Arcade-Marquee TMDB: Box-Front Fanart-Background FanArt.TV: Box-Front Banner Clear Logo Disc Fanart-Background Arcade-Marquee Big thanks to @Slipstream for the original code and @jayjay for his update. As always, all comments and suggestions are welcomed. Submitter JoeViking245 Submitted 04/12/2023 Category Third-party Apps and Plugins
Movie Scraper (Reboot 2023) View File This is a reboot of the Movie Scraper Plugin by @Slipstream. The intent of this plugin is to scrape metadata and media for movies you’ve imported into LaunchBox. Q & A: Why use LaunchBox as your digital movie library? Because you can. What metadata is imported? Title Notes (Movie Plot) Release Date Publisher (Production Studio i.e. “Marvel Studios”) Genre(s) Series (Collection i.e. “The Avengers Collection”) Video Url (YouTube movie trailer) What media is imported? Box – Front Banner Clear Logo Disc Fanart – Background Arcade – Marquee Can it import media I already have? Yes. When importing media, the plugin will 1st look in the same folder the movie file is located. Do I need to have my own personal API keys for both TMDB and FanArt.TV? Yes. However, when running Setup the first time, “temporary” API keys are automatically inserted. For now, they work. But for best, continued results, obtain and enter in your own keys. (See below) Are both API keys required to scape? Yes. If either of the keys are missing or invalid, the plugin will exit. Do the Movie Titles [in LaunchBox] need to be named a certain way before scraping? Yes. The Titles should be the name of the movie without any extras. The Avengers will work. The Avengers 2012 will not work.* The.Avengers.2012.1080p.BluRay.x264.DTS-FGT will not work.* *No. If you have a valid Information (NFO) file in the same folder as the movie, the plugin will parse the file to get the proper Title and movie ID#. The Avengers 2012 will work. The.Avengers.2012.1080p.BluRay.x264.DTS-FGT will also work. Can I scrape more than one movie at a time? Yes. Select multiple (or all) movies in the Platform, right-click and select Scrape Movie. You may want to test with just one movie or only a couple at first. Installation: Download the zip file Unblock it by right-clicking the file, select Properties, check “Unblock” and click OK. (Alternately, just use 7Zip to open the downloaded file) Copy the folder inside the zip into ../LaunchBox/Plugins/ i.e. D:\LaunchBox\Plugins\MovieScraper2023\MovieScraper.dll Setup: Start LaunchBox Click Tools and select “Movie Scraper Setup” Enter in your API keys Click Verify Keys to confirm they are working (Optional) Check “Automatically select 1st Movie when multiple results are found” Click Save Use: Select one or movies you have imported into LaunchBox, then right-click on one of them. Select Scrape Movie A “Please Stand By” window will appear indicating scraping is in progress. If a movie has more than one ‘close match’, a window will appear where you can select the correct movie. Unless during Setup, you checked “Automatically select 1st Movie when multiple results are found”. Scraping is complete when “Please Stand By” disappears. When completed, press F5 to refresh the Box-Front images for the selected movie(s). Click on a different movie and then back on one just scraped to refresh the images in the right side-bar. Getting your personal API keys: (both are free to get) TMDB A TMDB user account is required to get an API key. Once created, log in and go to Profile - Overview - Edit Profile. Go down to API to get your “api_key (v3 auth)”. http://www.themoviedb.org FanArt.TV Register an account at https://fanart.tv/. Once registered, go to https://fanart.tv/get-an-api-key/ to find your personal key The process when scraping: Get the API keys from APIfile.xml and verify the API keys are valid If either API key returns “Unauthorized”, the plugin will exit Check if the movie has an NFO file (in the same folder as the video file). If so… Get/store the movies ID#. (Can be either TMDB or IMDB) Set the ‘games’ Title Check for existing image files in the same folder as the video file. If any exist, copy them into LB Image files need to have the same name as the video file, plus -imageType.png (or .jpg depending on the image type) Search TMDB using ‘Title’. (If an NFO file exists, search by the movie ID# from step 2 above) If no matches, “The movie could not be found.” [popup message] will appear. When scraping in bulk, a popup will appear at the end of all scraping instead, listing the movies not found If there are multiple matches, a window will appear to have you select the correct movie. (Unless you chose to “Automatically select 1st Movie” during Setup) If there’s only 1 match (or when a movie was manually selected), set the movies: Title, Notes, Release Date, Publisher, Genre(s), Series and Video Url (link to movie trailer) Download images from TMDB and FanArt.TV. Download images only if the image type doesn’t already exist (i.e. local images weren’t found) Order of precedence for importing images: Local images: Box-Front Banner Clear Logo Disc Fanart-Background Arcade-Marquee TMDB: Box-Front Fanart-Background FanArt.TV: Box-Front Banner Clear Logo Disc Fanart-Background Arcade-Marquee Big thanks to @Slipstream for the original code and @jayjay for his update. As always, all comments and suggestions are welcomed. Submitter JoeViking245 Submitted 04/12/2023 Category Third-party Apps and Plugins -

Version 1.3.0
509 downloads
This is a reboot of the Movie Scraper Plugin by @Slipstream. The intent of this plugin is to scrape metadata and media for movies you’ve imported into LaunchBox. Q&A: Why use LaunchBox as your digital movie library? Because you can. What metadata is imported? Title Notes (Movie Plot) Release Date Publisher (Production Studio i.e. “Marvel Studios”) Genre(s) Series (Collection i.e. “The Avengers Collection”) Video Url (YouTube movie trailer) What media is imported? Box – Front Banner Clear Logo Disc Fanart – Background Arcade – Marquee Can it import media I already have? Yes. When importing media, the plugin will 1st look in the same folder the movie file is located. Do I need to have my own personal API keys for both TMDB and FanArt.TV? Yes. However, when running Setup the first time, “temporary” API keys are automatically inserted. For now, they work. But for best, continued results, obtain and enter in your own keys. (See below) Are both API keys required to scape? Yes. If either of the keys are missing or invalid, the plugin will exit. Do the Movie Titles [in LaunchBox] need to be named a certain way before scraping? Yes. The Titles should be the name of the movie without any extras. The Avengers will work. The Avengers (2012) will work. (new v1.3.0) The Avengers 2012 will not work.* The.Avengers.2012.1080p.BluRay.x264.DTS-FGT will not work.* *No. If you have a valid Information (NFO) file in the same folder as the movie, the plugin will parse the file to get the proper Title and movie ID#. The Avengers 2012 will work. The.Avengers.2012.1080p.BluRay.x264.DTS-FGT will also work. Can I scrape more than one movie at a time? Yes. Select multiple (or all) movies in the Platform, right-click and select Scrape Movie. You may want to test with just one movie or only a couple at first. Can I scrape metadata in a language other than English? Yes. See Setup: below. (new v1.3.0) Installation: Download the zip file Unblock it by right-clicking the file, select Properties, check “Unblock” and click OK. (Alternately, just use 7Zip to open the downloaded file) Copy the folder inside the zip into ../LaunchBox/Plugins/ i.e. D:\LaunchBox\Plugins\MovieScraper2023\MovieScraper.dll Setup: Start LaunchBox Click Tools and select “Movie Scraper Setup” Enter in your API keys Click Verify Keys to confirm they are working (Optional) Check “Automatically select 1st Movie when multiple results are found” (Optional) Select a language to use when downloading metadata. (Default: English) (new v1.3.0) Click Save Use: Select one or movies you have imported into LaunchBox, then right-click on one of them. Select Scrape Movie A “Please Stand By” window will appear indicating scraping is in progress. If a movie has more than one ‘close match’, a window will appear where you can select the correct movie. Unless during Setup, you checked “Automatically select 1st Movie when multiple results are found”. Scraping is complete when “Please Stand By” disappears. When completed, press F5 to refresh the Box-Front images for the selected movie(s). Click on a different movie and then back on one just scraped to refresh the images in the right side-bar. Getting your personal API keys: (both are free to get) TMDB A TMDB user account is required to get an API key. Once created, log in and go to Profile - Overview - Edit Profile. Go down to API to get your “api_key (v3 auth)”. http://www.themoviedb.org FanArt.TV Register an account at https://fanart.tv/. Once registered, go to https://fanart.tv/get-an-api-key/ to find your personal key The process when scraping: Get the API keys from APIfile.xml and verify the API keys are valid If either API key returns “Unauthorized”, the plugin will exit Check if the movie has an NFO file (in the same folder as the video file). If so… Get/store the movies ID#. (Can be either TMDB or IMDB) Set the ‘games’ Title Check for existing image files in the same folder as the video file. If any exist, copy them into LB Image files need to have the same name as the video file, plus -imageType.png (or .jpg depending on the image type) Search TMDB using ‘Title’. (If an NFO file exists, search by the movie ID# from step 2 above) If no matches, “The movie could not be found.” [popup message] will appear. When scraping in bulk, a popup will appear at the end of all scraping instead, listing the movies not found If there are multiple matches, a window will appear to have you select the correct movie. (Unless you chose to “Automatically select 1st Movie” during Setup) If there’s only 1 match (or when a movie was manually selected), set the movies: Title, Notes, Release Date, Publisher, Genre(s), Series and Video Url (link to movie trailer) Download images from TMDB and FanArt.TV. Download images only if the image type doesn’t already exist (i.e. local images weren’t found) Order of precedence for importing images: Local images: Box-Front Banner Clear Logo Disc Fanart-Background Arcade-Marquee TMDB: Box-Front Fanart-Background FanArt.TV: Box-Front Banner Clear Logo Disc Fanart-Background Arcade-Marquee When selecting a language other than English (new option v1.3.0) to download metadata, Box-Front and Background images are the only ones that will appear in that language (if available). FanArt.TV doesn't appear to support other languages. Big thanks to @Slipstream for the original code and @jayjay for his update. Thanks to @universeofgamer for the suggestion to add the option to scrape metadata in other languages. As always, all comments and suggestions are welcomed. -
Cannot sync metadata for Street Fighter Zero 3
JoeViking245 replied to ghislefou's topic in Troubleshooting
What platform are you trying to scrape in? The link you show is for the platform Taito Type X. If your platform is Taito Type X, check that it's set to Scrape As Taito Type X. Search Results for street fighter zero 3 - LaunchBox Games Database (launchbox-app.com) If your platform is Arcade, that Title is listed as an alternate name to Street fighter Alpha 3. If you go ahead and select "...Alpha 3" and import the metadata, you could then go into the Alternate Names section, select "...Zero 3" and then click Set Selected Games as Title. -
I recall seeing that's an M$ thing (for quite a while now [years?]) and can be ignored. A sort of 'false-positive', as it were.
-
You can't associate an emulator to a playlist. But you can associate it a platform and just un-check Default Emulator. You'll now have the option to manually which emulator to use but will default to the original emulator. To set the default emulator to use for games that are in a specific Playlist: Select your [Naomi] playlist. Select all games in that playlist. (click on 1 of them, then press Ctrl+A to select all) Press Ctrl+E. This will open the Bulk Edit Wizard. Click Next. In Field, Select Emulator. In Value, select the emulator you want the selected games in that playlist to use as-default.
-
For Running Scripts (and Additional Apps), you can't pass any variables to them. But for Command-Line Parameters.... In addition to those listed, there's also %romlocation% (added in v12.7).
-
I'm not really sure how else you could sort/filter your list to always have one specific Platform/Category/Playlist always listed 1st. I think the intent of having a Sort Title field is to do something just like that. I use it to put SNES next to the other Nintendo's. Never thought about using it to put something always at the top of the list. Thanks for the idea. Sound pretty convenient.
-
Which [LaunchBox] theme are you using? Do they also not show with the Default theme?
-
View - Media - Auto-Play Videos or Ctrl+Alt+V
-
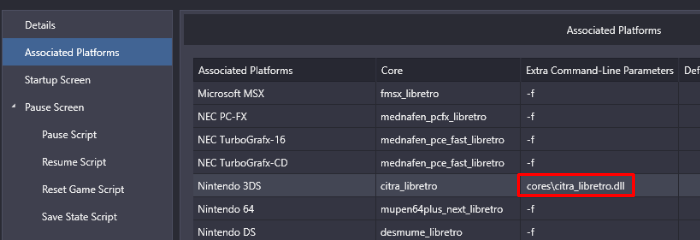
I've only ever used stand-alone Citra. But a couple RetroArch-related settings you have stand out.... Edit your emulator. Uncheck the boxes Remove Quotes and Remove space before ROM. You can also completely remove the Default Command-Line Parameters (on this screen). [It gets overridden on the next screen. So serves no purpose for this emulator.] In the Associated Platforms section, replace the Extra Command-Line Parameters with -f (just like the others).

-
Notifying player to use controller or joystick depending on emulator.
JoeViking245 replied to CalmGamer's topic in Noobs
Not on a per emulator basis. But you can do it on a per platform basis. If you look in \LaunchBox\StartupThemes\Default\, you'll notice there's the Default.xaml theme and then a couple more for specific platforms. They just need to be named the exact same as the specific platform, in your setup. As an example for your use, for Dolphin emulator, you'll see specific [platform] ones are already there. "Nintendo GameCube.xaml" and "Nintendo Wii.xaml". -
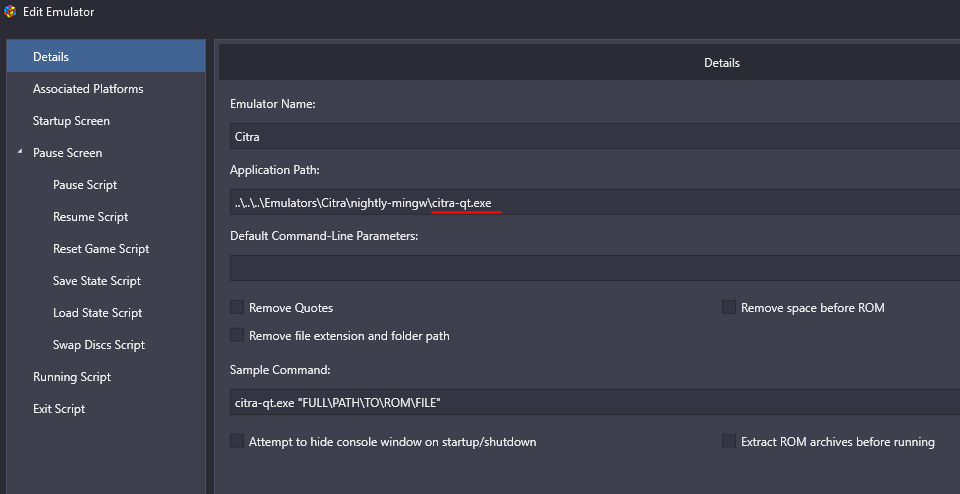
I tried to make it NOT work. But failed. If the game can be launched from a shortcut (or better yet, test from the Command Prompt), it'll launch from LaunchBox. From the Command Prompt I used/typed (long-hand): "T:\Emulators\Citra\nightly-mingw\citra-qt.exe" "T:\LaunchBox\Games\Nintendo 3DS\3DS0128 - Frogger 3D (Usa)-decrypted.3ds" Emulator settings in LaunchBox: (Be sure to point to citra-qt.exe. Not "citra.exe". No checkboxes checked)
-
If the emulator does support zip files, you shouldn't have LaunchBox extract them.
-
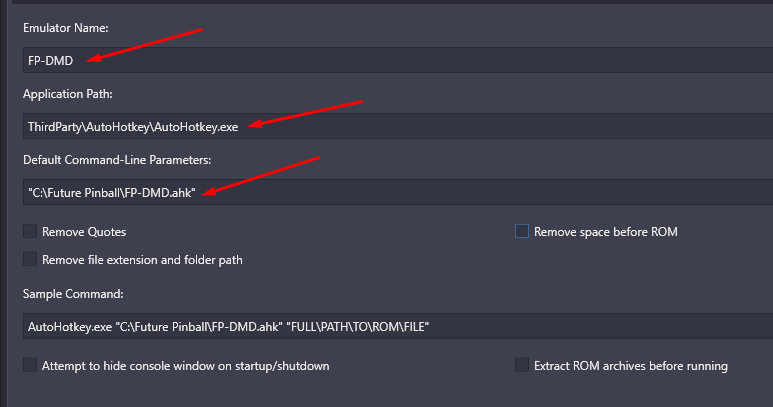
If you're using FPLoader to launch your tables, it never will. The Running script only stays active while the 'emulator' (FPLoader.exe in this case) is running. If I recall correctly, FPLoader is essentially a launcher for 'Future Pinball.exe'. So as soon as it launches it, it itself closes. Thus, closing out the Running Script making the escape sequence unavailable. Steam is the same way. So if you need to run something after playing a Steam game, you're in the same boat. 'Nature of the beast'. The Fix: Create a new "emulator". Unless you know how to "wait for an application to not exist [anymore]" (Future Pinball.exe in this case) using a batch file, we'll have to learn ya' some AHK. Create a new text document. ("FP-DMD.txt" or whatever) In there, put: Run, "dmdext.exe" mirror --source=futurepinball -q --virtual-stay-on-top --fps 60 -g "[GAMENAME]" --use-ini="C:\Visual Pinball\VPinMAME\DmdDevice.ini", C:\Visual Pinball\VPinMAME, Min Run, "C:\Future Pinball\BAM\FPLoader.exe" /play /exit /open "%1%" Sleep, 10000 While WinExist("ahk_exe Future Pinball.exe") sleep 700 Process, Close, dmdext.exe ExitApp Adjust the 2nd Run command to point where your FPloader.exe is located. Save to somewhere convenient to you, Close and change the file extension to .ahk ("FP-DMD.ahk"). Be careful that it's not saving it as ""FP-DMD.ahk.txt". In LaunchBox, Add a new Emulator. Name the emulator (FP-DMD or whatever you want) Browse to and set the Application Path to ..\LaunchBox\ThirdParty\AutoHotkey\AutoHotkey.exe Note: once selected, LaunchBox will show it as a relative path. In the Default Command-Lin Parameters: enter the full path to the AHK file you created, in quotes. In the Associated Platforms section (select it on the left), Add "Future Pinball" (or whatever the exact name of your platform is). Assuming all your FP tables will be using dmdext, check the box for Default Emulator. You'll probably be asked, Do you want to make this the default emulator?. Yes. Click OK to save and close. Play a table (or two)
-
It's not that it's not finding the files inside the zip. It's not 'seeing' the zip, itself. Edit your MAME emulator in LaunchBox and in the Default Command-Line Parameters, add -rompath %romlocation%. Also make sure both "Remove Quotes" and "Remove file extension" boxes are checked. To test it from Window Command Prompt: G:\LaunchBox> Emulators\MAME240\mame.exe -rompath Games\Arcade asteroid or from any location "G:\LaunchBox\Emulators\MAME240\mame.exe" -rompath "G:\LaunchBox\Games\Arcade" asteroid
-
Add additional Application to every Game in Collection
JoeViking245 replied to micpo's topic in Troubleshooting
Yes. -
Need help getting CXBX Reloaded and Xenia to launch on my second monitor
JoeViking245 replied to BrainyCabde's topic in Noobs
You're welcome. As for Display Fusion being easier to use, you already had MonitorSwitcher working. Just needed the command lines. Anyway, I like the footprint of MonitorSwitcher compared to DF (KB's vs. 200+ MB's), and it doesn't require any installation. Also the $ cost to save profiles for later use is a bit cheaper. But that's just me. Glad you got something working for you. -
Need help getting CXBX Reloaded and Xenia to launch on my second monitor
JoeViking245 replied to BrainyCabde's topic in Noobs
Instead of creating/adding/using the hotkeys and using AutoActions, just use the command(s) available in MonitorProfileSwitcher to load the profiles. If it works to change the profile while the game is loading (vs. it HAS to be switched PRIOR to loading the game), add to the Running Script for that emulator: (For cxbx emulator) Run, "MonitorSwitcher.exe" -load:Profile-1.xml, F:\Misc\Monitor Switcher Process,Wait,cxbx.exe while winExist("ahk_exe cxbx.exe") sleep 700 Run, "MonitorSwitcher.exe" -load:Profile-2.xml, F:\Misc\Monitor Switcher Change Profile-1.xml and Profile-2.xml to your saved profile_names.xml you want to load when the emulator launches (1st line) and after it exits (last line). Respectively. Change F:\Misc\Monitor Switcher (2 places) to the full path where your MonitorSwitcher.exe is located. For your Xenia emulator, do the same thing(s), and also change cxbx.exe to xenia.exe (2 places). If they have to be switched before loading the game (emulator), then you'll [instead] need to add Additional Apps for each game and have them checked to Run Before Main App and Run After Main App using only [modified] line 1 above and the last line. Respectively. LaunchBox can't 'fix' finnicky emulators. But it can accommodate most all of their shortcomings. -
If you have an EmuMovies account Select the Platform you want to add manuals to Click on one of the games in that platform then press Ctrl+A to select all games Click Tools, Download, Update Metadata and Media for Selected Games... Follow through the prompts until you get to Would you like to download media from EmuMovies? In that view, scroll down and check the option Manual Kepp going through the prompts until you get to Ready to Download Click Finish Note, not all platforms will have manuals available.
-
Super Nintendo Platform Icon not showing up
JoeViking245 replied to Kozar's topic in Troubleshooting
When you replaced the icon, I presume it was in ..\LaunchBox\Images\Platform Icons\Platforms\Super Nintendo Entertainment System.png It needs to be a .png file (vs .ico). If you didn't have LaunchBox closed while replacing it, you may be able to select the Platform (on the left pane) and press F5 to refresh the image. Worse case, close and restart LaunchBox and it should appear. -
(Bulk) Remove Additional Applications
JoeViking245 commented on JoeViking245's file in Third-party Apps and Plugins
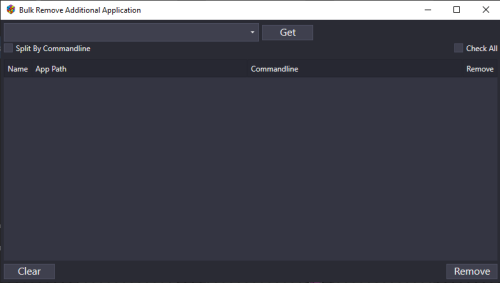 I won't give you a button, but I will give you a "Check All" checkbox. Check it to select (check) all. Un-check it to un-select all. v1.2.0 New Feature - Added check-box to check/un-check all items
 -
Change the last line to RunWait, "D:\LaunchBox\Emulators\MAME 0.243\mame.exe" -skip_gameinfo -waitvsync -keyboardprovider dinput -rompath %romlocation% %ROM%, D:\LaunchBox\Emulators\MAME 0.243
- 10 replies
-
- 1
-

-
- 360
- 360 controller
- (and 1 more)
-
What does your existing MAME emulator (in LB) Default Command-Line Parameters look like?
-
No. 😊 Try changing these 2 lines to: romlocation = %1% ROM = %2%
- 10 replies
-
- 2
-

-

-
- 360
- 360 controller
- (and 1 more)
-
(another "try this") For the fullscreen thing, create a new file ("BSfullscreen" or whatever). In it, put: Set WshShell = WScript.CreateObject("WScript.Shell") WScript.Sleep 10000 WshShell.SendKeys "{F11}" Save the file with a .vbs extension. ("BSfullscreen.vbs") Create an(other) additional app to Run Before. Have the Application Path point to this file. If that works, you can thank @AliMujahid20 (you. lol). If it doesn't, you can blame me.