.png.d63b88dc3d5c6db8803dfbd996ce65fc.png)
JoeViking245
-
Posts
2,941 -
Joined
-
Last visited
-
Days Won
25
Content Type
Profiles
Forums
Articles
Downloads
Gallery
Blogs
Everything posted by JoeViking245
-
There's a plugin that was made a couple years to create VPX gameplay video snaps. It may be a little less time consuming (?) as you can run it from within LaunchBox and the videos can be saved directly into \LaunchBox\Videos\VisualPinball\ folder (or wherever you want). But it's still one-table-at-a-time.
-
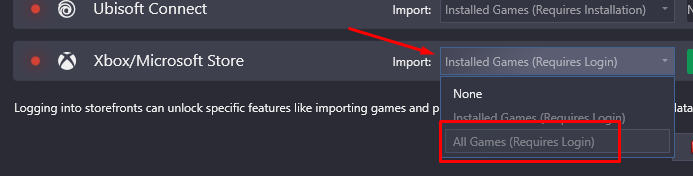
As of version 13.7-beta-1, you can do that. Since you're posting in this thread, I assume you have at least 13.7-beta-1 installed. Click Tools, Manage, Storefronts. Next to the storefront you want to change, click the dropdown box next to Import and select All Games. Keep in mind this is still a beta release. If you come across any issues with this feature, please post them in this thread. We'll hold you to that.

-
There is an IStateManager property that "Gets a value specifying whether Big Box is in attract mode or not." But you need to call it. There doesn't seem to be a system event that can monitor when it goes into attract mode.
-
As stated in the official plugin release notes, only screenshots will be imported. All other images are stored too inconsistently among the various databases with respect to the folders they reside in. The notes do continue to say how you can manually copy available images. [After a year and a half] I don't recall if all databases had their images in pdf files, or just certain ones. Or just certain sets of images. The ones that aren't in embedded in a pdf file should be a simple copy/paste. Sounds like you found a way to automate the process for the ones that are in pdf's. @foleyjo did do a write up and created some batch files (found here on the Official Release Support page) for getting all the screenshots, cover-art and music added to the C64 GameBase collection. He later stated that with some slight modifications to the batch files, he was also able to use them for Spectrum and Acornmania.
-
The program I use is ffmpeg and created a batch file to have it do the conversions. There's no fancy UI and this (batch file) only does one folder at a time. But ffmpeg.exe is a single, small file and very good at what it does. No matter what program you use, the trim process does take time (depending on how many files there are). Also, many of the fancy UI type programs actually use ffmpeg in the background. This way just cuts out the middle-man. Create a text file and paste the following code into it. Save and rename the file with a .bat file extension. Place the batch file and ffmpeg.exe in a folder containing videos. When executed, the batch file will: create a subfolder "trimmed". look for all files with a .mp4 file extension tell ffmpeg to trim each video file to 20 seconds (-t 20) then put the trimmed video file in the "trimmed" subfolder "pause" when completed. (press the 'any key' to close the window) md trimmed for %%a in ("*.mp4") do ffmpeg -t 20 -i "%%a" -vcodec copy -acodec copy "trimmed\%%~na.mp4 pause This only trims the files that are in the same folder as the batch file. This doesn't delete the original files. After it's done, I suggest moving the original video files to an outside folder (temporary 'backup'). Then move the trimmed files to where the original ones were. Start LaunchBox (or BigBox) and go to that platform. Confirm you like what you see. If so, you can delete the temp backups, move the batch file and ffmpeg.exe to the next video folder, wash-rinse-repeat (and can probably do away with the temp backup - test part). You can replace "ffmpeg" (without quotes) in the batch file with "full\path\to\ffmpeg.exe" (with quotes and being the actual path to ffmpeg.exe) so that you only have to place the batch in the videos folder.
-
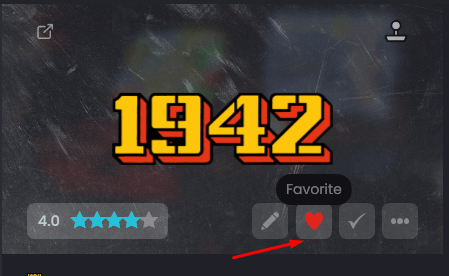
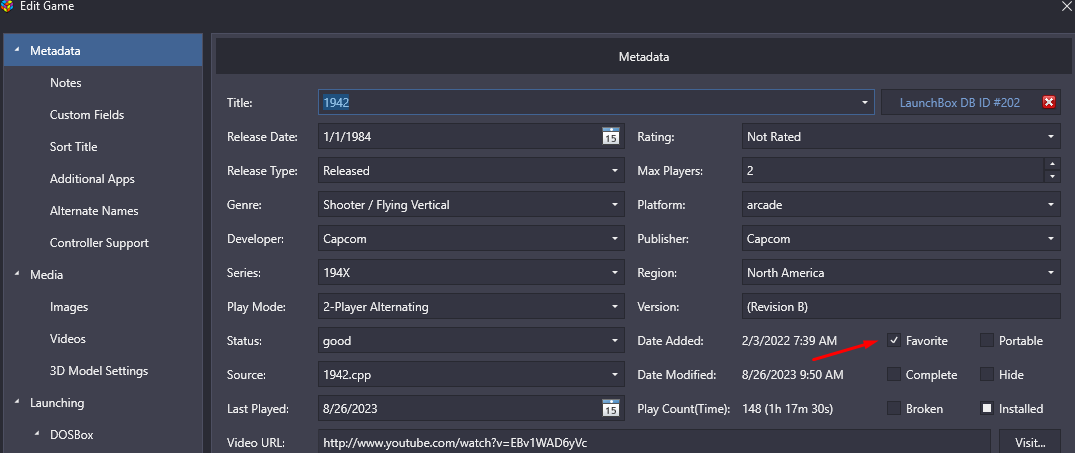
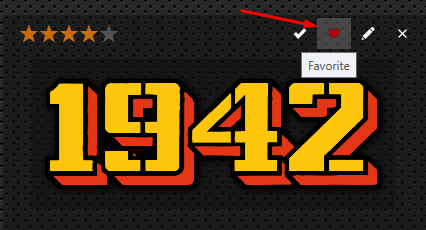
Look at the top on the right panel for a white colored heart and click it to make it red. (most themes will have it somewhere) Option #2, edit the game and check the Favorite box.
-
.thumb.png.c9faf450e4d2b690a819048b18173f61.png)
Movie Scraper (Reboot 2023)
JoeViking245 commented on JoeViking245's file in Third-party Apps and Plugins
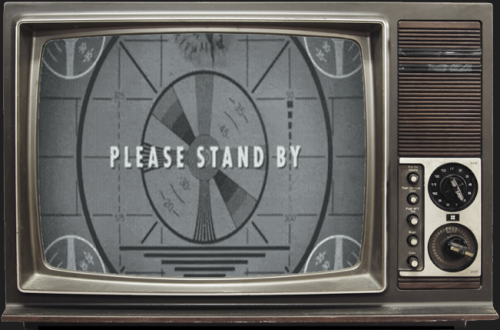 I just tested it with the latest LaunchBox version 13.7-beta-2 and it worked here. When you right click on a movie, is Scrape Movie (v1.2.0) greyed out (unclickable) or can you actually click on it? If you can click on it and nothing happens, then there's something's really wrong. No “Please Stand By” window? No popup messages or anything? Did you unblock the file 'MovieScraper.dll'? You must have if you were able to run Movie Scraper Setup from the Tools menu. Can you share the log file located in your \LaunchBox\Plugins\MovieScraper2023\Logs\ folder
 -
Launch box doesn't recognize Half-Life and Left 4 Dead
JoeViking245 replied to LuWhisky's topic in Troubleshooting
Try highlighting Windows (next to Platform) and pressing Delete (aka remove the associated platform). Then click Search for Metadata. That should give you a list of platform options for Half-Life. Select the last one (Windows). If the options don't appear, you may need to refresh your local database. Tools, Download, Force Update Games Database Metadata... -
Custom Icons dont display without bigbox licnese
JoeViking245 replied to magicray1028's topic in Troubleshooting
Correct. -
How do I tell LaunchBox to Run a Specific Clone inside a Rom?
JoeViking245 replied to Skirmy's topic in Troubleshooting
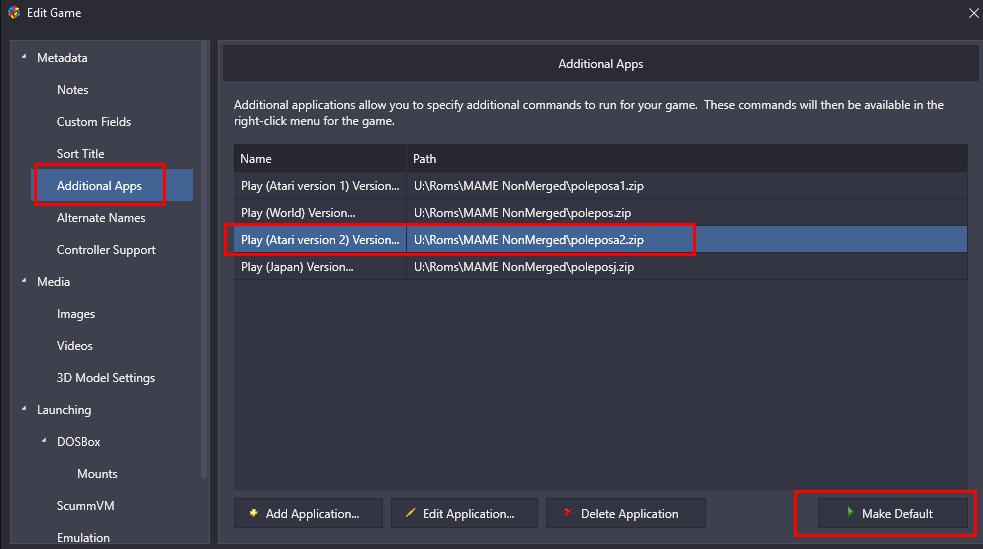
From the sounds of things, your game.zip is from a merged set. Meaning the zip file contains the parent game and its clones. The file itself is named after the parent game and when you import that [single] game, that's what LaunchBox imports. It doesn't look 'inside' to attempt to determine if the ROM is from a merged, non-merged or split set. If it is indeed from a merged set, and you want to launch just one of the 'embedded' clones, you can change the launching path to the ROM to the name of the would-be clone. Example: if the ROM is polepos.zip (World version of Pole Position) and you want to launch the Atari version-2 version of the game, change the application path of the game to point to poleposa2.zip (even though that file doesn't physically exist in that location). When you launch the game from LaunchBox, MAME will know to look inside polepos.zip for the Atari version. If you want the options to launch any of the other versions, you'd need to manually add them as additional apps and then mark the one you want as default. That's if you're importing your [merged set] ROMs one-at-a-time. aka: The hard way. To get all the clones imported as Additional Apps (or separately, for that matter) from a Merged set, I believe your only option is to use the ever-so-intelligent MAME Arcade Full Set import Wizard. This will account for clones that are in a merged set. But you need the full-set (merged, non-merged or split) to use the wizard.
-
When I 1st read your original post, I thought you were saying you had all games working directly with MAME but none through LaunchBox. Rereading it, it sounds like you have some MAME games able to launch correctly through LaunchBox. If some work correctly when starting them through LaunchBox, they should all work correctly. Especially if they're all working directly through MAME. For the Pole Position Atari licensed versions, make sure you have all the Device files located in with your ROMs. You'll need these as well as the Atari version(s) on the game ROM. LaunchBox doesn't know if the games actually work on your setup or not. So it can't default anything for you in that regards. With the clones imported as Additional Apps, you can edit the main game, go to the additional apps section and select which on you want to be the default game.
-
Can you edit (in LaunchBox) your MAME emulator and share a screenshot of the Details section?
-
Doesn't look like you loaded a cassette. From the Command Prompt, you'd [probably] type mame.exe mikrosha -cass alambush That would start MAME with the cassette for Alien Ambush. Next, you'd need to "Load" the cassette [into memory]. Press Scroll-Lock to get out of the emulated keyboard, then press F2 to Load the cassette. You should hear some nasty sounds (kind of like the old modems) and see a loading count-down (or count-up) timer. Wait until that's done, and they game might then load. I say 'probably', 'should' and 'might' because I haven't tested it. But that's the general process for other cassette systems. Note that Mikrosha and Radio-86RK are 2 separate systems, with the prior being a clone of the latter.
-
 I reset the background video options and the videos are working as expected with v3.01. This theme looks great, especially in my Arcade platform! Thanks!
 -
-
Add a new "game" and in the Launching section, set the Application Path to C:\Windows\explorer.exe and for Parameters, enter the path to the folder you want to open up to. Depending on where you place this 'game', you may need to also go to the Emulation section and un-check Use an emulator....
-
Bulk Convert cue/gdi/iso files to CHD
JoeViking245 commented on JoeViking245's file in Third-party Apps and Plugins
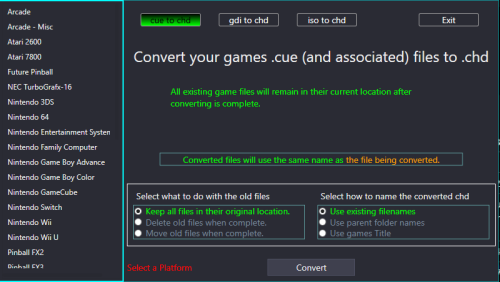 Thanks for your patience on this and sorry for the inconvenience. It shouldn't make a difference. But I don't know enough about Write permissions to give a definitive answer. Which I believe is what the issue might actually be. You may have write permissions, but the app/plugin may not. Again, just a guess. I think at this point (without digging into how permissions work or don't work), it may be easier to go with Plan "B". (Or is it plan "C"? )..... Copy the ROMs (.cue, .bin etc.) from your E: drive to the L: drive, then run the plugin and have it Delete them [from the E: drive after successful conversion] instead of Moving them.
 -
Bulk Convert cue/gdi/iso files to CHD
JoeViking245 commented on JoeViking245's file in Third-party Apps and Plugins
I'm at a loss here as it worked during my tests and have not had reports of this issue from other users. Is the L: drive a physical hard drive in your computer or an external drive connected to a USB port? Or something else? What is the full path to your .cue file and the full path to where you want them moved to, on the L: drive? Make sure there are no odd characters in either path. It's possible that your computer is not allowing this plugin to access your L: drive. If that's the case, you could have the plugin move the files to a temp folder on your E: drive and then manually move the whole temp folder to the L: drive. Another option is to copy your ROMs from E: drive to L, then have the plugin Delete instead of Move. If it (the plugin) can't delete the files after converting, then your PC is not allowing that [either]. -
I'm not familiar with that emulator (nor MALA or Mgalaxy), but looking at some comments from 2015, the only command line parameter it takes is the path to the ROM file. Whether that's still true 8 years later, don't know. Also, I've no idea what "Finder" is. (Is that a MAC thing??) That said, in LaunchBox, edit the emulator and make sure none of these boxes are checked. And also (unless your ROMs are zipped and they need to be extracted first.) To verify that you even can run it from LaunchBox, open the Windows Command prompt window where the emulators' executable is located and try running it from there. coolcv.exe "full\path\to\the\ROM\file.ext" (changing the emulators actual executable name [if it's not that] and the actual path to the ROM.ext [with quotes]) If you can get it to run from the command prompt, you can get it to run in LaunchBox.
-
I was having the same issue and followed @neil9000's advice from page one of this thread and that worked for me.
-
Area 51 and other mame roms needing chds not working
JoeViking245 replied to Scott82236's topic in Troubleshooting
For Area51, you should have the main ROM file, area51.zip (which is about 622kb). And then have a folder called area51. This [sub]folder should then have a single file area51.chd (which is about 475MB). -
Bulk Convert cue/gdi/iso files to CHD
JoeViking245 commented on JoeViking245's file in Third-party Apps and Plugins
I'm a little confused. Are you saying that if you choose a Destination folder on your E: drive (for example E:\myBackupfolder\Sega Dreamcast\), the files will get moved as you'd expect. But if you choose a Destination folder on your L: drive (for example L:\myBackupfolder\Sega Dreamcast\), none of the files get moved? -
Bulk Convert cue/gdi/iso files to CHD
JoeViking245 commented on JoeViking245's file in Third-party Apps and Plugins
Glad the conversions worked for you. Was the destination folder on a LAN drive or local drive/folder? Were (are) the games .cue and .bin files is the same folder? Did only one of the two games that got converted not get moved? Or did neither of the sets of .cue/.bin files get moved? Can you share the .cue file for the game that couldn't get moved (or just one if the if both didn't get moved)? -
Bulk Add/Remove Additional Applications
JoeViking245 commented on JoeViking245's file in Third-party Apps and Plugins
 You're very welcome. Not with this plugin. This plugin will only remove them from being associated to the game(s).
 -
It seems like there should be an easier way, but you could create a new emulator and have it point to your script. Then have those game use this new emulator. LaunchBox will pass the "full/path/to/the/rom/file.ext" to your script. Have your script do its pre-game Sinden thing (if any), then start the emulator with the appropriate parameters and "%1% " as the path to the ROM (or just the ROM filename, depending on your check boxes). Then do the AHK voodoo to get past the calibration screens. This way you keep the ROMs path (in LaunchBox) as it should be. And if you need to change something later, you only have to change the emulator (or edit the script). Alternately, you could add an additional app to these games. Have the app point to the AHK script and check 'Launch Before Main Application'. At the top of your script, add something along the lines of Process, Wait, emulator.exe to wait for the emulator to be running. You might need to then add a WinWaitActive ahk_exe emulator.exe to make sure it's the active window (and maybe a short sleep timer to make sure it's fully loaded?).