
.png.d63b88dc3d5c6db8803dfbd996ce65fc.png)
JoeViking245
-
Posts
5,272 -
Joined
-
Last visited
-
Days Won
38
Content Type
Profiles
Forums
Articles
Downloads
Gallery
Blogs
Files posted by JoeViking245
-
Bulk change game Titles to Alternate Names (by Region)
By JoeViking245 in Third-party Apps and Plugins
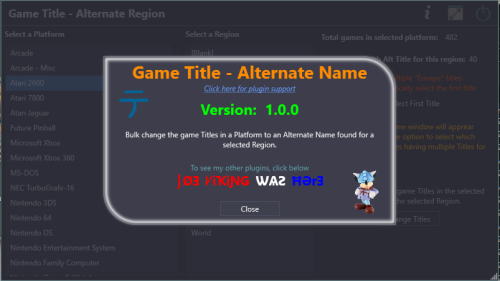
Game Title - Alternate Name
Inspired from a comment by @AstroBob (December 2024)
Challenge accepted. 😎
Some (many?) games have Alternate Names and are saved as such when metadata is scraped from the LaunchBox Games Database. These are generally used for different Regions.
Using this plugin, you can bulk change the game Titles in a Platform to an Alternate Name found for a selected Region.
Prerequisites
Requires LaunchBox v13.19 (or newer)
Installing
Download and extract the contents of the download into your /LaunchBox/Plugins/ folder.
i.e. D:/LaunchBox/Plugins/GameTitle-AlternateName/GameTitle-AlternateName.dll
Using
Start LaunchBox From the Tools menu, select Game Title - Alternate Name Select a Platform Select a Region Only possible Alternate Name Regions for games in that platform will be shown. If the Alternate Name doesn't have a Region. it will be listed as [Blank] Click Change Titles
If a game doesn't have an Alternate Name for the selected Region, nothing will change for that game.
If any of the games have more than one Alternate Name for the selected Region, you have the option to:
(default) manually select the Title for each game having more than one Title for that Region (optional) replace the game Title with the 1st one it finds for the selected Region (check Select First Title)
If you didn't check Select First Title (default):
When clicking Change Titles, after the games that had a single Title for the Region are updated, you will be shown a list of games that have multiple Titles for the selected region. Select a game, then double-click the Title you wish to use.
Updates (internet connection required)
If an (U)pdate for this plugin has been released on the forums,
The plugin title in the Tools menu will show as: (U) Game Title - Alternate Name (The addition of (U) at the beginning) At the top of the plugin window, it will show "Update available" Click the Info/Support icon, then click the Update Available button. This will open the plugins download page in your default browser.
As always, all thoughts, views, opinions, suggestions, requests and comments and welcome.
"Be good Humans." (Brian Phelps)
156 downloads
-
Movie Scraper (Reboot 2023)
By JoeViking245 in Third-party Apps and Plugins
This is a reboot of the Movie Scraper Plugin by @Slipstream.
The intent of this plugin is to scrape metadata and media for movies you’ve imported into LaunchBox.
Q&A:
Why use LaunchBox as your digital movie library?
Because you can.
What metadata is imported?
Title Notes (Movie Plot) Release Date Publisher (Production Studio i.e. “Marvel Studios”) Genre(s) Series (Collection i.e. “The Avengers Collection”) Video Url (YouTube movie trailer)
What media is imported?
Box – Front Banner Clear Logo Disc Fanart – Background Arcade – Marquee
Can it import media I already have?
Yes. When importing media, the plugin will 1st look in the same folder the movie file is located.
Do I need to have my own personal API keys for both TMDB and FanArt.TV?
Yes.
However, when running Setup the first time, “temporary” API keys are automatically inserted. For now, they work. But for best, continued results, obtain and enter in your own keys. (See below)
Are both API keys required to scape?
Yes. If either of the keys are missing or invalid, the plugin will exit.
Do the Movie Titles [in LaunchBox] need to be named a certain way before scraping?
Yes. The Titles should be the name of the movie without any extras.
The Avengers will work. The Avengers (2012) will work. (new v1.3.0) The Avengers 2012 will not work.* The.Avengers.2012.1080p.BluRay.x264.DTS-FGT will not work.* *No. If you have a valid Information (NFO) file in the same folder as the movie, the plugin will parse the file to get the proper Title and movie ID#.
The Avengers 2012 will work. The.Avengers.2012.1080p.BluRay.x264.DTS-FGT will also work.
Can I scrape more than one movie at a time?
Yes. Select multiple (or all) movies in the Platform, right-click and select Scrape Movie.
You may want to test with just one movie or only a couple at first.
Can I scrape metadata in a language other than English?
Yes. See Setup: below. (new v1.3.0)
Installation:
Download the zip file Unblock it by right-clicking the file, select Properties, check “Unblock” and click OK. (Alternately, just use 7Zip to open the downloaded file) Copy the folder inside the zip into ../LaunchBox/Plugins/ i.e. D:\LaunchBox\Plugins\MovieScraper2023\MovieScraper.dll Setup:
Start LaunchBox Click Tools and select “Movie Scraper Setup” Enter in your API keys Click Verify Keys to confirm they are working (Optional) Check “Automatically select 1st Movie when multiple results are found” (Optional) Select a language to use when downloading metadata. (Default: English) (new v1.3.0) Click Save Use:
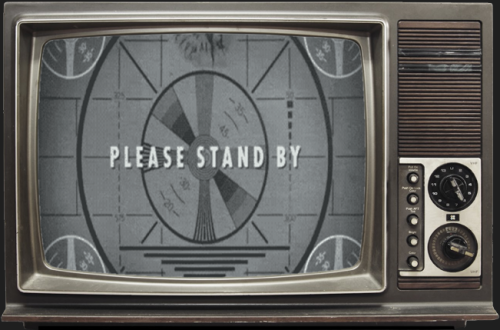
Select one or movies you have imported into LaunchBox, then right-click on one of them. Select Scrape Movie A “Please Stand By” window will appear indicating scraping is in progress. If a movie has more than one ‘close match’, a window will appear where you can select the correct movie. Unless during Setup, you checked “Automatically select 1st Movie when multiple results are found”. Scraping is complete when “Please Stand By” disappears. When completed, press F5 to refresh the Box-Front images for the selected movie(s). Click on a different movie and then back on one just scraped to refresh the images in the right side-bar.
Getting your personal API keys: (both are free to get)
TMDB
A TMDB user account is required to get an API key. Once created, log in and go to Profile - Overview - Edit Profile. Go down to API to get your “api_key (v3 auth)”. http://www.themoviedb.org
FanArt.TV
Register an account at https://fanart.tv/. Once registered, go to https://fanart.tv/get-an-api-key/ to find your personal key
The process when scraping:
Get the API keys from APIfile.xml and verify the API keys are valid If either API key returns “Unauthorized”, the plugin will exit Check if the movie has an NFO file (in the same folder as the video file). If so… Get/store the movies ID#. (Can be either TMDB or IMDB) Set the ‘games’ Title Check for existing image files in the same folder as the video file. If any exist, copy them into LB Image files need to have the same name as the video file, plus -imageType.png (or .jpg depending on the image type) Search TMDB using ‘Title’. (If an NFO file exists, search by the movie ID# from step 2 above) If no matches, “The movie could not be found.” [popup message] will appear. When scraping in bulk, a popup will appear at the end of all scraping instead, listing the movies not found If there are multiple matches, a window will appear to have you select the correct movie. (Unless you chose to “Automatically select 1st Movie” during Setup) If there’s only 1 match (or when a movie was manually selected), set the movies: Title, Notes, Release Date, Publisher, Genre(s), Series and Video Url (link to movie trailer) Download images from TMDB and FanArt.TV. Download images only if the image type doesn’t already exist (i.e. local images weren’t found)
Order of precedence for importing images:
Local images:
Box-Front
Banner
Clear Logo
Disc
Fanart-Background
Arcade-Marquee
TMDB:
Box-Front
Fanart-Background
FanArt.TV:
Box-Front
Banner
Clear Logo
Disc
Fanart-Background
Arcade-Marquee
When selecting a language other than English (new option v1.3.0) to download metadata, Box-Front and Background images are the only ones that will appear in that language (if available). FanArt.TV doesn't appear to support other languages.
Big thanks to @Slipstream for the original code and @jayjay for his update. Thanks to @universeofgamer for the suggestion to add the option to scrape metadata in other languages.
As always, all comments and suggestions are welcomed.
1,009 downloads
-
View game specific commands from MAME's command.dat
By JoeViking245 in Third-party Apps and Plugins
This plugin has been replaced with the MAMEdatsViewer plugin.
Apologies for any inconvenience.
See here for the new and improved all-in-one plugin here:
Inspired from MAME's built in feature in the main UI (and via their in-game Tab menu) and Ben Baker's CPWizard.
View information from MAME's command.dat to show:
CONTROLS
CHEATS
HOW TO PLAY
COMMON COMMANDS
SECRET CHARACTERS
Included in the plugin is a "MAME Command" Custom Badge (LaunchBox Only [unless someone figures out how to show Custom Badges in BigBox])
This will show the badge for games included in command.dat
Installing the plugin
Download and open the file using 7zip. if you don't use 7zip, first unblock the file (Right click, select Properties, and click Unblock) then open it as you normally would. Extract the main folder from inside the zip file into ..\LaunchBox\Plugins\ i.e. D:\LaunchBox\Plugins\MAMEConmmandDat\ (the main folder "MAMEConmmandDat" and all its subfolders are required for the plugin to work!) Start LaunchBox or BigBox
Enabling the Custom Badge
In LaunchBox, click Badges, Plugin Badges, "MAME Command"
You can change the badges image by replacing the image ../LaunchBox/Images/Badges/MAMEcommands.png
Using the plugin
LaunchBox: Right-click on a game and select MAME Commands.
BigBox: In the Game Details screen, scroll to the bottom on the list and select MAME Commands.
To scroll through the page, use your keyboard Up/Down arrow keys, mouse wheel or your controller's left joystick (or DPad) Up/Down.
To close the window, press Escape, or on your controller press your mapped Exit Game (LaunchBox) or Close Active Window (BigBox) button(s).
Version 0.262 of command.dat is included. Future updates can be found here: https://www.progettosnaps.net/command). Just replace the existing file located in the plugins /Data/ subfolder.
As always, all thoughts, views, opinions, suggestions, comments and accolades are welcome. 😎
129 downloads
-
MAME History.xml Viewer
By JoeViking245 in Third-party Apps and Plugins
This plugin has been replaced with the MAMEdatsViewer plugin.
Apologies for any inconvenience.
See here for the new and improved all-in-one plugin here:
View game specific history from MAME's history.xml
Inspired from MAME's built in feature in the main UI and via their in-game Tab menu
Prerequisites
Requires LaunchBox 13.3 or newer MAME or MAMEui set as the game(s) emulator "history.xml" (download it from https://www.arcade-history.com/) MAME users: Place the file in the "history" subfolder of your MAME emulator. i.e. D:\Emulators\MAME\history\history.xml MAMEui users: Place the file in the "dats" subfolder of your MAME emulator. i.e. D:\Emulators\MAMEui\dats\history.xml Currently only available in LaunchBox (not BigBox)
Installing
Download and then open the plugin file using 7zip. if you don't use 7zip, first unblock the file (Right click, select Properties, and click Unblock) then open it as you normally would. Extract the main folder from inside the zip file into ..\LaunchBox\Plugins\ i.e. D:\LaunchBox\Plugins\MAMEhistoryXml\ Start LaunchBox
Using
Right-click on a game and select View MAME History.
Updating history.xml
When loading the plugin, it will check your local version of history.xml against what's available on https://www.arcade-history.com/.
If a newer version is available, you will be given the option to Update your local copy.
Updating will attempt to download and then replace your existing file.
As always, all thoughts, views, opinions, suggestions, comments and accolades are welcome. 😎
36 downloads
-
MAME gameinit.dll Viewer
By JoeViking245 in Third-party Apps and Plugins
This plugin has been replaced with the MAMEdatsViewer plugin.
Apologies for any inconvenience.
See here for the new and improved all-in-one plugin here:
View game specific "Initialization(s)" and/or "Tip(s)" from MAME's gameinit.dat
Inspired from MAME's built in feature in the main UI and via their in-game Tab menu.
Not all MAME games require any initial setup to run, but some do. Currently, the DAT file contains 1439 entries.
A badge will be displayed if there is an entry in gameinit.dat for that game. (See below for Enabling Badges)
Currently only available in LaunchBox (not BigBox)
Prerequisites
Requires LaunchBox 13.3 or newer Installing
Download and then open the plugin file using 7zip. if you don't use 7zip, first unblock the file (Right click, select Properties, and click Unblock) then open it as you normally would. Extract the main folder from inside the zip file into ..\LaunchBox\Plugins\ i.e. D:\LaunchBox\Plugins\MAMEgameinitDAT\ Start LaunchBox Included Files
MAMEgameinit.dll /Data/gameinit.dat (v0.263 [latest available] - downloaded from https://www.progettosnaps.net/gameinit/) Using
Right-click on a game and select View MAME gameinit. Updating gameinit.dat
When loading the plugin, it will check the local version of gameinit.dat against what's available from https://www.progettosnaps.net/gameinit/. If a newer version is available, you will be given the option to Update the local copy. Updating will attempt to download and then replace the existing file. Enabling Badges
To enable the badge, click Badges, Plugin Badges, MAME gameinit The Badge image can be changed by replacing the image ../LaunchBox/Images/Badges/MAMEgameinit.png
As always, all thoughts, views, opinions, suggestions, comments and accolades are welcome. 😎
If you like this plugin, you may also enjoy some of my other MAME related plugins:
View game specific commands from MAME's command.dat
https://forums.launchbox-app.com/files/file/4913-view-game-specific-commands-from-mames-commanddat/
MAME History.xml Viewer
https://forums.launchbox-app.com/files/file/5228-mame-historyxml-viewer/
MAME Hi-Score Display - A plugin for BigBox
https://forums.launchbox-app.com/files/file/2173-mame-hi-score-display-a-plugin-for-bigbox/
MAME Software Lists Import Tool
https://forums.launchbox-app.com/files/file/2080-mame-software-lists-import-tool-plugin/
See all my plugins here:
https://forums.launchbox-app.com/profile/102158-joeviking245/content/?type=downloads_file
40 downloads
-
RetroAchievement Badges
By JoeViking245 in Third-party Apps and Plugins
RetroAchievement Badges
Version 2.3.6 was the last update for this plugin.
(Sept. 2024) This plugin is broken and is no longer supported.
As of LaunchBox version 13.2 (Feb. 27, 2023), Achievement Badges are supported directly in LaunchBox.
To enable: click View < Badges < Game Attributes < Enable Achievements.
I wish to give a huge thanks to @jayjay for his work in initiating this plugin all those years ago!! And to all Community Members who have used, provided feedback and gratitude, Thank You for Your Support!
(This thread remains here for historical reference until such time The Management deems otherwise)
What does this plugin do?
Adds “RetroAchievement” Badges to games that support RetroAchievements.
(See complete list of games here: https://retroachievements.org/gameList.php)
Why?
Because some people wanted it.
How to install the plugin:
Download RetroAchBadge v2.x.x.zip UnBlock the zip file. Right click the file, select “Properties” and check the box that says ‘Unblock’ [or something along those lines] Click OK to close the Properties window Open the zip file Copy the folder “RetroAchBadge” into your “/LaunchBox/Plugins/” folder Start LaunchBox Select Tools Select RetroAchievements Badge Updater (Internet connection required) Click Start Update and Wait for the Updater to complete. (This may take up to 1 minute.)
How to see the badges:
Start LaunchBox (not necessary if you just completed the Install - steps 1 through 9) Click BADGES Select Plugin Badges 'Check’ Enable Retroachievements
How to add or remove the badge from a game:
Right click the game and select "RetroAchievements Badge"
How to get updates for new games added to RetroAchievements:
In LaunchBox, Select Tools Select RetroAchievements Badge Updater (Internet connection required) If you added or removed RetroAchievement badges for specific games, those games will remain added or removed after running the Updater. To reset the games that have been added/removed, delete the files Added.xml and Removed.xml located in the plugins folder and rerun the Updater.
A word about Platform names:
Some of the Platform names used by RetroAchievements are different than the default names used in LaunchBox. When using the Badge Updater, it will ‘convert’ these to the default names.
Examples: “Mega Drive” gets changed to "Sega Genesis". “SNES” to "Super Nintendo Entertainment System". "Game Boy" to "Nintendo Game Boy".
This plugin will not rename any of your existing Platforms.
When checking for badges, the plugin will check your Platforms Scrape As setting as well as the Platform name.
Example: If you named your Platform "Game Boy" and Scrape As is set to "Nintendo Game Boy", badges will show for that Platform.
Platform names that get changed:
From To
"Mega Drive" "Sega Genesis"
"SNES" "Super Nintendo Entertainment System"
"Game Boy" "Nintendo Game Boy"
"Game Boy Advance" "Nintendo Game Boy Advance"
"Game Boy Color" "Nintendo Game Boy Color"
"NES" "Nintendo Entertainment System"
"32X" "Sega 32X"
"Master System" "Sega Master System"
"PlayStation" "Sony Playstation"
"Game Gear" "Sega Game Gear"
"Virtual Boy" "Nintendo Virtual Boy"
"MSX" "Microsoft MSX"
"SG-1000" "Sega SG-1000"
"Saturn" "Sega Saturn"
"Intellivision" "Mattel Intellivision"
"Vectrex" "GCE Vectrex"
"PC-8000_8800" "NEC PC-8801"
"PC-9800" "NEC PC-9801"
"PC-FX" "NEC PC-FX"
"Dreamcast" "Sega Dreamcast"
"PlayStation Portable" "Sony PSP"
"PC Engine" "NEC TurboGrafx-16"
Changing the default icon:
If you wish to use a different Badge icon, replace “\LaunchBox\Images\Badges\RABadge001.png” with your own image.
Known Issues:
Game titles are taken directly from RetroAchievements and may differ (slightly or a lot) from yours. So if you have a game that is known to have achievements and the badge isn’t showing, follow all steps under How to add or remove the badge from a game:.
Updating via the Tools menu may take up to 1 minute to complete. Though not really an 'issue' perse, but it is a "thing". So plan your updates around refilling your water glass, grabbing a soda or whatever takes you about 60 seconds to do.
Unknown issues:
Let me know when you find them.
Designed for LaunchBox 11.3 and newer. Major contributors to the plugin are: @jayjay
1,129 downloads
- retroachivements
- badges
- (and 1 more)
-
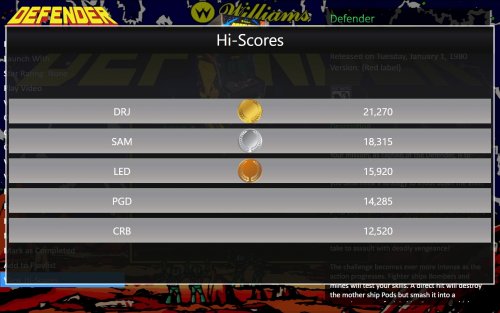
MAME Hi-Score Display - A plugin for BigBox
By JoeViking245 in Third-party Apps and Plugins
MAME Hi-Score Display - A plugin for BigBox
Use this plugin to view a games high scores from BigBox’s Game Menu.
Features
Creates a menu item called “View Hi-Scores” that allows you to display high scores for most games in your Arcade platform directly in BigBox. What's needed
(3) files that are included in the downloaded zip file (the plugin) Version 3.0 - One file that is included in the downloaded zip file (the plugin) 2 lines of text added to the "TextGamesView.xaml" file for your current BigBox Theme MAME configured to save high scores Saved high score files (These are automatically generated by MAME once it’s configured to save them in the "hi" and/or “nvram” subfolders of your MAME emulator) What it won't do
Show high scores for games using emulators other than MAME. Show high scores for games in LaunchBox. MAME is not built to save high scores the same way (or at all) for all arcade machines, so not all games are supported by this plugin Contributors
@jayjay – The one who came up with the idea and did all the hard stuff.
@JoeViking245 – The one who helped with all the easy stuff.
@fromlostdays – The one who made these instructions easier to follow.
A HUGE Special Thanks goes to GreatStone’s utility “hi2txt”. This utility converts MAME’s high score files into a readable format which ultimately makes this plugin possible!!
http://greatstone.free.fr/hi2txt/index.html
Installation and setup instructions:
Step 1: Installing the Plugin
Step 2: Editing your BigBox Theme to add support for the Plugin
Step 3: Making sure MAME is set up to save high scores
Installing the Plugin:
Download the plugin, Mame_Hi_Scores (v5.0.0).7z from the LaunchBox download section (If not using 7zip) After you’ve downloaded the zip file, be sure to unblock it in Windows by right clicking it, selecting Properties, and clicking Unblock Open the zip file and extract/copy the "Hi_Scores" folder into ..\LaunchBox\Plugins i.e. D:\LaunchBox\Plugins\Hi_Scores\Mame_Hi_Scores.dll
Editing Your BigBox Theme to add support for the Plugin:
As of version 5.0.0, this step is no longer required.
If you are updating from a version PRIOR to v5.0.0, you will need to UNDO THE CHANGES made to your TextGamesView.xaml file!!!
(just delete the 2 lines that were added, and save.)
Setting up MAME to save high scores:
Using a recent official MAME release –
If you have an older release of MAME, you may need to do the following steps instead.
Congrats! You’re all setup! Now that you’ve setup the plugin, why not give it a try?
How to use:
Start BigBox Go into the "Arcade" Platform Select a game Near the bottom of the Menu (if the selected game has a high score file saved) you'll see "View Local Hi-Scores" Select "View Local Hi-Scores" to see your high scores for that game! To close the Hi-Scores window (options): (new v5.1.0)
Press the button you have mapped for your controller to Back Press the key you have mapped for your keyboard to Back511 downloads
- mame
- high scores
- (and 2 more)
-
LaunchBox Multi Monitor and BigBox +3rd monitor plugin
By JoeViking245 in Third-party Apps and Plugins
LaunchBox Multi Monitor and BigBox +3rd monitor plugin
This plugin adds support for 2nd (and 3rd) monitors in LaunchBox to display game images while navigating your collections. If you have LaunchBox version 13.1 or newer, Platform, Platform Category or Playlist images will be displayed when making a selection on the left navigation pane.
With BigBox, you already have use of a 2nd display (marquee monitor) for displaying images. For those who have a pinball-cab (or a fancy desktop setup) with 3 displays, this plugin will allow you display an image on the 3rd monitor while navigating BigBox.
Some details:
- The image displayed changes based on the Platform, Platform Category, Playlist or game you are viewing for both BigBox and LaunchBox.
- To view Platform, Platform Category and Playlist images in LaunchBox, LaunchBox version 13.6 is required. BigBox will work with any version.
- When a game is launched, the image(s) will be hidden and then reappear after exiting the game. (default)
- Optionally (new v1.1.0), you can select Keep image(s) visible during gameplay.
The exception is Steam games that are launched via "steam://rungameid/xxxxxx". Their images will not stay visible nor reappear.
- You set the default image type (i.e. Box-Front) to use for all games. Or you can set individual image types to use on a per Platform basis (new v1.1.2).
Q&A:
Why would I want to display an image on a 3rd monitor? Because you can. What image would I put on a 3rd monitor? That's entirely up to you. You can choose from pretty much any image type in your collection. Can it display a video on the 3rd (or 2nd-or-3rd in LB) monitor? No. Can it show a pdf file on the extra monitor? No. Can it display 3D models for boxes? Yes (new v 1.2.0)
Installing:
Download the plugin zip file. Right-click the zip file, select Properties and check Unblock (if present). Click OK.
(With LaunchBox/BigBox not running,) Open the zip file and extract the included folder into your /LaunchBox/Plugins/ folder.
Setting up:
Start LaunchBox.
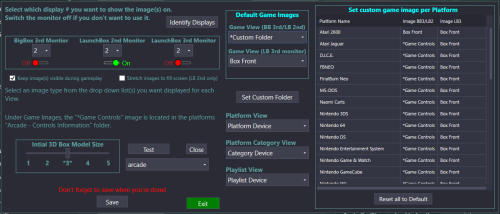
Click Tools, MultiMonitor Setup
Monitor Configuration:
Select which monitor # you want the images displayed on from the pull-down list. Click Identify Displays to confirm which monitor corresponds with which monitor number. Toggle On or Off to see images on the respective monitors. (v1.1.0) If you wish to keep the images up during gameplay, check Keep image(s) visible during gameplay. (v1.1.1) In LaunchBox, if images aren’t displaying correctly on you marquee monitor, check Stretch images to fill screen (LB 2nd only). This only works on LaunchBox 2nd monitor.
Image Selection:
Select the default image type you want displayed based on which View you're in. Default Game Images: BigBox 3rd Monitor and LaunchBox 2nd Monitor use the "Game View (BB 3rd/LB 2nd)" image. LaunchBox 3rd monitor uses the "Game View (LB 3rd monitor)" image. The image selection *Game Controls looks for game-specific images in your "/Images/platform_name/Arcade - Controls Information/" folder. In LaunchBox, if LaunchBox 3rd Monitor is turned off and the Game View 2nd monitor image doesn’t exist, it will attempt to use the Game View 3rd monitor image. In BigBox, if the Game View 2nd monitor image doesn’t exist, it will attempt to the Game View 3rd monitor image. Set custom game image per Platform (new v1.1.2) Pretty self-explanatory. Click Save after you're done making changes.
Custom Folder: (new v 1.2.0)
You can use a Custom Folder to search for game images. This will search for game images in /your_Custom_Folder/game_platform/game.png
Select *Custom Folder as the Default Game Image, then click Set Custom Folder to set your folder.
Image* files can be named the same as:
games' Title**
ROM filename
games' LaunchBox Database Id #
games' Platform***
*Image file names with suffix -xx (i.e. myImage-01.png) are OK (aka. copy/paste from existing LaunchBox Images). However, the plugin will ONLY ever use one of the images if you have multiple. i.e. myImage-01.png and myImage-02.png
**Game images using its Title must have invalid characters replace with _ (underscore). See Invalid Characters below.
Most common is when the Title has a : (colon).
Example: Title = Disney-Pixar's Toy Story 2: Buzz Lightyear to the Rescue!
image = Disney-Pixar_s Toy Story 2_ Buzz Lightyear to the Rescue!.png
***If a game specific image can't be found, the plugin will look for an image named after the games platform in the Custom Folder. NOT inside the platform folder. i.e. /your_Custom_Folder/game_platform.png
Invalid Characters below
Other Notes:
LaunchBox:
Platform/Category/Playlist images will only be displayed if using LaunchBox version 13.6 or newer.
BigBox:
Changes to image selections etc. can only be made in LaunchBox through Tools, MultiMonitor Setup.
General:
If after making changes in MultiMonitor Setup (AND clicking Save) images aren't displaying or there's some other plugin issue, try restarting LaunchBox.
Disclaimer:
This has only been tested on a 2-monitor setup. Neither of which were marquee monitors. So..... Good luck!
As always, comments, suggestions and requests are welcomed and encouraged.
645 downloads
-
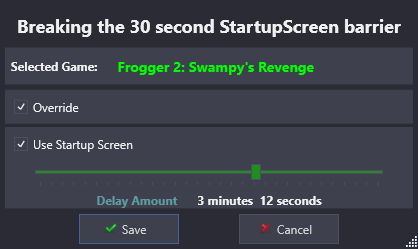
Startup Screen Load Delay: greater than 30 seconds
By JoeViking245 in Third-party Apps and Plugins
Breaking the 30 second Startup Load Delay barrier.
Description:
This plugin allows you to set the Startup Screen load delay time to greater than 30 seconds.
You can set it for a single game, multiple games (in bulk) or per emulator.
Installing:
With LaunchBox not running, download and unblock the zip file.
Copy the contents of the file to /LaunchBox/Plugins/
i.e. D:\LaunchBox\Plugins\StartupScreenTime\StartupScreenTime.dll
Using:
Single game - Right-click a game and select Custom Startup Screen Time
Check Override and Use Startup Screen
Set the Delay Amount to the desired duration.
Click OK to save the changes.
Multiple games - Select multiple games
Right-click and select Custom Startup Screen Time
Check Override and Use Startup Screen
Set the Delay Amount to the desired duration.
Click OK to save the changes.
An emulator - Click Tools and select Emulator Custom StartupScreen Time
Select an emulator
Check Use Startup Screen
Set the Delay Amount to the desired duration.
Click OK to save the changes.
Limitations:
- Max load delay time is 5 minutes (300 seconds)
- This WILL NOT fix issues with games/emulators that use a 'loader' to start a game.
The Startup Screen will still go away after the launched executable exits.
Here's showing a games' load delay time set to 3 minutes and 12 seconds.
112 downloads
- startup screen
- loading screen
- (and 1 more)
-
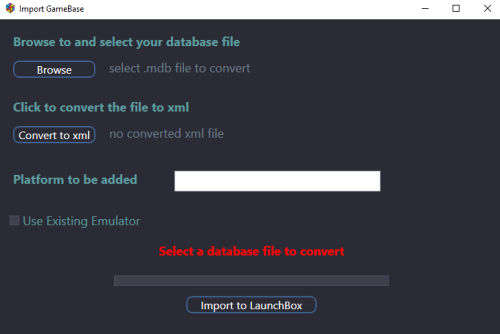
GameBase database Importer
By JoeViking245 in Third-party Apps and Plugins
GameBase database Importer
Import games and metadata from GameBase database file(s) into LaunchBox.
Based on information in your GameBase database file(s), this plugin will:
Create a new Platform Add games to the new Platform Add game “Extras” as Additional Applications Add available information to each game: Metadata Title Release Date Genre Developer Play Mode Max Players Platform Publisher Favorite (check box) Media Game Manual Path Image Game Screenshot Launching Full Application Path to files
If you’re not familiar with GameBase, you can check it out here: https://www.bu22.com Also check out their forums for more complete and updated databases.
Installing the plugin
Download the plugin Unblock “ImportGameBase.zip” by right clicking the file and checking “Unblock” and clicking “OK” Open the zip file and copy the folder (containing 3 files) into /LaunchBox/Plugins/ (For those who braved testing the beta release, delete that copy of the plugin first.)
Using the plugin*
Start LaunchBox Select Tools, Import GameBase Click Browse and navigate to your GameBase database folder and select the database file (i.e. “Amstrad CPC.mdb”) Click Convert to xml (may take a couple seconds) (Optional) rename the Platform to be added (Optional, but recommended) Select an emulator to use with the games being imported** Click Import to LB Once you’ve clicked Import, you’re stuck until it’s done importing! This will 1st import the games and Extras into the Platform then copy Screenshot images (if they exist) When importing, DO NOT attempt to multi-task in LaunchBox!! Just sit back and let it do its thing. Once it’s done, close the plugin window. * If you plan to use an emulator already setup in GameBase, setup the “GBLaunch” emulator in LaunchBox BEFORE running the plugin. (See Using GameBase Emulators below).
Some kind of important stuff:
You need to have your own GameBase database file(s), ROMs, images and manuals. You need to have your databases setup in GameBase BEFORE attempting to import. Namely setting up the Paths to the ROMs, Screenshots and Extras. To make use of the emulators through GameBase, those need to be already setup AND working. You can only import into a new Platform. The Platform will not be setup to “Scrape As...”, so you’ll need to set that yourself for when you use LaunchBox to import images***. If a database you plan to import into LaunchBox doesn’t work in GameBase, it WILL NOT magically work in LaunchBox. No files will be moved, copied (except Screenshots***) or altered in your existing GameBase installation folder(s). All games and Extras imported will point to their current location in your GameBase directory.
**Setting up an emulator
Since GameBase pretty much sets up the emulators for you through exhaustive scripts they’ve created, it makes sense to use those. This is easily done by using GBLauncher.exe (included with GameBase). However to access game ROMs that are located in game “Extras”, you’ll need to have GBLauncher2.exe.
The other option is to setup and use your own emulator in LaunchBox. Example: RetroArch for SuperNESBase.
Using GameBase Emulators
You need to add 2 files to your GameBase root folder. GBLauncher2.exe and GBLaunch.ahk.
Download and unzip GBLauncher2.exe and place it in your GameBase root folder. “Unblock” the file the same way as in step 2 - Installing the plugin. You can download it from here: http://www.gb64.com/forum/viewtopic.php?t=5653. UPDATE Oct. 22, 2023 The file in the above link appears to now be corrupt (bad CRC). An archived version of the file can be found here. Thanks @GreatGuy for the heads up! Copy (or move) GBLaunch.ahk (included with the plugin) into your GameBase root folder. In LaunchBox,
1. Click Tools, Manage, Emulators…
2. Click Add
3. Give it an Emulator Name: Example: GBLaunch (But can be any name you want)
4. In Application Path: Click Browse and navigate to /LaunchBox/ThirdParty/AutoHotkey/ and select AutoHotkey.exe
5. In Default Command-Line Parameters:, type in GBLaunch.ahk
6. Now go to Associated Platforms and select an existing Platform (i.e. Atari 2600). It doesn’t matter which one. But DO NOT check Default Emulator!! You can also just type in a name like “airplane”. It doesn’t matter, as long as something is in there.
7. Click OK to save and exit.
When you run the plugin, check Use Existing Emulator. "GBLaunch" (or whatever you ended up naming it in step #3) will automatically be selected.
Using your own Emulator(s)
These do not necessarily need to be setup in LaunchBox prior to importing.
If using emulators you already have setup in LaunchBox, in the plugin, check Use Existing Emulator and select it from the dropdown list. This will automatically assign the Associated Platform to that emulator and set it as the Default Emulator for this platform.
In either case, you may need to edit the emulator and assign any Default Command-Line Parameters: and in the case of RetroArch, you will need to assign the Core and Extra Command-Line Parameters (if needed).
***GameBase Images
The only game images this plugin will touch are game Screenshots. The available Screenshots will be copied into the Platforms’ "Screenshot - Gameplay" folder.
Any other images (box art, flyers etc.) that a database may have will not be handled by this plugin in any way, shape or form. These other images are stored too inconsistently among the various databases with respect to the folders they reside in.
To add other images from the database into LaunchBox, you’ll need to copy them from the respective database folder to the corresponding LaunchBox/Images folder.
For example, Box – Front images (as LaunchBox sees them) would come from:
Vic20_v03 \Extras\Cover\Cart Box\Front\
Amiga 2.3 \Extras\Cover Scans\[letter or number]\
SuperNESBase \Extras\Boxart - Front\[country]\[letter or number]\
…and copied into /LaunchBox/Images/platform_name/Box – Front/
(It’s recommended you close LaunchBox prior to copying the images)
Disclaimer
I don’t use GameBase myself. I only know how to get the database to Import into LaunchBox. So that part I know works. 😎
If you need any help getting GameBase setup with databases and emulators they use, or setting up your own emulator(s) in LaunchBox for use with the database ROMs, ask somewhere else. These go far beyond the scope of this plugin and my personal knowledgebase.
Only a select few databases have been tested. So I imagine some refinements will need to be made to accommodate other databases. Accommodations considered will be in the form of ROMs that are listed as a games “Extras”. Examples: Extras using “WHDLoad” in Amiga 2.3. And “TAP” and “Cart” in Vic20_v03.
Special Thanks
Huge thanks goes to @dillonm for all your time and patience. Dillon was instrumental in teaching me how GameBase works and without hesitation, took time to do testing, retesting and testing once again. Without Dillon’s guidance, contributions and willingness to help, this plugin would still be sitting in beta collecting dust. Thanks Dillon!!
As always, any and all comments and suggestions are welcomed. All reasonable requests (‘reasonable’ as determined by management) will be considered.
488 downloads
-
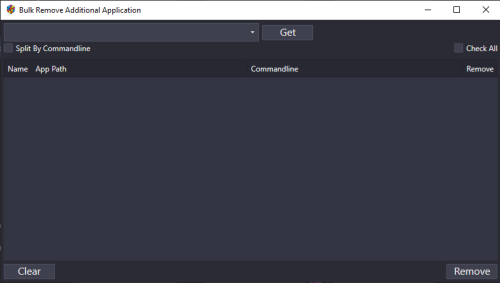
(Bulk) Remove Additional Applications
By JoeViking245 in Third-party Apps and Plugins
(Bulk) Remove Additional Applications
(July 10, 2023)
This plugin is no longer supported. But [for now] still works.
Please see its successor: Bulk Add/Remove Additional Applications
The intent of this plugin is to Remove the same** Additional Application for all games in a given Platform, all at one time.
**Same is determined by the Additional Applications Application Name and Application Path. If they match exactly, they are the ‘same’.
Why use this? Quite possibly because you used the Bulk Add Additional Applications plugin and you clicked “OK” before realizing you forgot to add in the Command-Line Parameters or it's simply not needed anymore.
Setup:
Download and extract "BulkRemoveAdditionalApps.dll" from the zip file and place it in your Plugins subfolder of LaunchBox.
Right click the dll file, select Properties, and click "Unblock" (if it's there) and click OK.
Using the plugin:
- Click Tools and select "Bulk Remove Additional Apps".
- Click the dropdown box and select a Platform.
- Click Get to show the Additional Apps for that Platform.***
- Check the Remove box(s) for the Additional Apps you wish to delete.
- Click Remove to delete/remove all occurrences of those selected Additional Apps.****
*** The plugin will 'combine' any Additional Apps that have the exact same Name AND App Path, and only display one of those. When you remove that "one", all occurrences (having the same Name and Path) will be removed.
***Example: You used the Bulk Add Additional Applications plugin to add an Additional App to 245 different games. You named it “My Run-Before App” and set the Application Path to “D:\MyApps\RunBefore.exe”. This plugin will only display it in the list once, instead of 245 times. (Because they all “have the exact same Name AND App Path”.)
**** Once you click Remove, the apps you had selected will get removed/deleted forever. There is no undoing this once OK is clicked! (unless of course you have your backup file that was created with the LaunchBox built-in Automatic Backup feature.)
325 downloads
-
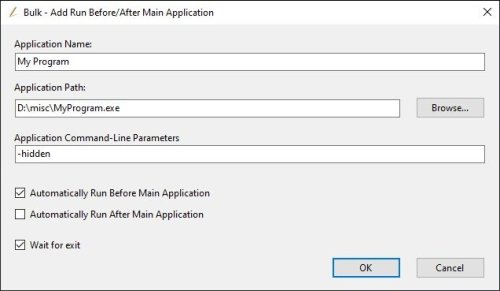
(Bulk) Add Additional Applications
By JoeViking245 in Third-party Apps and Plugins
(Bulk) Add Additional Applications A.K.A. (Bulk) Add Run Before/After Main Application
(July 10, 2023)
This plugin is no longer supported. But [for now] still works.
Please see its successor: Bulk Add/Remove Additional Applications
The intent of this plugin to add the same Additional Application to more than one game, all at one time. More specifically, it is to add an Additional Application you want to run Before and/or After the selected games.
*Works with LaunchBox versions 10.14 and newer.*
Setup:
Download and extract "Bulk Run Before-After.dll" from the zip file and place it in your Plugins subfolder of LaunchBox. Right click the dll file, select Properties, and click "Unblock" (if it's there) and click OK.
Using the plugin:
Select more than one game (or all of them) in your Platform. Right click on one of the selected games and select "Bulk Run Before/After Main Application". Fill in the Application Name, Path to the program, any necessary Command Line Parameters and then check the appropriate box if you want it to run Before or After (or both or none) the Main Application. Click OK You should probably test this on only 2 or 3 games first BEFORE you decide to do your entire Platform. There is no [bulk] undo (See Additional Notes).
Additional Notes:
Once you click "OK", the Additional Application is added to each game you had selected. There is no Bulk Edit or Bulk Remove**Additional Application(s). (at least by me)
It does require that you give it an Application Name and an Application Path.
It will verify that your Application Path points to an existing file but it will not check if there's an existing Additional Application with the same Name.
**If you clicked OK when you should have clicked Cancel, you can remove them with this plugin: (Bulk) Remove Additional Applications
864 downloads
-
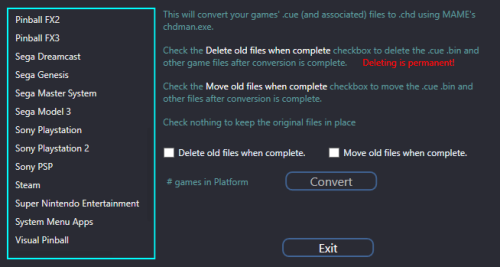
Bulk Convert .cue/.bin (or files other than .bin) to .chd
By JoeViking245 in Third-party Apps and Plugins
Bulk Convert .cue/.bin (or files other than .bin) to .chd
Using MAME’s chdman.exe (“Compressed Hunks of Data (CHD) Manager”, included with MAME), this plugin will convert CD based game files to a single .chd file in your selected Platform. Example:
Before Loom (USA).cue Loom (USA).ccd Loom (USA).img Loom (USA).sub
After Loom (USA).chd
Before Arctic Thunder.cue Arctic Thunder.bin
After Arctic Thunder.chd
If you are looking to convert gdi or iso files (as well as cue) to CHD, see this plugin instead.
Bulk Convert cue/gdi/iso files to CHD - Third-party Apps and Plugins - LaunchBox Community Forums (launchbox-app.com)
Why convert?
You end up with just a single file per game A CHD file is, well… compressed. Resulting in less storage space requirements Arctic Thunder.cue + .bin = 601MB Arctic Thunder.chd = 466MB Spider-Man 2: Enter Electro = 684MB CHD format = 318MB Because we can and it's easy to do
Requirements
This plugin file chdman.exe (included with MAME) Game rom-sets that include a .cue file. (Loom (USA).cue, Arctic Thunder.cue etc.)
What happens after converting?
After successfully creating a CHD Image, the games application path will be changed to the new .chd file.
Also, after the files have been converted you have the option to
Leave the old files in place (default) Move the old files to a separate [backup] folder Delete the old files
Installing the plugin
Download the plugin Unblock “cue2chd (v1.00).zip” by right clicking the file and checking “Unblock” and clicking “OK”. Open the zip file and copy the contents (1 folder containing 1 file) into /LaunchBox/Plugins/ i.e. G:/LaunchBox/Plugins/cue2chd/cue2chd.dll
Using the plugin
Start LaunchBox Select Tools, Convert cue to chd Select a Platform Click Convert (Optional) Check Delete old files when complete This will permanently delete the old files (.cue, .bin, .img etc) after successfully converting them to .chd. Check Move old files when complete This will move the old files (.cue, .bin, .img etc) after successfully converting them to .chd to a folder you specify [for ‘backup’].
If you do not select Delete or Move, all files will remain in their current location along with the newly created .chd file.
If you opt to delete the old files and later want/need to convert the CHD files back to .cue etc., you can use chdman.exe to "reverse the process". The command line is:
chdman.exe extractcd -i “file_name.chd” -o “file_name.cue”
Special thanks to @faeran for coming up with the idea for this plugin and his support and testing.
As always, all comments and suggestions are welcome.
3,314 downloads
-
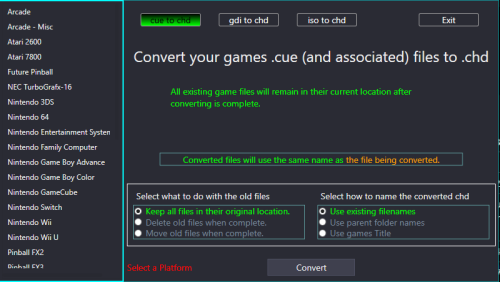
Bulk Convert cue/gdi/iso files to CHD
By JoeViking245 in Third-party Apps and Plugins
Bulk Convert cue, gdi or iso ROMs to chd
This plugin expands the capabilities of the existing Bulk Convert .cue to .chd plugin by adding the options to also convert gdi and iso formats to CHD. (For cue/bin files, the process is the exact same between the 2 plugins.)
Using MAME’s chdman.exe (“Compressed Hunks of Data (CHD) Manager”, included with MAME), this plugin will convert CD based game files to a single .chd file in your selected Platform.
Why convert?
• You end up with just a single file per game
• A CHD file is, well… compressed. Resulting in less storage space requirements
• Most, if not all emulators now support .chd format
• chdman applies lossless compression so there should no noticeable difference in load time.
Requirements
This plugin file chdman.exe (included with MAME) ROM sets that are in a .cue, .gdi or .iso format
What happens after converting?
After successfully creating a CHD Image, the games application path in LaunchBox will be redirected to the new .chd file.
Also, after the files have been converted you have the option to
• Leave the old files in place (default)
• Move the old files to a separate [backup] folder
• Delete the old files
Installing the plugin
1. Download the plugin
2. Unblock “BulkConvert2CHD (v1.00).zip” by right clicking the file and checking “Unblock” and clicking “OK”.
3. Open the zip file and copy the contents (1 folder containing 1 file) into /LaunchBox/Plugins/
../LaunchBox/Plugins/BulkConvert2CHD/BulkConvert2CHD.dll
Using the plugin
1. Start LaunchBox
2. Select Tools, Bulk Convert To CHD
3. Select a Platform
4. Select the file format you’re converting from
5. Click Convert
6. (Optional)
Check Delete old files when complete
This will permanently delete the old files after successfully converting them to .chd.
Check Move old files when complete
This will move the old files after successfully converting them to .chd to the folder you specify.
Troubleshooting:
If you are getting errors while attempting to convert the files, make sure you are using chdman.exe that comes with the latest release of MAME.
If you use multiple versions of MAME in LaunchBox, copy chdman,exe from your latest MAME release folder into the ../LaunchBox/Plugins/BulkConvert2CHD/ folder
Special thanks to @faeran for the idea of the original Bulk Convert cue to chd. Without that, I probably never would have made this.
As always, all comments and suggestions are welcome.
1,787 downloads
-

View MAME High scores in Game Details - A plugin for LaunchBox/BigBox
By JoeViking245 in Third-party Apps and Plugins
View MAME High scores in Game Details - A plugin for LaunchBox/BigBox
Use this plugin to see a games top 3 high scores in the Game Details.
Features
Shows high scores for most games in your Arcade platform in the Game Details. After playing a MAME Arcade game that saves its' high scores [and is supported by the included hi2txt program], this adds a Custom Field called "Hi-Scores" to the game. It will store 1st, 2nd and 3rd place and appear in the Game Details when the game is selected.
What's needed
(3) files that are included in the downloaded zip file (the plugin) One file that is included in the Version 3.0 downloaded zip file MAME configured to save high scores Saved high score files (These are automatically generated by MAME [once configured to save them] in the "hi" and/or “nvram” subfolders of your MAME emulator)
What it won't do
Show high scores for games using emulators other than MAME. MAME does not save high scores for all arcade machines, so not all games are supported by this plugin.
Contributors
@jayjay and @JoeViking245
A HUGE Special Thanks goes to GreatStone’s utility “hi2txt”. This utility converts MAME’s high score files into a readable format which ultimately makes this plugin possible!!
http://greatstone.free.fr/hi2txt/index.html
Installation and setup instructions:
Step 1: Installing the Plugin
Step 2: Making sure MAME is set up to save high scores
Installing the Plugin:
Download the plugin, LB-BB_Hi_Scores_v1.0.zip, from the LaunchBox download section After you’ve downloaded the zip file, be sure to unblock it in Windows by right clicking it, selecting Properties, and clicking Unblock
Open the zip file and extract/copy the "Hi_Scores" folder into ..\LaunchBox\Plugins e.g D:\LaunchBox\Plugins\
If you have previously installed “MAME Hi-Score Display - A plugin for BigBox”, you will only to copy the “HiScoreCustomField.dll” file into that same folder. Otherwise all 3 files are required. (Only one file is required with version 3.0) The 2 plugins will not conflict with each other.
Setting up MAME to save high scores:
Using a recent official MAME release –
By default, plugins are enabled in MAME. You can verify this by looking at the “mame.ini” file located in the root MAME install folder. Open “mame.ini” and scroll down to (or press Control + F and search for) “Scripting Options”. “plugins” should be set to 1. If it’s 0 (zero), change it to 1.
Next, open “plugin.ini” also located in MAME’s root directory and change “hiscore” to 1.
If you have an older release of MAME, you may need to do the following steps.
Go to this website: http://www.mameworld.info/highscore/download.htm and download a copy of the file hiscore.dat that corresponds to your version of MAME. The file (hiscoredat.zip) will need to be unzipped. Place the file hiscore.dat in your MAME/Plugins folder Open up your MAME.ini file in a text editor. In newer versions, this file will be in the same directory as the MAME.exe Press control + F and search for “Scripting Options” Next to the word Plugins, type “1” no quotes Next to the word Plugin, type “hiscore” no quotes It will look like this:
How to use:
Start LaunchBox or BigBox Go into the "Arcade" Platform Select a game, run it, then close it Now select a different game, then go back (poor man’s version to refresh the Game Details) If the game has saved high scores, they will now appear in that game’s Detail pane Depending on the BigBox theme you use, the amount of data shown in the Game Details may be limited. So you might need to go into Options, Game Details and deselect some of the Details.
Be sure that “Custom Fields” is checked.
495 downloads
-
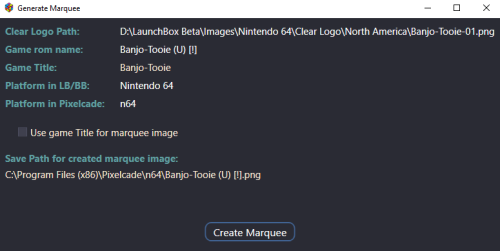
Create marquee images from Clear Logos (for use with Pixelcade™ LED Marquee displays)
By JoeViking245 in Third-party Apps and Plugins
Create marquee images from Clear Logos (for use with Pixelcade™ LED Marquee displays)
Pixelcade already provides numerous marquee images for many Platforms. But you may come across one or more that are missing.
This plugin will create 128x32 marquee-resolution png images using your games existing Clear Logo and place them in your Pixelcade directory**, under the corresponding Platform folder.
What’s needed:
The plugin files Pixelcade software installed (including LEDBlinky) [https://pixelcade.org] ffmpeg.exe (used to convert/create the marquee images) [https://ffmpeg.org] (included) (optional) An actual Pixelcade™ Marquee display
Installing:
Download and unblock the plugin zip file (Right-click the zip file, select Properties and check UnBlock) Copy the contents of the zip file into your ../LaunchBox/Plugins/ folder i.e. D:\LaunchBox\Plugins\PixelcadeMarquees\
Setting up the plugin:
The default install location for Pixelcade is “C:\Program Files (x86)\Pixelcade”**. If you installed it somewhere else, edit “pixSettings.xml” located in the Plugin folder. (Notepad can be used to edit it) Change the path (line #3) to match your install location. Save and close.
<?xml version="1.0" encoding="utf-8"?> <settings> <pixCadePath>C:\Program Files (x86)\Pixelcade</pixCadePath> </settings>
**Note:
If your Pixelcade installation is located under “C:\Program Files (x86)”, you will need to have Access Permission to be able to save the images there. The plugin will check for permissions when launched. If it doesn’t have the proper permission, images will be saved to the "Completed" subfolder.
i.e. D:\LaunchBox\Plugins\PixelcadeMarquees\Completed\
You will then need to copy them manually when done. The images will be saved to their own Platform subfolder as Pixelcade sees them. (Pixelcade Platform naming conversions are taken from "console.csv" located in your Pixelcade directory.) Example: if your Platform is called "Arcade", images will be saved in the folder "mame".
Using the plugin:
Start LaunchBox. Select one or more games. Right Click and select Generate Pixelcade Marquee Image Click Create Marquee
Game Title vs. ROM name:
In most cases LaunchBox passes the games ROM name to LEDBlinky (which in turn passes it to Pixelcade). But for certain games (namely Steam games [and others?]), LaunchBox will pass the games Title. For these, you’ll want to check the box Use game Title for marquee image.
If the games Title contains illegal characters (such as : [semicolon]), the image will not be created.
When selecting multiple games, if you check Use game Title for marquee image and click Create Marquees, if the game Title contains illegal characters, a message will popup indicating that game will be skipped. You can bypass these messages by checking Skip warnings about Titles with invalid characters.
Special thanks to @megashub for coming up with the idea for this plugin and for figuring out how to manipulate and convert the images to make them suitable for Pixelcade™ displays.
As always, questions, comments and suggestions are always welcome.
177 downloads
-

Visual Pinball X VideoSnap Creator
By JoeViking245 in Third-party Apps and Plugins
Visual Pinball X VideoSnap Creator (Playfield Recorder)
Use this plugin to create videosnaps of the Visual Pinball X tables on your PC/Cab.
This will record any VPX table at any orientation and from any monitor.
Why record your own?
There already exists a lot of video snaps of most every Visual Pinball Table. You can even find vertically oriented (portrait) ones for your pincab. The issue is they may not be recordings of the actual version of the table you use. Or you simply can’t find one for a particular Original. Or you just don’t like the one(s) you found.
Features:
This will automatically ‘find’ your table’s playfield view so there’s no need to set up which monitor to look at or set any scale, resolution or aspect ratio. Your VPX default monitor settings will be displayed for your reference. (new v2.0) Record the backglass at the same time as the playfield. (optional) (new v2.0) Record the DMD (3rd screen) at the same time as the playfield. (optional) (new v2.0) Record the tables gameplay sounds along with the playfield video. (optional) (new v2.1) Add the tables Clear Logo to the end of the video. (optional) Included is an AutoHotkey script that the plugin uses to quickly bypass the VPinMAME window when loading a table. (Should reduce loading time by approximately 4 seconds per table) (This also works well if added to your Running AutoHotkey Script tab for your VPX emulator ) Record durations can be set between 5 seconds and 3 minutes. If your playfield is in portrait mode, the saved output video can be rotated for proper viewing. (Options are 0º (default), 90º, 180º, -90º) You can set the video to record at 60 FPS (Depreciated v2.1) All video will be recorded at 30 FPS Videos are automatically saved to the default folder (/Plugins/VPXVideoCreator/CreatedVideos/) or you can change it to be placed directly into your /LaunchBox/Videos/Visual Pinball/ folder. Installing:
Download and unblock the zip file. (right click the file, select properties and check the Unblock check box and click OK) Copy the VPXVideoCreator folder (from inside the zip) into your /LaunchBox/Plugins/ folder. If updating to 2.0, overwrite the existing file. Quick Start:
Start LaunchBox (always a good place to start) Right click one of the tables in your Visual Pinball platform and select Create VPX video. Set how long you want your final recording to be. Click Capture Video. The default save location is in the plugins’ subfolder, “CreatedVideos”.
Setting up to record audio: (new v2.0) (optional)
You will need to register “audio_sniffer-x64.dll”** (included with the plugin) with Windows. Basically what this does is makes all your audio output accessible in one place. Think of it as a Frontend for all your audio output devices. This “frontend” will be labeled “virtual-audio-capturer”.
2 ways to register/unregister audio_sniffer are:
The easy way: Run the included batch file (located in the plugins AudioSniffer subfolder). You need to run this as administrator. The batch file can also be used to unregister it. Follow the prompts.
Old school: Open the command prompt [as administrator] in the “AudioSniffer” subfolder.
To Register: type in then press enter:
regsvr32 audio_sniffer-x64.dll.1 To Unregister: type in then press enter:
regsvr32 /u audio_sniffer-x64.dll.1 **NOTE: The file is named "audio_sniffer-x64.dll.1" (with a “.1” at the end). Otherwise LaunchBox will try to load it as a plugin, which will cause errors. Source code for audio_sniffer can be found here: https://github.com/rdp/virtual-audio-capture-grabber-device
Using the plugin:
Set Delay:
This is the delay time between clicking Capture Video and the video actually starting to record. Set to bypass (in the recording) the VPX editor loading the table. Default is 12 seconds. Options are from 5 to 30 seconds.
Record Duration:
Set to how long you want your video snaps to be. Default is 30 seconds. Options are from 5 to 180 seconds (3 minutes).
Video Rotation:
If you play on a rotated monitor (or TV), you will want to set this to the direction your monitor/TV is rotated. Default is 0º. Options are 0º, 90º, 180º and -90º.
Include Audio: (new v2.0)
Check this box to include the tables playfield sounds with the recording (needs to be configured).
Record Backglass: (new v2.0)
Check this box to record the Backglass at the same time as recording the Playfield. This will be saved to a separate file that is saved in the “/VPXVideoCreator/CreatedVideos/Backglass/” folder.
The backglass is typically on a 2nd monitor, but (if setup) will get recorded separately no matter which monitor it’s on (single or otherwise). The file will be saved as [the-games_Title]_BG.mp4
Record DMD: (new v2.0)
Check this box to record the Dot Matrix Display (DMD) at the same time as recording the Playfield. This will be saved to a separate file that is saved in the “/VPXVideoCreator/CreatedVideos/Backglass/” folder alongside the backglass video.
The DMD is typically on a 3nd monitor, but (if setup) will get recorded separately no matter which monitor it’s on (single or otherwise). The file will be saved as [the-games_Title]_DMD.mp4
Add Clear Logo to the end of the video: (new v2.1)
Check this box to add the tables Clear Logo (if one exists) to the end of the video. The logo will fade in as the video fades out during the last 2 seconds of the recording. This feature is automatically disabled if no Clear Logo for that table exists.
60 FPS Option removed (v2.1)
Experimental. Check this box to record at 60 frames per second. Default is 30 FPS (un-checked). Depending on your video card (and probably some other factors too), this may or may not even be worthwhile.
Change Save Location:
The default save location is in /LaunchBox/Plugins/VPXVideoCreator/CreatedVideos/. The video filename will be saved as the ‘games’ Title in LaunchBox with .mp4 file extension. You can save them anywhere you want.
Reset to Default:
This will reset the Save Location, Delay, Duration and Rotation to their default values.
Save Settings:
This will save the Save Location, Delay, Duration and Rotation values you set and will load these next time you run the plugin.
Save settings before video capture
This is checked by default and will save any changes made when you click Capture Video and before launching VPX.
Capture Video:
This will launch the table you selected to open the plugin with. At the same time, the AutoHotkey script “vpxBypassPinMAME.ahk” will start. This runs in the background and waits for the VPinMAME popup window to appear and then ‘hits the spacebar’ to make it go away (sooner). The script will exit after it see the popup, or 15 seconds. Whichever comes first.
After the amount of Delay time has passed, recording will begin and will continue for the set Duration. When done, VPX closes and the video gets converted.
The video is saved to “_tempVideo.mkv” (in the CreatedVideos subfolder) and then gets converted to an mp4 file. After conversion, _tempVideo.mkv will be deleted.
Keep temp video when done:
By default, “_tempVideo.mkv” will be deleted after the video has been converted. If you want to see what the video looks like before converting, check this box. After your video is complete, go to the CreatedVideos folder to view it. Note: this file gets overwritten each time you click Create Video if you have the checkbox checked.
View Saved Video
Click this to view the converted video. This is the video file shown in Saved Video Location.
VPX Playfield
This shows the default playfield monitor settings you have setup for your Visual Pinball installation. These get read from your Registry settings:
HKEY_CURRENT_USER\SOFTWARE\Visual Pinball\VP10\Player\Display
The Monitor # listed may not be the same as what your Windows Display Settings says. So if it’s “wrong”, ignore it. The Image Scale (W and H) shown will be correct.
If the VPX display settings cannot be retrieved from the registry, monitor #1’s information will be displayed with an asterisk (*) after the monitor number. (Monitor #: 1*)
Some notes:
When you click Capture Video, probably don’t click anything else until recording is complete. However once the table is loaded, feel free to drop in a coin, hit start and play until ‘your time is up’. Just don’t click on another window.
Backglass and DMD recordings only work with B2S Backglass Server (which is what most of them are). PinUPPlayer windows are not supported.
Designed for LaunchBox v11.3 and higher.
Special Thanks!
Special thanks to gtxjoe’s PBX Recorder on VPForums and Carny_Priest’s post on GameEx Forum for paving the way to figuring out an excellent approach to creating your own Visual Pinball table videosnaps.
Huge thanks to @sundogak for convincing me (though it didn't take much once I saw it in action) and showing me how to add video fade and attaching Clear Logos to the videos. Also for all the testing done and invaluable insight!
Future releases and enhancements:
If there’s enough interest in this plugin (as in, it’s actually useful and would get used), I will look at adding:
Option to record the table’s audio in with the video. (added v2.0) Ability to select multiple tables for ‘bulk recording’. Record backglass videos??? (added v2.0) Any REASONABLE request.
As always, any and all feedback is welcome!
285 downloads
-
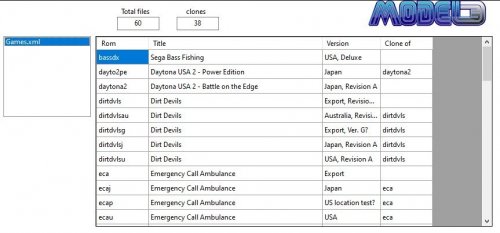
Sega Model 3 Game Importer
By JoeViking245 in Third-party Apps and Plugins
The intent of this plugin is to import MAME's Sega Model 3 roms that are supported in the Supermodel emulator.
Sega Model 3 machines are not playable in MAME, but a MAME full romset does contain the roms for it. This is where Supermodel ["A Sega Model 3 Arcade Emulator"] comes into 'play'. And quite literally. There are currently 60 machines supported, of which 38 are clones.
The plugin uses "Games.xml" to get the rom names, proper Titles and versions for the SM3 machines that Supermodel supports. This file is located inside the "Config" folder of your Supermodel installation.
Required Files:
This downloaded plugin Games.xml Not required for importing, but highly recommended:
All Supermodel files (you know, like supermodel.exe, etc.) A MAME romset containing the necessary SM3 roms Using the plugin:
Download and unblock the zip file. Copy the folder (which includes 1 file) inside the zip into your ../LaunchBox/Plugins folder. i.e. D:\LaunchBox\Plugins\ImportSegaModel3\ImportSegaModel3.dll Start LaunchBox. Select Tools, Import Supermodel Games.xml v1.00
The process from here should be fairly intuitive by just following the steps in the Import Wizard.
Select the folder where Supermodel's Games.xml file is located (if not automatically selected). Select Games.xml. (if not automatically selected) Choose a Platform to import the games into (You can create a new one or use existing). If you choose an existing Platform, the imported games will be set to Emulator selected in the next step and will not affect any of the existing game's emulator. Select your Emulator. (I strongly recommend Supermodel. But you can choose any emu [and change it later]) Filter the clones (Options are to Import: All games individually, clones as additional apps, no clones). Select the roms’ source folder (Only required if you plan to copy them from their current location). Select the roms’ destination folder (This is required to set the Application Path for the games). Select Copy & Import or Import Only.
Downloading Metadata:
If you selected an existing Platform to import the roms into, Right click that Platform and select “Edit”. Make sure the Scrape As: is set to “Arcade” and then click “OK”.
Click on one of the games, then press CTRL+A to select all games. Now click Tools and select Download Metadata and Media and follow the prompts. Be sure to check the box for: Search for game information and media from the LaunchBox Games Database (recommended).
Check or un-check the media images/videos you wish to download. (You can also click "None" and download these at a later time)
Click Yes, download and replace all existing metadata and media. Then click Finish.
This plugin was "designed" to account for subsequent Supermodel updates. After a Supermodel update (which should include an updated Games.xml file), rerunning this plugin "should" account for any new additions, renamed roms and renamed titles/versions. Adding/changing those respectively in your Platform. It won't, however, account for any games that were completely removed. But I really don't think this will be an issue.
If you're having issues getting Supermodel setup and running your games, a quick Goggle search will usually get you what you need. i.e. "LaunchBox Supermodel", "Supermodel <insert game title here>". For general (and some somewhat specific) information/help regarding Supermodel, see here: Installation - Supermodel: A Sega Model 3 Arcade Emulator (supermodel3.com).
List of currently supported games per Games.xml (Aug 31, 2021):
bassdx Sega Bass Fishing (USA, Deluxe) getbassdx Get Bass: Sega Bass Fishing (Japan, Deluxe) getbassur Get Bass: Sega Bass Fishing (Japan, Upright) getbass Get Bass: Sega Bass Fishing (Japan, Standard) daytona2 Daytona USA 2 - Battle on the Edge (Japan, Revision A) dayto2pe Daytona USA 2 - Power Edition (Japan) dirtdvls Dirt Devils (Export, Revision A) dirtdvlsu Dirt Devils (USA, Revision A) dirtdvlsau Dirt Devils (Australia, Revision A) dirtdvlsj Dirt Devils (Japan, Revision A) dirtdvlsg Dirt Devils (Export, Ver. G?) eca Emergency Call Ambulance (Export) ecap Emergency Call Ambulance (US location test?) ecau Emergency Call Ambulance (USA) ecaj Emergency Call Ambulance (Japan) fvipers2 Fighting Vipers 2 (Japan, Revision A) fvipers2o Fighting Vipers 2 (?) harley Harley-Davidson and L.A. Riders (Revision B) harleya Harley-Davidson and L.A. Riders (Revision A) lamachin L.A. Machineguns: Rage of the Machines (Japan) lemans24 Le Mans 24 (Japan, Revision B) lostwsga The Lost World (Japan, Revision A) lostwsgp The Lost World (Location Test) magtruck Magical Truck Adventure (Japan) oceanhun The Ocean Hunter (Japan) scud Scud Race (Export, Twin/DX) scudau Scud Race (Australia, Twin/DX) scuddx Scud Race (Export, Deluxe) scudplus Scud Race Plus (Export, Twin/DX, Revision A) scudplusa Scud Race Plus (Export, Twin/DX) skichamp Ski Champ (Japan) spikeofe Spikeout Final Edition (Export) spikeout Spikeout (Export, Revision C) srally2 Sega Rally 2 (Export) srally2p Sega Rally 2 (Prototype) srally2pa Sega Rally 2 (Prototype Version A) srally2dx Sega Rally 2 (Export, Deluxe) swtrilgy Star Wars Trilogy Arcade (Export, Revision A) swtrilgya Star Wars Trilogy Arcade (Export) swtrilgyp Star Wars Trilogy Arcade (Location Test, 16.09.98) vf3 Virtua Fighter 3 (Revision D) vf3a Virtua Fighter 3 (Revision A) vf3c Virtua Fighter 3 (Revision C) vf3tb Virtua Fighter 3 Team Battle (?) von2 Virtual On 2: Oratorio Tangram (Revision B) von254g Virtual On 2: Oratorio Tangram (Ver 5.4g) von2a Virtual On 2: Oratorio Tangram (Revision A) von2o Virtual On 2: Oratorio Tangram (?) vs2 Virtua Striker 2 (Step 2.0) vs215 Virtua Striker 2 (Step 1.5) vs215o Virtua Striker 2 (Step 1.5, older) vs298 Virtua Striker 2 '98 (Step 2.0) vs29815 Virtua Striker 2 '98 (Step 1.5) vs2v991 Virtua Striker 2 '99.1 (Revision B) vs299 Virtua Striker 2 '99 (?) vs29915 Virtua Striker 2 '99 (Step 1.5) vs299a Virtua Striker 2 '99 (Revision A) vs299b Virtua Striker 2 '99 (Revision B) As always, I'm open to any and all comments and suggestions regarding this plugin you may have.
250 downloads
- supermodel
- sega model 3
- (and 1 more)
(0 reviews)0 comments
Updated
-
Reset Play Count to zero - Plugin
By JoeViking245 in Third-party Apps and Plugins
Edit:
This is now a builtin LaunchBox feature as of release 10.7-beta-1.
Resets a games Play Count to 0 (zero).
Place the "ResetPlayCount.dll" file into your ..\LaunchBox\Plugins\ folder.
*edit* Right click ResetPlayCount.dll, select Properties and click "Unblock".
Start LaunchBox.
Select just one, multiple or all (Ctrl+A) games. Right-click and then click on "Reset Play Count" located at (or near) the bottom of the popup menu.
There is no "Please Confirm" nor "Play Counts have been reset to 0 (zero)" message boxes. It just does it as soon as you click it. (V1.0)
*edit* Version 1.1 adds a confirmation message box.
ResetPlayCount.dll - 6KB
98 downloads
(2 reviews)0 comments
Updated
-
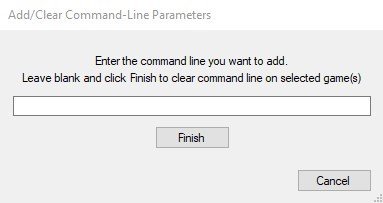
Bulk Custom Command-Line Editor - plugin
By JoeViking245 in Third-party Apps and Plugins
Bulk Custom Command-Line Editor
Use this to set (or clear) the Custom Command-Line Parameter for the selected games.
The would be the same as selecting a game, click Edit, go to the Emulation tab and check "Use Custom Command-Line Parameters:" and entering in a command line. But for multiple games all at once.
This will not change anything for the Emulator itself (i.e. Edit Emulator). This is only for the selected games' Custom Command-Line.
Setting up:
1) Copy "BulkEditCommandLine.dll" into your LaunchBox\Plugin folder.
2) Navigate to the folder, right click the dll file, click Properties then click Unblock.Using:
3) Start LaunchBox
4) Select a game (or games), right click and choose "Bulk Command Line Editor"
- Type in the command line and click "Finish" (or hit Enter)
- To clear the Command-Line for the selected game(s), leave blank and click "Finish"
- To exit without making changes, click "Cancel"
406 downloads
- plug-ins
- command-line parameters
- (and 1 more)


