
.png.d63b88dc3d5c6db8803dfbd996ce65fc.png)
JoeViking245
-
Posts
5,300 -
Joined
-
Last visited
-
Days Won
38
Content Type
Profiles
Forums
Articles
Downloads
Gallery
Blogs
Everything posted by JoeViking245
-
 I did just try several different approaches via code to be able to delete existing files, to no avail. Even tried: import an image, close plugin, refresh images [F5] (thought being LB would cache the [new] image(s) then "let go"), edit game and attempt to delete the new image. Hmmm... but didn't ty to delete the one "being replace". Anyway, I think you're on to something... Deleting existing images ain't gonna happen with the plugin. That should be easy enough. I'll add it to the list. Thank you!
 -
Thanks! No problems are the kind of problems I like to hear about. 😎 For Steam games that are launched via "steam://rungameid/xxxxxx", it will find an "exact match". All others are 'matched' via Game Title. To be honest, I never really looked at SteamGridDB until just last week and didn't realize they covered more than just Steam games. So subsequently added in the Title search as a backup to included non-Steam games. 😊 I had thought about doing this. By the time I got frustrated trying to figure out the 'best place' to default Grids and Heroes to, I gave up. 😄 Clear Logos are pretty straight forward as to where they need go. I will add this to the to-do list. I thought about his too. The plan was to, when you're in the View Existing Images Gallery, add a right-click option to delete the image. The problem is, sometimes (a lot of the times? Occasionally? Rarely?) the file will be [temporarily] locked by LaunchBox. And can't be deleted. It's not a bug thing. It's just-a-thing. Granted, me showing it in the Gallery probably locks it also and would need to work a way to release the image then maybe delete it. Maybe. Aside from that potential issue, if I were to say, add a checkbox to 'Replace Existing Image with Downloaded Image'... if that image-type [box-front or whatever] being replaced has more than one image of that type [for that game] existing, what-do-you do? A pop-up asking [and showing] which one do you want to replace might incur the above issue and may be more of pain to work around than I care to deal with. That said, I do still have 'this thought' in my notes and may look into it further. No promises.
-
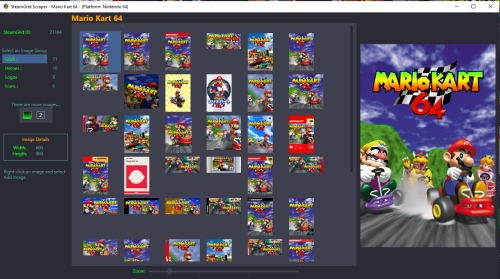
SteamGridDB Scraper View File Preview and import images from SteamGrid Database directly into your LaunchBox collection. A personalized SteamGridDB API Key is required. (See below about getting yours) Downloaded images are saved to the default LaunchBox image folder(s). Installing Download and extract the contents of the download to your /LaunchBox/Plugins/ folder. i.e. D:/LaunchBox/Plugins/SteamGrid Scraper/SteamGridScraper.dll First Time Run Select a game, right-click it and select SteamGrid Scraper. The "API key Required" window will open. Paste (or manually type in) your personal SteamGrid API key. Click Save Using Select a game, right-click it and select SteamGrid Scraper. In cases where an exact match for the game Tite is not found, a window will popup listing 'close matches'. Double-click a game from the list to select it. Click on the SteamGrid image group you'd like to view. Options are: Grids Heroes Logos Icons Up to 50 images will show in the Gallery. If the selected group has more than 50 available, click "2" to see then next 50. Use the Zoom slider to increase/decrease the image sizes in the Gallery. Double-click on an image to see a larger view. (Opens in a separate window). The Icons group is pretty much useless in LaunchBox. But since they're available, they're included. Saving an image To add an image to your game, right-click the image in the gallery switch from Image Preview to Add Image and select Add Image. Select the Image Type (folder) you want to save it as from the dropdown box. (It doesn't change automatically for you.) Only a few select image types are shown by default. To see all image folders (types), check the box See All available image types. (Optional) To view your existing images for the game, click View Existing Images Gallery. (Opens in a separate window) This shows only the images for the selected image type. (Optional) Click Open Image Folder to open Windows Explorer to the folder where your existing images are and where the image will be saved to. Click Save Add Image to save the image. Getting your SteamGridDB API Key Log into your SteamGridDB account. Go to your Profile - Preferences - API Click 'Generate API key' As always, all comments and suggestions are welcome. 😎 Submitter JoeViking245 Submitted 08/18/2024 Category Third-party Apps and Plugins
-
Version 1.3.0
1,603 downloads
Preview and import images from SteamGrid Database directly into your LaunchBox collection. A personalized SteamGridDB API Key is required. (See below about getting yours) Downloaded images are saved to the default LaunchBox image folder(s). Installing Download and extract the contents of the download to your /LaunchBox/Plugins/ folder. i.e. D:/LaunchBox/Plugins/SteamGrid Scraper/SteamGridScraper.dll First Time Run Select a game, right-click it and select SteamGrid Scraper. The "API key Required" window will open. Paste (or manually type in) your personal SteamGrid API key. Click Save Using Select a game, right-click it and select SteamGrid Scraper. In cases where an exact match for the game Tite is not found, a window will popup listing 'close matches'. Double-click a game from the list to select it. Click on the SteamGrid image group you'd like to view. Options are: Grids Heroes Logos Icons Up to 50 images will show in the Gallery. If the selected group has more than 50 available, click "2" to see then next 50. Use the Zoom slider to increase/decrease the image sizes in the Gallery. Double-click on an image to see a larger view. (Opens in a separate window). The Icons group is pretty much useless in LaunchBox. But since they're available, they're included. Saving an image To add an image to your game, right-click the image in the gallery switch from Image Preview to Add Image and select Add Image. Select the Image Type (folder) you want to save it as from the dropdown box. (It doesn't change automatically for you.) Only a few select image types are shown by default. To see all image folders (types), check the box See All available image types. (Optional) To view your existing images for the game, click View Existing Images Gallery. (Opens in a separate window) This shows only the images for the selected image type. (Optional) Click Open Image Folder to open Windows Explorer to the folder where your existing images are and where the image will be saved to. Click Save Add Image to save the image. Getting your SteamGridDB API Key Log into your SteamGridDB account. Go to your Profile - Preferences - API Click 'Generate API key' As always, all comments and suggestions are welcome. 😎 -
.thumb.png.c9faf450e4d2b690a819048b18173f61.png) I could, but don't think it would do much good. Your best bet would be to post a Feature Request. (Top of this page, Help & Support - Request a Feature) Once requested, and enough people express interest (vote on it), then 'the powers to be' will think about it. If they feel it's a worthwhile venture (cost, time, public interest, and probably a bunch of other Admin-type stuff), then they might put it to a public poll. IF it gets enough votes, then they might think about it more. But even then, there are NO guarantees it would get added. But 'someone' needs to get ball rolling by 1st submitting a feature request. That said, if you can live without the "curvature crt scanline shader" thingy (lol. Shows how much I know about it), the plugin seems to work just as well. As if it were built in. You might say it is pseudo 'integrated' (as in, once installed and setup, it starts and works within LaunchBox). Just not "built in". Semantics.
I could, but don't think it would do much good. Your best bet would be to post a Feature Request. (Top of this page, Help & Support - Request a Feature) Once requested, and enough people express interest (vote on it), then 'the powers to be' will think about it. If they feel it's a worthwhile venture (cost, time, public interest, and probably a bunch of other Admin-type stuff), then they might put it to a public poll. IF it gets enough votes, then they might think about it more. But even then, there are NO guarantees it would get added. But 'someone' needs to get ball rolling by 1st submitting a feature request. That said, if you can live without the "curvature crt scanline shader" thingy (lol. Shows how much I know about it), the plugin seems to work just as well. As if it were built in. You might say it is pseudo 'integrated' (as in, once installed and setup, it starts and works within LaunchBox). Just not "built in". Semantics. -
Thanks! Glad you like it! For future reference, you question would be better suited on the BezelLauncher support page. If the " curvature crt scanline shader" is the one I'm thinking of, it's not possible with the BezelLauncher plugin. To get those to work would take a lot of fenagling and possibly third-party resources. The scanline that's provided with the plugin is a tiny 4x4 png file that is multiplied to fill the viewable area. I don't think putting in a full-sized image with curvatures will work. You might be able to find bezels that have the TV bezel (curvature part) built in.
-
Don't put trailing slashes on the paths and don't "quote" "each" "path". Only "quote the whole thing". rompath "e:\MAME\MAME 0.268 ROMs (split);e:\MAME\MAME 0.268 CHDs (merged)"
-
Running that command from the Windows Command Prompt from within the folder that contains mame.exe should create mame.ini. Then when you close the Command Prompt window and are back in Windows Explorer, the file should be right 'next' to mame.exe. If you don't have file extensions showing, the file type you're looking for is Configuration settings.

-
Along with your gamate game ROMs, do you have the gamate.zip system ROM? Same with V-Smile. You also need the vsmile.zip system Rom. Tomy Tutor needs the system ROM tutor.zip.
-
close additional apps automatically launchbox
JoeViking245 replied to Vikingo1097's topic in Features
In LaunchBox, Edit the emulator in question (in your example, "Yuzu"). Tools - Manage - Emulators - select Yuzu and click Edit. Click on the Running Script section. Add in there: $Esc:: { WinClose, ahk_exe nameOfTheLosslessScalingProgram.exe WinClose, ahk_exe {{{StartupEXE}}} } Change "nameOfTheLosslessScalingProgram.exe" to the actual name of the executable you want to close.- 1 reply
-
- 1
-

-
Ya, like Neil says something's screwy with the command-line parameters. Should have been (with using the emulator installer plugin) -b -C Dolphin.Interface.ConfirmStop=False -C Dolphin.Display.Fullscreen=True -e Go into editing your Dolphin emulator and click Reinstall. See if that changes anything. My last-ditch effort process would be... Tools - Manage - Emulators Select Dolphin Click Delete ("are your sure"... Yes) Click Close Go to Windows Explorer and navigate to /LaunchBox/Emulators/ and delete the Dolphin folder Tools - Manage - Emulators Click Add For the Emulator Name, click the down arrow (far right) and select Dolphin from the pull-down menu Click Download "OK" "Close" Tools - Manage - Emulators Beyond that, no idea. Unless someone else knows what's going on, may have to wait until tomorrow when the developers are back online.
-
Exiting Keyboard2Xinput Not Working On RetroArch
JoeViking245 replied to an0thernumber's topic in Troubleshooting
The Exit Script section for exiting from the Pause Menu. Only. You can try overriding the escape sequence by adding to the Running Script: (below your Run... line) $Esc:: { Send, {NumPadMult} WinClose, ahk_exe {{{StartupEXE}}} } -
Exiting Keyboard2Xinput Not Working On RetroArch
JoeViking245 replied to an0thernumber's topic in Troubleshooting
If you enter LaunchBox's Pause Menu and select Exit Game, does it work then? -
MAME Games Don't Launch In Launchbox But Work Fine In Mame
JoeViking245 replied to an0thernumber's topic in Troubleshooting
Since you set your ROM paths in MAME, try removing from the command-line parameters -rompath %romlocation% -
To verify, when you go to Tools - Manage - Plugins and select Dolphin, does it say it's on version 1.2? When you go to Tools - Manage - Emulators, do you have more than one 'Dolphin' emulator? What version of Dolphin does it say you have? (give it a couple seconds to do its version checks) Actually, this is probably when you see the popup errors. Close the message window(s). Select your Dolphin emulator and click edit. What does it show for the "Current Version"? Can you click Update? Click Update and let it do its thing. The current version should show as above. If it doesn't, click OK, then click Close to close Manage Emulators. Re-open Manage Emulators. Do the message window(s) still appear? Does it show Dolphins' version as 2407-68?
-
For issues related to your license please reach out to support@unbrokensoftware.com.
-
Getting Visual Pinball to Load in Launchbox - B2S Issue
JoeViking245 replied to Todd Wiseman's topic in Noobs
That error looks to be you're trying to load a table with a wrong version of the exe. i.e. a vpx table with a vpt (V9.0) version of the exe (Vpinball.exe). But you indicate in LaunchBox, the app path is pointing to the same exe that you can load a table from in stand-alone Visual Pinball via File - Open, Run. So not sure what's going on. Hopefully someone else can chime in with more insight. -
Getting Visual Pinball to Load in Launchbox - B2S Issue
JoeViking245 replied to Todd Wiseman's topic in Noobs
Do other tables with a backglass work properly when launched from LaunchBox? Just not 24? When in Window's File Explorer, if you double-click 24.vpx, does it run properly [with the backglass]? (vs. opening VPX and then opening the table) In LaunchBox, when you edit your Visual Pinball X emulator (VPX), do you have the command-line parameters -minimized -exit -play ? Is the Application Path pointing to the x64 version of VPX? (assuming you may have the x86 and the x64 version of the exe) -
Custom Badges
JoeViking245 replied to jayjay's topic in Third-Party Applications and Plugins (Development and Beta Testing)
That video was made many LaunchBox versions ago. You might be able to see that in "Old Default". Not sure if there's a Tools - Options menu item where that can be changed. You'd have to look. -
Custom Badges
JoeViking245 replied to jayjay's topic in Third-Party Applications and Plugins (Development and Beta Testing)
Glad it was an easy fix. I don't know if you can edit the theme to have them show bigger. That'd be the only way (if even possible). Would probably be easier to use a different image. Generally, the less 'detailed' the image is, the better it appears. Less colors etc. And honestly, probably don't waste time attempting to make the one you have 'less detailed'. Just look for a different one. -
Custom Badges
JoeViking245 replied to jayjay's topic in Third-Party Applications and Plugins (Development and Beta Testing)
Make sure the image file (Map.png) you use is good to use as a badge. Not sure what the criteria is, but to test you could take one of the existing (known good) badge images, copy and rename to 'Map.png'. (Re-)Start LB. Now see if 'that' image appears on a game that has a map. You may need to regenerate the dll using the new test image as I believe the image gets embedded into the dll, then extracted to the images folder when the plugin is ran. The Additional App one looks like it should work. The Custom Field one, as you describe and show above, won't. You say the Name and Value are "Map", but the plugin (screenshot) is looking for "Maps" (with an "s"). -
Sounds like what you want is a Custom Badge.
-
If you go into Tools - Manage - Plugins, does it show that the Dolphin plugin has an update? If so, update it (LaunchBox may need to restart) then try having LB install the emulator.
-
Thanks! 😁 Never used that one before. Might be good for the start of a new topic.
-
Tools - Manage - Emulators - Add Give it a unique name Point the Application Path to same as your other one is (mame.exe) Check those afore mentioned 2 boxes Switch to the Associate Platforms section and add Advanced Pico BEENA and check "default" Click OK to save.
.thumb.png.c9faf450e4d2b690a819048b18173f61.png)


