Third-party Apps and Plugins
259 files
-
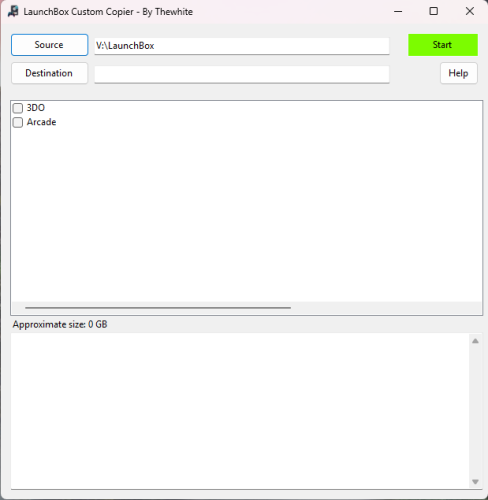
LaunchBox Custom Copier
By thewhite
Hi,
I created a small Windows tool that allows you to build a customized copy of your LaunchBox setup by selecting only the platforms you want to keep.
The goal is simple: reduce size, organize your collection, and create portable LaunchBox builds (for external drives, backups, or dedicated setups).
How it works:
Select your LaunchBox folder (source)
Choose a destination folder
Pick the platforms you want
The tool calculates the total size (games + media)
Start the copy process
What gets copied:
Games
Images
Videos
Manuals
Music
Only the selected platforms are included. Everything is reorganized automatically into a clean structure. The games are copied to the Launchbox\Games\Platform. The configuration files are modified with the new path. Optimized for emulator games with a single file or with .cue and m3u files. For other types of games (Windows and others), which contain multiple files, you will need to copy them manually.
Game handling:
Supports single-file formats (ISO, CHD, RVZ, etc.)
Supports M3U playlists (multi-disc games)
Supports CUE files and their referenced tracks
Automatically includes all required files
Avoids duplicates during size calculation
Additional features:
Estimating size before copying
Automatic update of ApplicationPath in platform XML files
Preserves all other LaunchBox data and configuration
Does not modify the original LaunchBox installation
The result is a fully independent LaunchBox setup containing only what you selected.
This tool is especially useful if you want a smaller, optimized LaunchBox build for emulation setups or storage-limited environments.
There is no progress bar, but the 2nd window indicates the folder being copied.
15 downloads
(0 reviews)0 comments
Submitted
-
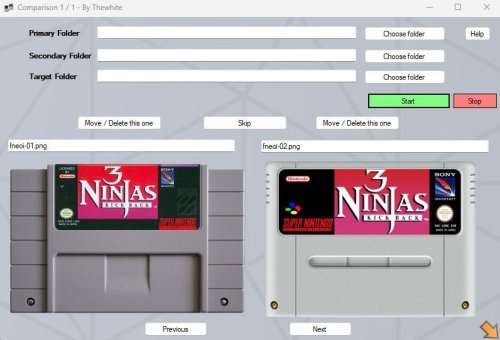
Image Comparison Tool – Easily Detect and Handle Duplicate Images
By thewhite
Hi,
LaunchBox often downloads multiple images for the same category (e.g., multiple front covers for a single game). However, not all images are equal — sometimes you want to keep the higher quality version, or prefer the American cover over the European one.
My tool helps you quickly compare and clean up duplicate images by relying on filenames to group related images (like multiple covers for the same game). Instead of going through the LaunchBox interface, selecting a game, navigating to the images tab, and manually sorting through them, this tool shows image pairs side by side so you can instantly decide which one to keep or remove.
⚡ This will save you countless minutes when cleaning up large collections.
🔧 Features:
Compare images from two folders based on filename similarity (e.g., Zoop-01.jpg vs Zoop-02.jpg)
Detect and display duplicates within the same folder
Preview matching images side-by-side
Move or delete images with one click
Optional: Move unselected images to a target folder while recreating the original folder structure
Automatically sends deleted files to the Recycle Bin if no target folder is set
🚀 How to Use:
Select Primary Folder and Secondary Folder — These are your two image collections (e.g., cart and fan art cart).
(Optional) Choose a Target Folder — This is where non-selected (duplicate) images will be moved. If left empty, files will be sent to the Recycle Bin.
Click Start to begin the comparison.
If matches are found:
Images are shown side-by-side.
Use Move/Delete buttons to act on one of the files.
Use Skip to move to the next pair.
After inter-folder comparison, the tool will automatically check for duplicates within Primary Folder, then within Secondary Folder.
🗂️ If a file is moved to the target folder, the tool preserves its original structure.
Example:
If the file is located at V:\Launchbox\images\snes\Cart\Zoop-01.png, and the target folder is V:\Duplicates, the moved file will be placed at:
V:\Duplicates\Cart\Zoop-01.png
150 downloads
-

script LaunchBox XML Cleaner (great for MAME merged roms) (keep entries for games that you have)
By Light Sock
Latest version and support here : https://github.com/gravelfreeman/launchbox-xml-cleaner
---
This script cleans a LaunchBox platform XML so it only keeps entries for games that actually exist in a local roms folder.
It is especially useful when a MAME platform XML was created from `MAME Arcade Full Set...` import but your local ROM folder only contains part of that set, and you want the XML reduced to the games you actually have while still preserving additional applications (clones) from merged romsets.
LaunchBox's Scan For Removed MAME Roms... feature removes clone entries from merged sets because those clone files are stored inside the parent rom.zip.
Although it was designed around this MAME workflow, it can also be used with other LaunchBox platform XML files.
What It Does
The cleaner scans the current ROM folder and compares it against the provided LaunchBox XML.
It keeps a game when a local ROM exists for that game, including:
- the main Game and ApplicationPath
- any linked AdditionalApplication entries for the same GameID
After the main game pass, it removes orphaned metadata entries that no longer belong to a kept game:
AdditionalApplication GameControllerSupport AlternateName How to Use
Paste a <Platform>.xml file in it's corresponding roms folder Paste _LB_XML_Cleaner.ps1 and _LB_XML_Drop.cmd files in the roms folder Drag and drop the Platform.xml file onto the _LB_XML_Drop.cmd launcher Command line
If you prefer using command line, run the PowerShell script directly and point it to the XML file and ROM folder you want to validate.
powershell.exe -NoProfile -ExecutionPolicy Bypass -File ".\_LB_XML_Cleaner.ps1" "C:\Path\Platform.xml" -RomsPath "C:\Path\Roms" powershell.exe -NoProfile -ExecutionPolicy Bypass -File ".\_LB_XML_Cleaner.ps1" -XmlPath "C:\Path\Platform.xml" -RomsPath "C:\Path\Roms" powershell.exe -NoProfile -ExecutionPolicy Bypass -File ".\_LB_XML_Cleaner.ps1" -PreviewOnly -XmlPath "C:\Path\Platform.xml" -RomsPath "C:\Path\Roms" powershell.exe -NoProfile -ExecutionPolicy Bypass -File ".\_LB_XML_Cleaner.ps1" -OutputPath "C:\Path\Cleaned.xml" -XmlPath "C:\Path\Platform.xml" -RomsPath "C:\Path\Roms" powershell.exe -NoProfile -ExecutionPolicy Bypass -File ".\_LB_XML_Cleaner.ps1" -InPlace -XmlPath "C:\Path\Platform.xml" -RomsPath "C:\Path\Roms"
Flags
-XmlPath : LaunchBox XML file to clean. Can also be passed as the first positional argument. -RomsPath : Folder containing the ROMs or CHDs to scan. -PreviewOnly : Run the cleanup without writing any file. -OutputPath : Write to a specific output path instead of replacing the source XML. -InPlace : Replace the source XML directly. If -OutputPath is not provided, the default behavior already performs a safe backup-and-replace workflow. -RomExtensions : File extensions treated as ROMs. Default: .zip, .7z, .chd. The script never modifies or deletes files or folders.
It only reads the folder content and writes a new XML based on local roms.
6 downloads
(0 reviews)0 comments
Updated
-
videos Launchbox Video Recovery - Audit, Find and Fix
By -McFly-
LaunchBox Video Recovery v1.0
Recover missing playlist and platform videos
LaunchBox Video Recovery scans your video library and helps you recover missing platform or playlist videos by finding likely matches elsewhere in your LaunchBox video collection.
The script can then optionally create symbolic links to the best matches, restoring videos without duplicating files.
This is especially useful for large LaunchBox libraries where videos may already exist but are stored under a different platform or theme folder.
What This Script Does
LaunchBox Video Recovery can:
• Scan LaunchBox Playlist XML files for missing videos
• Scan LaunchBox Platform XML files for missing videos
• Search your video library for possible matches
• Score candidate videos based on similarity
• Let you choose the correct match
• Create symbolic links to restore missing videos
The script helps recover missing videos without copying or duplicating large files.
Why This Exists
Large LaunchBox video libraries can become fragmented over time.
Common causes include:
• Media packs installed for the wrong platform
• Theme videos stored in different platform folders
• Moving media between drives
• Playlists referencing videos that no longer exist
• Duplicate or renamed videos
Instead of manually searching thousands of files, this script finds and links likely matches automatically.
Features
• Recover Playlist videos
• Recover Platform videos
• Dry-run mode (test without making changes)
• Interactive selection of candidates
• Candidate scoring system to identify best matches
• Automatic symlink creation for recovered videos
• Report generation for all actions
Match Score Explanation
When the script finds possible replacement videos, it displays them with a '[ match score ]':
Missing: Aquarium Collection 0. [1170] H:\LaunchBox\Videos\Final Burn Neo\Theme\Aquarium.mp4 1. [960] H:\LaunchBox\Videos\MAME\Aquarium Gameplay.mp4 2. [820] H:\LaunchBox\Videos\Arcade\Aquarium Trailer.mp4 3. [610] H:\LaunchBox\Videos\Arcade\Aquarium Intro.mp4 The number in brackets is the match score calculated by the script. Higher scores mean the script believes the video is a closer match.
Score Guide
Score Range Meaning 1000+ Very strong match 700–1000 Likely correct 400–700 Possible match Below 400 Weak guess Example:
Missing: Aquarium Collection Candidate: Aquarium.mp4 The script sees: • "Aquarium" → strong match
• "Collection" → missing word (small penalty)
Result: high score
How Matching Works
The script evaluates candidate videos using several factors:
• Exact word matches
• Partial word matches
• Filename similarity
• Platform folder relevance
• Penalties for extra or missing words
This helps identify videos that are likely correct even when stored in another platform folder.
Requirements
• Windows
• PowerShell
• Administrator privileges (required for symlink creation)
LaunchBox does not need to be running while the script runs.
How to Run
Place the script anywhere and run it with PowerShell from inside that location:
powershell -ExecutionPolicy Bypass -File .\LaunchBox-Video-Recovery-v1.0.ps1 The script will guide you through: Selecting Playlist or Platform recovery
Choosing dry-run mode (shows what will be changed without changing anything yet)
Setting report output folder
Selecting video search roots
Example Workflow
Example scenario:
A playlist references a missing video:
H:\LaunchBox\Videos\Playlists\Aquarium Collection.mp4 But the actual video exists here: H:\LaunchBox\Videos\Final Burn Neo\Theme\Aquarium.mp4 The script detects the match and can create: H:\LaunchBox\Videos\Playlists\Aquarium Collection.mp4 → symlink to H:\LaunchBox\Videos\Final Burn Neo\Theme\Aquarium.mp4 LaunchBox will then play the video normally. Typical Output
Example:
Playlist XML files checked : 718 Missing destination videos : 365 Missing: Aquarium Collection 0. [1170] H:\LaunchBox\Videos\Final Burn Neo\Theme\Aquarium.mp4 1. [960] H:\LaunchBox\Videos\MAME\Aquarium Gameplay.mp4 2. [820] H:\LaunchBox\Videos\Arcade\Aquarium Trailer.mp4 You can then select the correct match. Safety
The script is designed to be non-destructive.
It:
• Does not delete videos
• Does not overwrite existing videos
• Only creates symbolic links to existing files
Dry-run mode lets you preview all changes before anything is created.
Recommended Usage
This script is most useful for:
• Very large video libraries
• Recovering missing playlist videos
• Fixing broken media references
• Consolidating video libraries across platforms
Feedback
If you encounter issues or have suggestions, feel free to post feedback.
16 downloads
(0 reviews)0 comments
Updated
-
BezelLauncher
By JoeViking245
What is it?
Use this plugin to display bezels for emulators that don't natively support them.
What does it do?
It displays a bezel and resizes the emulator window to fit within the bezels transparent area.
What's required to make this plugin work?
LaunchBox v13.3 (or newer), the plugin file, bezel images and some minor setup. No more. No less. (See Setting up)
Do I need to provide my own bezel images?
Yes. (See Setting up for where to place them)
Will it work with game specific bezels?
Yes.
Will this work with all emulators?
Yes, with exception. RetroArch and MAME emulators will not show in the list of emulators and cannot be used with this plugin.
The emulators that have been tested so far all work. Some adjustments may be necessary. (see Emulator Settings)
Will this work with storefront games or Windows games?
No.
Can I use my existing RocketLauncher bezel configuration files?You can use the existing platform.png and platform.ini files from RL. These existing files should be located under:
/RocketLauncher/Media/Bezels/platform_name/_default/something.ini (and something.png)
(See Setting up [step #3])
What are the .ini files for?
The .ini (configuration) files tell the plugin how to resize and move the emulator window to fit within the bezel. (See .ini (configuration) Files for more info and Testing for creating and saving them)
Can this plugin add shaders as well?
No. Yes. See Using Shaders (new v2.1.0)
Disclaimer
This works on my test PC. I didn’t test it on my cab because I didn’t want to change my emulator settings to not use fullscreen (see Emulator Settings). Outside of RetroArch and MAME, I don’t use bezels, so didn’t want to mess-up-a-good-thing.
There are no guarantees, express or implied… blah blah blah blah blah blah blah.
There is no risk. This plugin makes no changes to LaunchBox or your emulators. If you decide this isn’t for you, simply undo any fullscreen changes you made and (with LB/BB not running) delete the BezelLauncher folder.
Special Thanks
Special thanks to @MadK9 for the idea, direction and help with testing! Without him, I would have never contemplated starting this project. Also a big thanks to @Sbaby for testing un-tested emulators with the plugin.
Installing
With LaunchBox/BigBox not running...
Download the plugin .zip file "Unblock" the file Right-click the file, select Properties, check the box "Unblock", click OK. Or better yet, just use 7-zip to open the file Copy the contents (a folder called "BezelLauncher") into your \LaunchBox\Plugins\ folder Start LaunchBox
Setting up
Start BezelLauncher Setup from the LaunchBox Tools menu, then click Close This will create the \Plugins\BezelLauncher\Bezels\platform_name\ subfolders Copy your bezel images into their respective platform_name subfolders See Bezel Images for more information (optional) If you have existing RL platform_name.ini files, copy those alongside the image files See .ini (configuration) Files for more information Restart BezelLauncher Setup Select a platform Choose an emulator you wish to use for that platform. Check Disabled to enable it Click Test Adjust (Move/resize) the orange frame to fit within the view area of the bezel (See Testing) Click Shaders to enable, adjust and change shader (see Using Shaders) (new v2.1.0) Click Save [to save the .ini file] Click Save on the main setup screen to add the emulator to the list of Enabled platform emulators Repeat for other platforms and emulators you wish to add You must click "Save" for each emulator you've enabled, separately.
Maintenance
After adding/removing platforms or emulators
Run BezelLauncher Setup Click Refresh Continue with Setting up, step #5
Testing
To configure the placement of the emulator window within the bezel (Requires an existing bezel image):
Run BezelLauncher Setup Select a platform and an emulator Enable it (if it's not already) Click Test
Move and resize the frame
Click [and hold] the left or right side of the frame to move it around Click [and hold] the bottom right corner to resize Use the on-screen buttons to fine-tune the adjustments The on-screen display will show information about the emulator window.
(You can click and drag the OSD to move it around as needed)
x, y = upper left monitor-coordinates of the emulator window w, h = width and height of the emulator window x, y = lower right monitor-coordinates of the emulator window
If any of the values are red, they are off the screen The OUTSIDE edge of the frame is the emulator window extents After adjusting, click Save. This will overwrite any existing configuration file.
Using Shaders (new v2.1.0)
First you need some shaders. Place the .png images in the /Bezels/Shaders/ folder (Scanline.png 'shader' is included) Start BezelLauncher Setup Select your platform and emulator and click Test Click Shaders Check the box to turn shader on Use the slider to adjust the shader Adjust the opacity down to lighten the shader Use the drop-down box to select a different shader Click Save to save your settings
Parameters
Depending on the emulator and the bezel, you may need to check 1 or more of the following parameters:
(h) hideStuff
Check this if you see the desktop behind bezel while the game is loading. This adds a black background during the startup process.
(s) startupSleeper
“Hide stuff” for a little longer during startup (3 seconds)
(l) longerSleep
Same as above (4 seconds)
(g) hideGameStartup
Check this if LB Game Startup screen is showing behind the bezel at game startup
When selecting a platform, if the plugin detects an emulator that has been tested, “suggested” parameters will be shown. Your mileage may vary.
Emulator Settings
For the plugin to move/resize the emulators’ window, you will need to disable fullscreen in the emulator(s). This may be as easy as removing "-f" or "-fullscreen" from the Default Command-line Parameters (depending on the emulator).
Beyond that, of the emulators I've tested, the only one that needs to have its Default Command-line Parameters altered is SuperModel. You will need to manually set the resolution.
Start BezelLauncher Setup Select your Super Model 3 platform and Enable it Click Test and after adjusting the frame to where you want it, make note of the W(idth) and H(eight) #'s shown in the OSD. Save and Close. (Be sure to click Save on the main Setup screen to save Enabled as well.) Edit your SuperModel emulator (in LaunchBox) and set the Default Command-line Parameters to "-res=W,H" (no quotes, no spaces and replacing W & H with the #'s noted above) Example: -res=1420,1076
Bezel Images
When you run BezelLauncher Setup for the 1st time, the plugin creates subfolders for each of your eligible platforms. They are created in:
\LaunchBox\Plugins\BezelLauncher\Bezels\[platform_name]\
The platform image file needs to be in the [platform_name] folder and must be named the exact same as the platform.
\BezelLauncher\Bezels\Sony PSP\Sony PSP.png
Game-specific bezel files
Game-specific bezel folders (or files) can be named after the games ROM filename or the games Title.
Using the games Title:
If the Title has 'invalid file name characters', those characters will need to be replaced with _ (underscore). The exact same way LaunchBox does with its image files (but without the -01 suffix).
Example: Title = Disney-Pixar's Toy Story 2: Buzz Lightyear to the Rescue!
Bezel = Disney-Pixar_s Toy Story 2_ Buzz Lightyear to the Rescue!.png
NOTE: Additional Apps game Titles are (i.e.) "Play USA Version...". So the bezel would be "Play USA Version....png". Same rules apply with 'invalid file name characters'.
Invalid characters are:
< (less than) > (greater than) : (colon) " (double quote) / (forward slash) \ (backslash) | (vertical bar or pipe) ? (question mark) * (asterisk) ' (single quote) Not technically invalid (post-DOS), but consistent with LaunchBox character replacement
Storing game-specific bezels:
Option 1:
Place your game bezel images directly inside their respective \[platform_name]\ folder. Game-specific image files must be named the exact same as the games ROM file or the games Title (accounting for invalid characters).
example:
\BezelLauncher\Bezels\Sony PSP\After Burner - Black Falcon (USA) (En,Fr,Es,It,Nl) (PSP) (PSN).png
Option 2:
Place your game-specific bezel image folders under the \[platform_name]\ folder. The subfolder must be named the exact same as the games ROM file or Title (barring invalid characters). The .png and .ini files in the subfolder can be any filename. example:
\BezelLauncher\Bezels\Sony PSP\After Burner - Black Falcon (USA) (En,Fr,Es,It,Nl) (PSP) (PSN)\thisIsAnyFileName.png See Launching different game versions for information about bezel requirements for games that are combined as Additional Apps.
ScummVM
Setting up ScummVM for use with this plugin:
In LaunchBox, Edit games using ScummVM. In the ScummVM section, have both checkboxes un-checked. (Fullscreen and Aspect Correction). This cannot be done using the Bulk Edit Wizard, so will need to be done on a per-game basis. One-at-a-time.
If it's not displaying correctly with just the above, try the (optional) following:
Navigate to /LaunchBox/Third Party/SummVM/ and start ScummVM.exe. On the Graphics tab, set Graphics Mode to opengl. Leave the other 2 as default and the check box's un-checked. Click OK and Exit. ScummVM Bezel Files:
To use bezels with games using LB's integrated ScummVM, you will need to set them up manually. It will not appear in BezelLauncher Setup.
Navigate to the plugins Bezels subfolder and add your platform folder. i.e. \LaunchBox\Plugins\BezelLauncher\Bezels\ScummVM\ Add your platform default png and ini files to this folder. i.e. ScummVM.png ScummVM.ini Game specific bezels for ScummVM must be named the same as the Game Data Folder.
i.e. D:\LaunchBox\Games\ScummVM\King's Quest 1 - Quest for the Crown\[game files]
use: "King's Quest 1 - Quest for the Crown.png"
DOSBox
The integrated version of DOSBox is NOT supported by this plugin. I couldn’t get it to cooperate 100% of the time. So going with plan “B”.
To use DOSBox with this plugin, you will need to install and set up DOSBox-X.
Setting up DOSBox for use with this plugin:
Note: BezelLauncher Setup will NOT show your DOSBox platform ('MS-DOS') as an available platform. So don't bother looking for it.
Download DOSBox-X
DOSBox-X releases can be found here: https://github.com/joncampbell123/dosbox-x/releases
Download the vsbuild-win64 version. (direct link for the download file) Create a new folder under \LaunchBox\ThirdParty\ and name it DOSBox-X Extract the contents of the downloads "\bin\x64\Release\" folder into the new folder Be sure to unblock the zip file before extracting (unless you’re using 7-Zip) Configuring DOSBox-X
In Windows Explorer, navigate to \LaunchBox\ThirdParty\DOSBox-X\. Make a copy of dosbox-x.conf. Rename the copy to [something like] "BL-dosbox-x.conf" Right-click the new 'BL-dosbox-x.conf' file and select edit (Notepad++ works great for this. But any text editor (Notepad) will work) Look for the following keys and change their Values as shown: (starting on approximately line 78)
fullresolution = 1400x1080
windowresolution = 1400x1080
windowposition = 260,0
output = ttf
showmenu = false
"1400x1080" (2 locations) is the dimension of the transparent area of your bezel. Adjust as necessary.
From your MS-DOS.ini file, use [Right X]-[Left X] for the 1st value (1400) and [Right Y]-[Left Y] for the 2nd (1080)
"260,0" is the upper-left coordinate of the transparent area. Use the Left-X value for the 1st number and Left-Y for the 2nd.
Save the changes and close the editor.
Configure games to use DOSBox-X
The following assumes your MS-DOS platform games are already setup to use the integrated version of DOSBox.
In LaunchBox, select all your DOSBox games and press Ctrl+E to start the Bulk Edit Wizard. (Select 1 game in the MS-DOS platform, then press Ctrl+A to select all) On the 2nd screen select the Field Custom DOSBox Version EXE Path for Value, Browse to and select dosbox-x.exe Click Next, Next Click “Yes, I would like to make more changes” select the Field DOSBox Configuration File for Value, Browse to and select the new file you created (BL-dosbox-x.conf) Click Next. Next (again). Click "No, I would not like to make more changes"
MS-DOS Bezel Files:
This assumes your DOSBox platform is called "MS-DOS".
In the Bezels subfolder under the plugin folder, create a new folder called 'MS-DOS'. In \LaunchBox\Plugins\BezelLauncher\Bezels\MS-DOS\, add your bezel files (MS-DOS.png and MS-DOS.ini). Game specific bezels for DOSBox need to be named the same as the Game Data Folder
i.e. D:\LaunchBox\Games\MS-DOS\Cosmos Cosmic Adventure\COSMO1.EXE
use "Cosmos Cosmic Adventure.png"
.ini (configuration) Files
The .ini files contain the monitors' coordinates for placing the emulator window.
The Upper Left x,y coordinate and the Lower Right x,y coordinate
Example:
Upper Left X Coordinate=240
Upper Left Y Coordinate=100
Lower Right X Coordinate=1680
Lower Right Y Coordinate=1080
The platform ini file must be named the exact same as the platform. If copied from RocketLauncher, you may need to rename it (removing any under_scores).
i.e. \BezelLauncher\Bezels\Sony PSP\Sony PSP.ini
For game-specific ini files, if they are located in a subfolder below /[platform_name]/ (see Bezel Images, Option 2, above), they can have any filename. If they are inside the /[platform_name]/ folder (Option 1), then they must be named the exact same as the games ROM file or Title.
If a game-specific .ini file doesn’t exist, the plugin will use the games platform.ini file.
Launching different game versions
Also known as Additional Apps, when right-clicking a game and selecting Play Version, the Additional App is not required to have its own bezel files. If the Additional App doesn't have its own bezel, the plugin will look for the Default Games' bezel. If neither of those exist, it will use the platforms’ bezel.
This eliminates the need to have a separate set of bezel files for each version of the game. Useful since they most likely all use the same image. This only works for games that are Additional Apps.
Plugin Folder Structure
As always, any thoughts, views, opinions, [constructive] criticism, comments and suggestions are welcome.
1,464 downloads
-
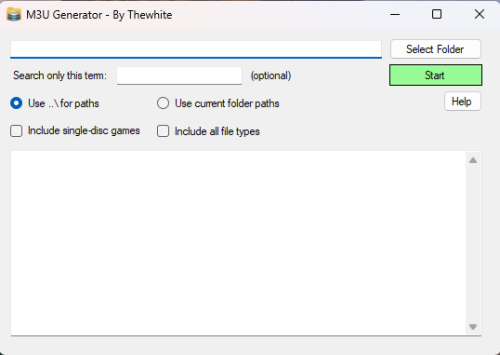
M3U Generator – Automatically Generate .m3u Files for Multi-Disc Games
By thewhite
Hi everyone,
I’d like to share a small utility I created called M3U Generator. It’s designed to automatically generate .m3u files for multi-disc games, commonly used with emulators like RetroArch and others that support playlist-style disc switching.
💡 What it does:
Scans a selected folder for game files (.cue, .iso, .img, .bin).
Groups discs belonging to the same game (based on filenames).
Creates .m3u playlist files in a subfolder named m3u.
Optionally includes single-disc games as well.
📦 Features:
✅ Supports subfolder-style or flat playlist paths (..\\ or current folder).
🔍 Filter results based on a keyword (e.g., "Disc" or "CD") to process only relevant files.
📝 Displays a log of the generated .m3u content directly in the software.
🧠 Automatically names playlists based on the first disc.
🕹 Example use case:
Let’s say you have these files:
Game Title (Disc 1).cue Game Title (Disc 2).cue The software will create:
m3u/Game Title (Disc 1).m3u
With content:
..\Game Title (Disc 1).cue
..\Game Title (Disc 2).cue
📥 How to use it:
Launch the application.
Click "Select Folder" and choose the directory where your ROMs are located.
Optionally enter a filter term like Disc to process only multi-disc games.
Choose path mode (relative or current folder).
Check the "Include single-disc games" option if needed.
Click "Start" – the .m3u files will be generated in a m3u subfolder.
The output will be shown in the result textbox and also saved to 1-m3u_results.txt.
677 downloads
-
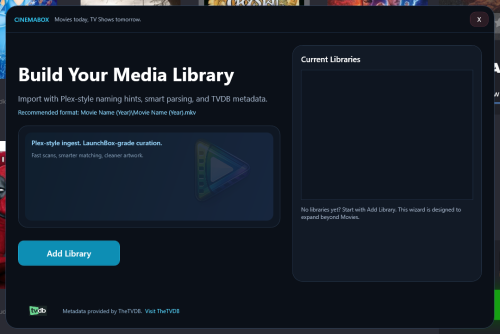
CinemaBox - A Simple Movie Importer Plugin
By faeran
I had a day to spare on the weekend and wanted to try my hand at a LaunchBox plugin. This is the result.
I don't plan to actively develop it too much moving forward, as this was very much a weekend hobby experiment project. Still, it works, and I figured I would share it in case it is useful to someone.
Requirement: LaunchBox 13.26 or higher
What does this do?
It's currently a movie importer plus metadata and artwork scraper. It is designed for people who already have a local movie collection organized for apps like Plex, Jellyfin, or Emby. It imports that folder into LaunchBox with minimal fuss.
It also downloads and configures MPV so movies can launch cleanly as an "emulator", and be used with a controller.
Metadata and artwork provided by TheTVDB.
Installation
Close LaunchBox
Download the 7z archive
Unblock the archive in Windows if needed (Right click > Properties > Unblock)
Extract it into your LaunchBox Plugins folder
Your structure should end up like this:
LaunchBox\Plugins\CinemaBox\CinemaBox.dll
LaunchBox\Plugins\CinemaBox\CinemaBox.deps.json
How to use
Tools > CinemaBox
Runs the import and downloads and configures MPV.
Right click a movie > CinemaBox > Change Match (TVDB)
Rematch the movie and re download metadata and artwork.
Right click a movie > CinemaBox > Media Download (Replace Artwork)
Grab alternate artwork.
A few things to be aware of:
Matching is based on folder and file names. If your naming is messy, results may be messy. If TheTVDB changes their API, this plugin can break. Heavy scraping could potentially hit API rate limits. MPV configuration is basic and meant to “just work”. If something breaks, feel free to post about it. I'll be checking in every now and then, and may be able to fix it.
Uninstall
Close LaunchBox
Delete the folder:
LaunchBox\Plugins\CinemaBox
50 downloads
(0 reviews)0 comments
Submitted
-
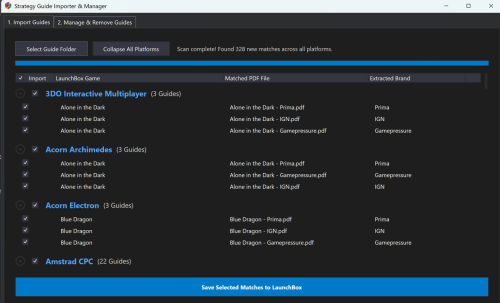
Batch Strategy Guide Importer
Strategy Guide Importer & Manager
A plugin to automatically batch-match and attach PDF strategy guides to your LaunchBox games, complete with a management tab to safely bulk-remove them.
✨ Key Features
Smart Matching: Ignores special characters and perfectly matches your PDFs to your LaunchBox database (e.g., Spider-Man Web of Fire.pdf matches Spider-Man: Web of Fire).
Auto-Brand Extraction: Automatically tags the publisher in LaunchBox if formatted correctly (e.g., names it Strategy Guide (BradyGames)).
Built-in Deduplication: Skips PDFs that are already attached to prevent menu clutter.
Safe Bulk Removal: A dedicated tab to scan for and unlink attached guides. (Note: This only removes the database entry; it never deletes your actual .pdf files).
📥 Installation
Create a folder named Strategy_Guide_Importer inside your LaunchBox\Plugins\ folder.
Drop the plugin .dll file inside.
(Optional) Right-click the .dll, select Properties, and check Unblock if Windows blocked it.
Restart LaunchBox.
📖 How to Use
Open LaunchBox, go to Tools, and select Strategy Guide Importer.
To Import: Use Tab 1 to select your PDF folder, review the matched platforms/games, and click Save.
To Remove: Use Tab 2 to scan your library for currently attached guides, check the ones you want to unlink, and click Remove.
🛠️ File Naming Best Practice
For the best automatic matching and brand extraction, name your PDFs like this: Game Title - Guide Publisher.pdf (Example: Final Fantasy VII - Prima.pdf)
22 downloads
- additional apps
- importer
- (and 1 more)
(1 review)0 comments
Submitted
-
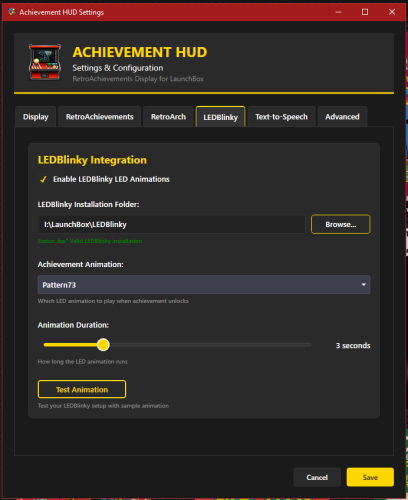
Retro Achievements HUD
By TrailerVert
# AchievementHUD_V6.6.1 Display Plugin
### Core Features
**Live Achievement Tracking**
- Shows all achievements for the current game with unlock status
- Displays achievement icons, descriptions, and point values
- Shows how rare each achievement is (percentage of players who've unlocked it)
- Instant detection when you unlock achievements (<100ms via RetroArch log monitoring)
**Dynamic Achievement Celebrations**
- Full-screen gold celebrations when you unlock achievements
- Text-to-speech announcements (optional, fully configurable)
- LEDBlinky integration for RGB button/joystick animations (optional)
- Audio ducking - game audio drops during announcements so you don't miss anything
**Profile Display**
- Your RetroAchievements profile with avatar, username, and rank
- Total points and "true points" (weighted by difficulty)
- Currently playing status
- Recently played games with completion percentages
**Smart Features**
- Configurable sort modes - sort achievements by popularity, points, or alphabetically
- Auto-scroll - smoothly scrolls through long achievement lists during gameplay
- "Next achievement" suggestion - shows you the most common locked achievement
- Multi-monitor support with DPI awareness
- Home screen when no game is running
---
## Why a Second Monitor?
Checking achievements mid-game means pausing, opening menus, breaking immersion. With a second screen, you always know:
- What you just unlocked
- What achievements are available
- How close you are to completion
- Which achievement to go for next
It's like having the RetroAchievements website open next to you, but live-updated and game-aware.
---
## Technical Highlights
**Instant Detection**
- Monitors RetroArch logs for achievement unlocks in real-time
- No polling delays - detections happen the moment RetroArch records them
- Falls back to API polling for non-RetroArch emulators
**LaunchBox Integration**
- Fully integrated with LaunchBox's game launch/exit lifecycle
- Uses LaunchBox's RetroAchievements configuration (no duplicate setup)
- Pulls game metadata directly from LaunchBox's database
- Supports Clear Logos via LaunchBox's image system (handles MAME ROM name mismatches automatically)
**Customizable Display**
- Choose your target monitor
- Adjust celebration duration
- Configure TTS voice, speed, and volume
- Enable/disable individual features (LEDBlinky, TTS, audio ducking)
- Sort achievements your way
- Auto-scroll for hands-free browsing
---
## Requirements
- LaunchBox (tested with latest versions)
- RetroAchievements account configured in LaunchBox (Tools > Options > RetroAchievements)
- RetroArch for instant achievement detection (optional - API polling works with any emulator)
- .NET 9.0 runtime
- Second monitor recommended (works on single monitor but best experience is dual-screen)
**Optional Integrations:**
- LEDBlinky for RGB lighting effects
- Text-to-Speech (built into Windows)
---
## How It Works
1. **Launch a game** through LaunchBox
2. **Display appears** on your configured second monitor showing:
- Game's Clear Logo or title
- Your achievement progress
- Full achievement list with icons and descriptions
3. **Unlock achievements** - instant celebration on screen
4. **Track your progress** without ever pausing the game
5. **Game exits** - display returns to home screen showing your profile and recent games
---
## Installation
1. Download the plugin
2. Extract to `LaunchBox\Plugins\AchievementHUD\`
3. Restart LaunchBox
4. Configure in Tools > Options > Achievement HUD
5. Set your target monitor and preferences
6. Launch a game and enjoy!
---
## Credits
by: TrailerVert
Built with love for the LaunchBox and RetroAchievements communities.
Special thanks to the LaunchBox plugin API and RetroAchievements for making this possible.
---
**Current Version:** 6.6.1
**Status:** Beta
**License:** Free to use
---
110 downloads
- retroachivements
- retroarch
- (and 1 more)
-
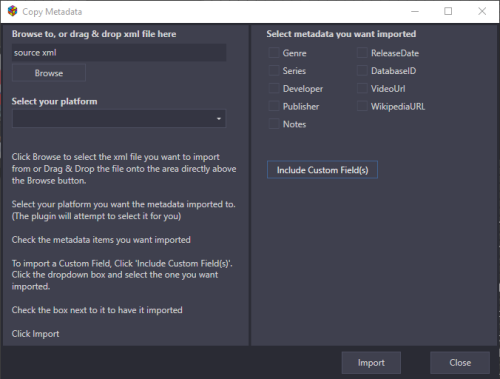
Copy Metadata (plugin): Apply metadata from someone else's XML file to your own.
By JoeViking245
Scenario:
"I have a build where I'm manually changing every game genre to a single genre/subgenre value and would love to share it, but without a tool to apply my metadata to their own it's kinda pointless."
Solution:
Copy Metadata plugin.
Purpose:
Import selected metadata from someone else's platform_name.xml file into one of your existing Platforms.
This will scan a LaunchBox platform_name.xml file and compare it your existing platform. For all matching games*, it will update the metadata you chose to have imported.
(*See Finding Matching Games for how games are matched up.)
Metadata fields to import (can select one or more):
Genre Series Developer Publisher Notes ReleaseDate DatabaseID VideoUrl WikipediaURL PlayTime (new v1.0.1) Imports PlayTime and PlayCount CustomField (up to 3)
Warning:
This will REPLACE any existing metadata for the fields you've selected. There is no un-do button. The exception is Custom Field(s). This will add new Custom Fields. If an existing Custom Field with the same Name as one be imported is found, you have the option to Overwrite your existing Custom Field Add a new Custom Field (creating 2 with the same Name but different Values)
How to:
Requires LaunchBox 13.3 or newer
Download, unblock the zip file, copy the contents of the zip to ..\LaunchBox\Plugins\ i.e. D:\LaunchBox\Plugins\CopyMetadata\CopyMetadata.dll Start LaunchBox Click Tools Select "Copy Metadata" Click Browse to locate and select the xml file you want to import from (optional) Drag & Drop the file onto the TextBlock (directly above the Browse button) Select your platform you want the metadata imported to (The plugin will attempt to 'select' the appropriate one for you) Check the metadata items you want imported To import a Custom Field Click "Include Custom Field(s)" Click the dropdown box and select the one you want imported Check the box next to it to have it imported (optional: you can select up to 2 others to be imported) Click Import
Finding Matching Games:
Every effort is made to properly match games in your existing platform to an external platform_name.xml.
It will first use the games LBDatabaseID # to ensure an exact match. If there are no matching database ID #'s, it will compare the games file_name.ext. If there are still no matches, it will look for a matching game Title.
Concept for this plugin was inspired by @C-Beats who caught me when I was bored and looking for a plugin idea.
348 downloads
-
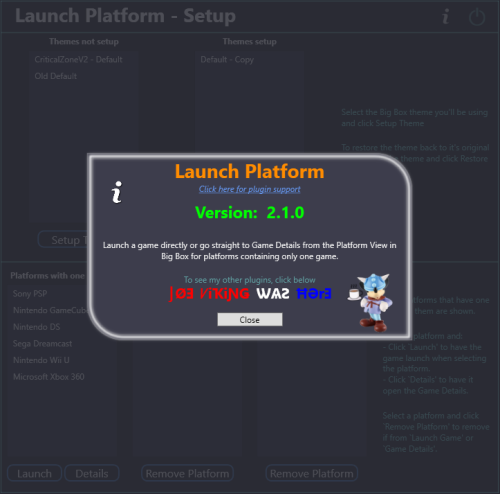
Launch Platforms
By JoeViking245
This is a Big Box plugin that allows you to launch a game/application directly from the Platform Wheel View level. For use with platforms that only have one game/application.
New in v2.0, now works in Hybrid views (if available). Hybrid Views are available in the Default theme in LaunchBox v13.22-beta-1 and newer.
New in v2.1.0, (option) Set platform to go straight to the Game Details View (instead of directly launching the game).
Example Use Case:
You have a platform called "Music Box Alpha" which contains only one "game", the Music Box Alpha application.
To launch it:
Select the platform Select the [only] "game" Select "Play" (or press A on your controller to go to the games Details view). Using this plugin (once you've setup the Theme and added the platform via Launch Platform Setup in the Tools menu), to launch the application or go straight to the Game Details:
Select the platform (That's it)
Installing:
Open the zip file and copy the contents into your ../LaunchBox/Plugins/ folder
e.g. D:\LaunchBox\Plugins\LaunchPlatform\LaunchPlatform.dll
If updating from a previous version, remove any existing .dll files first from the /LaunchPlatform/ subfolder.
Setup:
Click Tools and select Launch Platform Setup
(You may first want to create a backup of the themes' folder you will be using for Big Box. You shouldn't need it, but never a bad idea.)
Note: The Default theme is excluded. To use it, make a copy of the Default folder. e.g. /LaunchBox/Themes/Default - Copy/
In the Themes Not Setup list will be all your Big Box themes. (Excluding Default) Select the one you will be using use then click Setup Theme. This will now be listed in Themes Setup. At any time you can undo the changes made by selecting the setup Theme and click Restore Theme.
Selecting platform(s) to Launch "the game":
Select a Platform in the Platforms with one game List and click Launch . This will move it to the Platforms - Launch Game list.
Selecting platform(s) to go directly to the Game Details View:
Select a Platform in the Platforms with one game List and click Details . This will move it to the Platforms - Game Details list.
Using:
Start Big Box. If you just finished setting it up in LaunchBox, you can press Ctrl+B to switch to Big Box.
Set the theme to the one you setup earlier (if it's not the current theme already).
Scroll through your Platforms wheel until you find a platform you've added and select it.
What's actually happening when you "Setup" a theme: (a behind the scenes look)
@jayjay is the brains behind getting this to work, and I'm the one that threw it all together. So credit goes to where credit is due. (you decide ) If something's not working right, go ahead and post here and it'll get looked at. And possibly even get resolved.
290 downloads
-
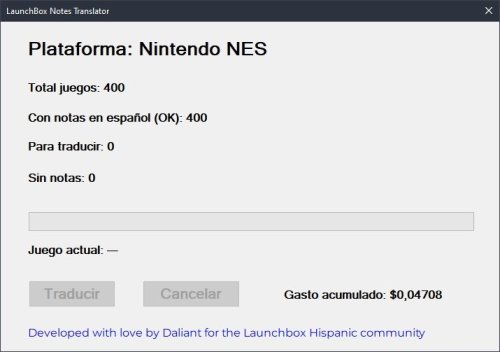
LaunchBox Notes Translator (Spanish)
By Daliant
LaunchBox Notes Translator (Spanish) is a plugin that automatically translates and generates Spanish (Spain) notes for your LaunchBox games using OpenAI.
The plugin works at platform level: by right-clicking on any game, it analyzes the entire platform and detects which games need translation or are missing notes.
Main features:
- Detects games with notes in English or without notes
- Translates existing notes into Spanish
- Generates professional Spanish descriptions for games without notes
- Works per platform (no need to select games manually)
- Progress bar with current game indicator
- Cancel button to stop the process safely
- Tracks estimated OpenAI usage cost locally
- Avoids unnecessary API calls by skipping already-correct notes
- Does not appear in Big Box
Requirements:
- LaunchBox 13.25 or newer
- An OpenAI API key
The OpenAI API key must be placed in a file named "config.txt" inside the plugin folder.
------------------------------------------------------------
LaunchBox Notes Translator (Spanish) es un plugin que traduce y genera automáticamente notas en español (España) para tus juegos de LaunchBox utilizando OpenAI.
El plugin funciona a nivel de plataforma: al hacer clic derecho sobre cualquier juego, analiza toda la plataforma y detecta qué juegos necesitan traducción o no tienen notas.
Características principales:
- Detecta juegos con notas en inglés o sin notas
- Traduce notas existentes al español
- Genera descripciones profesionales en español para juegos sin notas
- Funciona por plataforma (no es necesario seleccionar juegos manualmente)
- Barra de progreso con indicador del juego actual
- Botón de cancelación para detener el proceso de forma segura
- Control local del gasto estimado de uso de OpenAI
- Evita llamadas innecesarias a la API si las notas ya están correctas
- No aparece en Big Box
Requisitos:
- LaunchBox 13.25 o superior
- Una clave de API de OpenAI
La clave de la API de OpenAI debe colocarse en un archivo llamado "config.txt" dentro de la carpeta del plugin.
13 downloads
-
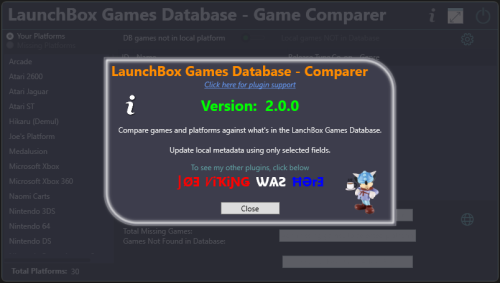
LaunchBox Games Database - Comparer Plus
By JoeViking245
See What You're Missing™
Game/Platform comparer
Compare games in your platforms against what's listed in the LaunchBox Games Database
See which platforms are in the Games Database that are not in your collection
Filter out games by Release Type, Genre and Co-op.
Import placeholders (see Game Placeholders below) into to a new platform, those platforms or games not found.
(optionally, import missing game placeholders into your existing platform)
Output the results to a tab-delimited text file.
Custom Metadata Updater (New v2.0.0)
Update an individual games metadata or do it in bulk.
Select only the fields you want to have updated. All others will be left untouched.
Requires LaunchBox 13.19 or newer
Installing;
Copy the contents of the zip file into your /Plugins/ folder
e.g. D:\LaunchBox\Plugins\LBDBcomparer\LBDBcomparer.dll
Using:
(click or scroll down for using the Custom Metadata Updater)
Game/Platform comparer
In the Tools menu, select LaunchBox Games Database - Game Comparer
Select a platform to compare.
(the list excludes platforms you've imported using Add Missing Games to NEW platform [see below])
This will show games listed in the database for this platform that are not found in the selected platform.
(this searches and compares by database ID)
Click the games ID # to open the LaunchBox Games Database to that game.
Other things:
Toggle Local games NOT in Database
This shows your games that either don't have an associated LaunchBox database ID # or their ID # is not in the database for the selected platform.
Toggle Missing Platforms
This show database platforms not found in your collection.
Search is done by Name Only. Exact match (but Ignore Case).
Does not cross-check the platforms Scrape-As value.
Does not exclude platforms you've imported using Add Missing Games to NEW platform (see below).
Settings: (click the gear icon)
Show only games that match the criteria (boxes that are checked). Filter by Release Type, Genre and/or Co-op.
Click Save and Close to save the selected filters and close the settings window.
Click Reset All, Save and Close to reset all filters to the defaults, save and close the settings window.
Click the Close icon to close the window without saving and changes.
The column headers will be highlighted Orange if any filters are set for that column.
Add/Import options:
Add Missing Games to NEW platform
This will create a new platform named platform_name (M) e.g. Atari 2600 (M)
Add game placeholders of games listed in the datagrid (filtered or otherwise) to the new platform.
Re-running it will essentially recreate the platform based on the items in the datagrid.
Add missing games to selected platform (not recommended)
This will import game placeholders into your existing platform for games listed in the datagrid (filtered or otherwise).
Game Placeholders:
The imported game placeholders will have set their
Title
LBDB-ID
Broken=True
Installed=False
With Installed=False, you can set Arrange By and choose Installed. But you can't Filter by it (nor Broken)
You can also, on the left panel select View Installed [vs. e.g. Platform Categoy] and then select the No option.
This can be helpful if you decide to add them to your existing platform. "Broken" can be used to hide the placeholders.
Output Results to A Text File:
This will output the results to a tab-delimited text file.
The file will be named platform_name (missingGames_count).txt and gets created in /Output/ under this plugins folder.
If it's a platform missing from your collection, the filename will be platform_name (M) (missingGames_count).txt
e.g. D:\LaunchBox\Plugins\LBDBcomparer\Output\Atari 2600 (137).txt
D:\LaunchBox\Plugins\LBDBcomparer\Output\Atari 2600 (M) (137).txt
Click the view file icon to view the created file.
Click the open folder icon to open you Windows Explorer to the /Output/ folder
Notes:
This will not check your games that are Additional Versions (Additional Apps). Additional Versions don't contain a LaunchBox database ID # to compare against. It "the numbers don't add up", check your platform for duplicates.
Custom Metadata Updater
From the LaunchBox main window... Select one or more games. Right-click one of them and select Custom Metadata Updater. If the games' field matches what's in the database, the Database column will show "identical". If they are different, double-click the value in the Database column to update that field in your game. Click the fields name in the left column to see both values in a larger window. (useful for the Notes field) If you selected more than one game, click the arrows to move to the next/previous game. Optionally, you can click Bulk Update, and update only the selected fields for all selected games. (click to go back up to using Game/Platform Comparer)
If a plugin update is available, the Info icon will flash red. Click it to find a link to the downloads page.
289 downloads
- launchbox games database
- missing games
- (and 2 more)
-
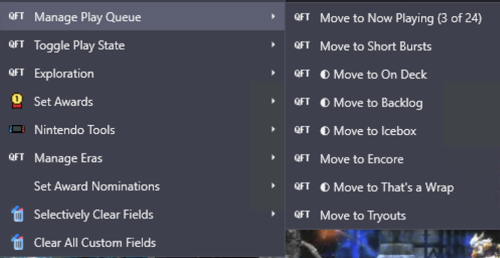
QuickFieldToggle v1.0.0
By idealbrandon
Hey everyone 👋 I built a plugin to solve a problem that's been driving me crazy, and I'm hoping it helps some of you too.
The Problem
I have 31,000 games in LaunchBox across 70+ platforms. I use custom fields heavily—tracking what I'm playing, managing a backlog, tagging award winners, marking first-party releases, organizing by era. It's a metadata system that works really well for discovery and organization.
Except for one thing: actually maintaining it is miserable.
You know the drill:
Right-click → Edit → Custom Fields tab → scroll → find field → change value → OK
That's 6+ clicks per field. Per game. If you're tagging a batch of games, it takes even more steps. When managing a play queue across thousands of titles, the friction compounds fast. I'd put off updating my metadata because it just wasn't worth the hassle.
The Solution: QuickFieldToggle
QuickFieldToggle puts your custom field actions directly in the right-click context menu.
One click. Done.
What It Does
✅ Single-click toggling — Toggle any custom field on/off instantly for a single game or multiple titles at once
✅ Create fields on-the-fly — No pre-setup needed, just define them in your config
✅ Multi-field actions — "Move to Now Playing" sets one field AND clears others
✅ Multi-value picker — For semicolon-separated fields, check/uncheck values from a submenu
✅ Conditional menus — Show "Nintendo Tools" only for Nintendo games
✅ Visual indicators — Checkmarks show current state
✅ Custom icons — Use platform icons or your own
✅ Hot reload — Edit config without restarting LaunchBox
✅ 100% JSON config — No coding required
Example Use Case
• Play Queue — "Move to Now Playing" / "Move to Backlog" / "On Deck" with mutual exclusivity
• Award Tracking — Quick-add awards from your existing values, auto-set "Any Award Won" flag
• Platform-Specific Tools — "First Party" toggle that only shows for Nintendo games
• Era Management — Set console generation, platform era, lifecycle phase
• Discovery Tags — "The Best" and "Discovery Bin" for standout titles
Download
Right here on the Launchbox Forums, or on GitHub: https://github.com/brandontravis/launchbox-quick-field-toggle
The download includes two sample configs:
• sample-simple.json — Basic play queue to get started
• sample-complex.json — My actual working config for 31k games
Installation
1. Download the latest release
2. Copy the QuickFieldToggle folder to your Plugins directory
3. Rename quickfieldtoggle.sample-simple.json to quickfieldtoggle.json
4. Restart LaunchBox
5. Right-click any game
Documentation
The GitHub repo has full documentation:
• Configuration Reference — All options, operators, and settings
• My Library Walkthrough — How I use QFT with 31k games, including my metadata philosophy and real examples
What's Next?
I'd love to hear your feedback. What custom field workflows would you like to automate? Any features you'd like to see?
If you try it out, let me know how it works for you. And if you run into issues, open a GitHub issue or reply here.
Enjoy!
39 downloads
-

Unofficial RetroAchievements 1G1R-Compatible DATs and CUEs/GDIs.
By AzgoRAth
These are 1G1R-compatible (1 Game 1 Rom) DAT files that are used with rom managers such as ClrMamePro and RomVault to scan for RetroAchievements-compatible roms in your collection. There are also CUE and GDI files that are compatible with the DATs. Please feel free to notify me of any errors/problems you encounter and/or suggestions you may have.
I've added the DATs as a repo on GitHub. This will be the main home for the DATs going forward as I can easily update and maintain them from there and other users can do pull requests for any changes/corrections. Also, DATVault is getting the DAT updates from the repo as well. https://github.com/UltraGodAzgorath/Unofficial-RA-DATs.git
I'll still upload the CUEs and DATs here from time to time.
The invite link to my discord is here: https://discord.gg/9DzD2umrKe
1,448 downloads
- datfile
- retroachievements
- (and 2 more)
-
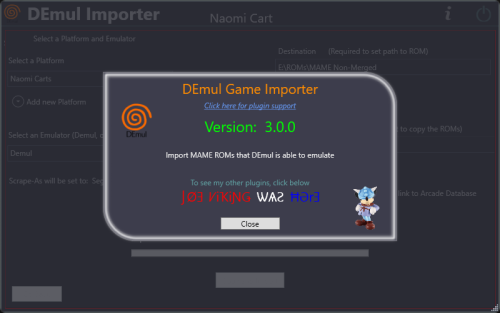
DEmul Games Importer
By JoeViking245
Import games for use with Demul (Sega * Emulator).
Purpose:
This purpose of this plugin is to import only the MAME machines that can be emulated in Demul. A sort of MAME machine ‘filtered’ importer to supplement LaunchBox’s Import Tool.
Why:
LaunchBox can already import these machines (games) for you using the built-in Tools - Import - MAME Arcade Full Set. All you need to do is un-check the skip games unplayable in MAME checkbox. The concern is this results in over 6000 additional entries imported (even more if you uncheck any other boxes and include clones). And as in most cases, more is NOT always better. Alternatively you can also simply drag-and-drop the roms into LaunchBox. Which is great when you already have them sorted out.
Included Systems:
The list of machines included for this plugin was generated by running the command “demule.exe –listroms” using Demul v0.7 (Apr 28, 2018). The systems included are Naomi, Naomi 2, Atomiswave, Hikaru, Gaelco, Cave3rd (CV1000) and System SP. (Sega Dreamcast, though emulated, is not included in the list. [It’s not a MAME machine])
Naomi and Naomi 2 are each broken into 2 separate systems: Cartridge System (rom only) and GDROM (chd).
Requirements:
LaunchBox v13.19 or newer DEmul already set up as an emulator in LaunchBox
What this plugin will do:
Import games for a selected system. Import into an existing Platform or create a new one. When creating a new Platform, assigns “Scrape as” per the associated system. Attempt to automatically detect/select your Demul emulator. (Required to exist as an emulator) (optional) Copy ROMs to a new location for the games you’re importing. What this plugin won’t do:
Add DEmul as a new emulator. Add the required command line to the emulator (**see below). Feature added v3.0 ‘Bulk’ import into separate Platforms. Add metadata and media to the imported games. If copying ROMs (optional), only the games main rom file is copied. It will not look for nor copy any required BIOS, Device or chd files.
Installing the plugin:
After downloading the zip file, extract the contents of the zip into your \LaunchBox\Plugins\ folder.
e.g. D:\LaunchBox\Plugins\DemulImporter\
If updating from a version prior to 3.0, "DemulGames.xml" is no longer needed and can be deleted from the plugins folder.
Using the plugin:
Click Tools and select Demul game Importer
Select a system This will populate a list of all the games for that system. (optional) Check View Parent ROMs Only When checked, only the parents ROMs will be imported When you select a game, a "globe" and the ROMs filename will appear Click the globe to navigate to the Arcade Database for the selected game Click Import Games Select a platform to import the games into You can select an existing platform from the dropdown list or click on Add New Platform to create a new one. Select an emulator The plugin will attempt to automatically select your DEmul emulator. If it isn’t already selected, look for it in the dropdown list. Select the folder where your ROMs are located (or will be if you select Copy) This is required to set each games Application Path (optional) Check Copy ROMs to another location Browse to the folder [Source Folder] where they’re located. (optional) Check Add Additional App with link to Arcade Database (New v3.0) The Additional App will be a hyperlink to the Arcade Database for that game Select Import (or Copy and Import) to complete the process
NOTES:
**Default Command-Line Parameters
System Command Line Parameter Naomi -run=naomi -rom= System SP -run=naomi -rom= Gaelco -run=gaelco -rom= Atomiswave -run=awave -rom= Hikaru -run=hikaru -rom= Cave -run=cave3rd -rom= Medalusion -run=alien -rom= Once import is completed, simply select the newly imported games and click Tools, Download Metadata and Media....
Information on getting these systems to run in Demul can be found here: https://forums.launchbox-app.com/topic/30622-sega-naomi-demul-in-launchbox/
After importing into a newly created platform, be sure to Edit the platform and check "Disable ROM Auto-Import".
Disclaimer:
I personally only have a few of these games on my cab. So I’m not very familiar with the systems mentioned here. Also, I have no idea if DEmul is even “the best” emulator for these systems.
744 downloads
-
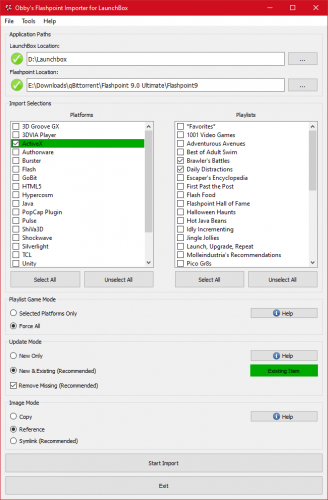
importer Flashpoint Importer for Launchers
By oblivioncth
FIL (Flashpoint Importer for Launchers)
FIL is an importer tool for several launchers/frontends that allows one to add platforms and playlists from BlueMaxima's Flashpoint project to their collection. It is fully automated and only requires the user to provide the paths to their launcher and Flashpoint installs, choose which Platforms/Playlists they wish to import, and select between a few import mode options. Once the import is started the current progress is displayed and any errors that occur are shown to the user, with resolvable errors including a prompt for what the user would like to do. After the process has completed, the specified launcher can be started and the games from Flashpoint can be played like those from any other Platform.
For Platforms, the importer is capable of importing each game/animation along with any additional apps, images, and most of the metadata fields (i.e. Title, Description, etc, see below).
Function
This utility makes use of its sister project CLIFp (Command-line Interface for Flashpoint) to allow launchers to actually start and exit the games correctly. It is automatically deployed into your Flashpoint installation (updated if necessary) at the end of a successful import and the latest version of CLIFp will be included in each release of this utility so it is not generally something the end-user needs to concern themselves with.
Before making any changes to your collection, any datafiles that will be altered are automatically backed up (only one backup is maintained at once so any previous backup will be overwritten) and if any unrecoverable errors occur during the import any partial changes are reverted and the backups are restored; however, it is strongly suggested that you consider making a manual backup of your launcher's configuration to be safe. No responsibility is held for the loss of data due to use of this tool.
FIL can safely be used multiple times on the same collection to update the selected Platforms and Playlists if that have already been imported previously. The method with which to handle existing entries is selected within the program before each import.
The import time will vary, correlated with how many Platforms/Playlists you have selected, but more significantly the image mode you choose, which is expanded on later. Importing the entire collection usually takes 5-10 minutes with the recommended settings but can take longer with a more basic PC. The vast majority of the processing time is due to the plethora of images that have to be copied/symlinked when games processed so the speed of your storage device is the most significant factor. Running the importer for updates should be significantly faster it first checks to see if the source image from the new import source is actually different than your current one before copying/linking it.
You will still be able to use the standard Flashpoint launcher as normal after completing an import.
Compatability
Flashpoint Infinity/Flashpoint Ultimate
This tool works well with either edition of Flashpoint.
General
While testing for 100% compatibility is infeasible given the size of Flashpoint, FIL was designed with full compatibility in mind.
The ":message:" feature of Flashpoint, commonly used to automatically show usage instructions for some games before they are started, is supported. The entries that use it are added as additional-apps to their respective games as they once were when Flashpoint came packaged with LaunchBox. All messages are displayed in a pop-up dialog via CLIFp.
Viewing extras (which are simply a folder) is also supported and the corresponding additional apps that open these folders will be added when importing a platform.
Since Flashpoint originally used LaunchBox as its launcher, most fields within Flashpoint have a one-to-one equivalent (or close enough equivalent) LaunchBox field. That being said there are a few fields that are unique to Flashpoint that do not have matching field and so they are simply excluded during the import, resulting in a relatively minor loss of information for each game in your collection.
Version Matching
Supported Launchers
LaunchBox AttractMode ES-DE Flashpoint
While testing for 100% compatibility is infeasible given the size of Flashpoint, FIL was designed with full compatibility in mind.
The ":message:" feature of Flashpoint, commonly used to automatically show usage instructions for some games before they are started, is supported. The entries that use it are added as additional-apps to their respective games as they once were when Flashpoint came packaged with LaunchBox. All messages are displayed in a pop-up dialog via CLIFp.
Viewing extras (which are simply a folder) is also supported and the corresponding additional apps that open these folders will be added when importing a platform.
Each metadata field (i.e. Title, Author, etc.) is matched to the closest equivalent of a given launcher, or a custom field if there is no near equivalent and the launcher supports them; otherwise, the field will be omitted.
Both Flashpoint Ultimate and Flashpoint Infinity are supported.
Version Matching
Each release of this application targets a specific version series of BlueMaxima's Flashpoint, which are composed of a major and minor version number, and are designed to work with all Flashpoint updates within that series. For example, a FIL release that targets Flashpoint 10.1 is intended to be used with any version of flashpoint that fits the scheme 10.1.x.x, such as 10.1, 10.1.0.3, 10.1.2, etc, but not 10.2.
Using a version of FIL that does not target the version of Flashpoint you wish to use it with is highly discouraged as some features may not work correctly or at all and in some cases the utility may fail to function entirely or even damage the Flashpoint install it is used with.
Please see the project's releases page on GitHub to check which tool version targets which Flashpoint version.
Metadata Fields
Currently the following fields in LaunchBox will be populated for each game, which is limited by what is available within Flashpoint:
Title Series Developer Publisher Platform Sort Title Date Added Date Modified Broken Flag Play Mode Status Notes Source Release Date Version Library Language (as a Custom Field) Usage
Please check the usage section for the tool on its GitHub page. It's easier to keep the instructions up to date when they are in one location.
If you have a bug or feature request I ask that you submit an issue on the GitHub page for this tool, but if you just want to ask a question, discuss the tool in general, or are having issues getting it working for reasons you don't think are due to a bug then please just make a post here. Since sometimes the line between the two can be blurry don't feel afraid to use the wrong system, it isn't a huge deal.
GitHub
FIL: https://github.com/oblivioncth/FIL
CLIFp: https://github.com/oblivioncth/CLIFp
962 downloads
- flash games
- flashpoint
- (and 3 more)
-
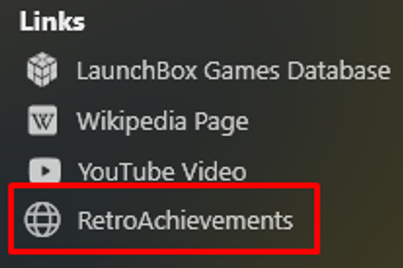
RetroAchievement Game Direct-Links
By JoeViking245
Inspired by @AstroBob's Feature Request https://feedback.launchbox.gg/p/retroachievements-icon-and-link-in-game-details-pane
This plugin will add an Additional Application to your games that will appear as a clickable link in the Game Details panel which directly links to that game on retroachievements.org.
If using @C-Beats Omni theme, this plugin [mostly**] fulfills this request. (**just not innately)
It works in the Default theme as well. Just appears differently in the Game Details panel.
This plugin is able to accomplish this without the need to Add RetroAchievements Game Page ID to LaunchBox Games Database.
Installing:
Extract the contents of the zip file into /LaunchBox/Plugins/
e.g. D:\LaunchBox\Plugins\RetroAchievementLinks\RetroAchievementLinks.dll
Using:
Click Tools and select Add RetroAchievement Game Links
In the window that opens, select Add Additional Apps.
The plugin will scan each game in your collection for a game-specific RetroAchievements Id. If found, an Additional Application and will be created for that game, named RetroAchievements. The Application Path will be the hyperlink to that game on retroachievements.org. e.g. https://retroachievements.org/game/1003 When done, a message box will appear indicating as much. Depending on your PC and the size of your collection, this could take 2 - 30 seconds to complete.
If at some point you wish to remove these Additional Apps, click Delete Additional Apps.
The plugin will scan each game in your collection for an Additional App called RetroAchievements. If found, it will attempt to remove it.
Note:
If, for whatever reason a game already has an Additional App named RetroAchievements, it will not add a 2nd one of the same name.
On that same note, if you click Delete Additional Apps, ALL Additional Apps named RetroAchievements will be removed.
75 downloads
(0 reviews)0 comments
Submitted
-

Unibox
By stigzler
Intro
Unibox allows you to add roms to any Launchbox installation you have running on your local network on the fly. It also automatically adds metadata and media. This can be done in real-time, making it useful for installations such as arcade machines or rigs dedicated to running BigBox. No manual adding of roms to folders required, or going into Launchbox to add more games.
Project thread here for more up to date features and screenshots etc. The videos below were made on the first version so there's been a number of improvements since then.
Video of it in action:
Getting started guide:
Presently in Beta, so maybe test on a test installation first. Hope helps!
78 downloads
-

Steam Scraper
By srxz
Plugin that scrapes Steam Information, banner, screenshots and video to a selected game.
Requirements: Launchbox 8.8+
Install: Extract the content of zip file to : Launchbox/plugins/SteamScraper
Source code: Github (feel free to make a pull request )
Thanks to:
@fawkesyeah for the extensive testing
@CriticalCid for Ideas.
EDIT
If you have trouble running the plugin and crashing due CAS error, please right click on the DLL's , properties and then unblock.
Usage:
Just paste the Steam URL from the game that you need to scrape information.
Video Tutorial:
If you want to add Additional Custom fields and Tags please edit the properties.json :
Note: This will generate a LOT of tags, I advise to hide it if you are going to use it. (Legacy Settings -> Game Details -> Disable Custom Fields)
Also if you have the SteamDB or SteamSpy Link only you can use it to get the Steam metadata as well, the regex works just remind to put the / on the final url just like this:
BUT THIS WONT GET INFO FROM THE RESPECTIVELY WEBSITES, IT WILL GO TO STEAM ANYWAYS.
2,761 downloads
-
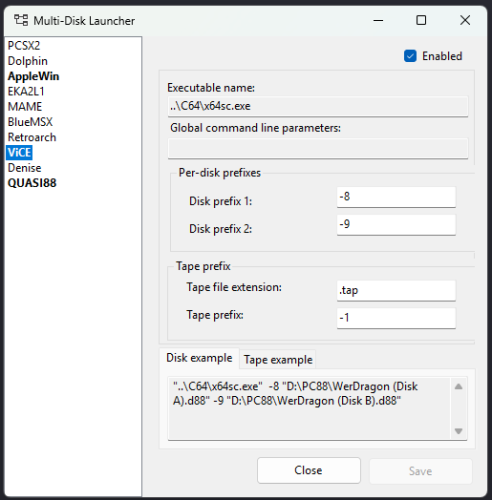
Multi-Disk Launcher
With all of it's fantastic functionality, Launchbox is missing a few features that make it difficult to use it with emulators for old computer systems.
First is the ability to launch an emulator while passing two image files as parameters. Particularly on Japanese home computers like the PC88, many games simply require you to insert two discs to play, and Launchbox can't pass more than one at a time. You can hardcode a custom commandline for each and every single game to fix this, of course, but that's pretty tedious.
Second is the ability to call an emulator two different ways depending on whether you're loading a disk or a tape. Some emulators expect "-tape" or "-disk" on the command line, and the only way to achieve this in Launchbox is by creating two separate emulator entries and splitting your library by format.
Multi-Disk Launcher solves both of these issues with a minimum of configuration.
Installation
Just download the .dll file from Releases and drop it in your Launchbox\Plugins folder. Start Launchbox and look in the Tools menu; if you have a "Multi-Disk Launcher..." menu item, it's installed.
Configuration
There are two phases of configuration: Setting up emulators, and setting up games. Emulator setup
The plugin works by modifying the command sent to an emulator when you launch a game, so to use it, you need to first configure the emulators you'll be using. Simply add the emulators as normal, including any custom commandline parameters (e.g. -fullscreen) in the standard config dialog.
Once that's done, go to Tools > Multi-Disk Launcher..., locate the emulator you wish to configure and click on it.
Check the Enable box in the upper right, then:
If the emulator simply requires two disks to be passed on the commandline: Checking Enable is enough.
If the emulator needs a flag before each disk, like -disk1 and -disk2: Fill in the "Disk prefix" fields.
If you are going to be using a mix of disks and tapes: Fill in the tape extension field (with e.g. .t88) and the tape prefix field (with e.g. -tape). If your emulator supports multiple tape formats (e.g. t64/tap) then separate them by commas: .t64,.tap
Close the window when done. Now you can move on to setting up games.
Game setup
For each game that you wish to have multi-disk support, you simply need to define a second disk in the Additional Applications section of the game's metadata. If you imported games from a typical collection, all the disks will most likely already be in the Additional Applications section. All you need to do is edit one and set the "Disk number" value on the Metadata tab to 2.
If not, all you need to do is click "Add Application" and enter a name, a path to the second disk image, and then set the "Disk number" on the Metadata tab to 2.
That's all there is to it. You should now be able to launch the game, and your emulator will receive both image files.
Troubleshooting
I haven't run into any issues yet, but be aware of these things: This functions by overwriting the "Custom command line" value in a game's metadata right before launching it. It's supposed to set that back to whatever it was after the game launches, but if something goes wrong, that might not happen and you could end up with junk in that field. If a game really DOES require a custom command line, that won't work because the plugin ignores any existing data in that field. This is something I could fix if anyone needs it to work, but I can't imagine a scenario where it would come up. If you suspect the plugin is causing problems, you can go in and uncheck Enable in the config dialog and it will revert to standard LB launching. If you delete an emulator, it will no longer appear in the plugin config, but if you add it back with the exact same name your settings should come back. Source code
This plugin is open-source and you can use it as the basis for your own work. The code is hosted here: https://github.com/cathoderaydude/LBMultiDiskLauncher
49 downloads
(0 reviews)0 comments
Submitted
-
Pause-Menu Music Player
By JoeViking245
Inspired by a feature request on the LaunchBox feedback site by @crusadeRGP
https://feedback.launchbox.gg/p/pause-screen-music-player
"Add option to set custom music tracks and/or game music to be auto played when pause screen is activated and muted/stopped when returning to game"
This plugin will allow you to play music while your game is paused.
This can adapted to any Pause Theme.
Requirements:
LaunchBox version 13.19 (or newer) Game and/or Platform and/or Background music files Modified Pause Theme
Installing:
Extract the contents of the zip file into /LaunchBox/Plugins/ e.g. D:\LaunchBox\Plugins\PauseMenuMusic\PauseMenuMusic.dll
Setup (Required for this to work)
Navigate to your \LaunchBox\PauseThemes\ folder If you don't use a custom pause theme, select the Default folder Press Ctrl+C, then Ctrl+V This will create a copy of the Default pause theme folder (Default - Copy) Go into your theme's folder (e.g. D:\LaunchBox\PauseThemes\Default - Copy\) Using any text editor, open Default.xaml Add/insert these 3 lines as shown below xmlns:playMusic="clr-namespace:PauseMenuMusic;assembly=PauseMenuMusic" <playMusic:PauseMenuMusicPlugin x:Key="playMyMusic"/> <MediaElement Source="{Binding SelectedGame, Converter={StaticResource playMyMusic}}"/> Save and close the file Repeat for other xaml files in that folder Go to Tools < Options < Gameplay < Game Pause Make sure the Pause Theme you modified above is selected
Insert line #1 here:
Insert line #2 here:
Insert line #3 here:
Optional:
Now that you've read, and have a complete understanding of how to modify your theme... included as an additional download is a pre-modified version of the Default Pause Theme (Default - Music). You can use this instead of doing the above theme modifications if you so wish.
After downloading, copy the contents of Default - Music.7z into your \LaunchBox\PauseThemes\ folder e.g. D:\LaunchBox\PauseThemes\Default - Music\Default.xaml Set Default - Music as your Pause Theme
Settings/Options:
Start LaunchBox
Go to Tools < Pause-Menu Music Player
Default settings (shown):
Look for the games' music file
Use fallback music files
The plugin is enabled
Volume set to 50% (new v1.1.0)
Music types:
Select to play:
Game specific music Platform specific music Background music Fallback order-of-precedence:
With fallback enabled, the plugin will look for music files in the following order, starting with your selected music type:
Game > Platform > Background Platform > Background Background: [none] If fallback is disabled and there is no music file for your selected type, no music will play.
Disable Pause Music:
When checked, no music will play during Pause.
After making any changes, be sure to click Save Changes before closing the window.
Music Files:
Only .mp3 and .wma audio files are supported. The plugin will search for them in that order. If your platform or background folders have music files that are .mp3 and .wma, only the .mp3 file will ever play. Many audio files formats are supported. Including, but not limited to: .mp3, .wma, .ogg, .webm, .wav (v1.1.0) Music folders/files:
As prescribed by LaunchBox, music files should be located respectively in the following folders:
Game: \LaunchBox\Music\[platform]\[game.ext]
Platform: \LaunchBox\Music\Background\Platforms\[Platform Name]\[any_file.ext]
Background: \LaunchBox\Music\Background\[any_file.ext]
Caveats:
Only .mp3 and .wma audio files are supported. (a limitation of the method I chose to play audio files) (v1.1.0 Many audio file formats now supported)
When you pause the game, the music (if found) plays. When resuming the game, the music stops pauses.
When you pause the same game-play again later on, the music resumes from where it left off. plays. From the beginning. Again. (v1.1.0)
With the tools and motivation at hand, there isn't a reasonable workaround for this. (motivation found )
If you have multiple audio files for the game, platform or background, only the 1st one found will ever be played.
There's no volume normalizer feature. Analyzing the media's audio levels programmatically to normalize them would add excess processing. (That, and I don't know how with the tools and motivation at hand.)
Music/song files will not loop. So don't pause for longer than the song. (We're here to play games, after all. Right? )
(v1.1.0) Music/song files will restart/loop when the track ends during pause.
As always, all thoughts, views, opinions, comments and suggestions are welcome.
50 downloads
-
Module Fightcade 2
By Crabi
What this module does
This module integrates Fightcade 2 into LaunchBox/BigBox and automates repetitive actions:
Launches Fightcade 2 automatically.
Searches for the game selected in LaunchBox/BigBox.
Quits the last joined room.
Joins the room of the chosen game.
Allows full controller navigation (via JoyToKey) across 3 zones:
Notifications (bell)
Chat
Contacts
Requirements
AutoHotkey v1.1 (you should already have it) Fightcade 2 Auto-download ROMs with lofi’s JSON pack: FC2 JSON Pack Auto Download Download fc2roms.zip
Extract the .json files into Fightcade\emulator\
In Fightcade → Settings → ROMs Path, set the ROMs folder used by the auto-download.
Module Installation
Download the Fightcade 2 Module Place fc2_RUN.ahk, fc2_SETUP.ahk, and FC2_JoinRoom.cfg.ini in the same folder.
Edit fc2_RUN.ahk and adjust the fc_root path if needed.
If your resolution ≠ 1920x1080:
Open Fightcade 2 fullscreen,
Run fc2_SETUP.ahk, hover each UI element as prompted and press SPACE to calibrate.
Setup saves everything to FC2_JoinRoom.cfg.ini (can be fine-tuned manually).
In the same config you can set JoyToKey paths and profiles. Example:
[joytokey] exe=D:\HFSBox\Utilities\JoyToKey\JoyToKey.exe fightcade_cfg=D:\HFSBox\Utilities\JoyToKey\FightCade.cfg launchbox_bigbox_cfg=D:\HFSBox\Utilities\JoyToKey\Layout 8 Boutons.cfg Controller Mapping (example with JoyToKey)
Map your controller to these logical keys expected by the AHK script:
D-Pad Up → g (up) D-Pad Down → v (down) D-Pad Left → f (previous zone) D-Pad Right → h (next zone) Button A → a (confirm / click) Button B → b (back / cancel) L/R Button → p (send “gg” in chat) Select + Start → Esc (quit Fightcade or close emulator) Alt: R3 → Esc LaunchBox Setup
Add a new “emulator” in LaunchBox (name it Fightcade for example). Application path = fc2_RUN.ahk (e.g. ..\HFSBox\Emulators\FightCade2\emulator\fc2_RUN.ahk). Under Associated Platforms, add Fightcade and set it as default emulator.
Installing Platform + Playlists
Copy the provided Data folder into your LaunchBox folder (merge). Edit Data\Platforms\Fightcade.xml to set the correct path to fc2_RUN.ahk. Playlists work out of the box, no edits needed. Bezel is included, ready to use.
Included in the pack
AHK scripts (fc2_RUN.ahk, fc2_SETUP.ahk, FC2_JoinRoom.cfg.ini).
Bezel (ready to use).
Fightcade platform XML (Fightcade.xml).
Playlists.
⚠️ Notes
You can only be in one room at a time.
Usage once in a room
Up = g
Down = v
Left = f
Right = h
Switch zones (Notifications, Chat, Contacts) with f/h.
To challenge someone: go to Contacts, scroll with g/v, press a on the player.
To accept/decline an invite: go to Notifications, press a, then accept/decline.
Chat is only used for quick “gg” via the p key for now.
If you run into any issues or have questions, feel free to ask — I’ll try to help.
36 downloads
(0 reviews)0 comments
Updated
-
Bulk Playlist Manager
By JoeViking245
Features
- Set auto-populate to False (single or bulk)
- Existing games in playlist will remain
But no new games will/can be added unless done manually
- May help decrease LB loading time
- Cannot be undone [via the plugin]
- Delete playlist(s)
- Permanently delete the selected playlist(s)
- Delete all playlists that have zero games
- Whether the playlist is auto-populated or is just there, if there are no games in it, permanently delete the playlist(s)
- Single or Bulk add/remove parent platforms and/or categories
- Select a playlist
- Check and un-check parents to your hearts content, then click Save Parents to save the changes.
- If selecting multiple playlists, clicking Save Parents will set the parents for all selected playlists to the ones checked.
e.g. Selected playlist A had "Computers" checked and playlist B had "Consoles" checked, clicking Save Parents will set both playlists to be under "Computers" and "Consoles".
Installing
Download and extract the contents of the zip file to /LaunchBox/Plugins/
e.g. D:\LaunchBox\Plugins\BulkPlaylistManager\BulkPlaylistManager.dll
Using
You may 1st want to turn on Backups (under Tools < Options < Data < Backups), exit then restart LaunchBox (to create at least one backup) before proceeding.
Click Tools and select Bulk Playlist Manager
Hopefully the layout is fairly intuitive. You can mouse over the buttons for a little more detail.
As always, all feedback, comments and suggestion are welcome.
84 downloads
-

Clips YouTube Downloader
By thewhite
This software was created to download missing videos from your games and which are among other things missing from emumovies.
What it does:
📥 Clips YouTube Downloader – Creates 40-second gameplay clips directly from YouTube URLs stored in your LaunchBox platform XML files. Perfect for building a consistent library of preview videos. 40-second clips are created from half of the video or the first 40 seconds if it is too short.
🧹 Remove URL from XML – Cleans up dead or broken YouTube links in your XML so LaunchBox won’t try to download them again.
🔧 Fix Missing Video – Scans your video folders, compares them with your XML entries, and corrects the missing status if a clip is already present but incorrectly marked as absent.
How to use it:
Download the required Youtube downloader and FFmpeg via the button or browse for the path to use. Select the platform XML file you want to work with.
Choose what you want to do:
Download videos from YouTube and create clips with the Start button,
Create only video clips, useful if ffmpeg freezes during a video, even if the software tries to detect problems at this level.
Move the downloaded clips into the correct LaunchBox Videos folder for that platform.
Use the button Remove URL from XML, to remove dead links and Fix missing videos to fix the platform file with the newly created clips.
Use the "update metadata" tool if some errors persist in the platform file; video present, but not seen by launchbox.
Select all games on a platform, Tools -> Downloads -> Update metadata and media for Selected Games. Choose not to download any media and "Yes, but do not replace any existing fields of media (recommended)". That’s it — you’ll have a cleaner, more accurate library with proper 40-second preview videos for your games.
139 downloads
(0 reviews)0 comments
Submitted


(USA).thumb.png.e73d5a885db08325d77c970131b9c5d0.png)
.thumb.png.a920a40e5a3febc2bfe967fa19872aab.png)
.thumb.png.a3faa9242d29b969fb5b963419165153.png)