Third-party Apps and Plugins
261 files
-
N64 Save Converter Tools
By ABOhiccups
This is for anyone who backup N64 Save Files from Retail Cartridge, EverDrive Flash Cartridge, or Controller Pak and want to use it on N64 Emulator that only support SRM File. These tools also helps if you want to import N64 Save File from Emulator to Retail Cartridge, EverDrive Flash Cartridge, or Controller Pak.
Convert EEP to SRM with Batch Script (Not Recommended)
1) Place all EEP Save Files in the same directory where you extracted.
2) Run "EEP to SRM.bat"
This Batch Script will rename all EEP Save Files to SRM Save File Format.
Convert EEP/MPK to SRM
Drag EEP Save File or MPK Save File to "pj64tosrm_32bit.exe" or "pj64tosrm_64bit.exe"
Only drag one file at a time.
Convert SRA/FLA to SRM
1) Run "ED64-Saveswap.exe" and select SRA Save File or FLA Save File.
2) Leave everything as default and click on "- Convert file -"
This will create another SRA/FLA Save File by swap a Save Data to be compatible with N64 Emulators that only reads SRM Save Files.
3) Drag SRA Save File or FLA Save File to "pj64tosrm_32bit.exe" or "pj64tosrm_64bit.exe"
Only drag one file at a time.
Convert SRM to EEP with Batch Script (1KB/2KB Size only)
If SRM Save File size is 290KB. Skip to "Convert SRM to EEP/MPK" instead.
1) Place all SRM Save Files in the same directory where you extracted.
2) Run "SRM to EEP.bat"
This Batch Script will rename all SRM Save Files back to EEP Save File Format.
Convert SRM to EEP/MPK
Drag SRM Save File to "pj64tosrm_32bit.exe" or "pj64tosrm_64bit.exe"
Only drag one file at a time.
Convert SRM to SRA/FLA
1) Drag SRM Save File to "pj64tosrm_32bit.exe" or "pj64tosrm_64bit.exe"
Only drag one file at a time.
2) Run "ED64-Saveswap.exe" and select SRA Save File or FLA Save File.
3) Leave everything as default and click on "- Convert file -"
This will create another SRA/FLA Save File by swap a Save Data back to original form to be compatible with N64 Retail Cartridge or EverDrive Flash Cart.
Credits
All credits goes to the people who made these Tools Software happened.
ED64-Saveswap by saturnu
pj64tosrm by Higor (heuripedes)
585 downloads
- nintendo 64
- save game
- (and 2 more)
(0 reviews)0 comments
Updated
-
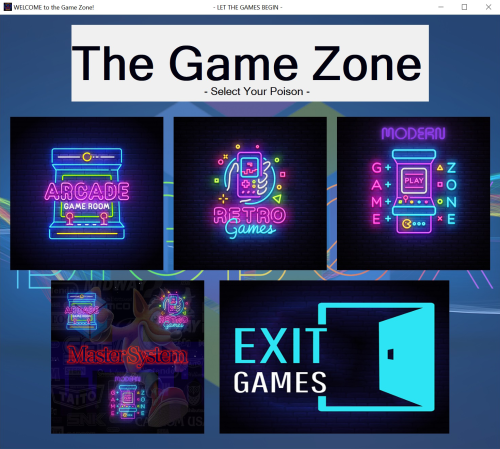
The Game Zone (Multiple BB Instances via AHK script)
By The Papaw
Allows you to Easily use multiple instances of Bigbox on each PC to improve speeds in navigation by splitting up platforms and running them from a single app. Also allows you to customize each instance to use different themes, platform videos, etc.. Includes a ReadMe in the folder
I wrote this AHK script to make it easy to run multiple instances of Bigbox on the same PC.
The reason I did this was I noticed my main LB/BB rig was getting so big that navigation was starting to slow down, especially in arcade using the newer themes. It was even worse on the older PC's thoughout he house. I got the idea that maybe if I split the platforms up into different copies of LB/BB I might get a smoother experience, especially on older PC's and it worked.
The script can be easily changed and customized to your needs. It's simple to change the images, background, layout, number of instances, etc. with much more than Notepad++. It takes a little work to set things up, but works pretty well after your done.
Just extract it and put the "The Game Zone" folder where you want.
Here is what you need do to Prepare: - this is most of the work
1. Make a copy of your Launchbox folder before doing anything just as a backup in case you have a boo-boo and something gets messed up. That makes it easy to go back. I'd leave it alone until finished.
2. If your game media, including roms, (images, videos, music, manuals) is within your Launchbox folder, you will need to move or make a copy of it all to a centralized location Outside the default Launchbox folder. This excludes your Platform Categories, Platforms, Playlists folders and startup videos. Mine is actually on a shared NAS folder. This keeps you from creating and having multiple copies of your roms and game media in a later step.
3. Next, you need to edit the paths to each of them in the "Folders" section of Launchbox by right clicking on a platform, then Edit > Folders (tab) and navigate each of them to where you put the media OR edit the Platform xml (../Launchbox/Data/Platforms) files with Notepad++ so Launchbox uses the new centralized media locations. Notepad++ is faster and easier, but more chance of errors.
4. After your media is in a centralized location, you can delete it all from your default Launchbox folders.
5. Next, make multiple copies of your edited Launchbox folder and rename them the following (only if you wish to use the script "As Is"):
LB-Arcade
LB-Retro
LB-Modern
by default the script uses your normal Launchbox instance for the Master system.
6. Lastly, you will need to edit the AHK script to match the different path instances that you have chosen. Mine are as follows and what the script is using by default:
D:\Gaming\Apps\LB-Arcade
D:\Gaming\Apps\LB-Retro
D:\Gaming\Apps\LB-Modern
D:\Gaming\Apps\LaunchBox (master system with all platforms)
After everything is all set up and working, you can play with modding to your taste and needs.
TIPS:
I do all my maintenance work in my master instance and use Syncthings to copy the appropriate platform xml files to the appropriate LB instances, that way I do the work once and the other instances are updated automatically. Yep, I'm lazy! There is a shortcut in the folder to drop on the desktop. You might have to fix the icon for it (copy of it in the "The Game Zone" folder), since my paths may be different than yours.
I think that's it. This is my first AHK script and was fun learning about AHK. You can do much more with it than I imagined.
Feel free to post questions, comments, suggestions and share what you come up with.
-Enjoy
53 downloads
(0 reviews)0 comments
Updated
-
BigBox PlatformCategoryPlaylist Selector
By Benuno
2022-03-23 10-33-23.mp4 A plugin for BigBox that makes it possible to have a playlist/platform carousel inside any game view/theme via simple .xaml edit of any game view. With this plugin you no longer have to leave the game view as you can select every playlist/platform from there!
Installation:
Globally: Put the BigBoxPCPSelector.dll file into Launchbox/Plugins folder.
Per Theme: Put the BigBoxPCPSelector.dll file into Theme's Plugin folder.
Theme's Game View files: Edit WallView/TextGame/HorizontalGame View's files by adding the plugin to the user control
<UserControl Name="Canvas" ClipToBounds="True" xmlns:PD="clr-namespace:BigBoxPCPSelector.View;assembly=BigBoxPCPSelector" .... /> and after that add the Platform Selector somwhere between the <Canvas> tags as below. These are currently the values you have to give the plugin to work. (Stuff like Position adjustment will be added soon)
<PD:PlatformSelector Panel.ZIndex="900" ItemFontSize="20" ItemFontWeight="Normal" ItemForegroundBrush="White" ItemBackgroundBrush="Transparent" SelectedFontSize="30" SelectedFontWeight="ExtraBold" SelectedForegroundBrush="Black" SelectedBackgroundBrush="Transparent"/> Controls:
Esc: Activate Plugin Wheel
Left/Right: Move carousel index
Up: Switch between playlists and platforms
Down: Deactivate Plugin Wheel
Esc 2x: Escape Menu like default
Enter: Confirm Playlist/Platform selection
Contribute:
Feel free to improve the plugin at https://github.com/Benuno/BigBoxPCPSelector! Any support is appreciated .
Thanks to @Fry for the help/initial code structure!
89 downloads
-
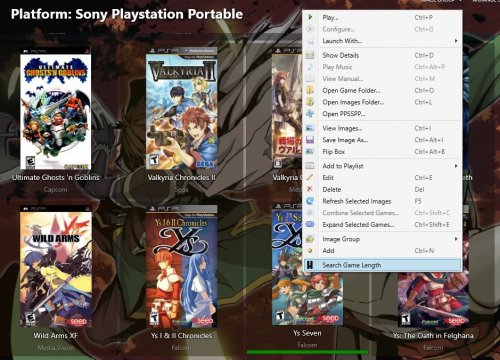
How Long To Beat - Game Length Plugin
By matiaspons
About
Plugin that scrapes information from HowLongToBeat.com and adds custom fields with game lengths information.
I made this plugin to add length information for certain games, mostly rpgs. This adds 3 custom fields for Main Story, Main + Extra and Completionist length. You can configure which ones you want to add by editing the file HLTBPlugin.xml.
Because there's no oficial API from HLTB, I had to parse the HTML, which means that as soon as they change something on the HTML this plugin probably will stop working...
Install
Extract files (dll + xml) to : Launchbox/Plugins/HLTBPlugin.
Config (HLTBPlugin.xml)
MainStoryLength: Enable/disable main story length update. Default: true. MainExtraLength: Enable/disable main story + extra length update. Default: true. CompletionistLength: Enable/disable completionist length update. Default: true. MainStoryFieldName: Change main story length custom field name. Default: Main Story Length MainExtraFieldName: Change main story + extra length custom field name. Default: Main + Extra Length CompletionistFieldName: Change completionist length custom field name. Default: Completionist Length Note: If you change the fields names it will not update the games that already have information, so you will end up with duplicated fields with different names and you will have to manually delete them (edit game -> custom fields tab). So config the first time and stick with that.
Usage
Access the option by right-click a game (only one game, no massive update yet). A window will popup with all the games found and you can choose which one correspond to your game. If there's no results you can manually change the search words (e.g. Metal Gear Ac!d will get no results but you can then change the search to Metal Gear Acid).
You can use the "Arrange By" option to order the games by length. Lengths are shown with leading zeroes because is the only way to properly order the games since custom fields are strings and not integers.
Tested on version 8.9. I think you need a premium license because custom fields are not supported in free license (not sure).
I have no relation with HowLongToBeat.com, if you like their work please go and support them.
Public Repository
https://github.com/matiasponsml/HLTBPlugin
1,605 downloads
- plugin
- game length
- (and 2 more)
-
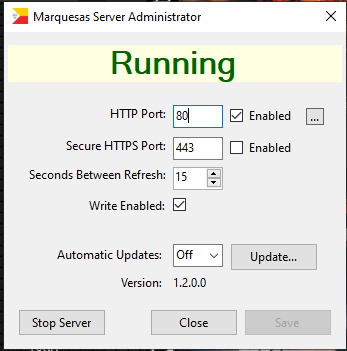
Marquesas HTTP Server
By pdavis
Small Footprint HTTP Server Plugin for LaunchBox.
Example Uses
* Display the current game marque full screen on a seperate system such as a tablet or smart phone.
* View the current game manual on a seperate system such as a tablet, laptop, smart phone.
* Retrieve LaunchBox and game information through a standard HTTP JSON API.
Installation
To install unzip and copy the MarquesasServer folder into your LaunchBox/Plugins folder.
The server will begin running whenever LaunchBox is started. The first time you run
it with the plugin a Windows security dialog will pop up asking if you want to allow
it to connect to the network. You will need to select one of the two options presented,
the option "Private networks, such as my home or work network will suffice". Once in
LaunchBox you will see a new "Marquesas Server Admin" option under the Tools menu to
manage the server. The server can then be accessed from any computer, phone, or tablet
located on (or with access to) the same network as the machine running LaunchBox/BigBox.
Requires .NET Framework Version 4.8 from https://dotnet.microsoft.com/download/dotnet-framework/net48
See the default index (LaunchBox->Tools->Marquesas Server Admin->Ellipses Button)
for a comprehensive list of dynamically generated direct links and detailed information.
Auto Refreshing Web Pages
These pages (specifically the Marque page) were designed to be brought up on a separate
computer such as an old tablet to display the marque of the game currently being played
in BigBox. It is recommended that the page be loaded and then the browser set to full
screen (kiosk) mode. In most browser on Windows you can toggle kiosk mode by hitting F11
when in your browser. Each page will refresh automatically every few seconds to insure
that the game being played will be reflected in the browser.
Works via a standard HTTP interface allowing the retrieval of HTML pages for the current
game. Any *ImagePath property can be retrieved from the IGame object
(Unbroken.LaunchBox.Plugins.Data.IGame.*) by specifying /Image/ followed by the Image
descriptor (the part preceeding ImagePath)
* /Image/Back
* /Image/Background
* /Image/Box3D
* /Image/Cart3D
* /Image/CartBack
* /Image/CartFront
* /Image/ClearLogo
* /Image/Front
* /Image/Marque
* /Image/PlatformClearLogo
* /Image/Screenshot
* /Manual
JSON API for retrieving
* /StateManager (Unbroken.LaunchBox.Plugins.PluginHelper.StateManager)
* /StateManager/IsInGame
* /StateManager/* (Unbroken.LaunchBox.Plugins.PluginHelper.StateManager.*)
* /SelectedGames (Unbroken.LaunchBox.Plugins.Data.IGame)
* /SelectedGames/* (Unbroken.LaunchBox.Plugins.Data.IGame.*)
JSON API for retrieving raw binaries
* /Binary/ScreenshotImage
* /Binary/FrontImage
* /Binary/MarqueeImage
* /Binary/BackImage
* /Binary/Box3DImage
* /Binary/BackgroundImage
* /Binary/Cart3DImage
* /Binary/CartFrontImage
* /Binary/CartBackImage
* /Binary/ClearLogoImage
* /Binary/PlatformClearLogoImage
* /Binary/Application
* /Binary/Configuration
* /Binary/DosBoxConfiguration
* /Binary/Manual
* /Binary/Music
* /Binary/ScummVmGameDataFolder
* /Binary/Video
* /Binary/ThemeVideo
See the default index (LaunchBox->Tools->Marquesas Server Admin->Ellipses) for direct links and detailed information.
Source: https://github.com/fpdavis/MarquesasServer
128 downloads
-

View MAME High scores in Game Details - A plugin for LaunchBox/BigBox
By JoeViking245
View MAME High scores in Game Details - A plugin for LaunchBox/BigBox
Use this plugin to see a games top 3 high scores in the Game Details.
Features
Shows high scores for most games in your Arcade platform in the Game Details. After playing a MAME Arcade game that saves its' high scores [and is supported by the included hi2txt program], this adds a Custom Field called "Hi-Scores" to the game. It will store 1st, 2nd and 3rd place and appear in the Game Details when the game is selected.
What's needed
(3) files that are included in the downloaded zip file (the plugin) One file that is included in the Version 3.0 downloaded zip file MAME configured to save high scores Saved high score files (These are automatically generated by MAME [once configured to save them] in the "hi" and/or “nvram” subfolders of your MAME emulator)
What it won't do
Show high scores for games using emulators other than MAME. MAME does not save high scores for all arcade machines, so not all games are supported by this plugin.
Contributors
@jayjay and @JoeViking245
A HUGE Special Thanks goes to GreatStone’s utility “hi2txt”. This utility converts MAME’s high score files into a readable format which ultimately makes this plugin possible!!
http://greatstone.free.fr/hi2txt/index.html
Installation and setup instructions:
Step 1: Installing the Plugin
Step 2: Making sure MAME is set up to save high scores
Installing the Plugin:
Download the plugin, LB-BB_Hi_Scores_v1.0.zip, from the LaunchBox download section After you’ve downloaded the zip file, be sure to unblock it in Windows by right clicking it, selecting Properties, and clicking Unblock
Open the zip file and extract/copy the "Hi_Scores" folder into ..\LaunchBox\Plugins e.g D:\LaunchBox\Plugins\
If you have previously installed “MAME Hi-Score Display - A plugin for BigBox”, you will only to copy the “HiScoreCustomField.dll” file into that same folder. Otherwise all 3 files are required. (Only one file is required with version 3.0) The 2 plugins will not conflict with each other.
Setting up MAME to save high scores:
Using a recent official MAME release –
By default, plugins are enabled in MAME. You can verify this by looking at the “mame.ini” file located in the root MAME install folder. Open “mame.ini” and scroll down to (or press Control + F and search for) “Scripting Options”. “plugins” should be set to 1. If it’s 0 (zero), change it to 1.
Next, open “plugin.ini” also located in MAME’s root directory and change “hiscore” to 1.
If you have an older release of MAME, you may need to do the following steps.
Go to this website: http://www.mameworld.info/highscore/download.htm and download a copy of the file hiscore.dat that corresponds to your version of MAME. The file (hiscoredat.zip) will need to be unzipped. Place the file hiscore.dat in your MAME/Plugins folder Open up your MAME.ini file in a text editor. In newer versions, this file will be in the same directory as the MAME.exe Press control + F and search for “Scripting Options” Next to the word Plugins, type “1” no quotes Next to the word Plugin, type “hiscore” no quotes It will look like this:
How to use:
Start LaunchBox or BigBox Go into the "Arcade" Platform Select a game, run it, then close it Now select a different game, then go back (poor man’s version to refresh the Game Details) If the game has saved high scores, they will now appear in that game’s Detail pane Depending on the BigBox theme you use, the amount of data shown in the Game Details may be limited. So you might need to go into Options, Game Details and deselect some of the Details.
Be sure that “Custom Fields” is checked.
495 downloads
-

Jay's Arcade - Animated Marquee Mod - for any theme
By JaysArcade
For lack of a better place to put this, I guess I'll settle for this Third Party apps category since it doesn't really fit anywhere else.
What is it: The Marquee Mod will add animated marquee support to your theme. I created this marquee style with the Community Theme Creator. Unfortunately it's not currently possible to use a Marquee created for one theme and use it in another unless you have all the source Community Theme Creator files from both the Marquee and theme you wish to patch. The files here will allow you to use the marquees I created for my Vertical Aspirations theme in any other theme. Everything you'll need is included in this one zip file. If you don't have a second monitor in use for marquees, this mod won't do you any good.
Instructions: After downloading the zip file, right click the zip, select properties and check the unblock box and click ok.
Open the zip and extract the folder onto your desktop or other directory you wish to work in.
Inside the folder, run the Edit Game Marquee View.exe first. If you have autohotkey installed on your PC, you can alternatively run the Edit Game Marquee View.ahk
When the search dialog opens, type "Marquee Views" without the quotes. Make sure you capitalize it and you type it plural with the s at the end.
When the replace dialog opens, type the name of the theme you will be importing this into. Example: Unified Refried. Make sure you spell the name of the theme correctly and use CAPS where needed or this mod won't work.
Next, run the Edit Platform Marquee View.exe. If you have autohotkey installed on your PC, you can alternatively run the Edit Platform Marquee View.ahk
When the search dialog opens, type "Marquee Views" without the quotes. Make sure you capitalize and you type it plural with the s.
When the replace dialog opens, type the name of the theme you will be importing this into. Example: Unified Refried. Make sure you spell the name of the theme correctly and use CAPS where needed or this mod won't work.
To confirm the rename worked, open the views folder and open the GameMarqueeView.xaml file and the PlatformMarqueeView.xaml files in a text editor (they may have already opened automatically in the previous step). Verify at the top of the text in the author block that the new name is present there.
An example (assuming you used Unified Refried in the replace field), the author block should look like...
<!--
COMMUNITY Theme Creator for BigBox - Version 2.3
Theme: Unified Refried
Aspect Ratio: Stretch
Developed by: Marquee Mod by Jay's Arcade
Published: Saturday 05, February 2022 @ 10:43 AM
BigBox Version: 12.7-beta-4 or later
-->
Finish: If all looks well, close both files. Now, copy the Views, Media and Plugin folders into your theme. Open Bigbox and switch to the theme you added support to if it's not already selected.
If something is not right, it's likely that something got misspelled. Delete the directory and re-extract from the zip and try again.
Please report if you have any issues.
Mascot files and animations in this mod were directly stolen from Faerans excellent RetroMags theme.
How the marquee views work: The views are not too much different from the default marquee views that come with BigBox. They do offer better support however (in my humble opinion) for Platform Marquees since they defeat the ugly default Banners that come with Bigbox. They also have some animations that run on either side of the logo. The animations are subtle.
Platform Marquees will have a default background image, a logo (pulled from your clear logos folder), and animated "mascot" images on either side of the logo.
Games Marquees will use a video marquee if available. If a video is not available, it will use an arcade marquee image if available. If an arcade marquee image is not available, it will default to the platform marquee.
Games View
2022-01-08 19-05-17.mp4
Platform View
2022-01-08 19-01-42.mp4
Options: Inside the Media folder there is a Platform Marquees folder that has a file named Platform Marquee Background.png. This is the file to change out if your prefer a different background.
There are a limited number of mascots in the 2 mascots folders. Faeran's RetroMags theme has a ton of these images if you need to fill in some blank spots that this mod doesn't cover.
How to remove: If you find you don't want to use this with your theme anymore, simply go into the theme folder and delete the GamesMarqueeView.xaml and the PlatformMarqueeView.xaml
200 downloads
(0 reviews)0 comments
Submitted
-
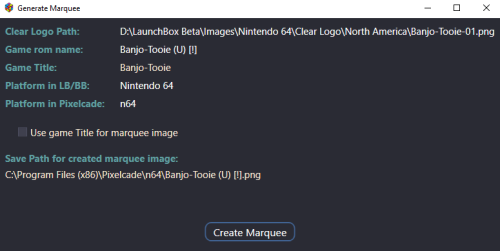
Create marquee images from Clear Logos (for use with Pixelcade™ LED Marquee displays)
By JoeViking245
Create marquee images from Clear Logos (for use with Pixelcade™ LED Marquee displays)
Pixelcade already provides numerous marquee images for many Platforms. But you may come across one or more that are missing.
This plugin will create 128x32 marquee-resolution png images using your games existing Clear Logo and place them in your Pixelcade directory**, under the corresponding Platform folder.
What’s needed:
The plugin files Pixelcade software installed (including LEDBlinky) [https://pixelcade.org] ffmpeg.exe (used to convert/create the marquee images) [https://ffmpeg.org] (included) (optional) An actual Pixelcade™ Marquee display
Installing:
Download and unblock the plugin zip file (Right-click the zip file, select Properties and check UnBlock) Copy the contents of the zip file into your ../LaunchBox/Plugins/ folder i.e. D:\LaunchBox\Plugins\PixelcadeMarquees\
Setting up the plugin:
The default install location for Pixelcade is “C:\Program Files (x86)\Pixelcade”**. If you installed it somewhere else, edit “pixSettings.xml” located in the Plugin folder. (Notepad can be used to edit it) Change the path (line #3) to match your install location. Save and close.
<?xml version="1.0" encoding="utf-8"?> <settings> <pixCadePath>C:\Program Files (x86)\Pixelcade</pixCadePath> </settings>
**Note:
If your Pixelcade installation is located under “C:\Program Files (x86)”, you will need to have Access Permission to be able to save the images there. The plugin will check for permissions when launched. If it doesn’t have the proper permission, images will be saved to the "Completed" subfolder.
i.e. D:\LaunchBox\Plugins\PixelcadeMarquees\Completed\
You will then need to copy them manually when done. The images will be saved to their own Platform subfolder as Pixelcade sees them. (Pixelcade Platform naming conversions are taken from "console.csv" located in your Pixelcade directory.) Example: if your Platform is called "Arcade", images will be saved in the folder "mame".
Using the plugin:
Start LaunchBox. Select one or more games. Right Click and select Generate Pixelcade Marquee Image Click Create Marquee
Game Title vs. ROM name:
In most cases LaunchBox passes the games ROM name to LEDBlinky (which in turn passes it to Pixelcade). But for certain games (namely Steam games [and others?]), LaunchBox will pass the games Title. For these, you’ll want to check the box Use game Title for marquee image.
If the games Title contains illegal characters (such as : [semicolon]), the image will not be created.
When selecting multiple games, if you check Use game Title for marquee image and click Create Marquees, if the game Title contains illegal characters, a message will popup indicating that game will be skipped. You can bypass these messages by checking Skip warnings about Titles with invalid characters.
Special thanks to @megashub for coming up with the idea for this plugin and for figuring out how to manipulate and convert the images to make them suitable for Pixelcade™ displays.
As always, questions, comments and suggestions are always welcome.
175 downloads
-
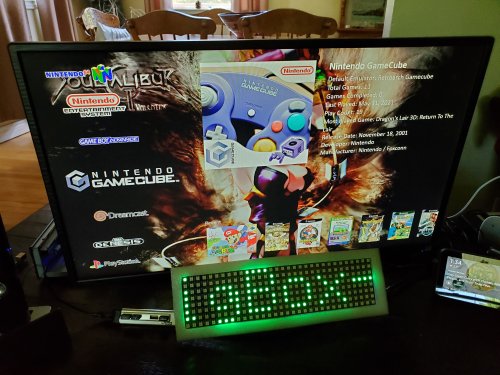
Inexpensive scrolling marquee
By mobarton
First, I am not a developer, so I am sure this can be improved on.
This is a way to get a scrolling marque for aprox $100 Canadian.
I did a quick video of it working in attract mode;
It uses the following hardware:
Elegoo LYSB01H4ZDYCE-ELECTRNCSMEGA 2560 R3 Board ATmega2560 ATMEGA16U2 with USB Cable Compatible and Arduino - $20
BTF-LIGHTING WS2812B RGB 5050SMD Individually Addressable Digital 8x32 256 Pixels 12.5in x 3.1in LED Matrix - $50
Power options for panel, can use 5v from a PC power supply (red wire) or a power brick with 2 amps or more. This is based on just scrolling text, if you start doing graphics or lighting a lot of LEDs, get a real power supply,
These were purchased off Amazon.ca. Read on the panel, as again, if you light a lot of LEDs it will draw a lot of power.
I provided the code for the Arduino, That I want to give credit to Cyan Infinite, although I did edit the code some.
see sketch.serial.text.ino
Cyan Infinite | Scrolling text with flexible 32x8 RGB LED Matrix
I started with a generic UNO, but it seemed a bit underpowered, so changed to a generic Mega board.
Note, later when I built the Python code, I had an issue with 2 odd characters being displayed at the beginning of my scrolling text which I suspect was a communication setting for the com port, but not positive. That is why I used a substring command.
I used pin 49 to send the data to the panel, as it was close to a ground. You need a data and a ground, and the pin you use must match the one identified in the code. If you use a UNO, the pin numbers are different range, I had used 6 then for example.
You need to set the com port for your board. That can be done in a couple ways, one is Device Manager, Properties, Ports, USB Serial Device, Port Settings, Advanced. My code uses Com 3. You can adjust this, but will need to compile the Python then and not use the supplied exe.
The python script will set the options in windows to match the Sketch settings (although I think I may have an error per my Note above)
The send_com.py is the source code for send_com.exe.
I tried to use the py file, but bigbox didn't like that. I actually started with a basic .bat file, but the popup window was messing things up. I'll paste that at the bottom for enquiring minds. The port settings may not match the sketch though, so if you use it, adjust it.
If you want to use different port or port settings, you will need to recompile. Up to you where you put the send_com.exe, but note that windows antivirus deems it a security risk when you try running it, it will block it and remove the file, so you will need to exclude it, I found it easiest to create a subfolder and exclude the subfolder from scanning. SEE V 1.02 or newer, recommend use of the ZIP version and not the single file exe to avoid this issue. If you are concerned I am providing malicious code, read the .py file and compile it yourself. Not going to try to tutorial that, I'm a novice at best and there is lots of info on the web. For some reason windows antivirus does this with all py files compiled as a single file exe, at least ones compiled using pyinstaller.
See the screenshot for the LaunchBox LEDBlinky settings. Browse to where you put the send_com.exe file, your path will not likely be same as mine.
So there are a couple things I don't like about my solution. LaunchBox and BigBox don't seem to be coded exactly the same for what to send to LEDBlinky for parameters. I didn't test LaunchBox really. Think it is close though. It does not send the Platform name (MAME, Playstation, etc...) when scrolling the Platform wheel, or I couldn't figure it out. If you navigate to a Platform (like MAME) in BigBox, it will show the game followed by platform, If you move the Game wheel, it will update to the game. If you select the game, it will update to the game. BUT if you navigate up a level, I could not find any content sent. That would be ok going from Game Details to Game Wheel, but not so going from Game Wheel to Platforms. And this all uses the same level code of 8 (the first passed parameter). I would like to code around that sometime, but have a bunch of learning to do...
Feel free to update this if you like. If you find it useful, excellent
send_com.zip
99 downloads
-
Playtime Tracker Migration
This Python script migrates playtime data from the Playtime Tracker plugin to a native LaunchBox playtime entry introduced in 12.5.
Python 3 is required.
To use, either launch the script from LaunchBox directory
OR
pass path to LaunchBox as the first argument, for example:
python migrate_launchbox_playtime.py "C:\Programs\LaunchBox" WARNING: This script OVERWRITES playtime already specified in LaunchBox with playtime from Playtime Tracker (if present),
so playtime counted by LaunchBox but not Playtime Tracker will be overwritten!
However, games without a Playtime Tracker entry present at all will remain untouched.
60 downloads
(1 review)0 comments
Submitted
-

Visual Pinball X VideoSnap Creator
By JoeViking245
Visual Pinball X VideoSnap Creator (Playfield Recorder)
Use this plugin to create videosnaps of the Visual Pinball X tables on your PC/Cab.
This will record any VPX table at any orientation and from any monitor.
Why record your own?
There already exists a lot of video snaps of most every Visual Pinball Table. You can even find vertically oriented (portrait) ones for your pincab. The issue is they may not be recordings of the actual version of the table you use. Or you simply can’t find one for a particular Original. Or you just don’t like the one(s) you found.
Features:
This will automatically ‘find’ your table’s playfield view so there’s no need to set up which monitor to look at or set any scale, resolution or aspect ratio. Your VPX default monitor settings will be displayed for your reference. (new v2.0) Record the backglass at the same time as the playfield. (optional) (new v2.0) Record the DMD (3rd screen) at the same time as the playfield. (optional) (new v2.0) Record the tables gameplay sounds along with the playfield video. (optional) (new v2.1) Add the tables Clear Logo to the end of the video. (optional) Included is an AutoHotkey script that the plugin uses to quickly bypass the VPinMAME window when loading a table. (Should reduce loading time by approximately 4 seconds per table) (This also works well if added to your Running AutoHotkey Script tab for your VPX emulator ) Record durations can be set between 5 seconds and 3 minutes. If your playfield is in portrait mode, the saved output video can be rotated for proper viewing. (Options are 0º (default), 90º, 180º, -90º) You can set the video to record at 60 FPS (Depreciated v2.1) All video will be recorded at 30 FPS Videos are automatically saved to the default folder (/Plugins/VPXVideoCreator/CreatedVideos/) or you can change it to be placed directly into your /LaunchBox/Videos/Visual Pinball/ folder. Installing:
Download and unblock the zip file. (right click the file, select properties and check the Unblock check box and click OK) Copy the VPXVideoCreator folder (from inside the zip) into your /LaunchBox/Plugins/ folder. If updating to 2.0, overwrite the existing file. Quick Start:
Start LaunchBox (always a good place to start) Right click one of the tables in your Visual Pinball platform and select Create VPX video. Set how long you want your final recording to be. Click Capture Video. The default save location is in the plugins’ subfolder, “CreatedVideos”.
Setting up to record audio: (new v2.0) (optional)
You will need to register “audio_sniffer-x64.dll”** (included with the plugin) with Windows. Basically what this does is makes all your audio output accessible in one place. Think of it as a Frontend for all your audio output devices. This “frontend” will be labeled “virtual-audio-capturer”.
2 ways to register/unregister audio_sniffer are:
The easy way: Run the included batch file (located in the plugins AudioSniffer subfolder). You need to run this as administrator. The batch file can also be used to unregister it. Follow the prompts.
Old school: Open the command prompt [as administrator] in the “AudioSniffer” subfolder.
To Register: type in then press enter:
regsvr32 audio_sniffer-x64.dll.1 To Unregister: type in then press enter:
regsvr32 /u audio_sniffer-x64.dll.1 **NOTE: The file is named "audio_sniffer-x64.dll.1" (with a “.1” at the end). Otherwise LaunchBox will try to load it as a plugin, which will cause errors. Source code for audio_sniffer can be found here: https://github.com/rdp/virtual-audio-capture-grabber-device
Using the plugin:
Set Delay:
This is the delay time between clicking Capture Video and the video actually starting to record. Set to bypass (in the recording) the VPX editor loading the table. Default is 12 seconds. Options are from 5 to 30 seconds.
Record Duration:
Set to how long you want your video snaps to be. Default is 30 seconds. Options are from 5 to 180 seconds (3 minutes).
Video Rotation:
If you play on a rotated monitor (or TV), you will want to set this to the direction your monitor/TV is rotated. Default is 0º. Options are 0º, 90º, 180º and -90º.
Include Audio: (new v2.0)
Check this box to include the tables playfield sounds with the recording (needs to be configured).
Record Backglass: (new v2.0)
Check this box to record the Backglass at the same time as recording the Playfield. This will be saved to a separate file that is saved in the “/VPXVideoCreator/CreatedVideos/Backglass/” folder.
The backglass is typically on a 2nd monitor, but (if setup) will get recorded separately no matter which monitor it’s on (single or otherwise). The file will be saved as [the-games_Title]_BG.mp4
Record DMD: (new v2.0)
Check this box to record the Dot Matrix Display (DMD) at the same time as recording the Playfield. This will be saved to a separate file that is saved in the “/VPXVideoCreator/CreatedVideos/Backglass/” folder alongside the backglass video.
The DMD is typically on a 3nd monitor, but (if setup) will get recorded separately no matter which monitor it’s on (single or otherwise). The file will be saved as [the-games_Title]_DMD.mp4
Add Clear Logo to the end of the video: (new v2.1)
Check this box to add the tables Clear Logo (if one exists) to the end of the video. The logo will fade in as the video fades out during the last 2 seconds of the recording. This feature is automatically disabled if no Clear Logo for that table exists.
60 FPS Option removed (v2.1)
Experimental. Check this box to record at 60 frames per second. Default is 30 FPS (un-checked). Depending on your video card (and probably some other factors too), this may or may not even be worthwhile.
Change Save Location:
The default save location is in /LaunchBox/Plugins/VPXVideoCreator/CreatedVideos/. The video filename will be saved as the ‘games’ Title in LaunchBox with .mp4 file extension. You can save them anywhere you want.
Reset to Default:
This will reset the Save Location, Delay, Duration and Rotation to their default values.
Save Settings:
This will save the Save Location, Delay, Duration and Rotation values you set and will load these next time you run the plugin.
Save settings before video capture
This is checked by default and will save any changes made when you click Capture Video and before launching VPX.
Capture Video:
This will launch the table you selected to open the plugin with. At the same time, the AutoHotkey script “vpxBypassPinMAME.ahk” will start. This runs in the background and waits for the VPinMAME popup window to appear and then ‘hits the spacebar’ to make it go away (sooner). The script will exit after it see the popup, or 15 seconds. Whichever comes first.
After the amount of Delay time has passed, recording will begin and will continue for the set Duration. When done, VPX closes and the video gets converted.
The video is saved to “_tempVideo.mkv” (in the CreatedVideos subfolder) and then gets converted to an mp4 file. After conversion, _tempVideo.mkv will be deleted.
Keep temp video when done:
By default, “_tempVideo.mkv” will be deleted after the video has been converted. If you want to see what the video looks like before converting, check this box. After your video is complete, go to the CreatedVideos folder to view it. Note: this file gets overwritten each time you click Create Video if you have the checkbox checked.
View Saved Video
Click this to view the converted video. This is the video file shown in Saved Video Location.
VPX Playfield
This shows the default playfield monitor settings you have setup for your Visual Pinball installation. These get read from your Registry settings:
HKEY_CURRENT_USER\SOFTWARE\Visual Pinball\VP10\Player\Display
The Monitor # listed may not be the same as what your Windows Display Settings says. So if it’s “wrong”, ignore it. The Image Scale (W and H) shown will be correct.
If the VPX display settings cannot be retrieved from the registry, monitor #1’s information will be displayed with an asterisk (*) after the monitor number. (Monitor #: 1*)
Some notes:
When you click Capture Video, probably don’t click anything else until recording is complete. However once the table is loaded, feel free to drop in a coin, hit start and play until ‘your time is up’. Just don’t click on another window.
Backglass and DMD recordings only work with B2S Backglass Server (which is what most of them are). PinUPPlayer windows are not supported.
Designed for LaunchBox v11.3 and higher.
Special Thanks!
Special thanks to gtxjoe’s PBX Recorder on VPForums and Carny_Priest’s post on GameEx Forum for paving the way to figuring out an excellent approach to creating your own Visual Pinball table videosnaps.
Huge thanks to @sundogak for convincing me (though it didn't take much once I saw it in action) and showing me how to add video fade and attaching Clear Logos to the videos. Also for all the testing done and invaluable insight!
Future releases and enhancements:
If there’s enough interest in this plugin (as in, it’s actually useful and would get used), I will look at adding:
Option to record the table’s audio in with the video. (added v2.0) Ability to select multiple tables for ‘bulk recording’. Record backglass videos??? (added v2.0) Any REASONABLE request.
As always, any and all feedback is welcome!
283 downloads
-

Mame 0.238 No-Nag
By MadK9
NOTE: This does NOT interfere with the Leader boards at all.
**This removes the nag screen that informs you if a rom doesn't work correctly, or if at all, if you use this no nag, then please do NOT go to the mame support site with issues with games, please only use if you understand that there will be no help from anyone at mamedev as you are using a modified version of mame.
mame.exe - Normal Mame with Nags removed. For Version 0.238 (Note mame no longer carries the 64 in its exe name changed by Devs in 0.229)
It's advisable to download the full 0.238 official pack and install it, then just overwrite the exe with the replacement, this covers any changes the mame devs may have made to the support files.
After you have done this, make sure you copy the folders artwork, ctrlr, cheat, hlsl, ini, folders and the ini files from the root of your original mame folder, and move/copy them to the new install.
make sure in the mame.ini file you have the following set.
Skip_gameinfo 1
206 downloads
-
EmuStation2LaunchBox.bat
By BeemanDev
EmuStation2LaunchBox moves emulation station roms/images (from a pi image saved to drive) into LaunchBox folders.
Then by using a pre-filled platforms.xml file, you can import the lot into LaunchBox with one command.
I've set up most of the front ends over the years and usually automate it. There are loads of pi images available, just grab one, use a tool to extract to your hard drive and run this.
142 downloads
(0 reviews)0 comments
Updated
-

Mame 0.237 No-Nag
By MadK9
NOTE: This does NOT interfere with the Leader boards at all.
**This removes the nag screen that informs you if a rom doesn't work correctly, or if at all, if you use this no nag, then please do NOT go to the mame support site with issues with games, please only use if you understand that there will be no help from anyone at mamedev as you are using a modified version of mame.
mame.exe - Normal Mame with Nags removed. For Version 0.237 (Note mame no longer carries the 64 in its exe name changed by Devs in 0.229)
It's advisable to download the full 0.237 official pack and install it, then just overwrite the exe with the replacement, this covers any changes the mame devs may have made to the support files.
After you have done this, make sure you copy the folders artwork, ctrlr, cheat, hlsl, ini, folders and the ini files from the root of your original mame folder, and move/copy them to the new install.
make sure in the mame.ini file you have the following set.
Skip_gameinfo 1
177 downloads
(1 review)0 comments
Submitted
-

Mame 0.236 No-Nag
By MadK9
NOTE: This does NOT interfere with the Leader boards at all.
**This removes the nag screen that informs you if a rom doesn't work correctly, or if at all, if you use this no nag, then please do NOT go to the mame support site with issues with games, please only use if you understand that there will be no help from anyone at mamedev as you are using a modified version of mame.
mame.exe - Normal Mame with Nags removed. For Version 0.236 (Note mame no longer carries the 64 in its exe name changed by Devs in 0.229)
It's advisable to download the full 0.236 official pack and install it, then just overwrite the exe with the replacement, this covers any changes the mame devs may have made to the support files.
After you have done this, make sure you copy the folders artwork, ctrlr, cheat, hlsl, ini, folders and the ini files from the root of your original mame folder, and move/copy them to the new install.
make sure in the mame.ini file you have the following set.
Skip_gameinfo 1
282 downloads
(2 reviews)0 comments
Submitted
-
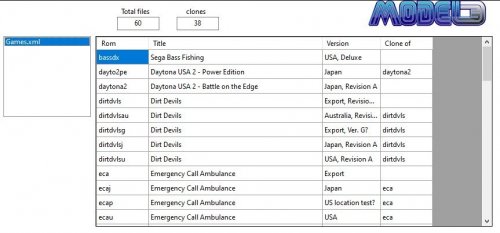
Sega Model 3 Game Importer
By JoeViking245
The intent of this plugin is to import MAME's Sega Model 3 roms that are supported in the Supermodel emulator.
Sega Model 3 machines are not playable in MAME, but a MAME full romset does contain the roms for it. This is where Supermodel ["A Sega Model 3 Arcade Emulator"] comes into 'play'. And quite literally. There are currently 60 machines supported, of which 38 are clones.
The plugin uses "Games.xml" to get the rom names, proper Titles and versions for the SM3 machines that Supermodel supports. This file is located inside the "Config" folder of your Supermodel installation.
Required Files:
This downloaded plugin Games.xml Not required for importing, but highly recommended:
All Supermodel files (you know, like supermodel.exe, etc.) A MAME romset containing the necessary SM3 roms Using the plugin:
Download and unblock the zip file. Copy the folder (which includes 1 file) inside the zip into your ../LaunchBox/Plugins folder. i.e. D:\LaunchBox\Plugins\ImportSegaModel3\ImportSegaModel3.dll Start LaunchBox. Select Tools, Import Supermodel Games.xml v1.00
The process from here should be fairly intuitive by just following the steps in the Import Wizard.
Select the folder where Supermodel's Games.xml file is located (if not automatically selected). Select Games.xml. (if not automatically selected) Choose a Platform to import the games into (You can create a new one or use existing). If you choose an existing Platform, the imported games will be set to Emulator selected in the next step and will not affect any of the existing game's emulator. Select your Emulator. (I strongly recommend Supermodel. But you can choose any emu [and change it later]) Filter the clones (Options are to Import: All games individually, clones as additional apps, no clones). Select the roms’ source folder (Only required if you plan to copy them from their current location). Select the roms’ destination folder (This is required to set the Application Path for the games). Select Copy & Import or Import Only.
Downloading Metadata:
If you selected an existing Platform to import the roms into, Right click that Platform and select “Edit”. Make sure the Scrape As: is set to “Arcade” and then click “OK”.
Click on one of the games, then press CTRL+A to select all games. Now click Tools and select Download Metadata and Media and follow the prompts. Be sure to check the box for: Search for game information and media from the LaunchBox Games Database (recommended).
Check or un-check the media images/videos you wish to download. (You can also click "None" and download these at a later time)
Click Yes, download and replace all existing metadata and media. Then click Finish.
This plugin was "designed" to account for subsequent Supermodel updates. After a Supermodel update (which should include an updated Games.xml file), rerunning this plugin "should" account for any new additions, renamed roms and renamed titles/versions. Adding/changing those respectively in your Platform. It won't, however, account for any games that were completely removed. But I really don't think this will be an issue.
If you're having issues getting Supermodel setup and running your games, a quick Goggle search will usually get you what you need. i.e. "LaunchBox Supermodel", "Supermodel <insert game title here>". For general (and some somewhat specific) information/help regarding Supermodel, see here: Installation - Supermodel: A Sega Model 3 Arcade Emulator (supermodel3.com).
List of currently supported games per Games.xml (Aug 31, 2021):
bassdx Sega Bass Fishing (USA, Deluxe) getbassdx Get Bass: Sega Bass Fishing (Japan, Deluxe) getbassur Get Bass: Sega Bass Fishing (Japan, Upright) getbass Get Bass: Sega Bass Fishing (Japan, Standard) daytona2 Daytona USA 2 - Battle on the Edge (Japan, Revision A) dayto2pe Daytona USA 2 - Power Edition (Japan) dirtdvls Dirt Devils (Export, Revision A) dirtdvlsu Dirt Devils (USA, Revision A) dirtdvlsau Dirt Devils (Australia, Revision A) dirtdvlsj Dirt Devils (Japan, Revision A) dirtdvlsg Dirt Devils (Export, Ver. G?) eca Emergency Call Ambulance (Export) ecap Emergency Call Ambulance (US location test?) ecau Emergency Call Ambulance (USA) ecaj Emergency Call Ambulance (Japan) fvipers2 Fighting Vipers 2 (Japan, Revision A) fvipers2o Fighting Vipers 2 (?) harley Harley-Davidson and L.A. Riders (Revision B) harleya Harley-Davidson and L.A. Riders (Revision A) lamachin L.A. Machineguns: Rage of the Machines (Japan) lemans24 Le Mans 24 (Japan, Revision B) lostwsga The Lost World (Japan, Revision A) lostwsgp The Lost World (Location Test) magtruck Magical Truck Adventure (Japan) oceanhun The Ocean Hunter (Japan) scud Scud Race (Export, Twin/DX) scudau Scud Race (Australia, Twin/DX) scuddx Scud Race (Export, Deluxe) scudplus Scud Race Plus (Export, Twin/DX, Revision A) scudplusa Scud Race Plus (Export, Twin/DX) skichamp Ski Champ (Japan) spikeofe Spikeout Final Edition (Export) spikeout Spikeout (Export, Revision C) srally2 Sega Rally 2 (Export) srally2p Sega Rally 2 (Prototype) srally2pa Sega Rally 2 (Prototype Version A) srally2dx Sega Rally 2 (Export, Deluxe) swtrilgy Star Wars Trilogy Arcade (Export, Revision A) swtrilgya Star Wars Trilogy Arcade (Export) swtrilgyp Star Wars Trilogy Arcade (Location Test, 16.09.98) vf3 Virtua Fighter 3 (Revision D) vf3a Virtua Fighter 3 (Revision A) vf3c Virtua Fighter 3 (Revision C) vf3tb Virtua Fighter 3 Team Battle (?) von2 Virtual On 2: Oratorio Tangram (Revision B) von254g Virtual On 2: Oratorio Tangram (Ver 5.4g) von2a Virtual On 2: Oratorio Tangram (Revision A) von2o Virtual On 2: Oratorio Tangram (?) vs2 Virtua Striker 2 (Step 2.0) vs215 Virtua Striker 2 (Step 1.5) vs215o Virtua Striker 2 (Step 1.5, older) vs298 Virtua Striker 2 '98 (Step 2.0) vs29815 Virtua Striker 2 '98 (Step 1.5) vs2v991 Virtua Striker 2 '99.1 (Revision B) vs299 Virtua Striker 2 '99 (?) vs29915 Virtua Striker 2 '99 (Step 1.5) vs299a Virtua Striker 2 '99 (Revision A) vs299b Virtua Striker 2 '99 (Revision B) As always, I'm open to any and all comments and suggestions regarding this plugin you may have.
249 downloads
- supermodel
- sega model 3
- (and 1 more)
(0 reviews)0 comments
Updated
-

Mame 0.235 No-Nag
By MadK9
Important:
Mame changed the BGFX shader, if you are using this shader, i recommend you either make a completely New install and set it up to how you like, or change the shader options before running a game, then add the no-nag, if you try running this over an older install with the BGFX shader you may find your screen will be dark and barely visable.
NOTE: This does NOT interfere with the Leader boards at all.
**This removes the nag screen that informs you if a rom doesn't work correctly, or if at all, if you use this no nag, then please do NOT go to the mame support site with issues with games, please only use if you understand that there will be no help from anyone at mamedev as you are using a modified version of mame.
mame.exe - Normal Mame with Nags removed. For Version 0.235 (Note mame no longer carries the 64 in its exe name changed by Devs in 0.229)
It's advisable to download the full 0.235 official pack and install it, then just overwrite the exe with the replacement, this covers any changes the mame devs may have made to the support files.
After you have done this, make sure you copy the folders artwork, ctrlr, cheat, hlsl, ini, folders and the ini files from the root of your original mame folder, and move/copy them to the new install.
make sure in the mame.ini file you have the following set.
Skip_gameinfo 1
169 downloads
-

Mame 0.234 No-Nag
By MadK9
NOTE: This does NOT interfere with the Leader boards at all.
**This removes the nag screen that informs you if a rom doesn't work correctly, or if at all, if you use this no nag, then please do NOT go to the mame support site with issues with games, please only use if you understand that there will be no help from anyone at mamedev as you are using a modified version of mame.
mame.exe - Normal Mame with Nags removed. For Version 0.234 (Note mame no longer carries the 64 in its exe name changed by Devs in 0.229)
It's advisable to download the full 0.234 official pack and install it, then just overwrite the exe with the replacement, this covers any changes the mame devs may have made to the support files.
After you have done this, make sure you copy the folders artwork, ctrlr, cheat, hlsl, ini, folders and the ini files from the root of your original mame folder, and move/copy them to the new install.
make sure in the mame.ini file you have the following set.
Skip_gameinfo 1
127 downloads
- mame
- mame 0.234
- (and 2 more)
-

Mame 0.233 No-Nag
By MadK9
NOTE: This does NOT interfere with the Leader boards at all.
**This removes the nag screen that informs you if a rom doesn't work correctly, or if at all, if you use this no nag, then please do NOT go to the mame support site with issues with games, please only use if you understand that there will be no help from anyone at mamedev as you are using a modified version of mame.
mame.exe - Normal Mame with Nags removed. For Version 0.233 (Note mame no longer carries the 64 in its exe name changed by Devs in 0.229)
It's advisable to download the full 0.233 official pack and install it, then just overwrite the exe with the replacement, this covers any changes the mame devs may have made to the support files.
After you have done this, make sure you copy the folders artwork, ctrlr, cheat, hlsl, ini, folders and the ini files from the root of your original mame folder, and move/copy them to the new install.
make sure in the mame.ini file you have the following set.
Skip_gameinfo 1
190 downloads
-
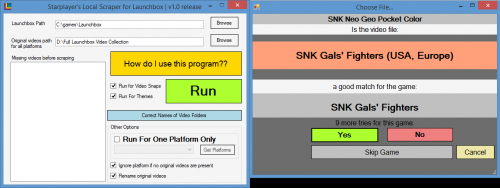
scraper Starplayer's Local Scraper for Launchbox
By starplayer
This program is a scraper for your video files, to be used with launchbox.
------------What it does:------------
Imagine you have in your possesison a full collection of video snaps and theme videos for launchbox.
Now, you might just have them all in your launchbox\videos\ folder, and everything will work.
However, you might prefer to have only some games that you like in your launchbox installation, in a faster SSD, or you might have a Raspberry Pi, which has limited space.
In those cases, you will want to only get the videos that correspond to the games you have in launchbox.
This program does that automatically for you.
-----------------------------------------------------------------------------------------------------------
------------How do you use this program then??------------
Glad you ask!
-1: set the path of your launchbox installation. Usually C:\program Files\Launchbox for example
-2: set the path of the folder in which you have your full video collection. For example D:\Launchbox Videos\
-3: Check the checkboxes "Run for videos snaps" and "Run for Themes" depending on
if you want to get game snaps, theme videos, or both
-4: Press Run
-----------------------------------------------------------------------------------------------------------
------------Things to have in consideration:------------
You have to have your video folders with the same name of the folders in the launchbox directory.
ie, if a folder is called "sega saturn" in launchbox, the correspondent in the folder that containsall your videos can't be called only "saturn".
The blue button "Correct Names of video folders attempts to solve this, but you should check.
If you want, you can run the program for just one game platform.
To do that, check "Run for One Platform Only", press "Get Platforms" and select the platform you want to run for.
-----------------------------------------------------------------------------------------------------------
------------"Other Options" explanation:------------
--"Ignore platform if no original videos are present" - check this if you don't want to be reminded thatthe program didn't found any videos for a specific platform.
--"Rename original videos": check this if you also want the original videos in your video collection to bepermanently renamed to the name that launchbox is expecting for each game.
Any suggestions, you can find me on Launchbox's forum.
You're welcome. Be happy.
Starplayer
Update: You can find the source code here, in case anyone wants to change it. License is GPL: https://github.com/rafcon-dev/Launchbox-Local-Scraper
294 downloads
-
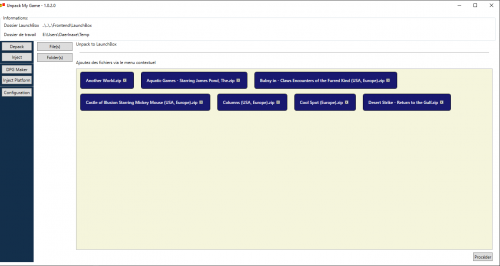
Unpack My Game
By Axenn
Hi guys !
1) Description
UnpackMyGame allow to inject games packed with PackMyGame into LaunchBox, based on wpf/.net Core 3.1 instead of forms/.net framework ...
It's available in English and French.
2) Current Version
Unpack-My-Game: v1.0.2.1 (beta) PackMyGame
3) Links
Because there is a lot of modifications, bugfixes since the last version i made a wiki on my github, i will try to let the best explanations on it.
Github Wiki Don't hesitate to signal any bug, there is a log system, it will help to improve the application (if you are french, write to me in french ^^)
4) Some words...
If, after have inject a game, you don't see its cover, check if the emulator injected from the xml files (your old backup) still available, and/or refresh images. Sapp Pas Root could help you at the end to manage paths. I tested a lot Pack and Unpack, 3 months for pack and 1 month since i changed all the core for Unpack. I tried to place some securities to avoid bad manipulations, but it still to be a beta there is probably some (minor i hope) bugs to remove. Unpack makes a copy of platforms before to inject, you have 100 copies before it blocks on the 00 version of the backup and overwrite it. I must find an algorithm to overwrite by date on 100 copies. Difference between unpack and inject is inject don't add files... If you have several users on the same machine, you don't need to copy files but you need to inject games for each launchbox profile, inject is here for that. Pack and Unpack use a common library i wrote, the same used in SappPasRoot... Step by step i will accelerate and reduce verbose, and put a parameter in config file to change the verbose mode for the user. You need the 7z NATIVE dll to use 7z compression, it must be copie in x86 or x64 folder according of your version. Currenly tested only on windows computer, i will happy to have feedback if somebody test with linux but i don't think it can work because of link i use in paths. I must install a linux machine soon i will see what can i do for that. 5) Bug Knowns
Inject game: right button crash, fixed on source files.49 downloads
(0 reviews)0 comments
Updated
-
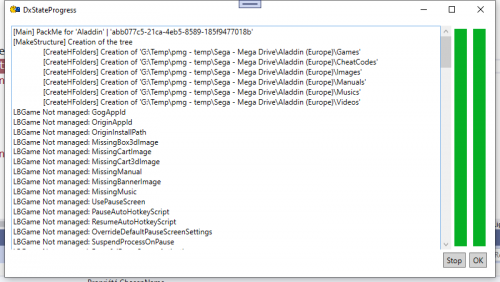
PackMyGame V2
By Axenn
Hi guys,
I made a new version of PackMyGame, based on wpf/.net Core 3.1 instead of forms/.net framework ...
1) What's new
This new version bears the possibility to unpack games, extract platforms to reinject later, don't have paths into the xml extracted, check links validity, md5 file calculation. Unpack need a new file, generated by PackMyGame, 'DPGame.json', but you can generate a new:
By pack if you have always your game into LaunchBox. By the old xml files (TBGame, EBGame) with Unpack. This DPGame.json file allows also to change, place default files... except for Additionnal Application and the main, there is a lot of modification with LaunchBox, i prefere that the user changes it into LaunchBox.
Both are now portable, new config file is created at the root. Both use relative links for LaunchBoxPath and the working folder... You could let it on an external hard drive.
Read the wiki to discover all the other things that changed since the last version.
2) Description
PackMyGame allow to pack your games into folders, zip or 7zip archives. If you need to keep a backup of them, even more if you translated descriptions of your games, you could keep it in a sure place with this application.
It's available in English and French, PackMyGame use now a xml file to translate, you could easy make your own translation, put it in the Languages folder, it will be recognize
3) Version
Pack-My-Game: v2.0.2.0 (beta) UnpackMyGame
4) Links
Because there is a lot of modifications, bugfixes since the last version i made a wiki on my github, i will try to let the best explanations on it.
Github Wiki Don't hesitate to signal any bug, there is a log system, it will help to improve the application (if you are french, write to me in french ^^)
5) Some words...
I tested a lot Pack and Unpack, 3 months for pack and 1 month since i changed all the core for Unpack. I tried to place some securities to avoid bad manipulations, but it still to be a beta there is probably some (minor i hope) bugs to remove. I'm sick, this why sometimes i can't make update, i will not die but i have a genetical dicease that make my days very difficult during months. This is why i couldn't make any update during months, i couldn't understand my own code because i was to tired. I apologize for that. Pack and Unpack use a common library i wrote, the same used in SappPasRoot... Step by step i will accelerate and reduce verbose, and put a parameter in config file to change the verbose mode for the user. You need the 7z NATIVE dll to use 7z compression, it must be copie in x86 or x64 folder according of your version.81 downloads
(0 reviews)0 comments
Updated
-

Mame 0.232 No-Nag
By MadK9
NOTE: This does NOT interfere with the Leader boards at all.
**This removes the nag screen that informs you if a rom doesn't work correctly, or if at all, if you use this no nag, then please do NOT go to the mame support site with issues with games, please only use if you understand that there will be no help from anyone at mamedev as you are using a modified version of mame.
mame.exe - Normal Mame with Nags removed. For Version 0.232 (Note mame no longer carries the 64 in its exe name changed by Devs in 0.229)
It's advisable to download the full 0.232 official pack and install it, then just overwrite the exe with the replacement, this covers any changes the mame devs may have made to the support files.
After you have done this, make sure you copy the folders artwork, ctrlr, cheat, hlsl, ini, folders and the ini files from the root of your original mame folder, and move/copy them to the new install.
make sure in the mame.ini file you have the following set.
Skip_gameinfo 1
217 downloads
-
Mame 0.231 No-Nag
By MadK9
NOTE: This does NOT interfere with the Leader boards at all.
**This removes the nag screen that informs you if a rom doesn't work correctly, or if at all, if you use this no nag, then please do NOT go to the mame support site with issues with games, please only use if you understand that there will be no help from anyone at mamedev as you are using a modified version of mame.
mame.exe - Normal Mame with Nags removed. For Version 0.231 (Note mame no longer carries the 64 in its exe name changed by Devs in 0.229)
It's advisable to download the full 0.231 official pack and install it, then just overwrite the exe with the replacement, this covers any changes the mame devs may have made to the support files.
After you have done this, make sure you copy the folders artwork, ctrlr, cheat, hlsl, ini, folders and the ini files from the root of your original mame folder, and move/copy them to the new install.
make sure in the mame.ini file you have the following set.
Skip_gameinfo 1
170 downloads
-

Mame 0.230 No-Nag
By MadK9
NOTE: This does NOT interfere with the Leader boards at all.
**This removes the nag screen that informs you if a rom doesn't work correctly, or if at all, if you use this no nag, then please do NOT go to the mame support site with issues with games, please only use if you understand that there will be no help from anyone at mamedev as you are using a modified version of mame.
mame64.exe - Normal Mame with Nags removed. For Version 0.230
It's advisable to download the full 0.230 official pack and install it, then just overwrite the exe with the replacement, this covers any changes the mame devs may have made to the support files.
After you have done this, make sure you copy the folders artwork, ctrlr, cheat, hlsl, ini, folders and the ini files from the root of your original mame folder, and move/copy them to the new install.
make sure in the mame.ini file you have the following set.
Skip_gameinfo 1
127 downloads
(0 reviews)0 comments
Submitted


.thumb.png.632d19a4f33f16491745f891e0ea495b.png)
.thumb.png.d8248f4f7e6ac686eebb9c1c4d1c451a.png)
(Disc1)(KeyDisc)(SegaCD).thumb.png.f871615d9008153c8073315db041de44.png)


.thumb.png.fdf9695bea36e103007bccb9dbd6bd3a.png)