-
Posts
4,025 -
Joined
-
Last visited
-
Days Won
54
Content Type
Profiles
Forums
Articles
Downloads
Gallery
Blogs
Everything posted by Zombeaver
-
I added a section about splitting out VirtualMidiSynth into separate virtual devices which, while by no means required, is pretty handy for specific scenarios.
- 7 replies
-
- general midi
- mt-32
-
(and 3 more)
Tagged with:
-
It might be, it's just the one I've always used since it's the one they recommend in the "Remap Joystick" section of the site. It works fine for most things, and identifies the joystick number, etc. but I wouldn't be surprised if it wasn't pretty out of date at this point.
-
It shouldn't. It's never made any difference for me between wired and wireless but that's with the caveat that I use the USB dongles for both 360 and One controllers; and I can confirm that AHK does have some issues with recognizing inputs when using a One controller over bluetooth specifically. Last time I tried that, the test script didn't recognize any inputs when it was over bluetooth but worked fine with the wireless dongle. Hmm, very weird... Yeah, definitely. One more button is one more button.
-
Hmm. I'll give that a try. The test script has never shown anything for me when I press the home button on either a 360 or One controller.
-
Or, better yet, try out the free version and see if you like it. There's quite a bit you can do with LB without paying anything. If, after that, the premium features are something you'd like access to after you've settled in, get a premium license. There are quite a few really good premium features that are worth getting, but there's no reason to jump right into them without trying the free package out first. If you like it and decide to buy a premium license, you'll get a discount code which you can use over at Emumovies too. I recommend Lifetime for both as you'll most definitely get your money's worth, but you should decide whether or not it's a front end that you want to use first.
-
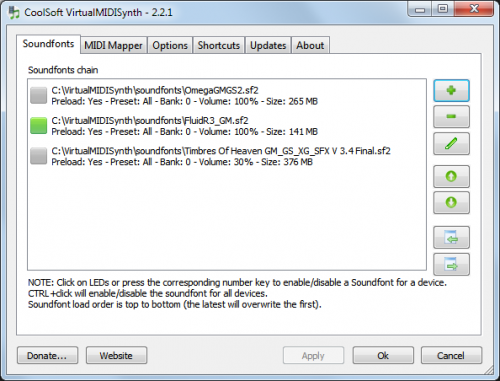
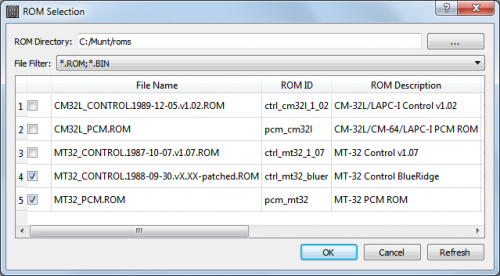
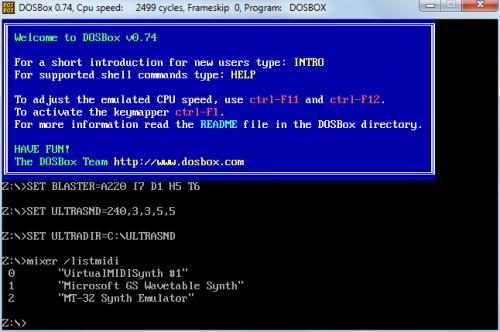
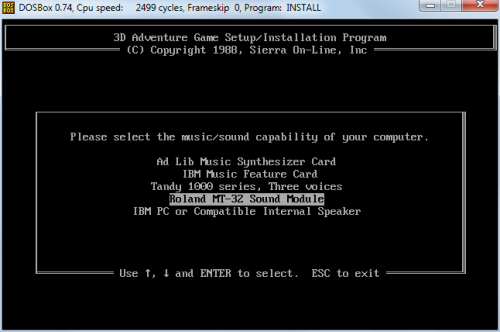
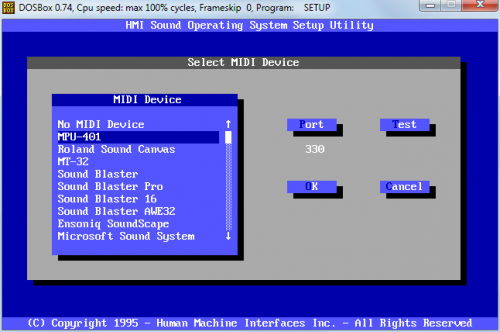
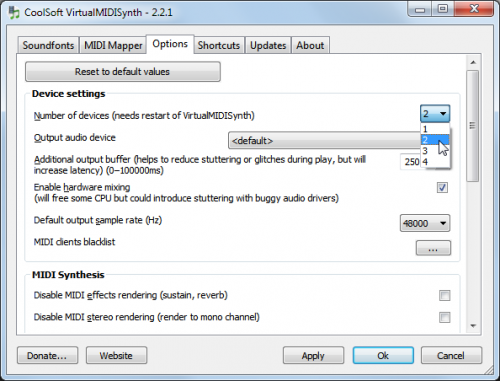
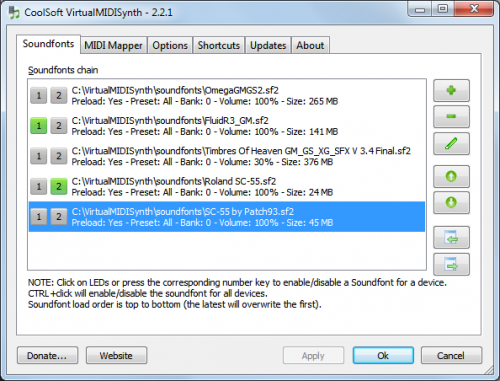
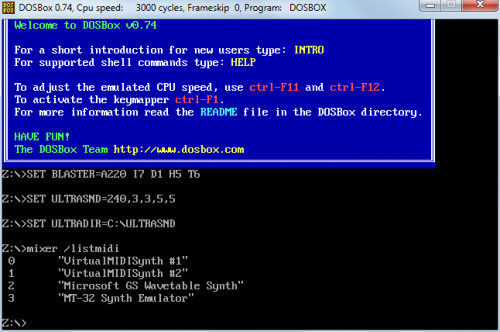
Introduction Let's start off with the obvious question: why should you care? Well, do you like DOS games? Would you like to have really high quality music in your DOS games? If the answer is yes to these, then you should definitely care. As an example of the difference this can make for General Midi games, check out these two clips. The first is using Adlib/Sound Blaster audio, and the second is using the FluidR3 soundfont (which we can use with VirtualMidiSynth). Now let's take a look at the difference we can achieve for MT-32 supported games via Munt. The beginning to 2:02 in the below clip is using Adlib audio. 2:03 to the end is using MT-32 audio. We'll be doing this with a couple tools that we can hook into in DOSBox that will function as virtual midi devices - VirtualMidiSynth for General Midi audio and Munt for Roland MT-32 audio. Think of these as virtual sound cards but specifically for music. Back in the day, a number of dedicated midi audio devices were available but were prohibitively expensive for most gamers - they were designed primarily with music production in mind, not gaming, but thanks to groups like Sierra which made extensive use of the MT-32 in their games it gained legendary status and set the bar for video game music quality. Prior to General Midi, the MT-32 and similar devices used banks of instruments arranged in their own arbitrary fashion which meant that midi music had to be composed for specific devices - you couldn't just take music composed for one specific device and swap that device for another as the instruments would be wrong, because they'd be arranged differently. General Midi was a standardization of midi devices which made the arrangement of instruments uniform, so a single track could be used for multiple midi devices. Because of this, the MT-32 eventually faded away, but you'll want to have access to both because in the period prior to General Midi, MT-32 was generally the best choice available. Okay, let's get started. Installing VirtualMidiSynth The first thing we need to do is install VirtualMidiSynth. You can find it here. You'll also need a soundfont to go with it. Several good ones are listed there. FluidR3 is my recommendation as I think it's probably the best all-rounder. Timbres of Heaven and Omega GMGS2 are both very good too. Omega GMGS2 isn't listed on that page but you can find it here. An important note here is that a number of the soundfonts are in a compressed format called .sfArk. These are not usable in VirtualMidiSynth and need to be decompressed. There's a dedicated program for doing this, but an easier solution is using cloudconvert. You select the sfArk file to upload, select sf2 as the output format (this should already be set), click the "start conversion" button at the bottom to convert it, then download it. You can find a comparison of quite a few different soundfonts here. That one doesn't include Omega GMGS2 but you can find the same song using Omega GMGS2 here. Once you've installed VirtualMidiSynth, open up the Configurator and click the + button on the right side of the window, and find the soundfont(s) that you want to use. Click the button to the left of the soundfont name to enable/disable it. Green means it's enabled and gray means it's disabled. Once you're done, click Apply and then Ok. I would also recommend enabling the "Start automatically at logon" box in the Options tab if you haven't already. Installing Munt Now we need to install Munt. You can find it here. You'll also need the MT-32 roms to go with this. I can't supply these to you but Google is your friend. The two that I use, specifically, are named "MT32_CONTROL.1988-09-30.vX.XX-patched.ROM" and "MT32_PCM.ROM". Once you've installed Munt, open it and go to Options -> Rom Configuration, click the "..." button to browse to the rom location and then click the checkbox next to those two files. Enabling them in DOSBox Okay, so that's it for setting up the programs themselves. Now we just need to mess with DOSBox a bit. Open up DOSBox - you can do this by right-clicking on a DOS game in your library that has DOSBox enabled and selecting the option to start DOSBox, or by going into Launchbox\DOSBox\ and starting DOSBox.exe. In the window, type the following: mixer /listmidi What you'll then see is a list of numbers. These correspond to the various midi devices available to it. Now that we've installed VirtualMidiSynth and Munt, we should see 3 numbers (Microsoft GS Wavetable Synth is installed by default with Windows): Make note of which numbers correspond to which devices. You should really be making configurations (.conf files) for every game, but that's a discussion for another time. Whether you do or don't, you're going to need to edit the .conf that you're currently using to tell it to use the device that you want to use. In the above case, if I want to use VirtualMidiSynth I'll need to indicate that I want to use device 0. If I want to use Munt, I'll need to indicate that I want to use device 2. I use VirtualMidiSynth as the default as it has wider coverage, but for those earlier games where I want to use MT-32 specifically I'll need to create a separate .conf for them and choose the different device. You do this by finding the line "midiconfig=" in your dosbox.conf and placing the number of the device you want to use after the equals sign. Keep in mind that all this is doing is setting up DOSBox to be able to use VirtualMidiSynth or Munt, it's not enabling GM or MT-32 audio within each game. You'll still need to setup the games themselves to use GM or MT-32 audio, just like you would if you wanted to specify Soundblaster or any other audio device. Most DOS games come with a separate setup.exe/install.exe/sound.exe/setsound.exe that'll let you choose the audio device (Soundblaster, Ultrasound, MT-32, etc.) so you'll need to use them and set the audio device to GM or MT-32. Launchbox normally does a pretty good job of picking out which .exe to use for this, but you can double-check by editing the library entry, and in the Launcher tab the top .exe should be for the game itself, and the bottom one should be for the setup .exe. You can start it by clicking on the "Configure" option in the right-click menu for a game. Note that there will be some cases where "General Midi" isn't listed but "MPU-401" is - VirtualMidiSynth usually works well with MPU-401 (but it's terrible for MT-32). If both GM (or MPU-401) and MT-32 are available, you'll have to experiment to see which you prefer - remember that you'll need to change the midiconfig= number to do this. Not all games support MT-32, and not all games that support MT-32 necessarily sound best with it (some were designed specifically with MT-32 sound in mind, and others weren't). The vast majority of instances where it's available though it's going to be a huge improvement. If both MT-32 and GM are available, it can be a toss-up. For MT-32, I'd recommend starting with some early Sierra games (Police Quest 2, Space Quest 3, etc.) as those are about as clear an example of good MT-32 usage as any - if you've got everything setup right, you'll definitely know one way or the other. There's a list of games that support MT-32 here. It's pretty long though I'm fairly certain it's not entirely complete. For GM you're going to be looking at games from the early to mid 90s as this is when it became the standard. As time went on, music shifted to CD-audio where these became mostly irrelevant, but there's a solid period of time from the late 80s to mid 90s where you're gonna see a huge difference with these. Anyway, I think that's pretty much everything. Have fun blasting your awesome new music! Bonus (Multiple VirtualMidiSynth Devices) This is by no means necessary, but thought I should mention it here as well. You can actually split out VirtualMidiSynth into up to four different devices each setup to use a different soundfont. This is actually quite handy since it means you can make a separate device specifically for, say, Roland SC-55 (the followup to the MT-32) for example for use with the Roland Sound Canvas option that some games offer. You do this by going to the "Options" tab in VirtualMidiSynth and then clicking the drop-down for "Number of devices". Then restart VirtualMidiSynth and you'll notice new boxes to the left of each soundfont based on the number that you chose. Click the button with 1 for the font that you want to use for device 1, 2 for 2, etc. Now, when you use mixer /listmidi again you'll notice that you now have a corresponding number of new devices. All the same rules for selecting the midiconfig= number in the .conf still apply here. Note that if you plan on splitting them out like this, do it sooner rather than later since, as you can see, this shifts the device numbers around (what was "1" is now "2", and what was "2" is now "3") which could obviously create a problem for existing .confs that you've created where the number has now changed. Again, you don't have to do this. If you want to just flip between them with one device within VirtualMidiSynth, that's okay too, but I think it's a good idea to have a separate one dedicated to Sound Canvas at least.
- 7 replies
-
- 8
-

-

-
- general midi
- mt-32
-
(and 3 more)
Tagged with:
-
No, you'd make them separate lines, like $4:: { Process, Close, {{{StartupEXE}}} } $3:: { Process, Close, {{{StartupEXE}}} } Scroll up to my CCS64 script above if you want a more complex example.
-
You likely can't. AHK is very picky/finicky when it comes to joystick hotkeys. You can't assign the Xbox button on a 360/One controller in AHK (it doesn't recognize the input) so I would assume the same would be true for a PS4 controller. You can test by downloading the joystick test script here: https://autohotkey.com/docs/scripts/JoystickTest.htm Run the script with the controller connected and if it doesn't show a button name when you press the home button you won't be able to use it. If it does show a button name you'll just need to duplicate your script and use the button as the hotkey to trigger it. Something like 1Joy8:: followed by the close command.
-
Absolutely! Got a bunch of stuff left to do. I just needed to take a bit of a break. That C64 set took a lot out of me - that was about two solid weeks of work that absorbed 100% of my free time during that period. Been taking a bit of a rest and actually playing some games for myself the last week I think Star Trek: A Final Unity will likely be up next.
- 274 replies
-
- 3
-

-
- abandonware
- dos
-
(and 2 more)
Tagged with:
-
-
No problem. It's usually the small things
-
I'm talking about launching standalone and RA through Launchbox. It works fine. You uh... might wanna try adding a .dll at the end of your core there...
-
It's working fine here, both in standalone and RA. You'll need to send some screenshots. I need to see 1) the Launcher tab for the game 2) the DOSBox tab for the game 3) the emulation tab for the game and 4) the associated platform tab of your Retroarch emulator entry with the command line shown for MS-DOS. Things like joy2key and xpadder generally don't work over streaming services like Steam in-home streaming/Steam Link unless you're using VirtualHere (which has its own share of issues). DOSBox's own built-in mapper is quite robust, however, when it comes to remapping inputs and should work over streaming. It's accessible via Ctrl+F1 while DOSBox is running. If you want different mapping for different games you're going to need to create separate .confs directed to different map files. You really should be creating individual .confs anyway, to be honest with you. Many games need different settings and there's not just a one-size-fits-all setting solution when it comes to DOS games.
-
This is covered in the video. They're separate.
-
You're not really providing much useful information here. 1) Send a screenshot of the contents of the .zip you're trying to use. 2) Send a screenshot of the hard drive tab for the config.
-
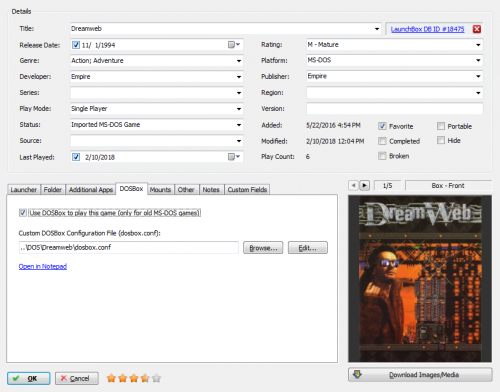
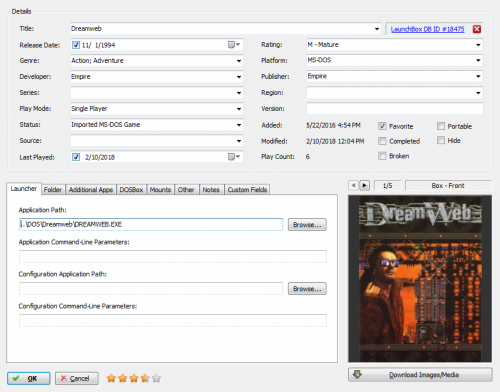
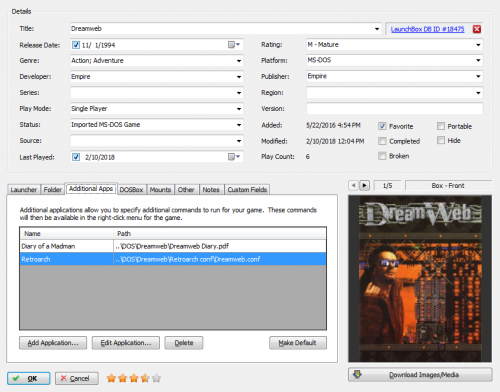
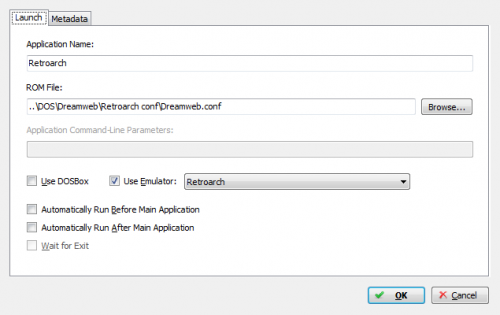
You're not giving enough information here. Are you actually indicating in LB that you want to use DOSBox for them (default behavior for DOS games)? Because, if so, you shouldn't; not if you're planning on using RA. You'd need to uncheck the DOSBox checkbox first, then go to the emulation tab and select Retroarch as the emulator. You'd also likely need to create a .conf for the specific game with the correct start commands (mounting paths, etc.). Generally you can't just have a core in your associated platforms and fire up a DOS game like anything else. It's not like throwing a SNES game at it. I actually don't recommend using RA for DOS as it's 1) more convoluted than working with standalone DOSBox and 2) has some significant limitations not present in standalone DOSBox like not having access to virtual midi devices like Munt and VirtualMidiSynth 3) has a really awful way of handling cycles. That said, if you really must use RA for it, the way I usually do this is by adding it as an additional app, with the default being set to use standard DOSBox. So, in this case, the launcher tab is directed to the game .exe, the use DOSBox box is checked in the DOSBox tab, and I've directed it to the .conf that I've created for the game: Then, in the Additional Apps tab, I've added an app for Retroarch. I've named it "Retroarch", directed it to the separate .conf that I've created for the game for RA, and I have Retroarch selected as the emulator. Now I can start the game normally and get normal DOSBox or right-click on it and select Retroarch and start it there. If you were to only use RA, you'd need to uncheck the "Use DOSBox" box in the DOSBox tab, then select the .conf (or .exe, though this won't always work) in the Launcher tab, and select Retroarch in the Emulation tab.
-
I'm not sure what you mean by "zip folder" but I answered your question in the other thread. You just choose the add button and navigate to them.
-
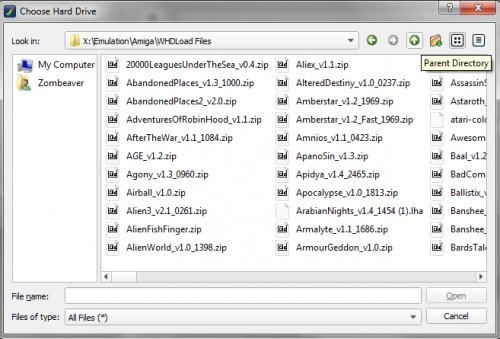
You just need to navigate to them. Use the custom default config, go to the hard drive tab, click the add button and then select the zip you want. I show this in the video. If the folder that it defaults to when you click the add button isn't the right one, just use the up (parent directory) button until you get to wherever they are.
-
FXAA has the tendency to make things a little too blurry in my opinion. It most assuredly doesn't "completely fix" aliasing. It blurs everything, which makes aliasing slightly less noticeable while making everything blurrier in the process. It's not going to "hurt" anything in the sense that it'll break anything, but I don't think it looks better, personally. Small details, text, that sort of thing, often turns into a blurry mess. Pretty much, yeah. You can change to Blend bff/Blend tff or Auto (which will use one of the Blend modes) which will eliminate jitter, but will make everything blurrier (even during moments that would have no jitter with a Bob setting). Generally the jitter is only present during non-gameplay moments (like a pause screen or something), if at all, if I'm using one of the Bob modes. Some games have no jitter at all even with a Bob mode. The only games where any of this is relevant is ones that have "Bob tff" or "Bob bff" listed under "Interlacing" on the spreadsheet. Anything else is going to either be one of the Blend modes or Auto which will either be Blend or none.
- 619 replies
-
- automation
- ps2
-
(and 1 more)
Tagged with:
-
3.jpg.742da72ac43a94705002c210c5b6f7fd.thumb.jpg.f8fc1cacc611a7156fb5cc60847b357f.jpg)
PCSX2 Configurator
Zombeaver replied to alec100_94's topic in Third-Party Applications and Plugins (Released)
Yes, just use the configure button and then go into the video settings and change the scaling. I have some other tips in my config thread:- 183 replies
-
- pcsx2
- per-game config
-
(and 1 more)
Tagged with:
-
Well there's your problem. I need to see the associated platform tab of your PCSX2 entry and the emulator tab of a specific game in your library. EDIT: And a screenshot of the name of the platform in your library.
-
It sounds to me like you don't actually have an emulator assigned to your library entries. That message sounds like a Windows prompt, not one from PCSX2 or LB. Send a screenshot of the emulator tab from one of the library entries.

3.jpg.742da72ac43a94705002c210c5b6f7fd.thumb.jpg.f8fc1cacc611a7156fb5cc60847b357f.jpg)
