Third-party Apps and Plugins
223 files
-

Steam Scraper
By srxz
Plugin that scrapes Steam Information, banner, screenshots and video to a selected game.
Requirements: Launchbox 8.8+
Install: Extract the content of zip file to : Launchbox/plugins/SteamScraper
Source code: Github (feel free to make a pull request )
Thanks to:
@fawkesyeah for the extensive testing
@CriticalCid for Ideas.
EDIT
If you have trouble running the plugin and crashing due CAS error, please right click on the DLL's , properties and then unblock.
Usage:
Just paste the Steam URL from the game that you need to scrape information.
Video Tutorial:
If you want to add Additional Custom fields and Tags please edit the properties.json :
Note: This will generate a LOT of tags, I advise to hide it if you are going to use it. (Legacy Settings -> Game Details -> Disable Custom Fields)
Also if you have the SteamDB or SteamSpy Link only you can use it to get the Steam metadata as well, the regex works just remind to put the / on the final url just like this:
BUT THIS WONT GET INFO FROM THE RESPECTIVELY WEBSITES, IT WILL GO TO STEAM ANYWAYS.
2,238 downloads
-
BigBox Daily Reboot
By superrob3000
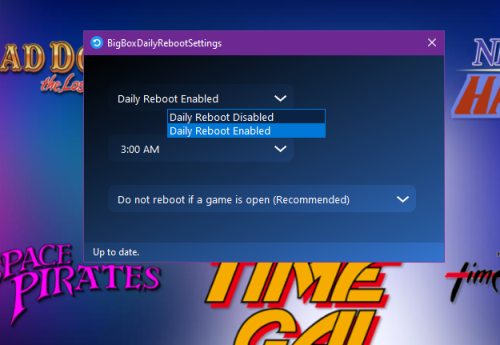
Plugin that adds automated daily reboot support to BigBox (to prevent any slowdowns or errors when running for days). Daily reboot setup is done directly from LaunchBox. Once enabled, your PC will reboot every day at the chosen time if BigBox is running. The plugin is also smart enough to skip the reboot if you are playing a game at the chosen reboot time.
Tutorial and Demo:
Installation:
Copy BigBoxDailyReboot.dll to your LaunchBox/Plugins folder. Open LaunchBox and choose Tools->BigBox Daily Reboot Settings Set daily reboots to Enabled and choose a reboot time. If your PC is not already booting directly into BigBox, create a shortcut to LaunchBox/BigBox.exe and place the shortcut into your Windows startup folder (to get to the startup folder choose Run from the Windows Start menu, type shell:startup in the command box, and hit OK).
Release History:
1.00:
- Initial release.
1.01:
- Improved detection of games being open at reboot time (Steam games were sometimes not being correctly reported as closed).
- Added optional debug log file.
1.02:
- Added version info to the settings screen.
88 downloads
-
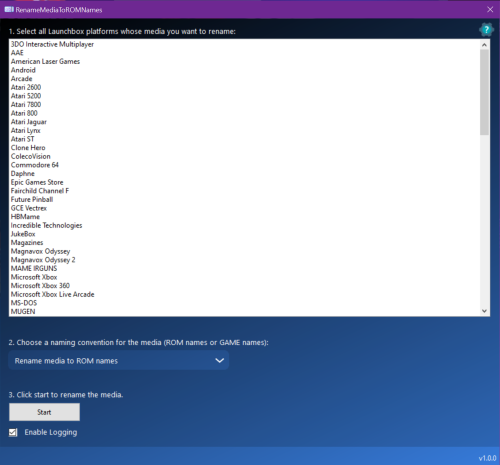
Rename Media Images/Videos as Rom Name or Game Name Format
By superrob3000
A plugin to allow you to switch between ROM name format and Game name format for your media files.
Installation:
Download RenameMediaToRomNames.dll to your PC. Close LaunchBox/BigBox and copy the dll file to your LaunchBox/Plugins directory. It is highly recommended that you make a backup of your LaunchBox/Images and LaunchBox/Videos folders prior to using this plugin.
Renaming game media for entire platforms:
1. Select "Rename Media To ROM or Game Names" from the Tools dropdown in LaunchBox.
2. Select the platform (or platforms) whose game media you want to rename.
3. Choose which format you want to rename the media to (ROM name format or Game name format).
4. Click Start.
Renaming media for individual games:
1. In LaunchBox, select the game or multiple games whose media you want to rename.
2. Right click and select "Rename Media To ROM or Game Names" from the game menu.
3. Choose which format you want to rename the media to (ROM name format or Game name format).
4. Click Start.
Renaming manuals: (new in version 2.0)
To rename game manuals, click the "Include Game Manuals" checkbox prior to hitting the Start button.
FAQs:
Q. Why would anyone want to use this?
A. I actually don't know, but I wrote it because some people on the forums requested it. So if you find this plugin useful please let us know why in the comments 😄.
996 downloads
-
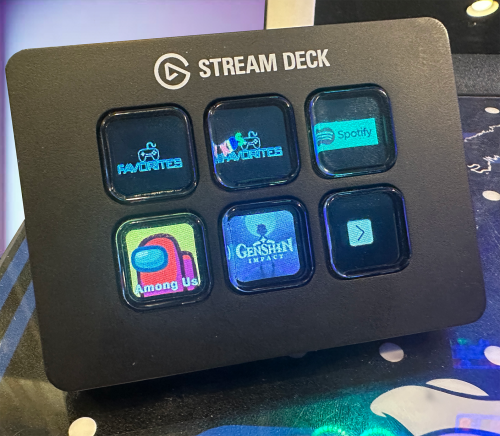
CLI Launcher - LaunchBox Command Line Interface for launching games directly from Stream Deck
By superrob3000
This plugin adds a command line interface to LaunchBox/BigBox for launching games via Stream Deck or having platform and playlist shortcuts. Marquee(s)* and LEDBlinky get updated automatically. Launching games on a remote PC is also supported.
*All Marquees will be updated when using either LaunchBox or BigBox if you are using the ThirdScreen Plugin. If you're using the default BigBox marquee handling, then your single marquee will be updated when using BigBox only.
Installation:
*** Before installing, if you are using the ThirdScreen plugin please make sure you are using the latest version. Download CLI_Launcher.zip to your PC. Right click on the zip file and extract all files. Close LaunchBox/BigBox and copy the Plugins and ThirdParty folders to your LaunchBox directory.
Usage (simple game shortcuts):
Right click on a game in LaunchBox and choose "CLI Launcher->Create Windows Shortcut".
A dialogue will open to allow you to choose the name and location of the game shortcut. When ready, click "Save" to create the shortcut. To create windows shortcuts for a batch of games at once: Select multiple games, right-click and choose "CLI Launcher->Create Windows Shortcuts".
Usage (advanced shortcuts and Stream Deck):
The currently supported commands are listed below. These can be run from a Stream Deck, from AHK scripts, or directly from the command line. To run a command from a Stream Deck, open the Stream Deck app and drag the Open action onto one of your buttons. Then on the App/File line, enter the commands as shown below including any required parameters. For example:
Game Shortcuts (launch command): (works with both LaunchBox and BigBox)
"<path_to_launchbox>\ThirdParty\CLI_Launcher\CLI_Launcher.exe" launch "<platform_name>" "<game_name>"
For example, to launch Street Fighter Alpha 2 from the Arcade platform:
"C:\Users\Administrator\LaunchBox\ThirdParty\CLI_Launcher\CLI_Launcher.exe" launch "arcade" "Street Fighter Alpha 2"
New in v7.0.0 (launch_by_id command): To launch a game using its game id instead of platform name/game title you can use the launch_by_id command. For example:
"C:\Users\Administrator\LaunchBox\ThirdParty\CLI_Launcher\CLI_Launcher.exe" launch_by_id "1e48ac15-55e2-47f7-a33e-486451a16def"
New in v7.0.3 (launch_by_db_id command): To launch a game using its database id instead of platform name/game title you can use the launch_by_db_id command. For example:
"C:\Users\Administrator\LaunchBox\ThirdParty\CLI_Launcher\CLI_Launcher.exe" launch_by_db_id "2532"
New in v8.0.1: The option "-t=num_minutes" can be passed to the launch commands. The game will be launched and then automatically closed after the specified number of minutes. By default it will attempt to use the ESC key to exit the game, but for games where that won't work (e.g Windows games) then you can also pass "-altf4" to tell it to use Alt-F4 to exit instead.
Platform Shortcuts (platform command): (added in v2.0.0 - only works with BigBox)
"<path_to_launchbox>\ThirdParty\CLI_Launcher\CLI_Launcher.exe" platform "<platform_name>"
For example, to navigate to the Arcade platform in BigBox:
"C:\Users\Administrator\LaunchBox\ThirdParty\CLI_Launcher\CLI_Launcher.exe" platform "arcade"
New in v8.0.1: The option "-all" can be passed to the platform command instead of a specific platform. This will take you to the platform/playlist root menu.
Playlist Shortcuts (playlist command): (added in v2.0.0 - only works with BigBox)
Run, "<path_to_launchbox>\ThirdParty\CLI_Launcher\CLI_Launcher.exe" playlist "<playlist_name>"
For example, to navigate to the favorites playlist in BigBox:
"C:\Users\Administrator\LaunchBox\ThirdParty\CLI_Launcher\CLI_Launcher.exe" playlist "favorites"
Open Manual for Currently Selected Game (manual command): (added in v8.0.2 - works with BigBox and LaunchBox)
Run, "<path_to_launchbox>\ThirdParty\CLI_Launcher\CLI_Launcher.exe" manual
For example, to open the manual for the currently selected game:
"C:\Users\Administrator\LaunchBox\ThirdParty\CLI_Launcher\CLI_Launcher.exe" manual
Remote commands:
To run a command on a different PC that has the plugin installed and is running LaunchBox or BigBox just add "remote_ip=<ip_of_remote_pc>". For example, to launch a game on a different PC with IP 192.168.168.238:
"CLI_Launcher.exe" launch "arcade" "Street Fighter Alpha 2" "remote_ip=192.168.168.238"
FAQs:
Q. What if neither LaunchBox nor BigBox are open when the script runs?
A. The command will get ignored if LaunchBox or BigBox is not open. As of version 8.0.0 you'll also get an error message when trying to run shortcuts without LaunchBox or BigBox being open.
Q. What if a game is already open when the script runs?
A. The command will just get ignored if a game is already open.
Q. Why not just launch the emulator and/or game directly from the Stream Deck or script?
A. Using CLI Launcher is much simpler and leverages all the work you've already done in setting up LaunchBox to properly launch the game. Also, if you were to run the emulator and/or game directly from a script, your Marquee(s) and LEDBlinky would not get updated for the game.
Q. Instead of manually entering the command for a Stream Deck button, can I use the "Create Windows Shortcut" game menu item and then just point Stream Deck to that shortcut?
A. Yes, but... Elgato's Stream Deck app has a quirk where if you use the file selector button to select a shortcut, it will jump straight to the executable that the shortcut points to and it will ignore any parameters that the shortcut was passing in. So to get it to work with a shortcut you have to just type out the full path to the shortcut (including the .lnk extension) on the App/File line instead of using the file selector button.
Q. If I want to use remote commands, which port do I need to ensure is open?
A. If you are having trouble with remote commands, ensure port 0xb0b0 is open in Windows Firewall on the remote PC.
Q. Why would anyone want to launch a game on a remote PC?
A. Dunno... but you can now.
481 downloads
- cli
- command line interface
- (and 5 more)
-

Vidsnap Scraper
By maikeru1986
DISCLAIMER: Use at your own risk! Please read and understand Youtube's terms of service. I will not be held liable for any misuse of any product or service.
Overview:
This plugin makes use of the open source and unlicensed application yt-dlp (forked from youtube-dl) in conjunction with ffmpeg to download game videos.
It first downloads videos from the link provided in the metadata from LaunchBox, skipping videos longer than a specified duration, and then searches for videos for missing games based on input search terms.
It is intended for modern Windows games, as this was my need initially.
Requirements:
Launchbox 13.19 or newer. (Use version 0.5.1 for older Launchbox installations) ytdlp (included in .zip) ffmpeg (included in .zip)
Installation Instructions:
Extract the contents of the .zip folder and place it in your LaunchBox plugins folder.
Usage Instructions:
Select a game or multiple games, right-click, and select "Download Video Snap." Select desired quality. Adjust the maximum duration if desired. The "Get Missing Videos" checkbox sets whether or not to search for videos of games that don't have URL's in their metadata. The "Trim videos" checkbox sets whether or not to trim videos after they have been downloaded. Enter desired search terms for missing videos. Click "Start" to start the download process. Games will download asynchronously. Resuming downloads is also supported natively.
Other:
PLEASE NOTE: I AM NOT A DEVELOPER! I know very little about C# and programming in general, so I probably won't be able to address many issues that you may face. That being said, I will try and fix things where I can. I've provided the spaghetti source code for anyone to modify, improve, etc. (it seems you need to unblock the forms in the "Resources" folder -> RMB->properties->unblock.)
As of now, I'm more comfortable with the usability of the plugin; however, there are still probably many issues. Any comments to provide insight/improvement to the code, etc. would be much appreciated.
Thanks to @srxz for his source of Youtube Scraper, on which this is based.
Credits:
@srxz @JoeViking245 @C-Beats
maikeru86
3,104 downloads
-
Movie Scraper (Reboot 2023)
By JoeViking245
This is a reboot of the Movie Scraper Plugin by @Slipstream.
The intent of this plugin is to scrape metadata and media for movies you’ve imported into LaunchBox.
Q&A:
Why use LaunchBox as your digital movie library?
Because you can.
What metadata is imported?
Title Notes (Movie Plot) Release Date Publisher (Production Studio i.e. “Marvel Studios”) Genre(s) Series (Collection i.e. “The Avengers Collection”) Video Url (YouTube movie trailer)
What media is imported?
Box – Front Banner Clear Logo Disc Fanart – Background Arcade – Marquee
Can it import media I already have?
Yes. When importing media, the plugin will 1st look in the same folder the movie file is located.
Do I need to have my own personal API keys for both TMDB and FanArt.TV?
Yes.
However, when running Setup the first time, “temporary” API keys are automatically inserted. For now, they work. But for best, continued results, obtain and enter in your own keys. (See below)
Are both API keys required to scape?
Yes. If either of the keys are missing or invalid, the plugin will exit.
Do the Movie Titles [in LaunchBox] need to be named a certain way before scraping?
Yes. The Titles should be the name of the movie without any extras.
The Avengers will work. The Avengers (2012) will work. (new v1.3.0) The Avengers 2012 will not work.* The.Avengers.2012.1080p.BluRay.x264.DTS-FGT will not work.* *No. If you have a valid Information (NFO) file in the same folder as the movie, the plugin will parse the file to get the proper Title and movie ID#.
The Avengers 2012 will work. The.Avengers.2012.1080p.BluRay.x264.DTS-FGT will also work.
Can I scrape more than one movie at a time?
Yes. Select multiple (or all) movies in the Platform, right-click and select Scrape Movie.
You may want to test with just one movie or only a couple at first.
Can I scrape metadata in a language other than English?
Yes. See Setup: below. (new v1.3.0)
Installation:
Download the zip file Unblock it by right-clicking the file, select Properties, check “Unblock” and click OK. (Alternately, just use 7Zip to open the downloaded file) Copy the folder inside the zip into ../LaunchBox/Plugins/ i.e. D:\LaunchBox\Plugins\MovieScraper2023\MovieScraper.dll Setup:
Start LaunchBox Click Tools and select “Movie Scraper Setup” Enter in your API keys Click Verify Keys to confirm they are working (Optional) Check “Automatically select 1st Movie when multiple results are found” (Optional) Select a language to use when downloading metadata. (Default: English) (new v1.3.0) Click Save Use:
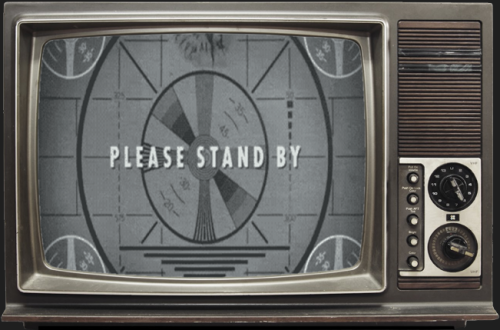
Select one or movies you have imported into LaunchBox, then right-click on one of them. Select Scrape Movie A “Please Stand By” window will appear indicating scraping is in progress. If a movie has more than one ‘close match’, a window will appear where you can select the correct movie. Unless during Setup, you checked “Automatically select 1st Movie when multiple results are found”. Scraping is complete when “Please Stand By” disappears. When completed, press F5 to refresh the Box-Front images for the selected movie(s). Click on a different movie and then back on one just scraped to refresh the images in the right side-bar.
Getting your personal API keys: (both are free to get)
TMDB
A TMDB user account is required to get an API key. Once created, log in and go to Profile - Overview - Edit Profile. Go down to API to get your “api_key (v3 auth)”. http://www.themoviedb.org
FanArt.TV
Register an account at https://fanart.tv/. Once registered, go to https://fanart.tv/get-an-api-key/ to find your personal key
The process when scraping:
Get the API keys from APIfile.xml and verify the API keys are valid If either API key returns “Unauthorized”, the plugin will exit Check if the movie has an NFO file (in the same folder as the video file). If so… Get/store the movies ID#. (Can be either TMDB or IMDB) Set the ‘games’ Title Check for existing image files in the same folder as the video file. If any exist, copy them into LB Image files need to have the same name as the video file, plus -imageType.png (or .jpg depending on the image type) Search TMDB using ‘Title’. (If an NFO file exists, search by the movie ID# from step 2 above) If no matches, “The movie could not be found.” [popup message] will appear. When scraping in bulk, a popup will appear at the end of all scraping instead, listing the movies not found If there are multiple matches, a window will appear to have you select the correct movie. (Unless you chose to “Automatically select 1st Movie” during Setup) If there’s only 1 match (or when a movie was manually selected), set the movies: Title, Notes, Release Date, Publisher, Genre(s), Series and Video Url (link to movie trailer) Download images from TMDB and FanArt.TV. Download images only if the image type doesn’t already exist (i.e. local images weren’t found)
Order of precedence for importing images:
Local images:
Box-Front
Banner
Clear Logo
Disc
Fanart-Background
Arcade-Marquee
TMDB:
Box-Front
Fanart-Background
FanArt.TV:
Box-Front
Banner
Clear Logo
Disc
Fanart-Background
Arcade-Marquee
When selecting a language other than English (new option v1.3.0) to download metadata, Box-Front and Background images are the only ones that will appear in that language (if available). FanArt.TV doesn't appear to support other languages.
Big thanks to @Slipstream for the original code and @jayjay for his update. Thanks to @universeofgamer for the suggestion to add the option to scrape metadata in other languages.
As always, all comments and suggestions are welcomed.
841 downloads
-
Clear Logo Creator
By B-B-Lee
What's this?
Ever wanted to fill the holes on your 40k games DB for your Commodore 64 platform or create your own nice set of stylish clear logos for your favourite platform? I did, so I created this simple yet useful tool to batch create Clear Logos for each game you can select from your list, starting from a background png image and writing the game name on it, adjusting text appearance and previewing the result.
How to install it
Just download the zip and extract its content in the LaunchBox plugin folder.
How to use it
Just select as many games you want to create your clear logo for, right click on them and select "Create Clear Logo" form the context menu.
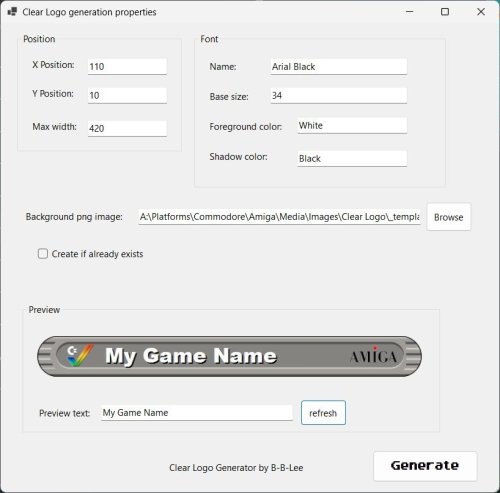
A configuration form will let you choose
the background png file to use as the base image of your clear logo (in the downloaded zip file there's an example of a Commodore 64 template clear logo); X and Y position where the name of the game will be rendered on the base image; The max width the name should take before shrinking to fit the logo; The font name to be used to render the game title (all fonts from your machine should be supported); The base size of the font to be used (if the rendered text exceeds the max width, the font size will be automatically decreased); The foreground color of the text (it supports html standard, so textual colors like "white" or Hex rapresentations like "#FFFFFF"); The shadow color of the text (it supports html standard, so textual colors like "white" or Hex rapresentations like "#FFFFFF"); if blank, no shadow will be rendered; A Check to create the Clear Logo even if it already exists; any clear logo is created as a second clear logo (with "<game title>-02.png" name) so it should not overwrite your main clear logo, but by default no Clear Logo is created if a clear logo named "<game title>-01.png" exists, to prevent priority on your main logos and just fill your holes in the collection, but if this option is checked ("Create if already exists") the logo will be created anyway for any game selected. Clicking Refresh button a Preview of the generated logo will be created (or refreshed) in the form, so you can test what the Clear Logo will look like, using the Preview Text you can modify, hopefully checking short and long names to see if the position and size parameters are ok. Once you're OK with the preview you can click "Generate" to start the bulk generation. A progress bar will let you know how long it's going to take, but it's a quite fast process.
Disclaimer
I created this plugin because I needed something like that and it's my first attempt to a structured plugin, so it could have issues, but I'm quite happy with the results, I hope you can enjoy it too!
137 downloads
-
View game specific commands from MAME's command.dat
By JoeViking245
This plugin has been replaced with the MAMEdatsViewer plugin.
Apologies for any inconvenience.
See here for the new and improved all-in-one plugin here:
Inspired from MAME's built in feature in the main UI (and via their in-game Tab menu) and Ben Baker's CPWizard.
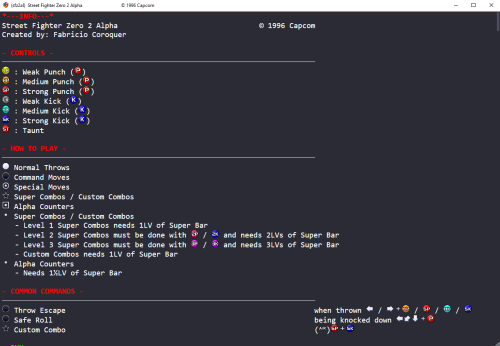
View information from MAME's command.dat to show:
CONTROLS
CHEATS
HOW TO PLAY
COMMON COMMANDS
SECRET CHARACTERS
Included in the plugin is a "MAME Command" Custom Badge (LaunchBox Only [unless someone figures out how to show Custom Badges in BigBox])
This will show the badge for games included in command.dat
Installing the plugin
Download and open the file using 7zip. if you don't use 7zip, first unblock the file (Right click, select Properties, and click Unblock) then open it as you normally would. Extract the main folder from inside the zip file into ..\LaunchBox\Plugins\ i.e. D:\LaunchBox\Plugins\MAMEConmmandDat\ (the main folder "MAMEConmmandDat" and all its subfolders are required for the plugin to work!) Start LaunchBox or BigBox
Enabling the Custom Badge
In LaunchBox, click Badges, Plugin Badges, "MAME Command"
You can change the badges image by replacing the image ../LaunchBox/Images/Badges/MAMEcommands.png
Using the plugin
LaunchBox: Right-click on a game and select MAME Commands.
BigBox: In the Game Details screen, scroll to the bottom on the list and select MAME Commands.
To scroll through the page, use your keyboard Up/Down arrow keys, mouse wheel or your controller's left joystick (or DPad) Up/Down.
To close the window, press Escape, or on your controller press your mapped Exit Game (LaunchBox) or Close Active Window (BigBox) button(s).
Version 0.262 of command.dat is included. Future updates can be found here: https://www.progettosnaps.net/command). Just replace the existing file located in the plugins /Data/ subfolder.
As always, all thoughts, views, opinions, suggestions, comments and accolades are welcome. 😎
120 downloads
-
MAME History.xml Viewer
By JoeViking245
This plugin has been replaced with the MAMEdatsViewer plugin.
Apologies for any inconvenience.
See here for the new and improved all-in-one plugin here:
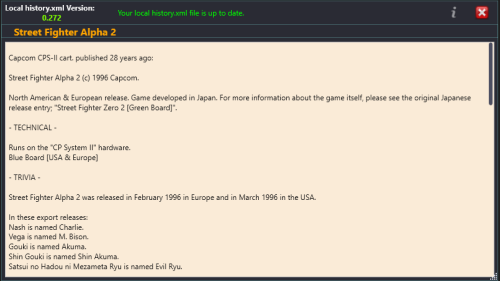
View game specific history from MAME's history.xml
Inspired from MAME's built in feature in the main UI and via their in-game Tab menu
Prerequisites
Requires LaunchBox 13.3 or newer MAME or MAMEui set as the game(s) emulator "history.xml" (download it from https://www.arcade-history.com/) MAME users: Place the file in the "history" subfolder of your MAME emulator. i.e. D:\Emulators\MAME\history\history.xml MAMEui users: Place the file in the "dats" subfolder of your MAME emulator. i.e. D:\Emulators\MAMEui\dats\history.xml Currently only available in LaunchBox (not BigBox)
Installing
Download and then open the plugin file using 7zip. if you don't use 7zip, first unblock the file (Right click, select Properties, and click Unblock) then open it as you normally would. Extract the main folder from inside the zip file into ..\LaunchBox\Plugins\ i.e. D:\LaunchBox\Plugins\MAMEhistoryXml\ Start LaunchBox
Using
Right-click on a game and select View MAME History.
Updating history.xml
When loading the plugin, it will check your local version of history.xml against what's available on https://www.arcade-history.com/.
If a newer version is available, you will be given the option to Update your local copy.
Updating will attempt to download and then replace your existing file.
As always, all thoughts, views, opinions, suggestions, comments and accolades are welcome. 😎
33 downloads
-
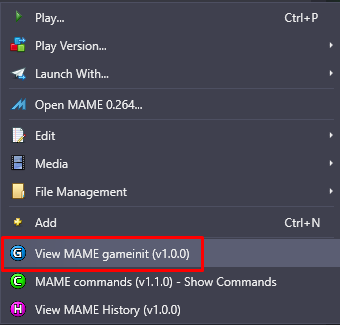
MAME gameinit.dll Viewer
By JoeViking245
This plugin has been replaced with the MAMEdatsViewer plugin.
Apologies for any inconvenience.
See here for the new and improved all-in-one plugin here:
View game specific "Initialization(s)" and/or "Tip(s)" from MAME's gameinit.dat
Inspired from MAME's built in feature in the main UI and via their in-game Tab menu.
Not all MAME games require any initial setup to run, but some do. Currently, the DAT file contains 1439 entries.
A badge will be displayed if there is an entry in gameinit.dat for that game. (See below for Enabling Badges)
Currently only available in LaunchBox (not BigBox)
Prerequisites
Requires LaunchBox 13.3 or newer Installing
Download and then open the plugin file using 7zip. if you don't use 7zip, first unblock the file (Right click, select Properties, and click Unblock) then open it as you normally would. Extract the main folder from inside the zip file into ..\LaunchBox\Plugins\ i.e. D:\LaunchBox\Plugins\MAMEgameinitDAT\ Start LaunchBox Included Files
MAMEgameinit.dll /Data/gameinit.dat (v0.263 [latest available] - downloaded from https://www.progettosnaps.net/gameinit/) Using
Right-click on a game and select View MAME gameinit. Updating gameinit.dat
When loading the plugin, it will check the local version of gameinit.dat against what's available from https://www.progettosnaps.net/gameinit/. If a newer version is available, you will be given the option to Update the local copy. Updating will attempt to download and then replace the existing file. Enabling Badges
To enable the badge, click Badges, Plugin Badges, MAME gameinit The Badge image can be changed by replacing the image ../LaunchBox/Images/Badges/MAMEgameinit.png
As always, all thoughts, views, opinions, suggestions, comments and accolades are welcome. 😎
If you like this plugin, you may also enjoy some of my other MAME related plugins:
View game specific commands from MAME's command.dat
https://forums.launchbox-app.com/files/file/4913-view-game-specific-commands-from-mames-commanddat/
MAME History.xml Viewer
https://forums.launchbox-app.com/files/file/5228-mame-historyxml-viewer/
MAME Hi-Score Display - A plugin for BigBox
https://forums.launchbox-app.com/files/file/2173-mame-hi-score-display-a-plugin-for-bigbox/
MAME Software Lists Import Tool
https://forums.launchbox-app.com/files/file/2080-mame-software-lists-import-tool-plugin/
See all my plugins here:
https://forums.launchbox-app.com/profile/102158-joeviking245/content/?type=downloads_file
37 downloads
-

Machtendo No-Intro ROM Parse
By machjas
Update:
I'm now maintaining this script on Github here: https://github.com/machtendo/rom-parse
What's this?
This is a Windows Powershell script you can use to sort any No-Intro romset into a consistent and intuitive structure. The goal is to sort and organize ROM files by region, release type and revision.
This script creates a directory structure to accommodate for all the various release types and flags found in a No-Intro set, which is then replicated to folders for the four major release regions, then sorted appropriately.
By default, this script creates full sets for each region - for example, (World) releases are actually COPIED to every major region - I wanted to avoid regional biases where I could so that if someone wanted a full Japanese set or a European set, you only need run the script and grab the contents of the corresponding folder. You can disable this by commenting or removing the "Regional Bias" section of the script.
Only available as a Windows Powershell script, not compatible with Linux or macOS currently.
Why's this?
In order to simplify compatibility with various frontends, to satisfy my own preferences, and possibly the preferences of others. A few use-cases can be found below.
When using LaunchBox, playlists can be created by using the "Application/ROM Path" parameter - the filepaths/folder structure created by this script will allow you to be as granular as you would like. When using other frontends or utilities, usually you're actually just browsing your file/folder structure - the filepaths/folder structure created by this script are meant to be descriptive and (hopefully) intuitive. Once the script is run, one could simply delete entire regions, remove all the various Test Programs, trim BIOS files, delete Demo or Sample roms, Prototypes, and easily create a custom set that suits their individual taste. This script is entirely filetype agnostic - it doesn't care about file extensions, so as long as the set of files you're applying this script to uses No-Intro's flags, this script can be used to sort them - one could also use this script to sort through artwork/image/media files for corresponding ROM files. Instructions
Simply copy this script file into the folder containing your rom files, and double click to run it.
That's it!
If you happen to receive an error saying something along the lines of "Running Scripts is Disabled on this System" you can open the folder in Terminal or PowerShell and run the script with the following command. I'll defer to this article if you would like more information.
powershell -ExecutionPolicy Bypass -File .\Machtendo No-Intro ROM Parse v5.0.ps1 Logic & Structure
How have these files been sorted, and why?
BIOS Files
BIOS files are first moved into a _BIOS folder prior to any sorting functionality. This is so that any available version is immediately and easily accessible for use with an emulator if needed.
Regions
I'm going by the three historically major release regions, with a fourth "Other" region to cover the other minor release regions.
North America US Canada Japan Japan Europe Italy Spain Sweden France Germany Australia Denmark Scandinavia Other Korea Brazil Argentina Taiwan Mexico Russia Hong Kong Netherlands China Greece Asia No-Intro Flags
The file structure for the No-Intro flags is replicated to the four regional folders described above.
Aftermarket Releases - Licensed, Unlicensed, or Homebrew games released for a platform after its "active" or "canonical" lifespan. Hacks - Not strictly within the scope of No-Intro - these ROMs have had patches applied to them to modify, transform, or attempt to improve an existing game. i.e. patches that can be found at RDHN (romhacking.net) Alternate Releases - Re-release of a ROM on a later platform or in a "Classics" Collection, i.e. Virtual Console, Nintendo Switch Online, or compilations such as "Castlevania Anniversary Collection" Official Releases - Licensed games released at the time of a platform's "active" lifespan. Pre-Release - Unfinished games - betas, demos, or prototypes not meant for the general public Test Cartridges & Utilities - These are tools generally used by developers or hardware manufacturers, mostly for testing purposes or diagnostics/troubleshooting Translations - Again, not strictly within the scope of No-Intro, but these are ROM files with an applied translation patch, commonly denoted with the [T-En] flag. Note that the region that these translations are targeting is the region the rom will be moved to - i.e. target language is English, therefore ends up in the North America > Translations folder. Currently, only [T-En] is supported. Unlicensed Releases - Unlicensed games that were released DURING the canonical lifespan of the platform in question without explicit permission or input of the platform's manufacturer. Previous Revisions - Earlier releases of a given title - The latest Revision is kept in the "Official Releases" folder, while the earlier revisions end up here. Notes & Clarification
Keep in mind, this script is only intended for use with romsets following the No-Intro naming convention. More information can be found here: https://wiki.no-intro.org/index.php?title=Naming_Convention This script cares ONLY about the No-Intro naming convention - the use of DAT files and ROM managers have not been considered, and splitting up these ROM files may break compatibility with said DAT files or ROM managers. Starting with v5.0, support for parsing/sorting numbered revisions was added - I have not yet verified if this script generates a perfect DAT-worthy 1G1R set. By default, no ROM files are deleted by this script - I'm only sorting and organizing. I am also not responsible for any undesirable effects or outcomes running this script on your machine may have. Feedback welcome in the comments! Tested with the following platforms
190 downloads
-

Emulators and Their Games / Platforms and Their Emulators
By JoeViking245
View all games associated with an emulator.
Can't remember which games in your Nintendo Wii platform use the Dolphin emulator and which ones use the Dolphin-TriForce branch?
Use this plugin see which games are used by a specific emulator.
New 2.0.0
Platforms and Their Emulators (toggle)
View all emulators associated with a Platform.
Setup:
With LaunchBox NOT running, download and copy the **contents** of the 7z (zip) file into you /LaunchBox/Plugins/ folder.
i.e. D:\LaunchBox\Plugins\Emulator-Games\Emulator-Games.dll
Using:
Stat LaunchBox Click Tools Click Emulators and Their Games Select an emulator to see a list of all games that use that emulator.
If a game uses the selected emulator but is NOT in one of its Associated Platforms (go figure how that happens. ), it will appear in Red.
A list of Associated Platforms for that emulator will also show.
Click on one of the Associates Platforms to view only games that use this Emulator AND are in the Platform.
Click Reset to go back to showing All games using the Emulator.
To create a Playlist of the games shown, click Create Playlist.
The Playlist will automatically be given the name of the selected Emulator. (Change it to whatever you want)
If you had selected an Associated Platform then clicked Create Playlist, the auto-fill name will be "emulator (platform)".
The playlists will be added to Platform Category "Emulator Games"
New 2.0.0
To view all emulators associated with a Platform, flip the toggle switch.
As always, all comments and suggestions are welcomed and encouraged.
220 downloads
-
Filter Arcade Platform - post MAME Arcade Full Set Import Wizard
By JoeViking245
Dilemma:
"Oh snap! I used the MAME Arcade Full Set Import Wizard, unchecked all filter boxes and now I have a bunch of extra junk in my Arcade platform."
Solution(s):
Option 1: Delete the Arcade platform and re-import again (this time paying attention to the boxes you decide to un-check).
This is actually a super easy and relatively fast process. And you won't need to re-download images again (assuming you downloaded some and didn't delete the media also when deleting the platform).
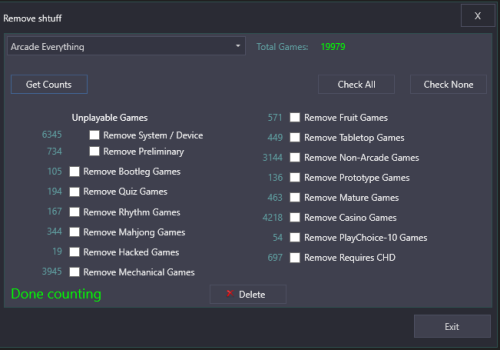
Option 2: Run this plugin and check the boxes to have those filter types removed from your collection and click Delete.
Plugin Features:
Show you the number of 'games' you have in each filter type. (unplayable, bootleg, quiz, rhythm, mahjong etc.) Check the boxes for the filter type(s) you wish to remove and click Delete to remove them from your LaunchBox collection. Click the number next to the filter type to show a list of the 'games' included with that filter. (shows ROM name and game Title) (optional) Create a text file of "the list" (for whatever reason) (optional) Create a playlist from "the list"
Notes:
You don't need to have used the MAME Arcade Full Set Import Wizard to make use of this plugin.
When launched, the plugin will attempt to load the platform "Arcade". If that's not found or you want to check a different platform that uses MAME ROMs, select the platform from the drop-down list then click Get Counts.
"Total Games" only takes into account your Main Games. No Additional Apps (clones) are accounted for in that number.
When clicking Delete to remove the games in the selected filter type(s), if a game being removed has Additional Apps, those will be removed too. No ROMs will be deleted from your system. Only the entries in your LaunchBox collection.
It won't delete any images associated with the removed games. But most likely, the 'junk' won't have any anyway. If they did, it's nothing that a suitable application of Clean Up Media located in the Tools menu couldn't take care of.
The Save to Text File option saves the file to ..\Plugins\FilterArcadePlatform\Output\[filter_type].txt
The Add to Playlist option will name the new playlist "Arcade type-[fileter_type]" and place it under the category "Arcade". If your selected platform is named something other than "Arcade", it' will name the playlist and put it under the category using your platforms actual name.
RE: Game Counts:
Some games fall into multiple filter types. i.e. some (but not all) Fruit games are also included in with Casino games. So don't try to add the numbers up and have them make sense. "Remove Preliminary" refers to Emulation Status and only includes games that are marked as Preliminary AND are not included any of the other filter types.
Example Usage:
Using the Import Wizard, un-check Skip games unplayable in MAME Once done, from the Arcade platform Search for source:model3 Select all the resulting games Press Ctrl+E to start the Bulk Edit Wizard Select the Field "Platform" Set the Value to (type in) "Sega Model 3" (without quotes) Save From here, you can Do "Option 1" (above) and your Sega Model 3 games will [now] be safe. Or, using the plugin and have it remove the remaining "Unplayable Games". Have the Import Wizard include "Bootleg", "Hacked" and "Prototype" games Use the plugin to create playlists of those respective filter types Select the playlist "Arcade type-Bootleg" created in example (2) and... well, I don't know. Attempt to play them, I guess.
Beyond that (if that), it's not very practical. But may have some merits.
140 downloads
-

Missing Games Checker Plugin
By AgentJohnnyP
Missing Games Checker (MGC) is a LaunchBox plugin designed to help users identify missing games in their collection based on platform metadata. It provides an easy-to-use interface that lets you view owned and missing games, and export the results.
v1.2 is out! NEW and IMPROVED! Enhanced for stability and usability!
Instructions for Using the Missing Games Checker (MGC):
Requirements:
This plugin in the LaunchBox Plugin folder. The latest version of LaunchBox (there could be an issue with this plugin in older versions of LaunchBox where it's not being detected). Installation and Usage:
1. Install the Plugin:
Download the latest release of the MGC plugin from this page. Make sure LaunchBox is closed. Unblock the downloaded zip file (Right-click on the zip -> Select Properties -> Click or Check "Unblock" if available) For help on Unblocking files, check out this article. Open the zip file and place the `LBMissingGamesCheckerPlugin.dll` file into your LaunchBox\Plugins folder (example R:\LaunchBox\Plugins). 2. Access the Plugin:
Launch LaunchBox, then access the Tools menu and find Missing Games Checker. 3. Using the Plugin:
Select a platform from the dropdown menu and click the Confirm Selection button. MGC will display a list of games owned and a list of games missing from your collection based on the LaunchBox metadata. You can export the list of missing games to a CSV file for easy reference. 4. Options/Features:
Filter games by Released status if you only want to check released titles. Sort columns by clicking on the column header. Filter select columns by clicking on the filter icon in the column header. If the filtered column has multiple values (ie. North America, Japan) the row will still show if any of the filters are not applied. All values need to be unchecked in the filter to hide the row. *Note: Filtering one column works well. Multiple column filtering may produce incorrect results. Export to CSV if you need to apply better filtering *Will enhance in a future release Window resizing (Right edge only) Click on the highlighted cell data for links to video URLs, Wikipedia links, and the game on the LaunchBox DB (where available).
Extra Notes:
The Owned Games list is pulled from YOUR collection. If fields are missing information, make sure your collections metadata is up to date. Check out this LaunchBox Video on how to do that. The Missing Games list is pulled from the local metadata.xml file. If you find information is missing, visit the LaunchBoxDB website to see how you can contribute! I've worked HARD to make the plugin as robust and efficient as I can. That being said, some computers may experience delays in processing the metadata at the start, processing any large collections' of games, and filtering/sorting large lists. Please be patient! Once you begin a process, it will complete! But the UI may become unresponsive during processing. As mentioned, filtering works well on one column at a time. Filtering one column, then another may have incorrect data shown. You can click the Reset button in the filter panel to reset the list, or just "Check It!" again to refresh the list again. NO data is modified in this plugin. Data is compared from the local metadata.xml (which updates automatically by LaunchBox) and your collection data reported from LaunchBox. Troubleshooting/Updates:
New to v1.2 - DebugLog
Click on the "Bug" to open the debug log. If you have issues, provide the relevant debug log here for review.
If you've confirmed the above and are still having issues, please provide the following:
Click the "Export to CSV" button for the Missing Games table and save the .CSV file. Attach the .CSV file to a post here. (Optional) Attach a screenshot of the app with the error message. I'll review the information and post a fix/suggestion as soon as possible.
Also, if you would like to have MGC perform additional tricks, let me know!! I do appreciate the feedback and will enhance the plugin over time based on your findings/suggestions.
Special Thanks
A huge thanks to the LaunchBox team and their API documentation for making this project possible, as well as Jason's helpful video tutorial.
Check out the source code on GitHub if you're interested.
Cheers! 🍻
423 downloads
-
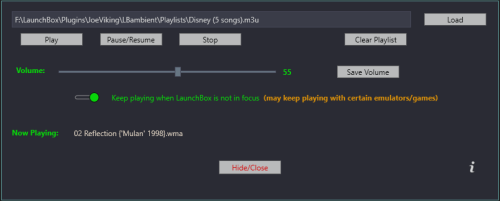
LaunchBox Ambient Music Player
By JoeViking245
Listen to your favorite Arcade music playlist while admiring your LaunchBox collection.
Requires LaunchBox 13.3 or newer
Just add your own playlists and start listening when LaunchBox starts. The music will pause when launching a game, and then resumes after exiting the game.
Setup:
Download and extract the contents of the zipped file into /LaunchBox/Plugins/
Quick Start:
With LaunchBox closed
Copy a music playlist (i.e. MyPlaylist.m3u) into the Playlists subfolder
i.e. /LaunchBox/Plugins/LBambient/Playlists/MyPlaylist.m3u
Start LaunchBox
See Playlists below for playlist requirements.
About this plugin:
Place your music playlist(s) into /LBambient/Playlists/
When you start LaunchBox, a random (if there're more than 1) playlist from that folder will be selected and start playing
Songs in the playlists will be played in a random order and will not repeat.
Songs will Pause when launching a game and then Resume when the game has exited.
Fixed v1.2.0 Exception: It might not stay paused when launching Steam games and others using a launcher.
Once the player has gone through the entire playlist, that's it. No more music.
So, if you plan to spend a lot of time looking at LaunchBox and not playing games, be sure to have a long playlist.
Options:
Go to Tools - LB Ambient Music
Adjust the player's volume slider (which is independent of LaunchBox's volume control) to your desired volume.
Click Save Volume to save it in Settings for next time you start LaunchBox.
To manually select a specific playlist (or song) to load when LaunchBox starts
Click Load to select a playlist (or song) and start playing it.
The selection will be saved in Settings.
Next time you start LaunchBox (and every time thereafter), the saved selection will be played.
To remove a playlist (or song) from Settings, click Clear Selection.
This immediately stops the player and removes it from Settings.
Next time you start LaunchBox, a random playlist (if any exists) will be selected from /LBambient/Playlists/ and automatically start playing.
Click Hide to close window.
Playlists:
Required: Playlists MUST have absolute paths to the song(s).
Some players (i.e. VLC) will save the playlists using relative paths if it's saved within the players folder structure.
(new v1.1.0) Playlists can have absolute or relative paths to the songs. Relative paths MUST be relative to the Playlists subfolder
Playlist formats tested are .m3u, .m3u8 and .xspf
No other formats have been tested and will not work with this plugin.
If you have playlists saved in a different format that you'd prefer to use, let me know.
THIS HAS ONLY BEEN TESTED WITH LOCAL FILES.
If the files paths in the playlists are URL's (i.e. start with "http://"), things might break.
You can try it if you want. Let me know what you find.
As always, all comments and suggestions are graciously accepted and encouraged. 😎
151 downloads
-
RetroAchievement Badges
By JoeViking245
RetroAchievement Badges
Version 2.3.6 was the last update for this plugin.
(Sept. 2024) This plugin is broken and is no longer supported.
As of LaunchBox version 13.2 (Feb. 27, 2023), Achievement Badges are supported directly in LaunchBox.
To enable: click View < Badges < Game Attributes < Enable Achievements.
I wish to give a huge thanks to @jayjay for his work in initiating this plugin all those years ago!! And to all Community Members who have used, provided feedback and gratitude, Thank You for Your Support!
(This thread remains here for historical reference until such time The Management deems otherwise)
What does this plugin do?
Adds “RetroAchievement” Badges to games that support RetroAchievements.
(See complete list of games here: https://retroachievements.org/gameList.php)
Why?
Because some people wanted it.
How to install the plugin:
Download RetroAchBadge v2.x.x.zip UnBlock the zip file. Right click the file, select “Properties” and check the box that says ‘Unblock’ [or something along those lines] Click OK to close the Properties window Open the zip file Copy the folder “RetroAchBadge” into your “/LaunchBox/Plugins/” folder Start LaunchBox Select Tools Select RetroAchievements Badge Updater (Internet connection required) Click Start Update and Wait for the Updater to complete. (This may take up to 1 minute.)
How to see the badges:
Start LaunchBox (not necessary if you just completed the Install - steps 1 through 9) Click BADGES Select Plugin Badges 'Check’ Enable Retroachievements
How to add or remove the badge from a game:
Right click the game and select "RetroAchievements Badge"
How to get updates for new games added to RetroAchievements:
In LaunchBox, Select Tools Select RetroAchievements Badge Updater (Internet connection required) If you added or removed RetroAchievement badges for specific games, those games will remain added or removed after running the Updater. To reset the games that have been added/removed, delete the files Added.xml and Removed.xml located in the plugins folder and rerun the Updater.
A word about Platform names:
Some of the Platform names used by RetroAchievements are different than the default names used in LaunchBox. When using the Badge Updater, it will ‘convert’ these to the default names.
Examples: “Mega Drive” gets changed to "Sega Genesis". “SNES” to "Super Nintendo Entertainment System". "Game Boy" to "Nintendo Game Boy".
This plugin will not rename any of your existing Platforms.
When checking for badges, the plugin will check your Platforms Scrape As setting as well as the Platform name.
Example: If you named your Platform "Game Boy" and Scrape As is set to "Nintendo Game Boy", badges will show for that Platform.
Platform names that get changed:
From To
"Mega Drive" "Sega Genesis"
"SNES" "Super Nintendo Entertainment System"
"Game Boy" "Nintendo Game Boy"
"Game Boy Advance" "Nintendo Game Boy Advance"
"Game Boy Color" "Nintendo Game Boy Color"
"NES" "Nintendo Entertainment System"
"32X" "Sega 32X"
"Master System" "Sega Master System"
"PlayStation" "Sony Playstation"
"Game Gear" "Sega Game Gear"
"Virtual Boy" "Nintendo Virtual Boy"
"MSX" "Microsoft MSX"
"SG-1000" "Sega SG-1000"
"Saturn" "Sega Saturn"
"Intellivision" "Mattel Intellivision"
"Vectrex" "GCE Vectrex"
"PC-8000_8800" "NEC PC-8801"
"PC-9800" "NEC PC-9801"
"PC-FX" "NEC PC-FX"
"Dreamcast" "Sega Dreamcast"
"PlayStation Portable" "Sony PSP"
"PC Engine" "NEC TurboGrafx-16"
Changing the default icon:
If you wish to use a different Badge icon, replace “\LaunchBox\Images\Badges\RABadge001.png” with your own image.
Known Issues:
Game titles are taken directly from RetroAchievements and may differ (slightly or a lot) from yours. So if you have a game that is known to have achievements and the badge isn’t showing, follow all steps under How to add or remove the badge from a game:.
Updating via the Tools menu may take up to 1 minute to complete. Though not really an 'issue' perse, but it is a "thing". So plan your updates around refilling your water glass, grabbing a soda or whatever takes you about 60 seconds to do.
Unknown issues:
Let me know when you find them.
Designed for LaunchBox 11.3 and newer. Major contributors to the plugin are: @jayjay
1,110 downloads
- retroachivements
- badges
- (and 1 more)
-

Panic Button - Restore Windows Session to its Startup State After an Emulator Crash
By Crabi
The Panic Button is a script designed for arcade and emulation users running Windows. If an emulator crashes or unwanted processes appear, it allows you to restore the Windows session to exactly how it was when the system first booted, without needing to use the keyboard. This script is especially useful for users controlling their system via a game controller and using tools like JoyToKey to map keyboard shortcuts to controller buttons.
How the Panic Button Works
Initializing the session:
Users start their Windows session and launch all the necessary tools (emulators, frontends, etc.). Once everything is ready, they run getProcessList.exe or getProcessList.ahk. This generates a processes_start.txt file that lists all the active processes at the time of session startup. Activating the Panic Button:
If an emulator crashes or unwanted processes start running, the user can simply press Ctrl+Alt+P (or a shortcut linked to their controller via JoyToKey) to activate the panic button. The panicButton.ahk script compares the current list of processes with the one recorded in processes_start.txt and closes all processes that weren’t present at the session’s start. Restarting Key Applications:
After cleaning up the session, the script will restart key applications such as: JoyToKey with the desired profile. BigBox (or any other arcade frontend). Launching the Panic Button at Windows Startup
If you want the Panic Button to launch automatically when Windows starts, follow these steps:
Create a panicButton.bat file to run the panicButton.ahk script.
Add a shortcut to this panicButton.bat file in the Windows Startup folder. This folder is typically located at:
C:\Users\<YourName>\AppData\Roaming\Microsoft\Windows\Start Menu\Programs\Startup Make sure to modify this line in the panicButton.bat file to match the path to your script:
set script_path="D:\HFSBox\Utilities\PanicButton\panicButton.ahk" Customizing the Script
To make this system work with your setup, you need to adjust two lines in the panicButton.ahk script:
Modify this line to match the path to your JoyToKey configuration: Run, D:\HFSBox\Utilities\JoyToKey\JoyToKey.exe "Layout 8 boutons.cfg" Modify this line to match the path to your BigBox application (or other frontend): Run, D:\LaunchBox\BigBox.exe Conclusion
The Panic Button simplifies process management after a crash by resetting the session without the need for a keyboard, making it ideal for arcade and emulation users controlling their system via a game controller. It automatically restores essential tools and relaunches BigBox, ensuring a smooth user experience.
22 downloads
(0 reviews)0 comments
Submitted
-
ServoSticker.zip
By Dinomight
ServoStick LauchBox plugin. With this plugin LaunchBox will switch between 4 way and 8 way modes automatically when the game starts and back when. the game is exited. Using the latest metadata the modes are created and selected for you. No need to fiddle with macros, ledblinky or emulator command lines.
For more details and support check the forum post
117 downloads
-
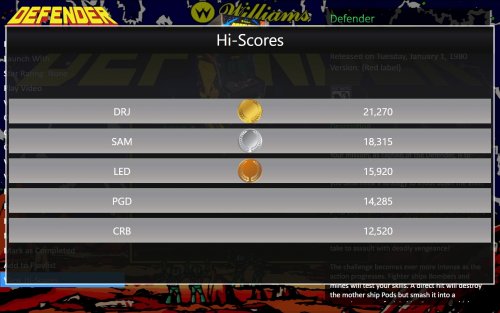
MAME Hi-Score Display - A plugin for BigBox
By JoeViking245
MAME Hi-Score Display - A plugin for BigBox
Use this plugin to view a games high scores from BigBox’s Game Menu.
Features
Creates a menu item called “View Hi-Scores” that allows you to display high scores for most games in your Arcade platform directly in BigBox. What's needed
(3) files that are included in the downloaded zip file (the plugin) Version 3.0 - One file that is included in the downloaded zip file (the plugin) 2 lines of text added to the "TextGamesView.xaml" file for your current BigBox Theme MAME configured to save high scores Saved high score files (These are automatically generated by MAME once it’s configured to save them in the "hi" and/or “nvram” subfolders of your MAME emulator) What it won't do
Show high scores for games using emulators other than MAME. Show high scores for games in LaunchBox. MAME is not built to save high scores the same way (or at all) for all arcade machines, so not all games are supported by this plugin Contributors
@jayjay – The one who came up with the idea and did all the hard stuff.
@JoeViking245 – The one who helped with all the easy stuff.
@fromlostdays – The one who made these instructions easier to follow.
A HUGE Special Thanks goes to GreatStone’s utility “hi2txt”. This utility converts MAME’s high score files into a readable format which ultimately makes this plugin possible!!
http://greatstone.free.fr/hi2txt/index.html
Installation and setup instructions:
Step 1: Installing the Plugin
Step 2: Editing your BigBox Theme to add support for the Plugin
Step 3: Making sure MAME is set up to save high scores
Installing the Plugin:
Download the plugin, Mame_Hi_Scores (v5.0.0).7z from the LaunchBox download section (If not using 7zip) After you’ve downloaded the zip file, be sure to unblock it in Windows by right clicking it, selecting Properties, and clicking Unblock Open the zip file and extract/copy the "Hi_Scores" folder into ..\LaunchBox\Plugins i.e. D:\LaunchBox\Plugins\Hi_Scores\Mame_Hi_Scores.dll
Editing Your BigBox Theme to add support for the Plugin:
As of version 5.0.0, this step is no longer required.
If you are updating from a version PRIOR to v5.0.0, you will need to UNDO THE CHANGES made to your TextGamesView.xaml file!!!
(just delete the 2 lines that were added, and save.)
Setting up MAME to save high scores:
Using a recent official MAME release –
If you have an older release of MAME, you may need to do the following steps instead.
Congrats! You’re all setup! Now that you’ve setup the plugin, why not give it a try?
How to use:
Start BigBox Go into the "Arcade" Platform Select a game Near the bottom of the Menu (if the selected game has a high score file saved) you'll see "View Local Hi-Scores" Select "View Local Hi-Scores" to see your high scores for that game! To close the Hi-Scores window (options): (new v5.1.0)
Press the button you have mapped for your controller to Back Press the key you have mapped for your keyboard to Back456 downloads
- mame
- high scores
- (and 2 more)
-
How Long to Beat Custom Fields Tool
By christhed
***Check out @JoeViking245's much better plugin instead. I'm leaving this tool available in case the plugin breaks but I won't be updating the data. *** About the tool: The tool is NOT scraping data from https://howlongtobeat.com/. It is using data that has already been scraped from the website and adding it as custom fields for your games.
I encourage you to visit the website and manually add the data for missing games as well as support the website by contributing to the database.
How does it work?
Just run HLTB.exe, select your Lauchbox/Data/Platforms folder and press confirm. That's it!
**MAKE SURE TO BACKUP YOUR XML FILES BEFORE RUNNING IT!!**
What are the included platforms?
3DI Interactive Multiplayer, Arcade, Atari 2600, Atari 5200, Atari 7800, Atari Jaguar, Atari Lynx, ColecoVision, Commodore 64, Commodore Amiga, Microsoft Xbox 360, Microsoft Xbox, MS-DOS, Nintendo 3DS, Nintendo 64, Nintendo DS, Nintendo Entertainment System, Nintendo Famicom Disk System, Nintendo Game Boy Advance, Nintendo Game Boy Color, Nintendo Game Boy, Nintendo GameCube, Nintendo Switch, Nintendo Wii U, Nintendo Wii, Sega Dreamcast, Sega Genesis, Sega Saturn, Sony Playstation 2, Sony Playstation 3, Sony Playstation, Super Nintendo Entertainment System, Windows
Will you update the data/add more platforms?
I don't plan on it. At least not on a regular schedule.
How do I show that data on BigBox?
You can create your own theme or make changes to existing themes using the Community Theme Creator. I'm pretty bad at designing themes so I don't plan on releasing one but I'd be interested if someone wants to create a theme that takes advantage of the HLTB data.
**UPDATE**
I lied and made a theme for it. Here it is.
115 downloads
-
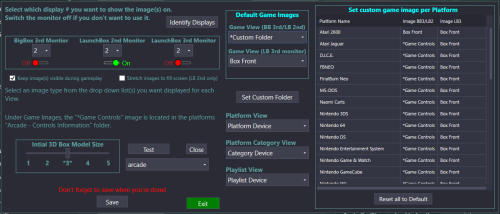
LaunchBox Multi Monitor and BigBox +3rd monitor plugin
By JoeViking245
LaunchBox Multi Monitor and BigBox +3rd monitor plugin
This plugin adds support for 2nd (and 3rd) monitors in LaunchBox to display game images while navigating your collections. If you have LaunchBox version 13.1 or newer, Platform, Platform Category or Playlist images will be displayed when making a selection on the left navigation pane.
With BigBox, you already have use of a 2nd display (marquee monitor) for displaying images. For those who have a pinball-cab (or a fancy desktop setup) with 3 displays, this plugin will allow you display an image on the 3rd monitor while navigating BigBox.
Some details:
- The image displayed changes based on the Platform, Platform Category, Playlist or game you are viewing for both BigBox and LaunchBox.
- To view Platform, Platform Category and Playlist images in LaunchBox, LaunchBox version 13.6 is required. BigBox will work with any version.
- When a game is launched, the image(s) will be hidden and then reappear after exiting the game. (default)
- Optionally (new v1.1.0), you can select Keep image(s) visible during gameplay.
The exception is Steam games that are launched via "steam://rungameid/xxxxxx". Their images will not stay visible nor reappear.
- You set the default image type (i.e. Box-Front) to use for all games. Or you can set individual image types to use on a per Platform basis (new v1.1.2).
Q&A:
Why would I want to display an image on a 3rd monitor? Because you can. What image would I put on a 3rd monitor? That's entirely up to you. You can choose from pretty much any image type in your collection. Can it display a video on the 3rd (or 2nd-or-3rd in LB) monitor? No. Can it show a pdf file on the extra monitor? No. Can it display 3D models for boxes? Yes (new v 1.2.0)
Installing:
Download the plugin zip file. Right-click the zip file, select Properties and check Unblock (if present). Click OK.
(With LaunchBox/BigBox not running,) Open the zip file and extract the included folder into your /LaunchBox/Plugins/ folder.
Setting up:
Start LaunchBox.
Click Tools, MultiMonitor Setup
Monitor Configuration:
Select which monitor # you want the images displayed on from the pull-down list. Click Identify Displays to confirm which monitor corresponds with which monitor number. Toggle On or Off to see images on the respective monitors. (v1.1.0) If you wish to keep the images up during gameplay, check Keep image(s) visible during gameplay. (v1.1.1) In LaunchBox, if images aren’t displaying correctly on you marquee monitor, check Stretch images to fill screen (LB 2nd only). This only works on LaunchBox 2nd monitor.
Image Selection:
Select the default image type you want displayed based on which View you're in. Default Game Images: BigBox 3rd Monitor and LaunchBox 2nd Monitor use the "Game View (BB 3rd/LB 2nd)" image. LaunchBox 3rd monitor uses the "Game View (LB 3rd monitor)" image. The image selection *Game Controls looks for game-specific images in your "/Images/platform_name/Arcade - Controls Information/" folder. In LaunchBox, if LaunchBox 3rd Monitor is turned off and the Game View 2nd monitor image doesn’t exist, it will attempt to use the Game View 3rd monitor image. In BigBox, if the Game View 2nd monitor image doesn’t exist, it will attempt to the Game View 3rd monitor image. Set custom game image per Platform (new v1.1.2) Pretty self-explanatory. Click Save after you're done making changes.
Custom Folder: (new v 1.2.0)
You can use a Custom Folder to search for game images. This will search for game images in /your_Custom_Folder/game_platform/game.png
Select *Custom Folder as the Default Game Image, then click Set Custom Folder to set your folder.
Image* files can be named the same as:
games' Title**
ROM filename
games' LaunchBox Database Id #
games' Platform***
*Image file names with suffix -xx (i.e. myImage-01.png) are OK (aka. copy/paste from existing LaunchBox Images). However, the plugin will ONLY ever use one of the images if you have multiple. i.e. myImage-01.png and myImage-02.png
**Game images using its Title must have invalid characters replace with _ (underscore). See Invalid Characters below.
Most common is when the Title has a : (colon).
Example: Title = Disney-Pixar's Toy Story 2: Buzz Lightyear to the Rescue!
image = Disney-Pixar_s Toy Story 2_ Buzz Lightyear to the Rescue!.png
***If a game specific image can't be found, the plugin will look for an image named after the games platform in the Custom Folder. NOT inside the platform folder. i.e. /your_Custom_Folder/game_platform.png
Invalid Characters below
Other Notes:
LaunchBox:
Platform/Category/Playlist images will only be displayed if using LaunchBox version 13.6 or newer.
BigBox:
Changes to image selections etc. can only be made in LaunchBox through Tools, MultiMonitor Setup.
General:
If after making changes in MultiMonitor Setup (AND clicking Save) images aren't displaying or there's some other plugin issue, try restarting LaunchBox.
Disclaimer:
This has only been tested on a 2-monitor setup. Neither of which were marquee monitors. So..... Good luck!
As always, comments, suggestions and requests are welcomed and encouraged.
547 downloads
-
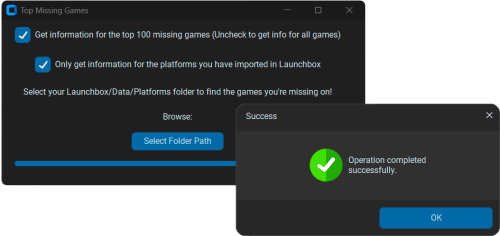
Find the Games your Collection is Missing
By christhed
About the Tool
It finds the top 100 games that are not already in your collection by scraping the XML files in your Data/Platforms folder and comparing it to the Launchbox database
How to use it
Select your Data/Platforms folder. The tool will look stuck for a couple of seconds (about 10-15 for me) but a message will pop up to confirm if it was successful.
So what's the point?
It outputs a .xlsx file containing the top 100 games that are missing from your library. It is meant to be used to find games to add to your library. The weighted score is score from 0-5 given to every game based on the user rating and the number of user votes.
I still plan to work on it a bit and I'd love some feedback if it's something you'd be interested in using! I mainly use it as a little project to teach myself coding
I know the size is a bit ridiculous for what it does, i'm trying to make it a bit lighter
407 downloads
-
community COLORFUL resources
By viking
# WHAT IS COLORFUL?
COLORFUL is a complete and coherent high quality graphic set, around a unique design. Made with love in France. I hope you like it ! ?
Here are planned development axes:
OFFICIAL COLORFUL ASSET :
COLORFUL Theme : The main hub, a unique interface for BigBox. Design by me, coded by @faeran COLORFUL Platform Video : Complete 4K video set, with a unique design. COLORFUL Source : To involve the community in the platform video creation. COLORFUL BigBox Startup Video : custom video to match the general design. COLORFUL Hardware Media PNG (1x1) : Taken from my videos, the 1x1 PNG set. (new) COLORFUL Startup Theme : (soon) COLORFUL Pause Theme : (soon) RECOMMENDED COMMUNITY ASSET :
Redrawn Platform ClearLogo by @Dan Patrick Colorful "Playlist" PNG set by @Klopjero Colorful custom theme for Android by @Bawnanable Platform Funtech Super A'can & Platform Arcade Kaneko by @evo1man Alternative Colorful Platform ClearLogo Set by @soqueroeu Alternative Startup Theme (Minimal-Colorful) by @Palada Recommended SoundPack with Steam Deck UI by @Phox
# WANT TO CREATE VIDEO? YOU ARE IN THE RIGHT PLACE!
On this page we are talking about COLORFUL RESOURCES.
Have you considered creating a new Platform/Category/Playlist video for Colorful? This is the place to be! Done, by and for the community.
You will find below my guideline and quick tutorial. If you are tempted by the adventure, please respect the rules below! Thx !!
# READY FOR ADVENTURE? FOLLOW THE GUIDE!
Before we start going into the technique, let's set up some basics on how we're going to do it.
The idea is not to make me a tyrant, but to keep an overall coherence of design, style and to centralize uploads/downloads on a single page.
The basic principles :
On this Resources Page, you will find: 1 archive = 1 platform sources. (From me or from you) On the Platform Video Page, you will find: 1 file = 1 video. (From me or from you) Here are the rules to follow:
ONLY use this forum thread for ALL that concerns the video creation. Form start to finish. Please, not used the comment section below. Announced on what platform(s) you want to work. (New or rebuild) Post your work in progress! This is very important, to have feedback from community and me. Follow the guideline below. There can be several videos from the same platform. I will add your credits. But keep the same background color please, for theme integration. Don't be susceptible if we make comments. ? At the end, send me your video and source files. I will upload them to the corresponding pages, with your credits. Here, I will act as a moderator. The goal of all these rules is to keep the set consistent, allow the community to take part in creation and centralize everything for ease of use.
About software, I used Photoshop and After Effect in their old version (CS6) and without any plugin, to maximize compatibility with your systems.
You can use other software of course, but try not to use plugins.
# GUIDELINES?
I created these guidelines, based on my experience with NOSTALGIA.
They have a whole purpose and I ask you to respect them.
Here is the principle:
You can find these construction lines, as guides, in the Photoshop (.PSD) files, in each Platform archive.
The goal is to let the design breathe, while allowing great versatility of use. Whether in full screen, in 4:3 or 1:1, this video set remains usable.
I have created a theme around this set, but I hope it will not be the only one! A word for the wise ...
# WHAT ARE THE STEPS ?
Briefly, the steps I follow for each video.
Find photo sources for each element of the montage. I try to put the credits in each archive. Carry out the editing in Photoshop, keeping a layer structure common to each platform. From Photoshop, save each layer group in separate PNG files. Find a Gameplay video (EmuMovies for most) and the boot section (Youtube for most) Go to After Effect, gather everything in 4K and render a "master" video file. (understand heavy one) Use VidCoder to make my different outputs (4K h264 / 4K h265 / HD h264) and size compression. <UPDATE> A quick word for the arcade cabinet:
It's too hard to find good photo sources. So I made them all in full 3D (CGI).
If you have the knowledge, go there! Otherwise, I create my renderings so that they can be edited in Photoshop. ?
# IN DETAIL, PHOTOSHOP ?
I'm not going to do a beginner tutorial for Photoshop. Here's how I sort my slaps.
It would be good to respect this nomenclature, always to maintain consistency.
And post on this forum thread your work in progress !
Once the editing is finalized, I export these slaps in 4 PNG files, to go under After Effect. (see text in the left column above)
Why in PNG and not directly use the PSD? Because I noticed "more file corruption with the PSD. In the context of exchange with the community, the PNG is much more universal for people not using the Adobe suite.
# IN DETAIL, AFTER EFFECT ?
Here it is more difficult to explain yourself with words or pictures.
But here is the basic principle:
The Mask Layer will be used for the Gameplay video.
And post on this forum thread your work in progress !
I let you open the files to better understand. If the need arises, I will come and fill this part.
# IN DETAIL, VIDCODER ? (update aug 23, 2022)
To optimize the size of the videos and multiply the formats, I use the free and open-source VIDCODER. (also on Microsoft Store)
It is rather simple, allows batch processing, and as there are finally few "moving" elements in my videos, the optimization is pretty good.
I created and tested 3 profiles that you can import and use. Here they are : VidCoder_Viking_Setting_Update.zip
# AT THE END, SHARING !
Once finished, send me the files directly:
Video in the 3 export formats from VidCoder. Your source archive, trying to keep the same structure as mine. I take care of the conformation of the names, the addition of the credit, and the upload on the right pages.
Thank you in advance !
# SPECIAL THANKS :
@Jason Carr for his hard work on LaunchBox/BigBox! To all Patreon guys! A GIANT THANKS to all of you!!! ? The whote community for yout support! # SOURCES - COPYRIGHT :
Each brand of hardware and software here represented as a tribute. Emumovies for (most) gameplay videos The Vanamo Online Game Museum for (most) photos. If special credit, see .TXT file in the corresponding source archive. (soon) # PLATFORM COVERED / CREDITBOARD :
See video release post for more details !
23,538 downloads
-
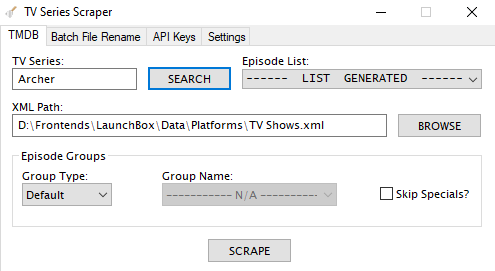
TV Series Scraper
By skizzosjt
Thank you for checking out TV Series Scraper! This tool will give LaunchBox and Big Box users the ability to easily add TV episodes to their library.
This is an AHK script written in V1 syntax and uses TMDB (The Movie Database) as its source for metadata and images
Users will be required to supply their own API key from https://www.themoviedb.org/ which is 100% free of charge and only takes the time needed to sign up creating a user name, and requesting an API key from within your user profile.
Within the .7z file there is a .ahk version and a .exe version. Both will operate exactly the same! If you are not familiar with setting up AHK then please use the .exe version.
#WHAT IT DOES#
-It will edit your PLATFORM XML file accordingly to add all data into LaunchBox and download both SEASON and EPISODE specific images
-SORT TITLE will be applied in the format of "TV SERIES SXXEXX EPISODE TITLE" to organize all series episodes together in proper sequential order
-SEASON specific images are saved into the platform's BOX - FRONT directory
-EPISODE specific images are saved into the platforms SCREENSHOT - GAMEPLAY directory
-METADATA applied will be the following:
Series title (within sort title) Series genre(s) Series network(s) Sort Title (in the format of SERIES TITLE SXXEXX EPISODE TITLE) Season number (within sort title) Episode number (within sort title) Episode title Episode overview Episode air date Episode Run Time (*only if custom field was added - see notes below)
#HOW TO USE#
-Import your video files into your platform
-Without editing these entries, close LaunchBox
-Open LaunchBox again, and now BULK EDIT the entries as follows
Edit the SERIES field with the TV SERIES NAME Edit the RELEASE DATE field with ANY DATE Optional but recommended Add a CUSTOM FIELD by doing the following Edit a SINGLE ENTRY Go to CUSTOM FIELDS tab Add a custom field name called "Run Time" Enter any value into the value field, for ex: "20" Custom fields only save if a value is assigned to at least a single entry Now BULK EDIT all entries again to edit the custom field "Run Time". Enter any value into the field -Close LaunchBox
-Open TV Series Scraper
-If this is your first launch, you must go to API KEYS tab and enter in your TMDB API KEY!
-On the TMBD tab, enter the TV SERIES into TV SERIES field
-Select the specific platform XML file using the BROWSE button
-Then click the SEARCH button
You will be prompted if the search result is correct or if you want to see the next result -Once you select a result all matching entries in your LaunchBox library will be populated into the EPISODES LIST drop down
This is to review if all of your episodes are in proper sequential order -Also once a search result is selected, if the TV series has additional "episode groups" then you will be able to change EPISODE GROUP TYPE to "Alternative" and then select the EPISODE GROUP NAME of your choice
-Once you are ready with your settings, click SCRAPE to begin the process!
#SETTINGS & FEATURES#
TMDB Tab
SKIP SPECIALS checkbox will do just that. If a TV series has specials, as in, episodes that do not correlate to any particular season, these can be skipped over if the checkbox is enabled EPISODE LIST is to review if your episodes are all in proper sequential order. If they are, you are free to pick either image naming format. ENTRY TITLE, or FILE NAME. If your episodes are NOT in proper sequential order, then you should ONLY use ENTRY TITLE. If FILE NAME is used and your episodes are not in sequential order, then images will not be assigned to the proper entry! Batch File Rename Tab (see below for details)
API Keys Tab
Go to this tab to enter in your TMDB API key. The script will NOT function without this key! Settings Tab
Search settings All of these settings will use different logic on how to match to your entries file name. Choose the one(s) that best fit your files naming scheme Each checkbox will display a tool tip to give an example of what it is using Use first search result will bypass the message prompt so the user can confirm they have the right series. Exact match only checkbox is the strictest search method and requires finding the SERIES TITLE, the SEASON AND EPISODE NUMBER, and the EPISODE NAME in your entries file name. This search method is ALWAYS enabled as the default but when this checkbox is enabled, all additional fallback search options are DISABLED Image settings ENTRY TITLE will name all images as the entries title (episode title) FILE NAME will name all images as the entries file name. Do NOT use this setting if your episode list is not completely in proper sequential order since images will not end up being named correctly Download first image found is permanently enabled. Potential improvement for future revision is to give users ability to choose additional images should they exist Additional Notes
If you choose to add multiple TV series to a single platform then it is recommended to NOT use the "Season # & episode #" search option (SXXEXX). This is due to it will only need to find for ex "S09E10" in a file name and will likely result in applying metadata and images for TV series "A" to a TV series "B" entry! This is the the "loosest" search setting as it has nothing specific to the TV series title, or to the individual episode title. Going off the above note, if all your TV series are separated into their own individual platforms, then using the "Season # & episode #" search option is very reliable assuming your file names have SXXEXX in them If you are having issues with getting good matches even with various search settings then you should utilize the Batch File Renamer to get your file's names better suited! SPECIALS, as in episodes that do not correlate to any specific season, will be considered part of "season 0" and given a sort title in LaunchBox as "SERIES TITLE S00EXX EPISODE TITLE" If you want to provide SEASON SPECIFIC images rather than have them downloaded from TMDB then place your image files into the "Images To Duplicate" folder prior to scraping. Images must be named in the following format: SERIES TITLE SXX For ex: Image file name "Archer S05.png" will be applied to every episode of Archer from its fifth season
#BATCH FILE RENAMER#
-This tool will batch rename files to the following format: SERIES TITLE SXXEXX EPISODE TITLE
-Having files named like this will guarantee good matches with even the strictest default setting of Exact match only!
-This tool will only rename files on a per season basis. For ex, if a TV series has 10 seasons and you want them all renamed, you will need to run this batch file rename 10 separate times
-The files in the selected directory MUST be in PROPER SEQUENTIAL ORDER! However, they can be named LITERALLY ANYTHING!
-What the batch file renamer does is take the first file found and gives it the name of the first episode for the series and season you entered. It then takes the second file found and gives it the second episodes name. Then it takes the third file found and gives it the third episodes name....and so on.
-To use do the following:
Enter the TV SERIES into the TV SERIES field Enter the SEASON NUMBER into the SEASON NUMBER field Enter your files FILE EXTENSION into the FILE EXTENSION field Select the directory which you want to batch rename files using the BROWSE button Click the SEARCH button You will be prompted if the correct search result came up. Once the proper search result is selected you can then select an ALTERNATIVE EPISODE GROUP should you want to use one, if the series has more than just the default episode group. With all fields filled in as desired, click the RENAME button. Your files will be renamed accordingly in just seconds! -CAUTION IS ADVISED! Back up your files first! There is no undo button associated with this action should you make a mistake
#GETTING TMDB API KEY#
-Once you have logged into your TMDB account you can click on your user name icon in the top right corner. In the pop-up menu click on "Edit Profile".
-In the left hand list click on API which will be near the bottom of the list
-Here you will be able to request and retrieve your own API key
#THANK YOU#
@Whatscheiser worked as a beta tester for v2.0 and their feedback was critical to making the tool better! Your time and efforts are much appreciated!
#EXAMPLE IMAGES#
Example for use in Big Box
#EXAMPLE VIDEO#
Showing the setup process to import and scrape for an entire season in just a few minutes!
Please note video editing took place during the scrape progress so the video could be shortened
TV Series Scraper Tutorial.mp4
#SUPPORT#
Please keep all questions and requests for help in the main discussion and support thread rather than this file download thread.
If you need any support, please click the "GET SUPPORT" button at the top of this page!
199 downloads
-
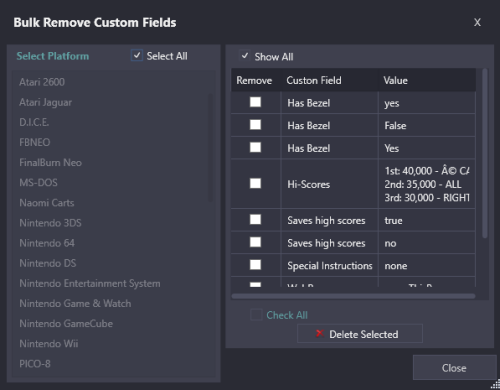
Bulk Remove Custom Fields
By JoeViking245
Bulk clear Custom Fields Values or remove the Custom Field entirely from LaunchBox.
Inspired in part by this BitBucket ticket (and the rest out of boredom)
https://bitbucket.org/jasondavidcarr/launchbox/issues/8475/mass-delete-remove-custom-fields
Notes about Custom Fields:
Custom Fileds are comprised of a Name and a Value. When you edit a game and look in the Custom Fields section, every Custom Field [Name] in your entire LaunchBox collection will be available. Whether a Value is assigned to it for that game, or not.
Only Custom Fields that have a Value assigned to it somewhere in your LaunchBox collection will actually exist.
aka, if you're seeing a Custom Field Name, something somewhere in your collection has a Value assigned to it.
Installing:
Download and unblock the zip file. Copy the contents of the zip into /LaunchBox/Plugins/ i.e. D:\LauncBox\Plugins\BulkRemoveCustomFields\BulkRemoveCustomFields.dll
How to use:
Start LaunchBox, click Tools and select Bulk Remove Custom Fields
Select a Platform to get a list of all Custom Fields [that have an associated Value] for that platform.
Or check Select All to get a list of all Custom Fields from all Platforms.
Example #1:
To remove all Custom Fields whose Name is "Has Bezel" and their Value is "yes" (lowercase "y")
Check Show All [to show ALL distinct Custom Field Names and Values]
Check the box next to "Has Bezel" "yes"
Click Delete Selected
Example #2:
To remove all Custom Fields whose Name is "Has Bezel", regardless of their Value
Un-Check Show All [to show ONLY the Custom Field Name]
Check the box next to "Has Bezel"
Click Delete Selected
To remove a Custom Field entirely from LaunchBox, check Select All and follow Example #2.
Options:
Select All
Show all Custom Fields for every Platform
Show All
Show Custom Fields Names and Values
CAUTION: If you click Delete Selected and then click Yes, those selected are now GONE!
Reprise: If you had LaunchBox's Automatic Backup feature enabled, you can use the Restore Data Backup to bring them back.
Q: Why is it listing the same Custom Field more than once?
A: It's not. Custom Fields are CasE sENsiTiVe. A Custom Field with the Name Saves High Scores is different from Saves high scores. Same goes for Custom Field Values. True is not the same as true.
75 downloads


![More information about "[Video Snap] Gripshift (Sony PSP)"](http://forums.cdn.launchbox.gg/monthly_2025_07/GripShift-01.thumb.png.574bbe726f42b666749efb5610eeff89.png)

![More information about "[Video Snap] Family Games: Pen & Paper Edition! (Sony PSP)"](http://forums.cdn.launchbox.gg/monthly_2025_06/FamilyGames_PenPaperEdition!-01.thumb.png.be6ac549a217096f6960be1dc8b1a7c5.png)
![More information about "[Video Snap] Echo Night: The First Voyage (Sony PSP)"](http://forums.cdn.launchbox.gg/monthly_2025_06/EchoNight_TheFirstVoyage-01.thumb.png.1b1abdb1aa88b36bc28b7c18f208eccf.png)
![More information about "[Video Snap] Dr. Maybee and the Adventures of Scarygirl (Sony PSP)"](http://forums.cdn.launchbox.gg/monthly_2025_06/Dr.MaybeeandtheAdventuresofScarygirl-01.thumb.png.2ccb07abd4ed565566e3ba0ee8876dea.png)